Samsung SSD Secure Erase: Permanently Wipe Data from Samsung SSD
Samsung SSD secure erase is able to permanently erase data from Samsung internal SSDs and external SSDs. You can use Samsung Secure Erase or third-party data erasure software - DoYourData Super Eraser to help you securely and permanently erase data from your Samsung SSD before you sell, donate or dispose of it.
![]() Updated by Shirly Chen on March 11, 2024
Updated by Shirly Chen on March 11, 2024
Quick Navigation:
- Samsung SSD Secure Erase Solution 1: Samsung Magician Erase
- Samsung SSD Secure Erase Solution 2: DoYourData Super Eraser
- Conclusion
“Hi, I will sell a 1TB Samsung SSD. But, after I format the SSD, the documents and photos still can be found after running a data recovery program to scan it. I don’t want the files stored on the Samsung SSD to be recovered by next owners, what should I do? Is there any way to permanently wipe the Samsung SSD data?” - Nixika
Regarding computers and data storage, keeping our data safe is like keeping our digital wealth safe. Think about having a Solid-State Drive, or SSD, from Samsung, a big tech company. It's a special kind of digital helper. The SSDs we use to hold our photos, movies, and important files. They're like magic boxes. Now and then, we have to get rid of old things or give our SSD to someone else. But hold on!

We don't want other people to see what's inside, right? Which is why Samsung's SSD Secure Erase is so helpful. It's like a superhero move that keeps our digital secrets safe and prepares our SSD for a new journey! Let's find out what Samsung SSD Secure Erase is all about!
Samsung SSD Secure Erase Solution 1: Samsung Magician Erase
The Secure Erase order is part of the ATA (Advanced Technology Attachment) standard, which Samsung SSDs use. During the Secure Erase process, the entire storage area is overwritten with zeros, which makes it impossible to get back the data that was there. In contrast to regular formatting or deleting methods, Secure Erase offers a more complete and safe option.
If you want to know how to do a Samsung SSD Secure Erase, here are the steps:
Step 1. Backup Data: It's essential to back up any critical data on the SSD before starting the Secure Erase process. All data will be erased permanently once the process begins.
Step 2. Disconnect Other Drives: To keep your data from being lost by mistake, disconnect other drives from the system. It ensures the Secure Erase method only goes on the target SSD.
Step 3. Boot from USB: Use the Secure Erase tool in the Samsung Magician program to make a bootable USB drive. Start up the computer from this USB drive to get to the tool.
Step 4. Start Samsung Magician: You can start the Samsung Magician program once the system has started up from the USB drive. This tool has the Secure Erase feature and an easy-to-use interface for handling Samsung SSDs.
Step 5. Pick the SSD you want to use: From the list of connected drives, find and select the Samsung SSD that you want to delete safely.

Step 6. Start Secure Erase: Follow the on-screen instructions to start the Secure Erase process. Once you confirm your choice, the tool will create a safe data deletion.
Step 7. Wait for It to Finish: The Secure Erase method could take a while, depending on how big the SSD is. Allow the tool to finish the job while you wait.
Step 8. Verification and Reconnection: Once Secure Erase is done, make sure the data was completely erased, reconnect any files that were disconnected, and then reinstall the operating system or restore the data.
Samsung SSD Secure Erase Solution 2: DoYourData Super Eraser
Another Samsung SSD secure erase tool - DoYourData Super Eraser offers 100% safe and effective solution to help you permanently delete files from Samsung SSD, wipe entire Samsung SSD, erase deleted/lost data from Samsung SSD, etc.
- Permanently erase data from Samsung internal SSDs and portable SSDs.
- Wipe entire Samsung SSD, permanently shred files, erase deleted/lost data, etc.
- Certified data erasure standards, such as Peter Gutmann, U.S. Army AR380-19, DoD 5220.22-M ECE, etc.
- Also supports to wipe data from PC, Mac, USB drive, memory card, Seagate/Toshiba/WD/Lexar drives, etc.
- 100% safe, no physical damage, won’t shorten the service life of your Samsung SSD.
- Easy to use Samsung SSD data erasure tool for both Windows and macOS.
Then follow the steps below to wipe your Samsung SSD before you sell or donate it:
Step 1. Download and install DoYourData Super Eraser on your computer (Windows or macOS), then open it, choose Wipe Hard Drive mode. This mode will erase all data from the Samsung SSD, leaving no trace for data recovery.
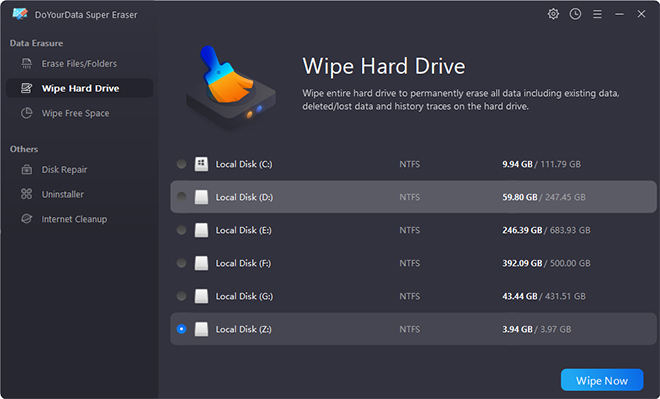
Step 2. Connect the Samsung SSD to your computer, then select it, click on Wipe Now button.

Once the process gets finished, all data including existing data, hidden data, deleted/lost data is gone forever, can not be recovered by any method.
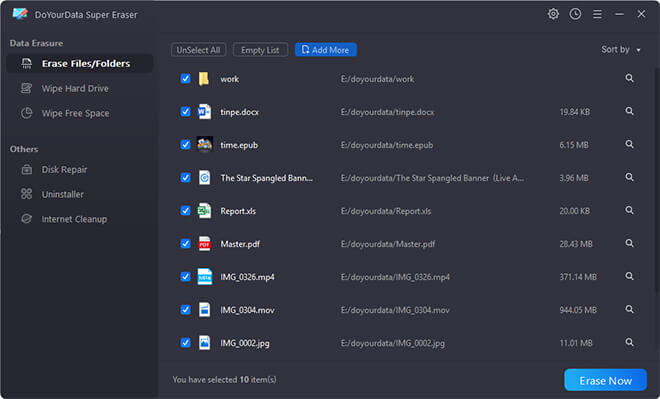
Erase Files - this mode can help you selectively erase files and folders from your Samsung SSD.
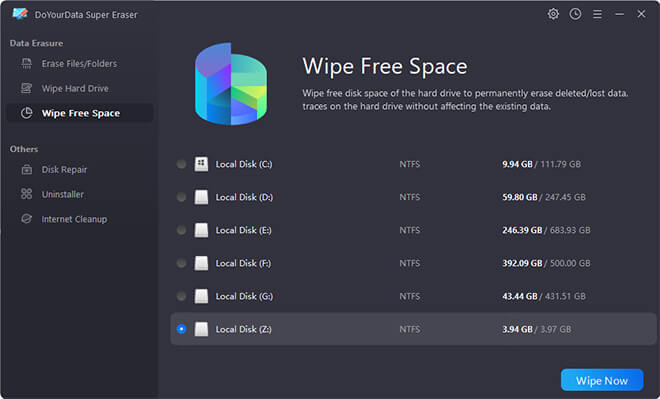
Wipe Free Space - this mode won’t erase the existing files, it wipes free disk space of the Samsung SSD and permanently erase all deleted/formatted/lost data from the Samsung SSD.
Benefits of Samsung SSD Secure Erase:
- Improved Security: Secure Erase ensures that all the SSD data is erased forever, which is safer than using regular formatting or removing tools.
- Improved Performance: During performance optimization, SSDs can get slower or gather extra data over time. Secure Erase helps restore the drive to its best state, improving performance.
- Compliance with Data Protection laws: It is vital for businesses and people who handle sensitive information to follow data protection laws. Secure Erase helps meet these needs by properly throwing data away.
- Peace of mind when disposing of or replacing a drive: Using Secure Erase when disposing of or replacing an SSD ensures that no data is left on the drive, lowering the risk of private information being accessed by people who shouldn't be able to.
Troubleshooting and Considerations:
Even though Samsung SSD Secure Erase is a strong and trustworthy tool, users should be aware of the following problems and things to think about:
- Compatible: Ensure the Secure Erase function works with your Samsung SSD model. It's essential to check the product specs because not all Samsung SSDs may have this feature.
- Backup: Before you start the Secure Erase process, you should always make a copy of your info. All the information on the SSD will be erased for good once the process starts.
- Updates to the software: Before using Secure Erase, ensure that the firmware on your SSD is up to date. Firmware updates might improve the erasure process and the drive's general performance.
- External Cases: The Secure Erase process might not work correctly if your SSD is in an outer case. In this case, you should plug the SSD straight into the motherboard.
- Power source: During the Secure Erase process, ensure the power source is stable. Power outages or interruptions can damage data or cause drives to fail.
Conclusion:
As we look into Samsung SSD Secure Erase comes close, we've learned that it can keep our digital secrets safe like a superhero. It deletes all evidence of our old files, like a guardian, preparing our SSD for a fresh start. We can trust Samsung's Secure Erase to keep our digital treasures safe, whether saying goodbye to an old friend or giving it to someone else. We can boldly walk into the digital future with this magical tool, knowing that our data is safe and that our SSD is ready for the next part of our digital adventures.
Here are two Samsung SSD secure erase solutions to help you permanently wipe data from your Samsung SSD. You can choose one of them to help you erase your private data before you sell or donate your Samsung SSD. Please note that once your data is erased, the data is gone for good, can't be recovered by any method. So, please make a backup before you erase your Samsung SSD.
DoYourData Super Eraser
DoYourData Super Eraser, the award-winning data erasure software, offers certified data erasure standards including U.S. Army AR380-19, DoD 5220.22-M ECE to help you securely and permanently erase data from PC, Mac, HDD, SSD, USB drive, memory card or other device, make data be lost forever, unrecoverable!
Written & Updated by Shirly Chen
Shirly Chen has been writing data recovery, data erasure articles for DoYourData over 4 years. She has been working as a professional website content writer & editor for quite a long time. She also writes articles about disk clone, Mac optimization, disk backup, etc.