How to Wipe SATA SSD [Files Unrecoverable]?
Reformatting can’t permanently erase data from your SATA SSD because data recovery software is able to recover deleted or formatted data from SATA SSD. To wipe a SATA SSD, you can try data erasure software - such as DoYourData Super Eraser. 1 click to wipe SATA SSD and erase all data permanently.
![]() Updated by Shirly Chen on January 24, 2024
Updated by Shirly Chen on January 24, 2024
Quick Navigation:
- Why Should You Wipe the SATA SSD?
- Steps to Wipe SATA SSD (For Windows and macOS)
- Wipe SATA SSD FAQs
- Conclusion
It might sound scary to start wiping your SATA SSD, but don't worry! It's kind of like giving your trusted digital friend a new look. Safely wiping your SATA SSD is the best way to keep your digital secrets safe, whether upgrading your machine, selling your SSD, or just starting over. It's like pressing the "reset" button, ensuring your favorite pictures, documents, and cat memes say goodbye without leaving any digital traces. We'll explain each step in a clear, simple, easy-to-follow guide. So, let's prepare our cleaning tools and ensure your SSD is sparkly clean and data-free!

Why Should You Wipe the SATA SSD?
Protecting private information stored on an SSD requires familiarity with secure wiping. Unlike older drives, SSDs' efficient TRIM mechanism requires a complete wipe to prevent data recovery. Not even renaming or erasing files will do the trick. Encryption and secure wiping technologies like ATA Secure Erase keep your data safe by erasing any trace of it. This step is essential to ensure that no one can access your digital footprint when you upgrade, sell, or recycle your SSD. You can keep control of your digital information and reduce the danger of data breaches by understanding the significance of secure wiping.
It is strongly recommended to wipe your SATA SSD before you sell/donate it or lend it to other people. Safe SATA SSD disk wiper - such as DoYourData Super Eraser can help you securely wipe the SATA SSD. Once the data is erased by DoYourData Super Eraser, the data is gone forever, can’t be recovered by any method.
Steps to Wipe SATA SSD (For Windows and macOS)
Step 1: Backup Your Data
Creating a backup of your vital data is critical before erasing it. Doing so will guarantee that you retain a data backup if the deletion procedure encounters any problems or accidental deletion. Protect your information by storing it on an external hard drive, in the cloud, or in any other dependable way.
Step 2: Identify the SATA SSD
Verifying its correct identification in your system is essential before cleaning your SATA SSD. To verify the brand and model of your solid-state drive (SSD), you can look it up in your computer's manual or on the manufacturer's website. With this information, you can choose the best method for erasing data from a given drive.
Step 3: Choose the Wiping Method
There are a few different approaches to erasing an SSD, so you can pick the one that best suits your needs. Three strategies that are frequently employed include:
a. ATA Secure Erase:
Most new solid-state drives (SSDs) come equipped with Secure Erase. It starts a procedure that deletes everything from the drive, even those categorized as "unrecoverable." Use software tools or your computer's BIOS/UEFI settings to achieve this effective procedure.
b. Secure Erase Software:
To safely delete data from solid-state drives, you can use one of several third-party software applications. Multiple wiping methods and intuitive user interfaces are common features of such programs, which increase their security. DoYourData Super Eraser, Parted Magic, Secure Erase+, and DBAN (Darik's Boot and Nuke) are a few examples.
In this article, we will show you how to wipe a SATA SSD with DoYourData Super Eraser, one of the best data erasure tools.
DoYourData Super Eraser
- Permanently erase data from SATA SSD.
- Certified data erasure standards, such as U.S. Army AR380-19, DoD 5220.22-M.
- No damage to your SATA SSD.
Step 4: Perform the Wiping Process
Open DoYourData Super Eraser on your computer, choose disk wiping mode - Wipe Hard Drive.
Select the SATA SSD and click on Wipe Now button.
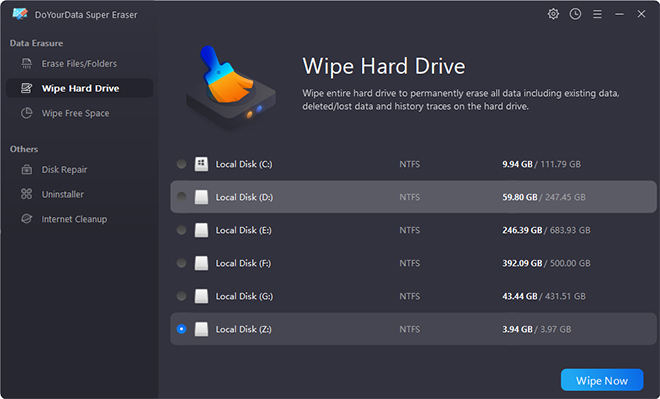
Securely and permanently erase all data stored on the SATA SSD.
Step 5: Verify the Wipe
Before you proceed to confirm that your SATA SSD has been properly erased, make sure to check the system log. A verification process is an integral aspect of the functionality of several wiping tools. Another option is utilizing data recovery software to see if any remaining data can be salvaged. You can rest assured that your SSD has been securely erased if no data is found.
Wipe SATA SSD FAQs
1. How to format a SATA SSD?
On Windows: connect the SATA SSD to your computer, then open This PC. Find and right-click the SATA SSD, choose Format. Then select a file system, click on Start button to format the SATA SSD.
On macOS: connect the SATA SSD to your Mac, open Disk Utility. Select the SATA SSD, click Erase. Select a file system, click Erase again.
Please note that the formatted data is not lost forever and can be recovered by data recovery software, check full guide: SATA SSD data recovery >>
2. How to wipe a SATA SSD?
If you want to wipe a SATA SSD, just try data erasure software - such as DoYourData Super Eraser. Choose Wipe Hard Drive mode, select the SATA SSD and click on Wipe Now. It will wipe all existing data/deleted/lost data stored on the SATA SSD, leaving no trace for data recovery.
3. Can I recover lost data after wiping SATA SSD?
No, if your data is erased by DoYourData Super Eraser, the data is lost forever, can’t be recovered by any method. Before you sell or donate your SATA SSD, you can use the erasure method to wipe the SATA SSD.
Conclusion:
Protecting your data in this digital world is very important, and properly removing a SATA SSD ensures that no one else can access your private data. You can safely delete data from your SSD by following the steps in this guide. That is true whether you use ATA Secure Erase, third-party software, or encryption ways. Always make a copy of your data before wiping it, and ensure the activity was successful to ensure your storage device has a safe transition.
Written & Updated by Shirly Chen
Shirly Chen has been writing data recovery, data erasure articles for DoYourData over 4 years. She has been working as a professional website content writer & editor for quite a long time. She also writes articles about disk clone, Mac optimization, disk backup, etc.