Home > Hard Drive Solutions for Mac
How to Get Read-Write Permission on Mac?
RAW file system, read-only setting or NTFS file system will cause read-only issue on Mac. You can easily get full read-write permission on Mac by changing the user settings, formatting the RAW drive or installing an NTFS driver on Mac. For example, DoYourData NTFS for Mac can quickly enable NTFS read-write support on Mac.
![]() Updated by Justin Kenny on October 15, 2023
Updated by Justin Kenny on October 15, 2023
Quick Navigation:
- 1. How to check file permissions on Mac?
- 2. How to Modify Disk Read-only Permissions on a Mac?
- 3. Get Full Read-write Permission with NTFS for Mac
You're not alone if you've ever tried to use an external hard drive on your Mac and encountered the frustrating "Read Only" permission issue. Transferring files to or from an external disk on a Mac often results in this frustrating error.
That is typically due to a format mismatch restricting access to the storage device. That is a common problem for Mac users using the same external drive with their Windows computer, smartphone, or television. This guide will show you how to modify the "Read Only" setting on your Mac's hard drive.
How to check file permissions on Mac?
Permissions for each file and folder are provided by default in macOS. The administrator can specify which users or groups can access internal or external storage media.
On a Mac, you can use these methods to verify the file's permissions.
1. Select Get Info from the Finder menu that appears when you right-click the file. Alternatively, you can pick the file in Finder and go to File > Get Info from the main Finder menu.
2. You can examine who has access to this file and their permissions under the Sharing & Permissions section of the file's information box.
Four distinct permissions can be used to grant each group more access.
- Read-only:lets them look at the file but not make any modifications to it.
- Write-only: allows things to be dropped into a folder without opening it. The drop box can only be accessed by its owner.
- Read & write: allows the user to access the file or folder, see it, and change it.
- No access: shuts down the folder or file completely.

How does Mac file ownership work?
Three groups of macOS users can be assigned certain file permissions. Permissions are set for the file's sole owner, the user group to which the owner belongs, and everyone else.
- User: A file's user is the person who first created the file.
- Group: A collection of users who should have similar access privileges; the "staff" group is the default on macOS.
- Everyone Else (Others): Every other user and group in the database.
To Make a Permissions Change as Admin:
1. First, you'll want to hook up your Mac's external hard drive.
2. Select "Properties" from your disk's menu. Select Get Info after that.
3. Third, click the lock icon in the window's lower right corner. To open a locked door, you must first click it. If asked for an administrator password or Name, type it in now. Open the Permissions and Sharing menu. When doing so, ensure the option labeled "Ignore ownership on this volume" is checked.
4. The fourth step is to select "Apply to enclosed items" by clicking the gear icon (displayed as three dots in macOS Big Sur or later) in the window's lower right corner.
How to Modify Disk Read-only Permissions on a Mac?
If you need to modify the permissions of a file or directory on your Mac, Finder is a great place to do so. Permissions can be changed without using the Terminal, making it ideal for macOS novices.
However, you must have administrative privileges before modifying user access to files.
- To change the permissions on a file or directory, launch Finder and go there.
- To see which accounts and user groups are currently logged into your Mac and which have access to which files and folders, right-click on a file and choose Get Info from the context menu.
- To view who has access to what, go to the Sharing & Permissions area at the bottom of the Info box.
- To make changes to permissions, tap the padlock symbol in the lower right and enter the admin password.
- Select the class whose permissions you wish to change under Name, then click the down arrow button next to the class's Name in the Privilege tab.
- Click the plus sign and select New Person to add a user to your Mac not listed under Sharing & Permissions. Create an account in the following prompt. Select it from the user menu after it has been added, and then click the Select button. The procedures above can then be used to configure access controls.

Get Full Read-write Permission with NTFS for Mac
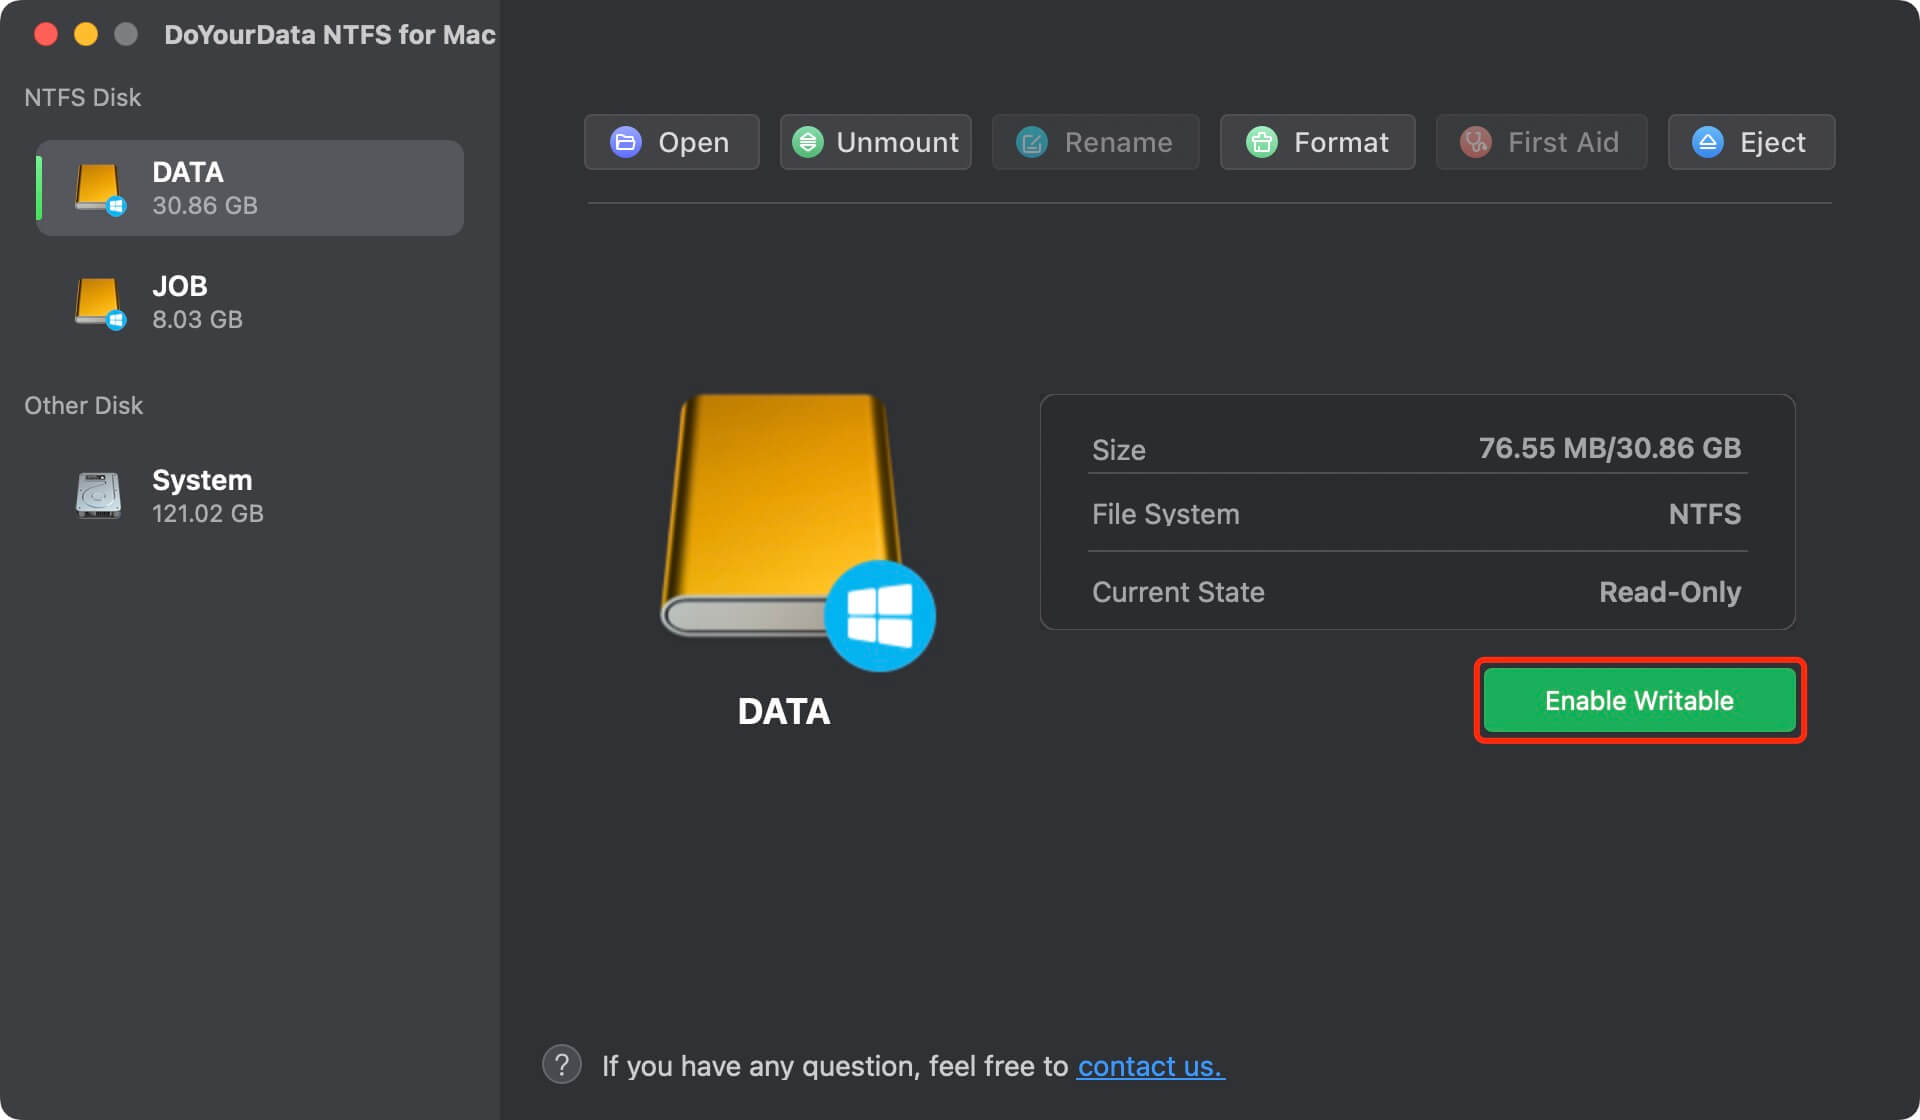
NTFS file system is a Windows-based file system and it is read-only for macOS. If your external hard drive is an NTFS drive, you can only read it, but can not write data to it. To get the full read-write permission of an NTFS hard drive on your Mac, you can download and install a third-party NTFS for Mac tool - such as DoYourData NTFS for Mac.
To get read-write permission of an NTFS hard drive on Mac, you just need to open DoYourData NTFS for Mac, find and select the NTFS hard drive, then click Enable Writable. Then it will grant full read-write access to the NTFS drive on your Mac.
Conclusion:
To modify a file or folder, you can open its Info window by clicking the lock at its lower right corner. Unexpectedly, you get a notification claiming you lack the privileges to carry out the operation.
You might be wondering why you're having trouble modifying permissions on your Mac. In most cases, only the file's owner can change the file's permissions. In such a situation, you must use the administrator account to access the Mac. Permissions for Mac users can only be changed by the system administrator.
If the external hard drive is an NTFS drive, just install an NTFS for Mac tool and use it to enable read-write support for NTFS drives. You also can format the NTFS drive to a ExFAT, FAT, APFS or macOS Extended drive to solve the read-only issue.
Written & Updated by Justin Kenny
Justin Kenny is a writer & editor of DoYourData. He joined DoYourData in 2016 and focuses on writing articles about Windows data recovery, Mac data recovery, external device data recovery, hard drive clone, data erasure, Mac cleanup, computer issue fixes, etc. He is a super fan of Apple devices and is big on testing new digital device and system utility software.