How to Force Mount A Hard Drive/USB Drive/Memory Card On Mac?
![]() Ricky Lin updated on February 19, 2024
Ricky Lin updated on February 19, 2024
Quick Navigation:
- How to Get Ready to Mount Disk on A Mac?
- How to Force Mount A Hard Drive/USB Drive/Memory Card on Mac?
- Use Third-party Disk Tool to Force Mount Disk on Mac
- Conclusion
Have you ever had the annoying experience of an external hard drive or USB storage device not mounting on your Mac? Unable to connect a hard drive, USB drive, or memory card can get in the way of your work and cause extra stress. Luckily, you can take steps to force-mount these devices to get to your important data again.
The OS must be able to find the external storage device and let you read and write data to it when you connect it to your Mac. For this to happen, you need to mount. It happens when you plug in a device. But, sometimes, it doesn't happen because of broken file systems, hardware problems, or software conflicts.
How to Get Ready to Mount Disk on A Mac?
Before mounting a disk on a Mac, you must ensure the links are correct, check the hardware's integrity, and know how to fix problems. Before installing a disk, ensure no cable connections are broken or loose, and don't use USB hubs. Also, restart your Mac to clear out the system's tasks, and use Disk Utility to organize your files and volumes.
Learn how to use Terminal commands to do more complicated troubleshooting if you need to. To fix hardware and system settings, restart the System Management Controller (SMC) and clear the Parameter RAM (PRAM) or Non-Volatile RAM (NVRAM). Lastly, test the disk on a different computer to see any hardware problems.
How to Force Mount A Hard Drive/USB Drive/Memory Card on Mac?
Step 1. Check The Connections
First, you must ensure the device is connected to your Mac correctly. Check to see if the wire connections are broken or coming loose. Don't use a USB hub. Instead, connect the device straight to a USB port on your Mac.
Step 2. Restart Your Mac Again
Resetting system processes with a simple restart can sometimes fix growing problems. Then go to the Apple menu and choose "Restart." It will save any work that is still being done.
Step 3. Use the Disk Utility
Disk Utility is a tool with macOS that lets you manage files and volumes. You can open Disk Utility by typing its name into Spotlight or going to "Applications" > "Utilities" > "Disk Utility." For the device that is giving you trouble, choose it from the list on the left and click the "Mount" button in the guide. If Disk Utility can't mount the drive, move on to the next step.
Step 4. How Terminal Commands
Terminal lets you run strong commands that can make a device mount without giving up.
You can open Terminal by going to "Applications" > "Utilities" > "Terminal."

diskutil list
This command will list all linked disks and volumes and their names.

Figure out what the device you want to put belongs to. It will be shown in the "IDENTIFIER" column.
To force mount the device, use the following command once you know what it is:
diskutil mountDisk /dev/diskX

X is the device number.
Step 5. Reset SMC
Reset the System Management Controller (SMC) and any Parameter RAM (PRAM) or Non-Volatile RAM (NVRAM). The SMC and PRAM or NVRAM are in charge of handling different hardware and system settings. Sometimes, mounting problems can be fixed by resetting them. Turn off your Mac.
Reset SMC:
If your Mac has a T2 chip (models made after 2018), Hold the power button for 10 seconds, then let go of it.
For Macs that don't have a T2 chip: Wait 15 seconds, then plug in the power cord again and wait five seconds before turning on your Mac again.
Clear PRAM or NVRAM:
Hold down the Option, Command, P, and R keys as you turn on your Mac.
Hold down the keys for about 20 seconds or until you hear the second starting sound.
Step 6. Check For Hardware Problems
If none of these work, there may be a problem with the hardware of either the external device or the ports on your Mac. Connect the device to a different computer to make sure it mounts correctly. If it doesn't, the problem is probably with the device itself, and you might need to get help from a professional to get your info back.
Step 7. Reformat The Device
If nothing else works, you could format the device, and you're ready to lose its data. It might fix the mounting problem. It should only be done as a last option since it will delete everything on the device.
If you have lost data from your drive, just run a data recovery app to scan the drive, then it will find all recoverable files. Select the wanted files and save them.
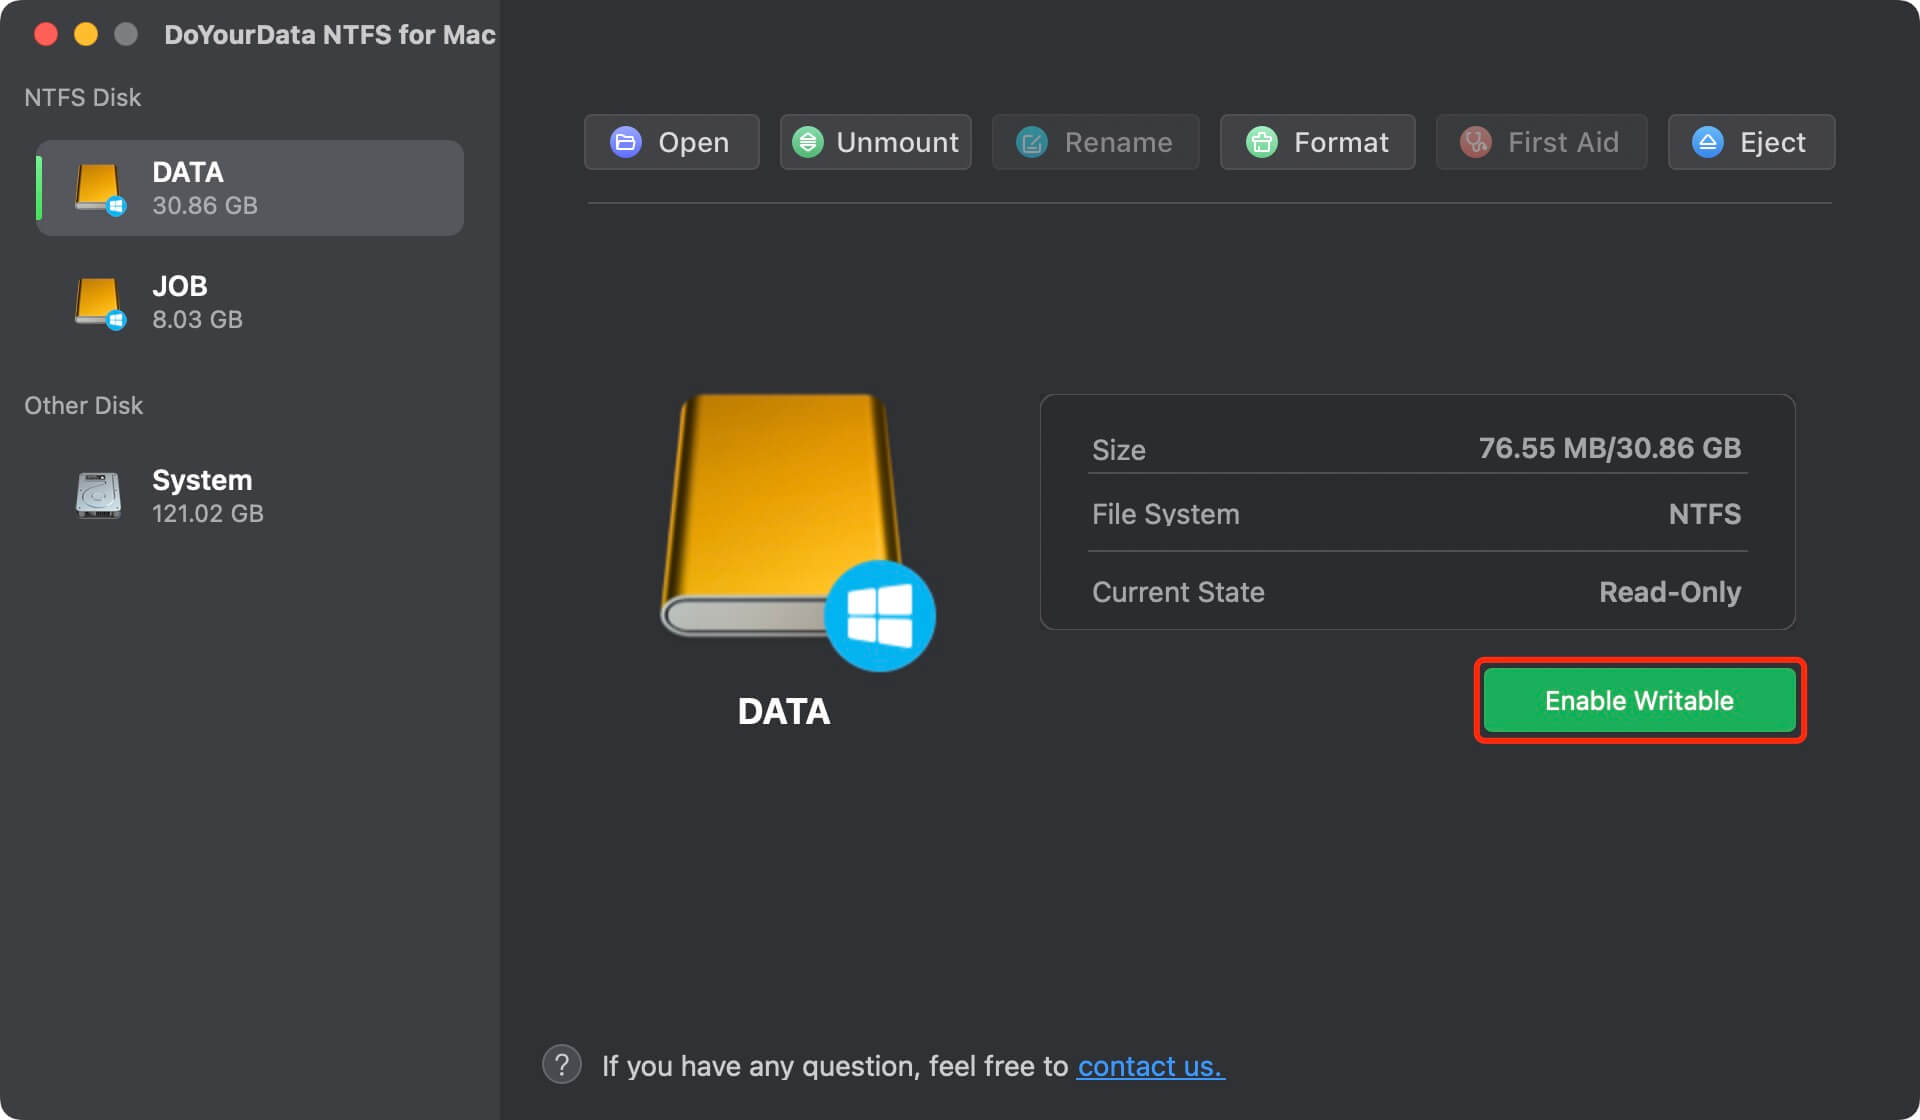
Use Third-party Disk Tool to Force Mount Disk on Mac
If you want to quickly install & mount an external hard drive, USB flash drive, memory card on Mac, just try a third-party disk tool - such as DoYourData NFTS for Mac, it can help you force mount APFS/HFS+/exFAT/FAT32/NTFS drive on Mac.
Step 1. Download and install DoYourData NTFS for Mac, then open it.
Step 2. Connect the device to your Mac, then find and select it, click on Mount button.

If the drive is a NTFS drive, just click on Enable Writable button to ensure you can read-write it on your Mac.
Conclusion:
Finally, fixing problems with external storage devices that won't mount on your Mac can be a pain, but these steps can usually fix the issue. There are different ways to force mount a hard drive, USB drive, or memory card, such as checking the connections, using Terminal instructions, or resetting the system controllers. But if nothing else works, you can get help from a professional to figure out and fix any hardware issues. Remember to back up your info regularly so you don't lose it.
If you still can not mount the external disk on your Mac, you can use Disk Utility, run First Aid to repair the disk. Make sure you have backed up your data stored on the disk, then click on First Aid button.
Written & Updated by Ricky Lin
Ricky Lin is an senior editor of DoYourData who lives in Adelaide, Australia. He is interested in writing technology articles related with data recovery, computer issue fixes, disk clone, iPhone data recovery, video edit, Mac optimization, etc. He Joined DoYourData in 2019 and have written 500+ articles to help both Windows users and Mac users to solve data or computer problems.
Hot Articles
- Fix External Hard Drive Read-Only Issue on Mac
- How to Wipe Trash Bin on Mac?
- Recover Lost Data from WD (Western Digital) External Hard Drive on Mac
- Fix External Hard Drive Not Showing Up on Mac
- How to Wipe SD Card on Mac?
- Mount and Unmount the External Hard Drive on the Mac
- Run First Aid on Mac to Repair Disks
- Fix Can't Save Files to An External Hard Drive on Mac
- (Solved) External SSD Not Detected in Disk Utility on Mac
- Why Can't Format A Hard Drive To NTFS on Mac? Can We Fix It?