Quick Navigation:
- What Is First Aid in Mac Disk Utility?
- Run First Aid to Repair Disk Error
- Run First Aid to Fix Mac Crashes (Repair Startup Disk)
- How to Recover Lost Data after Running First Aid?
- Conclusion
- FAQs About Running First Aid on Mac
Think about being in the middle of a big project on your Mac when it suddenly starts acting up. It could be running more slowly than normal, or you could be getting strange error messages. It's annoying, right? Don't worry! Enter First Aid in Disk Utility, which is like a lifesaver for your Mac when it comes to fixing common disk problems.
It would help if you used First Aid to find and fix issues with your Mac's storage devices so they work properly and quickly. Checking disk rights, finding errors, or fixing disk structures are all things that First Aid can do for you.
With its simple steps and easy-to-use design, even people who aren't tech-savvy can easily get through the troubleshooting process. Prepare to be guided into the world of First Aid in Disk Utility if you want to keep your Mac running at its best!
What Is First Aid in Mac Disk Utility?
First Aid in Disk Utility is a built-in macOS tool that can find and fix common problems with disks. It is important to keep your Mac's storage devices healthy and working. When viewed through Disk Utility, First Aid can check disk permissions, find errors, and fix disk structures if needed.
With this tool's simple interface, users can easily find possible problems and fix them. If you run First Aid often, your files will be safer, your system will be more stable, and your Mac's storage devices will last longer.
Run First Aid to Repair Disk Error
Fixing disk failures by running "First Aid" from Disk Utility is easy. It can help fix several problems with your Mac's storage devices. It's easy to do; follow these steps:
To start Disk Utility, open Finder, go to Applications > Utilities, and double-click on the app.
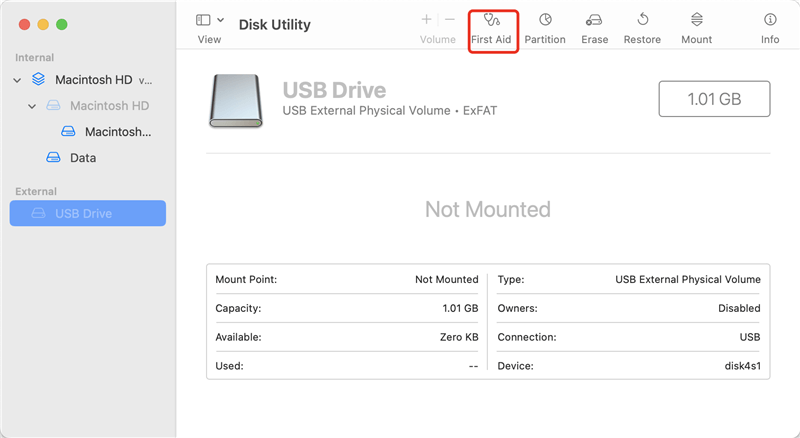
On the left side of Disk Utility, you will see a list of files and volumes. Click on the disk or folder you want to use for First Aid.
Once the disk or folder is chosen, click the "First Aid" in the toolbar at the top of the Disk Utility window.
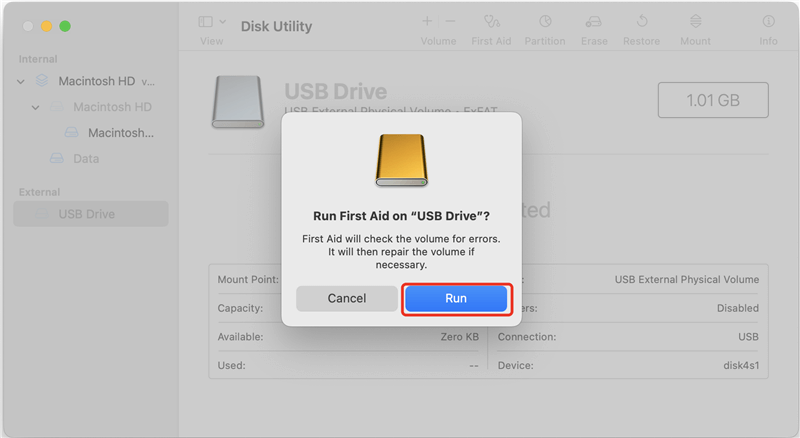
You can run First Aid in the new window that pops up. To start the process, click the "Run" button.
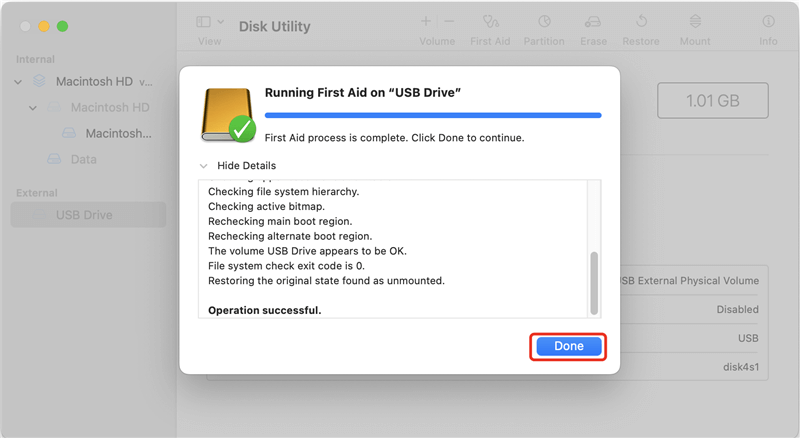
Disk Utility will scan the chosen disk or volume for mistakes. The time this takes will depend on how big and fast your disk is.
Once the scan is complete, Disk Utility will show a data summary. If any mistakes are found, Disk Utility will try to fix them on its own.
Disk Utility might sometimes ask you to restart your Mac to finish the repair process. Follow any directions shown on the screen.
Run First Aid to Fix Mac Crashes (Repair Startup Disk)
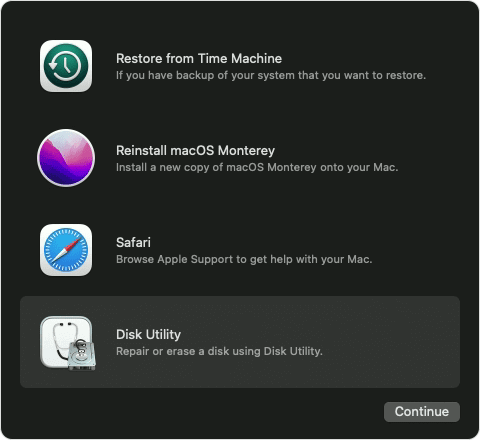
Running First Aid from macOS Recovery Mode is a powerful way to fix serious problems like Macs that keep crashing and other serious problems. To run First Aid from Recovery Mode, follow these steps:
Turn your Mac back on and hold down the Command and R keys simultaneously until you see the Apple logo or a world spinning. If you are using a Mac with Apple silicon, just restart the Mac, press and hold the Power button until you see the macOS Recovery interface, then choose Options and click on Continue.
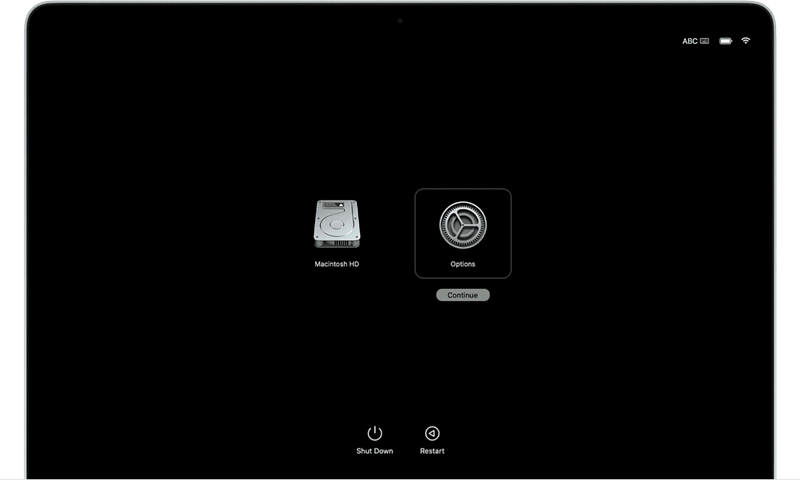
Once you're in Recovery Mode, the macOS Utilities window will appear. From here, you should choose "Disk Utility" and click "Continue."
On the left side of Disk Utility, there is a list of files and volumes. To select a disk or folder that is causing the crashes, click on it.
After picking out the disk or folder, click "First Aid" in the Disk Utility window's menu.

You can run First Aid in the new window that pops up. To start the check and fix process, click the "Run" button.
Now, Disk Utility will check the chosen disk or volume for mistakes and try to fix any problems. If necessary, wait a little while longer.
Disk Utility will show a data summary once the scan is done. Disk Utility will show information about any mistakes that were found and fixed.
After running First Aid, you can restart your Mac from the Apple menu in the top left corner of the screen.
Note: If you have erased the startup disk completed, just back to Utilities window and choose Reinstall macOS to help to reinstall macOS on your Mac.
How to Recover Lost Data after Running First Aid?
Running First Aid will erase all contents stored on the drive. To recover lost data from the drive, you can try Mac data recovery software - such as Do Your Data Recovery for Mac.
This Mac data recovery is able to deeply scan the erased hard drive and help you recover all lost files including images, videos and documents, emails, archives, audio files, etc. It takes only three steps to complete the recovery.
Step 1. Download and install Do Your Data Recovery, then launch it. Select the hard drive which is erased by First Aid.

Step 2. Click on Scan button. It will deeply scan the erased hard drive and ensure finding every recoverable file.
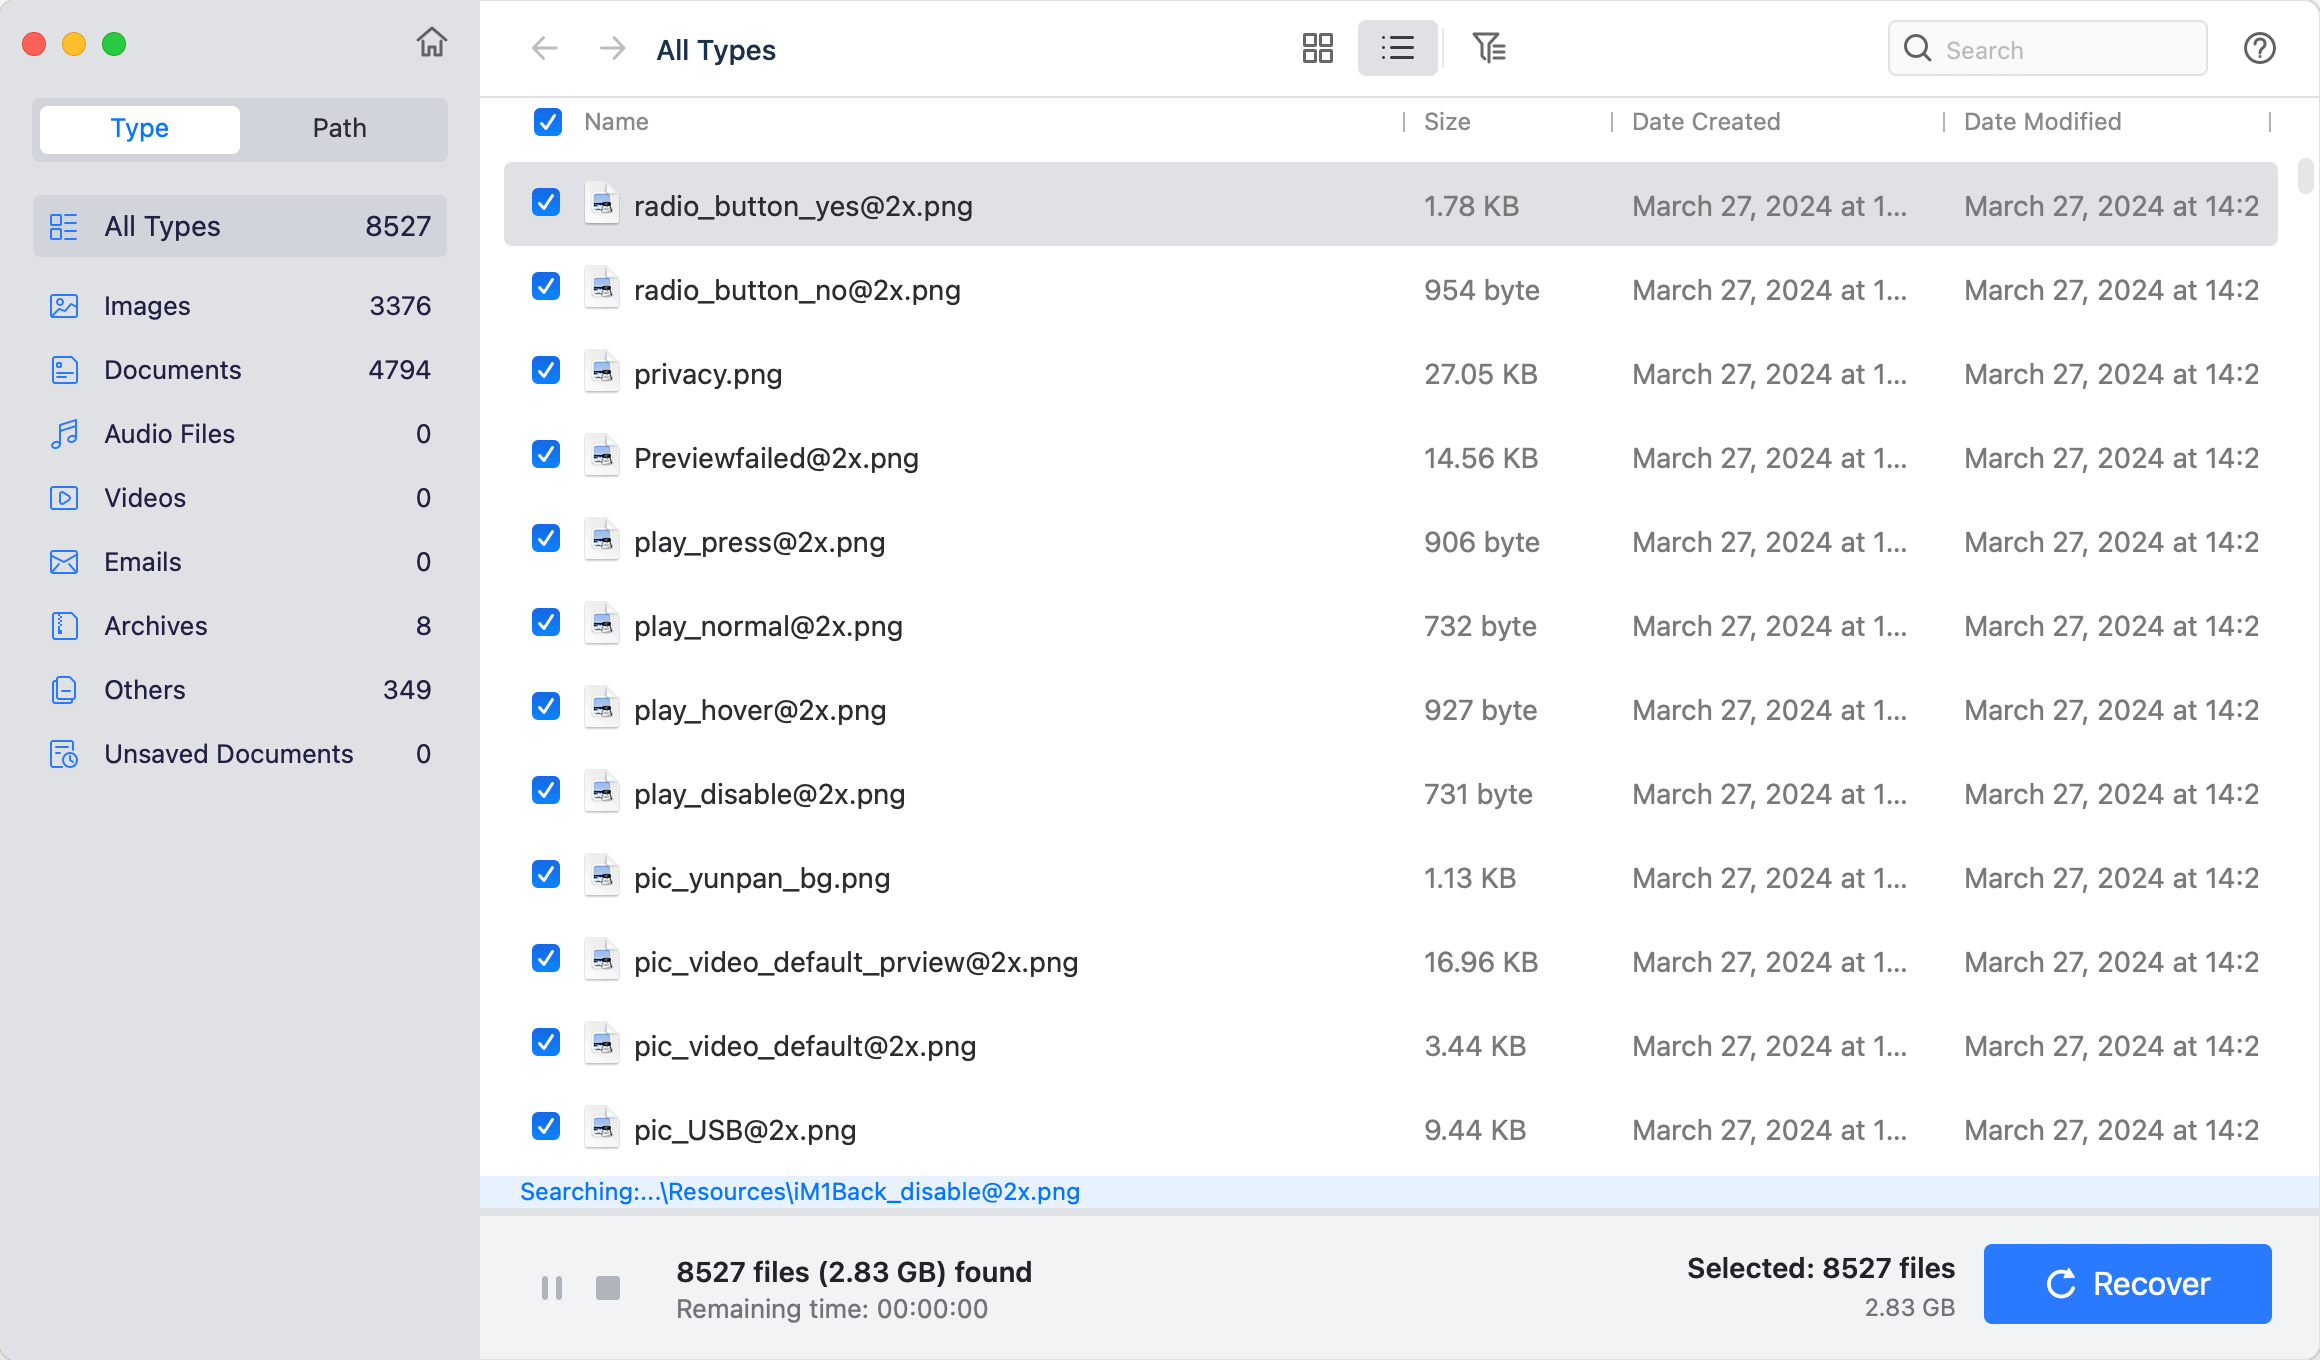
Step 3. Once the scan is completed, you can preview the recoverable files. Then select the wanted files and save them.

Conclusion:
In conclusion, First Aid in Disk Utility is useful for Mac users because it makes common disk problems easy to fix. First Aid can quickly find and fix problems, whether they are slow performance, strange error messages, or crashes that won't go away.
Users can ensure the health and life of their Mac's storage devices by following the simple steps for running First Aid from both Disk Utility and Recovery Mode. Using First Aid regularly not only keeps files safe and computers stable, but it also helps get the most out of them. Learn how to use First Aid to keep your Mac running smoothly and quickly.
FAQs About Running First Aid on Mac
1. How to run First Aid to repair a disk on Mac?
Make sure the disk is connected to your Mac, then open Disk Utility, select the disk and click on First Aid button.
If you want to repair Mac’s startup disk, just boot the Mac into macOS Recovery, then choose Disk Utility, select the startup disk such as Macintosh HD, click on First Aid button to repair it.
2. How to recover lost data after running First Aid?
Actually, you’d better make backup before you run First Aid on a disk. However, if you have not backed up the disk and have run the First Aid on it, just use a data recovery app to help you get lost data back.
For example, you can run Do Your Data Recovery for Mac to scan the erased drive and then get all lost files back.
3. How to run First Aid from third-party software?
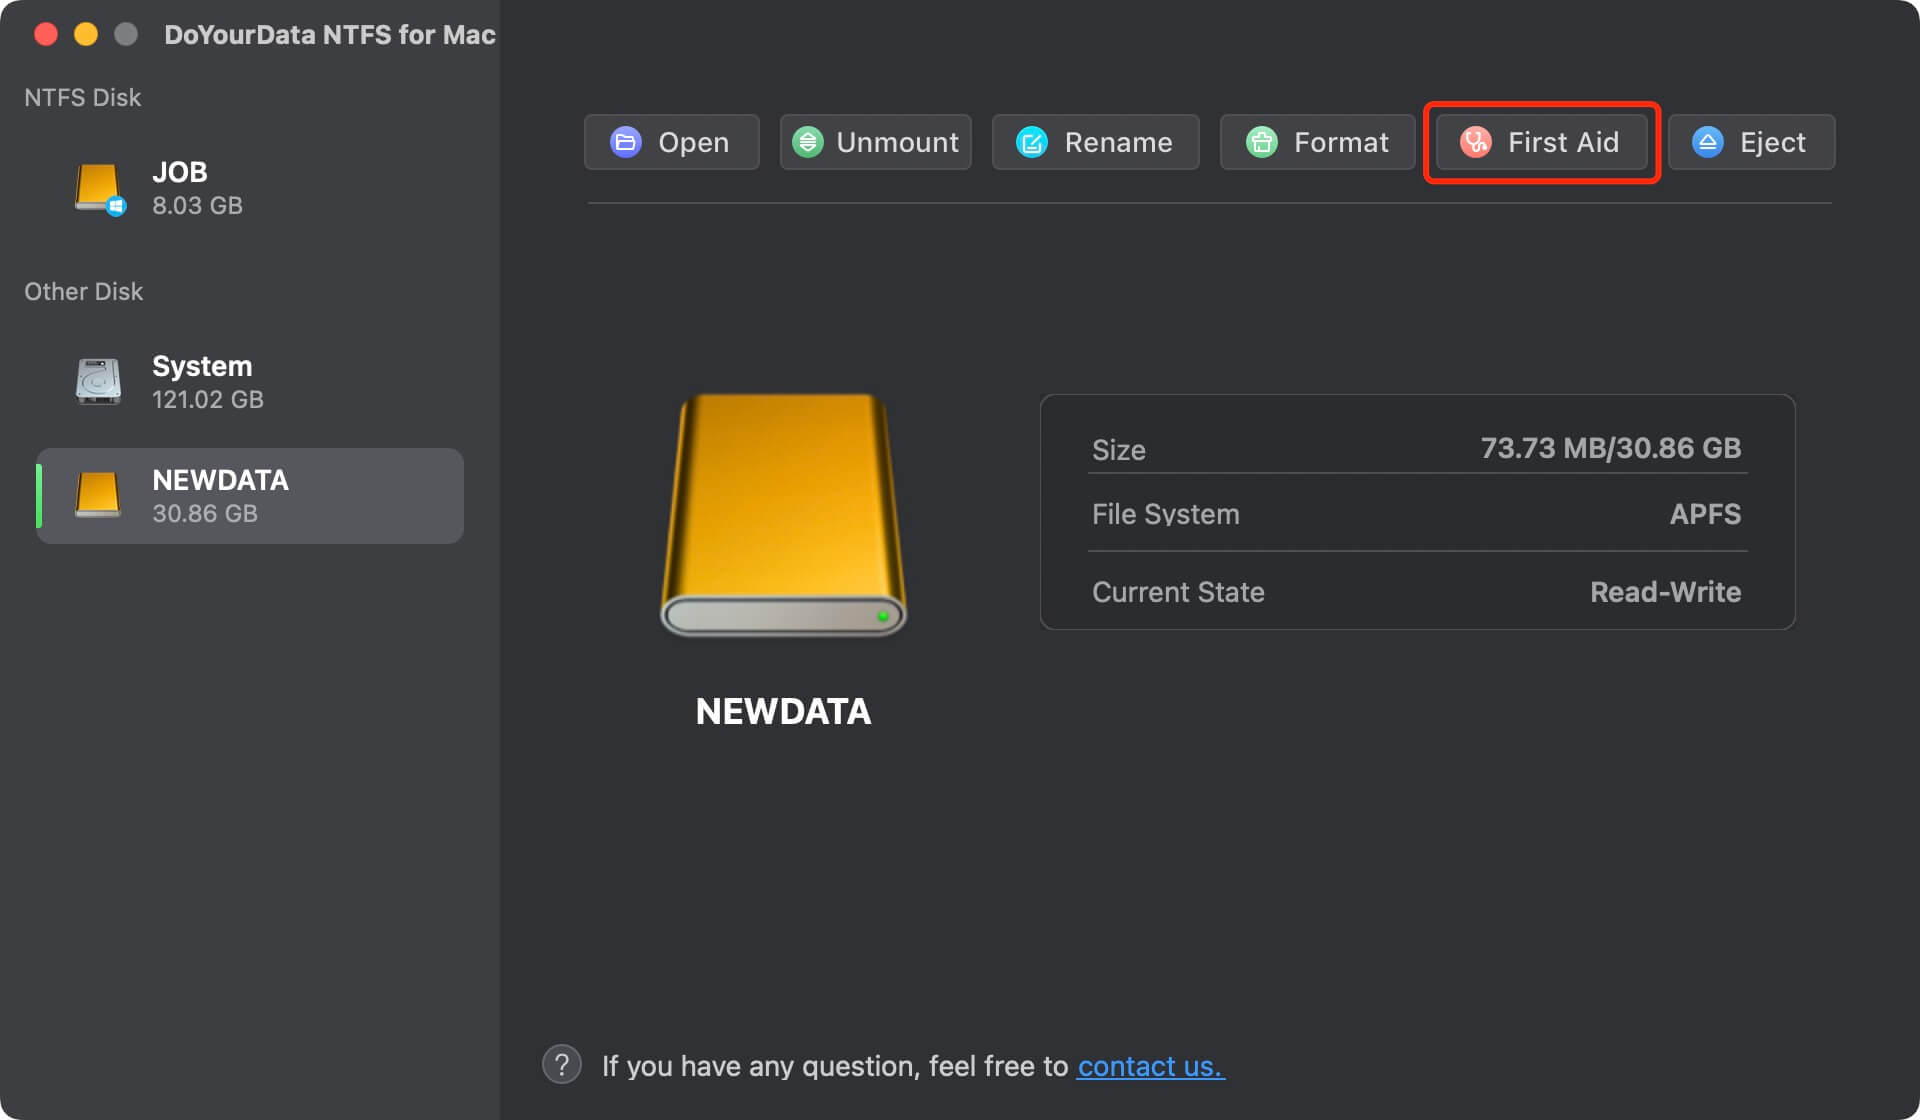
DoYourData NTFS for Mac can help you repair crashed hard drive on Mac. Just download and install this software on your Mac, then open it.
Select the hard drive, click on First Aid button to repair the damaged Disk.
Other software such as MacClean360, DoYourData Super Eraser for Mac also offer First Aid tool to help you format or repair disk on Mac.
4. Can I fix NTFS drive on Mac using First Aid?
Yes, you can run First Aid to repair the NTFS drive on Mac. However, it will change the file system of the drive.
If you want to use a NTFS drive on Mac without formatting it, just use NTFS for Mac tool to add NTFS read-write support on your Mac.
5. Is it safe to run First Aid?
Yes, First Aid is provided by macOS. It is safe and can help you repair damaged internal drive or external device. It is strongly recommended to back up your data before you run First Aid to fix errors on the drive.
Written & Updated by Ricky Lin
Ricky Lin is an senior editor of DoYourData who lives in Adelaide, Australia. He is interested in writing technology articles related with data recovery, computer issue fixes, disk clone, iPhone data recovery, video edit, Mac optimization, etc. He Joined DoYourData in 2019 and have written 500+ articles to help both Windows users and Mac users to solve data or computer problems.
Hot Articles
- Fix External Hard Drive Read-Only Issue on Mac
- How to Wipe Trash Bin on Mac?
- Recover Lost Data from WD (Western Digital) External Hard Drive on Mac
- Fix External Hard Drive Not Showing Up on Mac
- How to Wipe SD Card on Mac?
- Mount and Unmount the External Hard Drive on the Mac
- Run First Aid on Mac to Repair Disks
- Fix Can't Save Files to An External Hard Drive on Mac
- (Solved) External SSD Not Detected in Disk Utility on Mac
- Why Can't Format A Hard Drive To NTFS on Mac? Can We Fix It?