Quick Navigation:
- Things to Know Before Wiping An SD Card
- Two Methods Wipe SD Card on Mac
- Method 1. Wipe SD card on Mac using Disk Utility
- Method 2. Wipe SD card on Mac using Data Erasure Tool
- Conclusion
Online storage is convenient, but a flash drive or SD card is sometimes the best option. This is especially true since SD cards are so common in mobile devices. At some point, you'll have to wipe these cards so that they can be used on another device or so that they don't hold any more data. It is very important when working with private business data like customer contacts.
Luckily, you can wipe an SD card on a Mac, though you must make important formatting and security choices. This not only gives your storage device a clean slate, but it also keeps your info safe. The ability to effectively handle your SD card is an important skill in today's tech world, whether you're getting ready for a new project or just clearing your digital space.

Things to Know Before Wiping An SD Card
A few things need to be considered before you wipe an SD card on your Mac to ensure everything goes quickly and safely. First, make a copy of any important data that is on the card so that you don't lose it by chance. Check to see if the SD card also works with your Mac's operating system so there are no problems during the wiping process.
Learn about the different formatting choices and pick the one that works best for you, considering file size limits and platform compatibility. Lastly, if the data on the SD card is private, choose a higher security erase choice to ensure the data is gone for good. By taking these things into account ahead of time, you can safely wipe your SD card, protecting your data and ensuring the process goes smoothly.
Two Methods Wipe SD Card on Mac
Before you wipe your SD card on Mac, make sure you have a backup of your important data. Then choose one of the methods to help you wipe the SD card on Mac:
Method 1. Wipe SD card on Mac using Disk Utility
Note: Disk Utility is a built-in disk management app in macOS. You can run this app to erase your SD card. But some of the erased files on the SD card still can be recovered by data recovery software.
Step 1. Put the SD card
First, put the SD card into your Mac's card reader slot. Or, if you need to, you can use a separate card reader to join it. Make sure the card is in correctly to avoid problems with the link.
Step 2. Start-up Disk Utility
Disk Utility is an app with macOS that lets you control disks and other storage devices. Go to Applications > Utilities, press Command + Space, and type "Disk Utility" into Spotlight to find it.
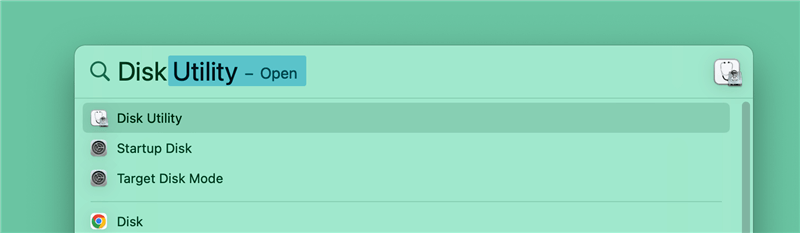
Step 3. Choose the SD Card
You can see a list of all synced files and storage devices in Disk Utility. Find your SD card in the sidebar and click on it to make it stand out.
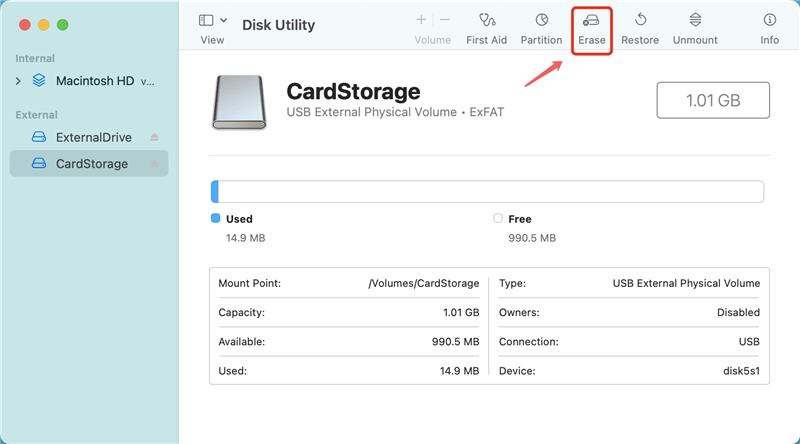
Step 4. Erase the SD card
In the Disk Utility window, click the "Erase" button at the top of the menu. It will erase the SD card. You can change how the removal works in the new box that appears.
Step 5 Set Up The Erase Settings
There is a box where you can name the SD card and pick the type it will use. The style choices are:
- APFS: For macOS 10.13 or later.
- MS-DOS (FAT): Works with both Mac and Windows computers.
- ExFAT: It works with multiple platforms and is good for big files.
- macOS Extended: Only works on Mac computers.
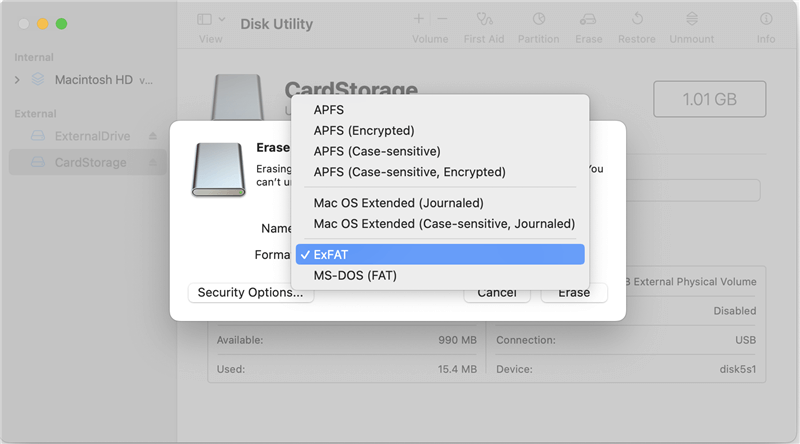
If you want to use the SD card with multiple devices, make sure the version you choose works with those devices.
Step 6. Choices For Security
You can click the "Security Options" button to ensure the SD card's data is wiped safely. You can then pick from different levels of data destruction, from a simple erase to a multi-pass delete that makes it almost impossible to get back the data.

Step 7. Start the Erasing Process
After setting up the erase settings and, if needed, the security settings, hit the "Erase" button to start the process. When you erase the SD card, Disk Utility will ask you to accept the action because it will permanently delete all its data.
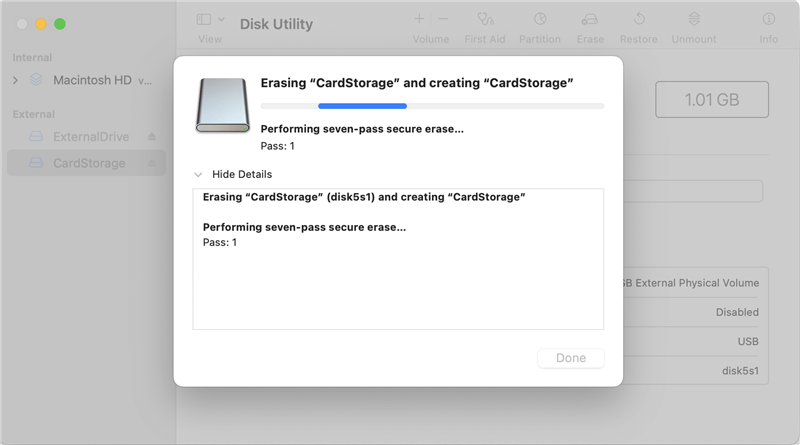
Step 8. Wait For The Process
How long it takes to erase an SD card depends on how big it is and what method you use. It might take longer to finish with bigger cards and safer ways to erase data. Wait your turn, and don't get in the way of the process.
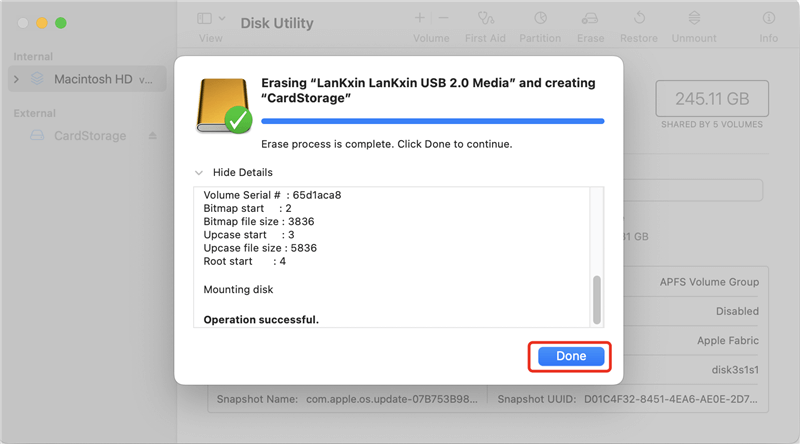
Step 9. Remove the SD card
Once the process is done, you can remove the SD card from your Mac. Right-click on the SD card in the Finder or Disk Utility and choose "Eject."
Method 2. Wipe SD card on Mac using Data Erasure Tool
Note: Once the data is erased by data erasure tool, the data is lost forever, can’t be recovered by any method.
Step 1. Make a full backup of the data stored on the SD card.
Step 2. Download and install the most reliable data erasure tool - DoYourData Super Eraser for Mac, then run this app from Launchpad.
Step 3. Open DoYourData Super Eraser for Mac, choose data erasure mode - Wipe Hard Drive.
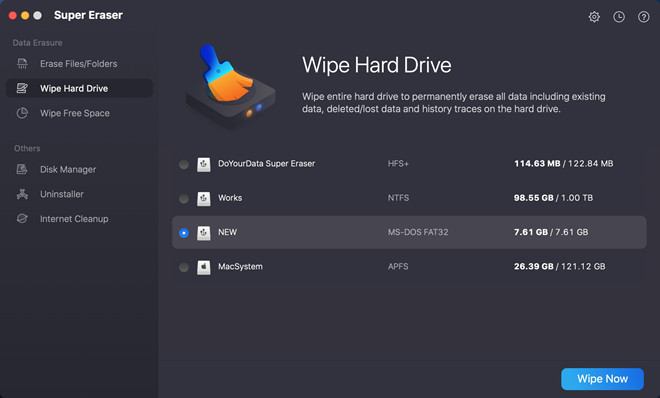
Step 4. Select the SD card and click on Wipe Now button. It will format and wipe the SD card and permanently erase all data (existing data, hidden data, deleted/formatted/lost data) from the SD card.
DoYourData Super Eraser for Mac also can help you wipe SSD, wipe USB flash drive, wipe HDD, wipe external hard drive on Mac. Once the data is erased by DoYourData Super Eraser for Mac, the data is lost forever, leaving no trace for data recovery.
Conclusion:
In conclusion, knowing how to wipe an SD card on your Mac is an important computer skill. As we try to find the best mix between ease of use and safety, following the steps above will keep your storage device clean and your private data safe.
Managing your SD card well is very important, whether getting ready for a new job or cleaning up your digital space. With each erase, you take back control of your data's fate, protecting your privacy and ensuring that the next part of your storage device goes smoothly.
Written & Updated by Ricky Lin
Ricky Lin is an senior editor of DoYourData who lives in Adelaide, Australia. He is interested in writing technology articles related with data recovery, computer issue fixes, disk clone, iPhone data recovery, video edit, Mac optimization, etc. He Joined DoYourData in 2019 and have written 500+ articles to help both Windows users and Mac users to solve data or computer problems.
Hot Articles
- Fix External Hard Drive Read-Only Issue on Mac
- How to Wipe Trash Bin on Mac?
- Recover Lost Data from WD (Western Digital) External Hard Drive on Mac
- Fix External Hard Drive Not Showing Up on Mac
- How to Wipe SD Card on Mac?
- Mount and Unmount the External Hard Drive on the Mac
- Run First Aid on Mac to Repair Disks
- Fix Can't Save Files to An External Hard Drive on Mac
- (Solved) External SSD Not Detected in Disk Utility on Mac
- Why Can't Format A Hard Drive To NTFS on Mac? Can We Fix It?