Lexar Portable SSD Not Showing Up on Mac, Fix It
There are many reasons behind why your Lexar Portable SSD is not showing up or not detected on your Mac. Find out why and then get a solution to fix this issue. If you have lost data from your Lexar Portable SSD, download Do Your Data Recovery to scan the SSD and get all erased or lost data back.
![]() Updated by Nancy on February 18, 2024
Updated by Nancy on February 18, 2024
Quick Navigation:
- Why Is Lexar Portable SSD Not Showing Up on Mac?
- Effective Methods to Fix Lexar Portable SSD Not Showing Up on Mac
- Conclusion
Many users have had the frustrating experience of not being able to find their beloved Lexar Portable SSD on their Mac. If this situation makes you feel alone, know you're not. Many other people have had the same problem, which has left them confused and looking for answers.
So, why does this take place? Several things could cause your Lexar Portable SSD to not appear on your Mac. It could be because of a loose link, improper Finder settings, old software, incompatible file system, SSD crash, a broken USB cable, or even problems with the hardware or setup of your Mac.
Many things could go wrong, but the good news is that there are ways to fix all of them. In this article, we'll talk about the most common reasons why your Lexar Portable SSD might have disappeared, along with step-by-step methods to help you get back on track.
Why Is Lexar Portable SSD Not Showing Up on Mac?
1. Check Connection
Ensuring that all physical links are safe is the first thing that should be done when there is a connectivity problem. First, unplug the Lexar Portable SSD from your Mac. Then, firmly connect it to your Mac's USB port and the SSD. To ensure there aren't any problems with the USB hub, connect the SSD straight to your Mac's USB port if you're using one.
2. Check The Power Source
Some portable SSDs need more power than the USB port can give them. If your Lexar Portable SSD comes with a different power adapter, ensure it's plugged in correctly and getting power. You can also connect the SSD to a different Mac or use a different USB port to see if the problem is with the port or the SSD itself.
3. Drive Recognition
Check if your Mac can see the Lexar Portable SSD after ensuring the links are solid. In the Finder, look for the SSD in the "Devices" area of the sidebar. If it's not there, move on to the next step.
4. Start Up Your Mac
Sometimes, it takes a restart to fix problems connecting your Mac to other devices. Close all open programs, go to the Apple menu, and choose "Restart." Connect the Lexar Portable SSD again after restarting your Mac and see if it shows up in the Finder.
5. Use the Disk Utility
Disk Utility is a tool with macOS that lets you handle disks and partitions. Open Disk Utility and search for it in Spotlight if your Lexar Portable SSD still doesn't appear. Once it's open, look to the left for the Lexar SSD in the list of drives. It will appear but be grayed until you click on it and then click the "Mount" button in the main menu. Move on to the next step if it's not mentioned at all.
6. Try a different USB Cable
External drives that won't work are often caused by USB connections that aren't working right. If you have one handy, you could use a different USB wire to connect the Lexar Portable SSD to your Mac. Check to see if it works with your SSD and can transfer files. You might need a new one if the SSD shows up with a different connection.
7. Update macOS and SSD Firmware
Outdated software can sometimes make it hard for your Mac and external gadgets to work together. Click on the Apple menu, then System Preferences or System Settings, and then Software Update to see if any macOS changes need to be installed. If there are changes, install them and then restart your Mac. Also, check the Lexar website to see if there are any firmware updates for your SSD. If there are, install them by following the on-screen directions.
8. Reset NVRAM
Sometimes, resetting your Mac's non-volatile random-access memory (NVRAM) or parameter random-access memory (PRAM) can fix problems with the hardware. To do this, turn off your Mac, then on it again, and press and hold the Option, Command, P, and R keys simultaneously. Hold down the keys until you hear the second starting chime, and then let go of them. Connect the Lexar Portable SSD again after restarting your Mac and see if it shows up.
Effective Methods to Fix Lexar Portable SSD Not Showing Up on Mac
Don't panic when you find your Lexar Portable SSD not detected on your Mac. Here are some frequently used solutions to help you fix this issue:
#1 Fix Lexar Portable SSD using Disk Utility
Disk Utility is a built-in disk management tool for managing or repairing disk drives on Mac. Before repair your Lexar Portable SSD using Disk Utility, you can export all data from your Lexar Portable SSD to another drive. Follow the steps below:
Step 1. Download and install a data recovery app - Do Your Data Recovery for Mac, then open from Launchpad. Connect the Lexar Portable SSD to your Mac.
Step 2. Open Do Your Data Recovery for Mac, then it show all drives, just select the Lexar Portable SSD to start data recovery.

Step 3. Click on Scan button to deeply scan the Lexar Portable SSD.
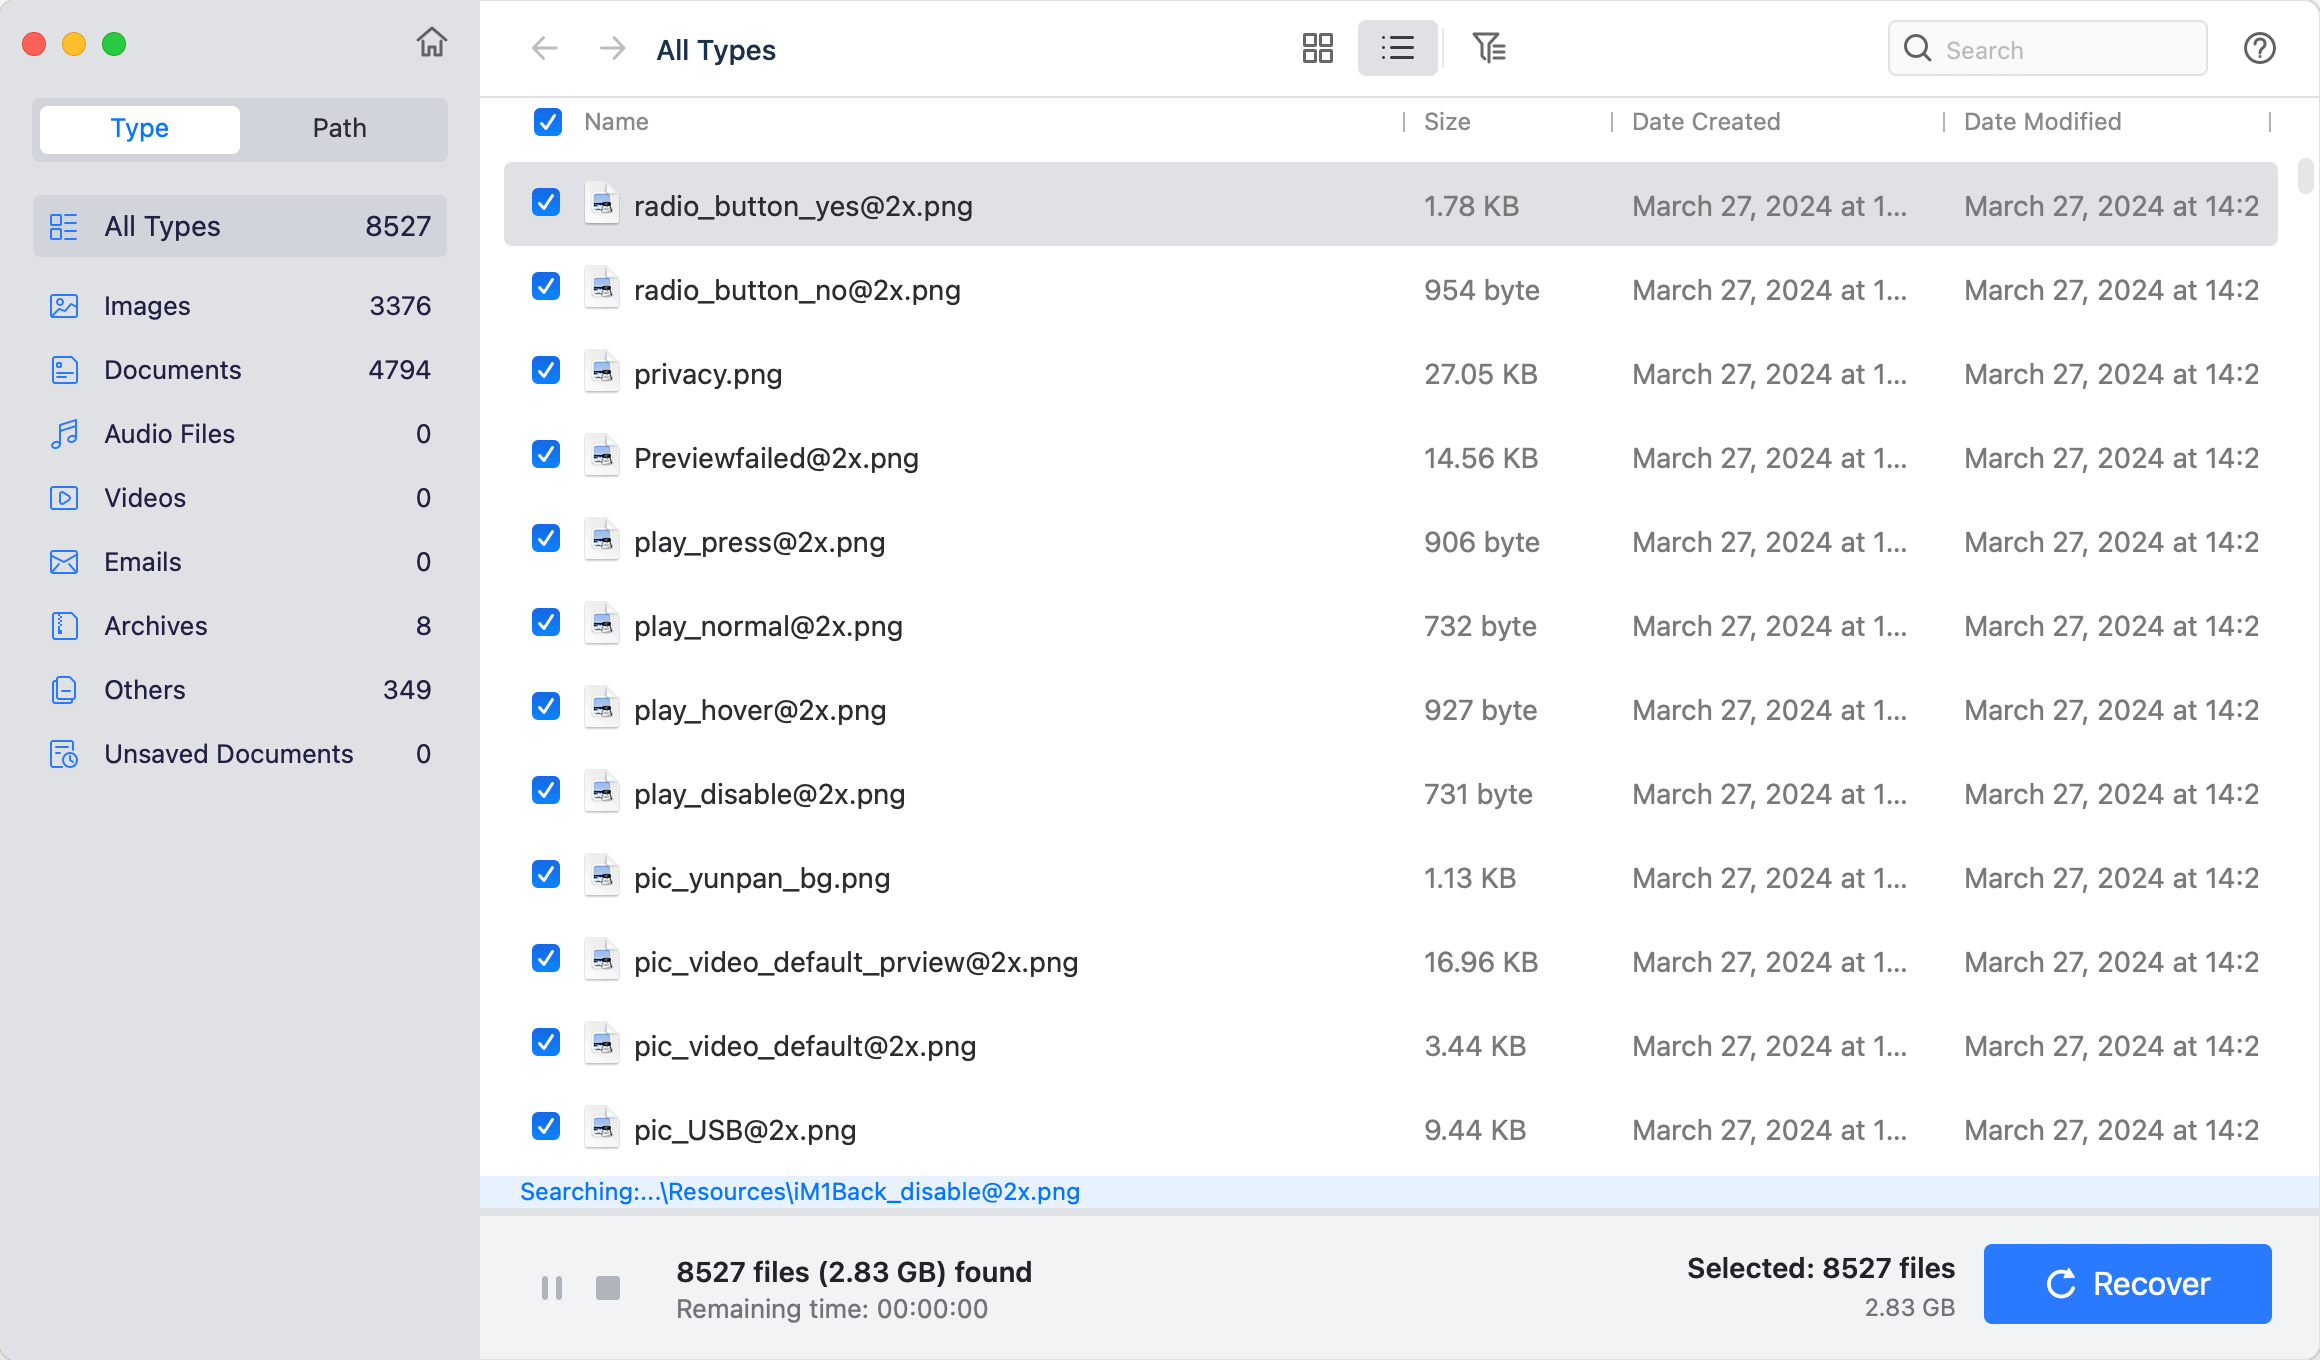
Step 4. Select the wanted files and click on Recover button. Choose a location to save the files.

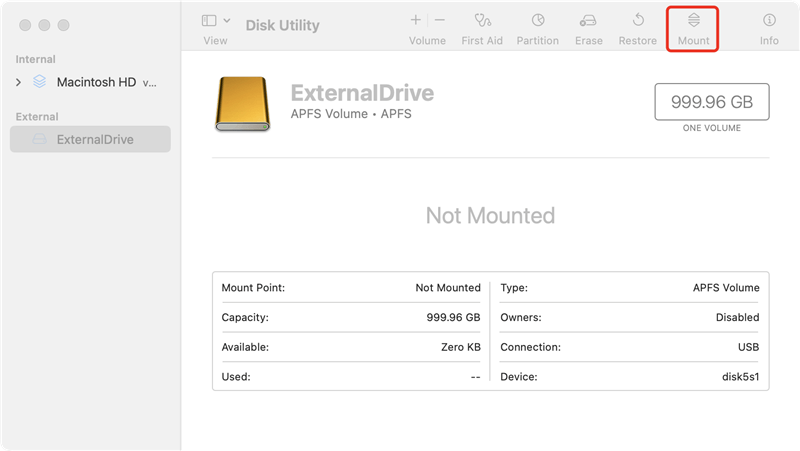
Then go to Launchpad > Other, find and open Disk Utility.
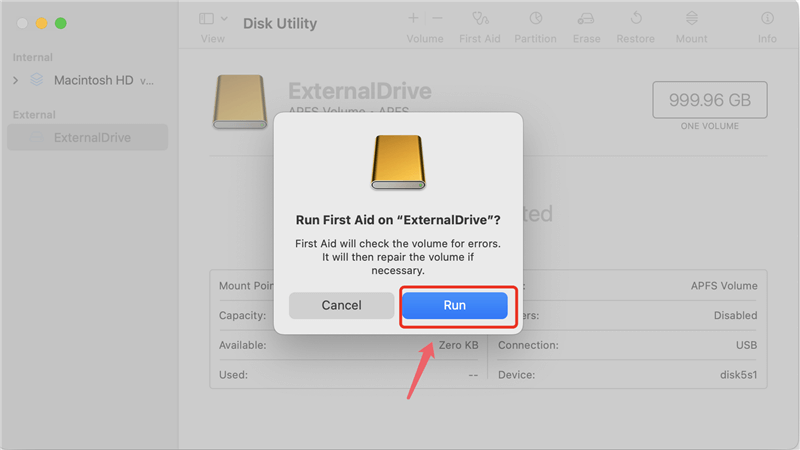
First of all, check if the Lexar Portable SSD is mounted. If not, click on Mount button.
If the Lexar Portable SSD gets crashed or has an unsupported file system such as NTFS, you can format it to a new file system.
Step 1. Select the Lexar Portable SSD, then click Erase.
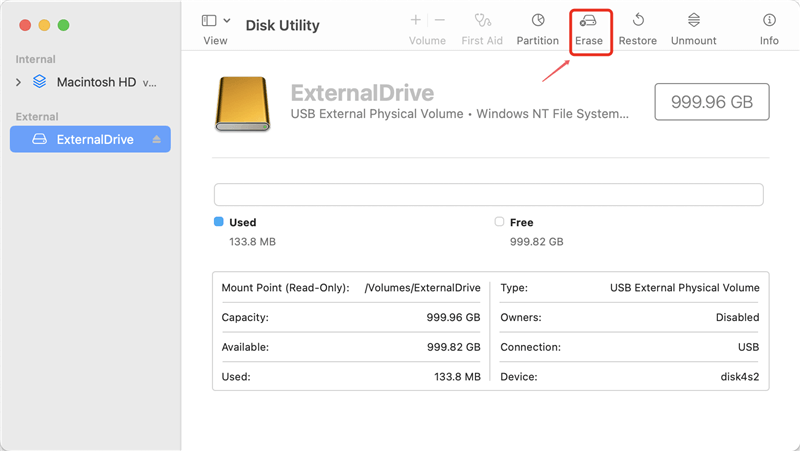
Step 2. Enter a new name if you need, then select a file system such as APFS, click Erase again.
Step 3. Once the process gets finished, click on Done button. Then check if your Mac can recognize the Lexar Portable SSD.
If Erase button is grayed out, just click on First Aid button to repair the crashed Lexar Portable SSD.
#2 Check Finder Settings
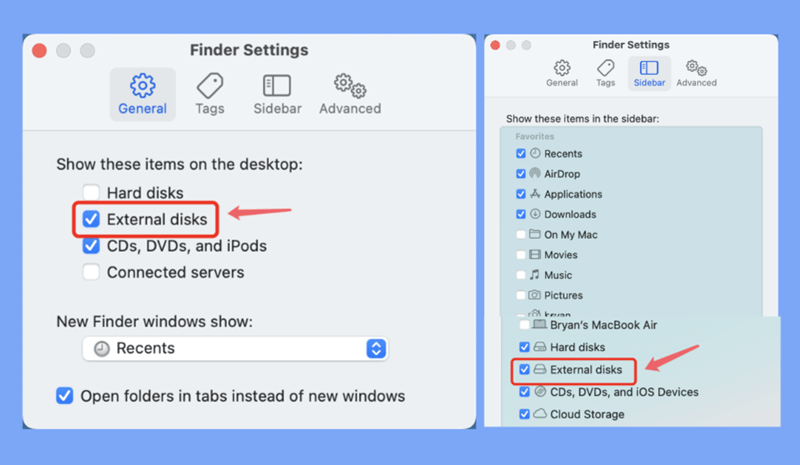
Step 1. Open a Finder, then click on Finder on Apple menu.
Step 2. Choose Settings, open Finder Settings window.
Step 3. Click General and Sidebar, make sure External disks is selected. Then you can see the Lexar Portable SSD on desktop and Finder sidebar.
#3 Mount and Use A NTFS Lexar Portable SSD on Mac Without Formatting
NTFS is a Windows-based file system and the NTFS drive may not mount on your Mac and you can’t write data to it due to read-only limitation. To solve this issue, most of Mac users will reformat the SSD, but it will erase all contents stored on the SSD.
To use a NTFS Lexar Portable SSD on Mac without formatting, you should download and install a third-party NTFS for Mac tool on your Mac. It can add NTFS support on Mac.
Step 1. Download and install DoYourData NTFS for Mac on your Mac, then open it.
Step 2. Select the Lexar Portable SSD, click on Mount button.
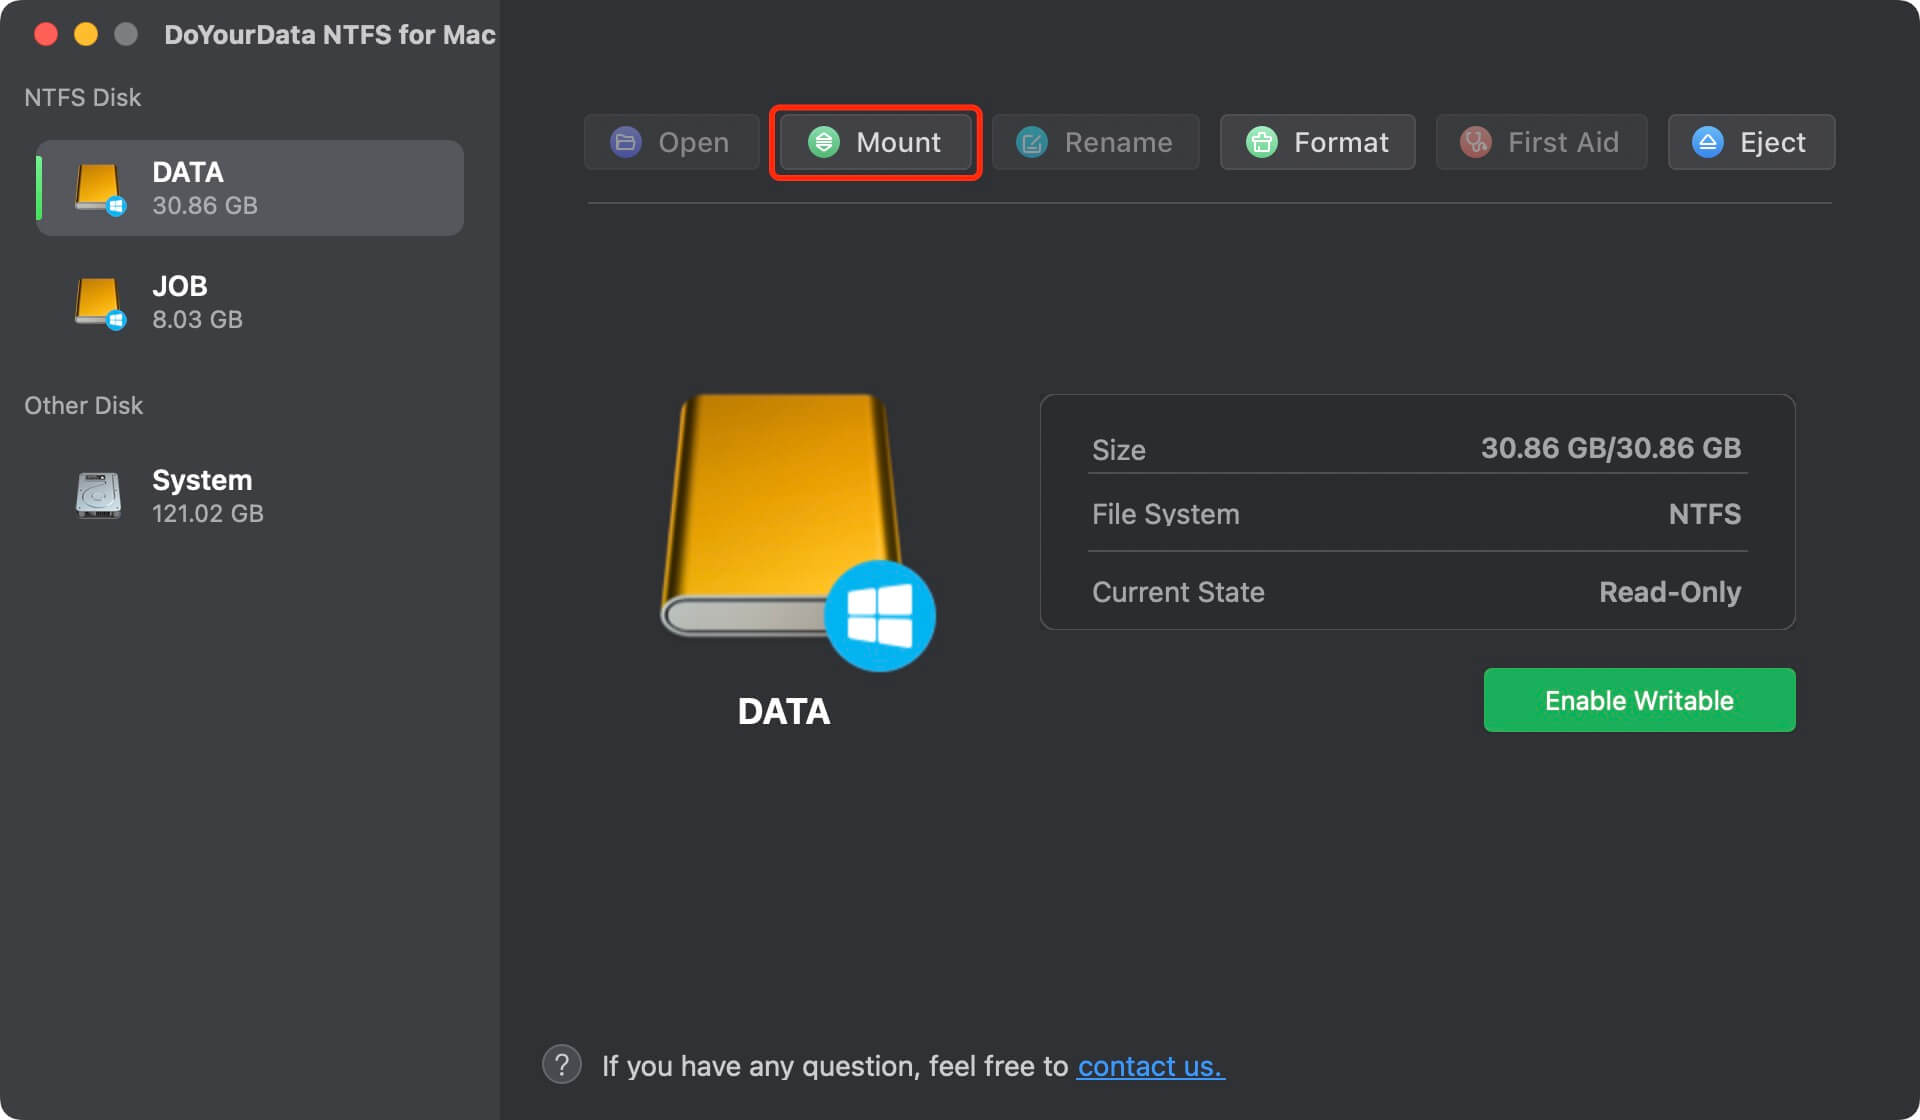
Step 3. Click on Enable Writable button, then you can read-write the NTFS Lexar Portable SSD on Mac without any limitation.
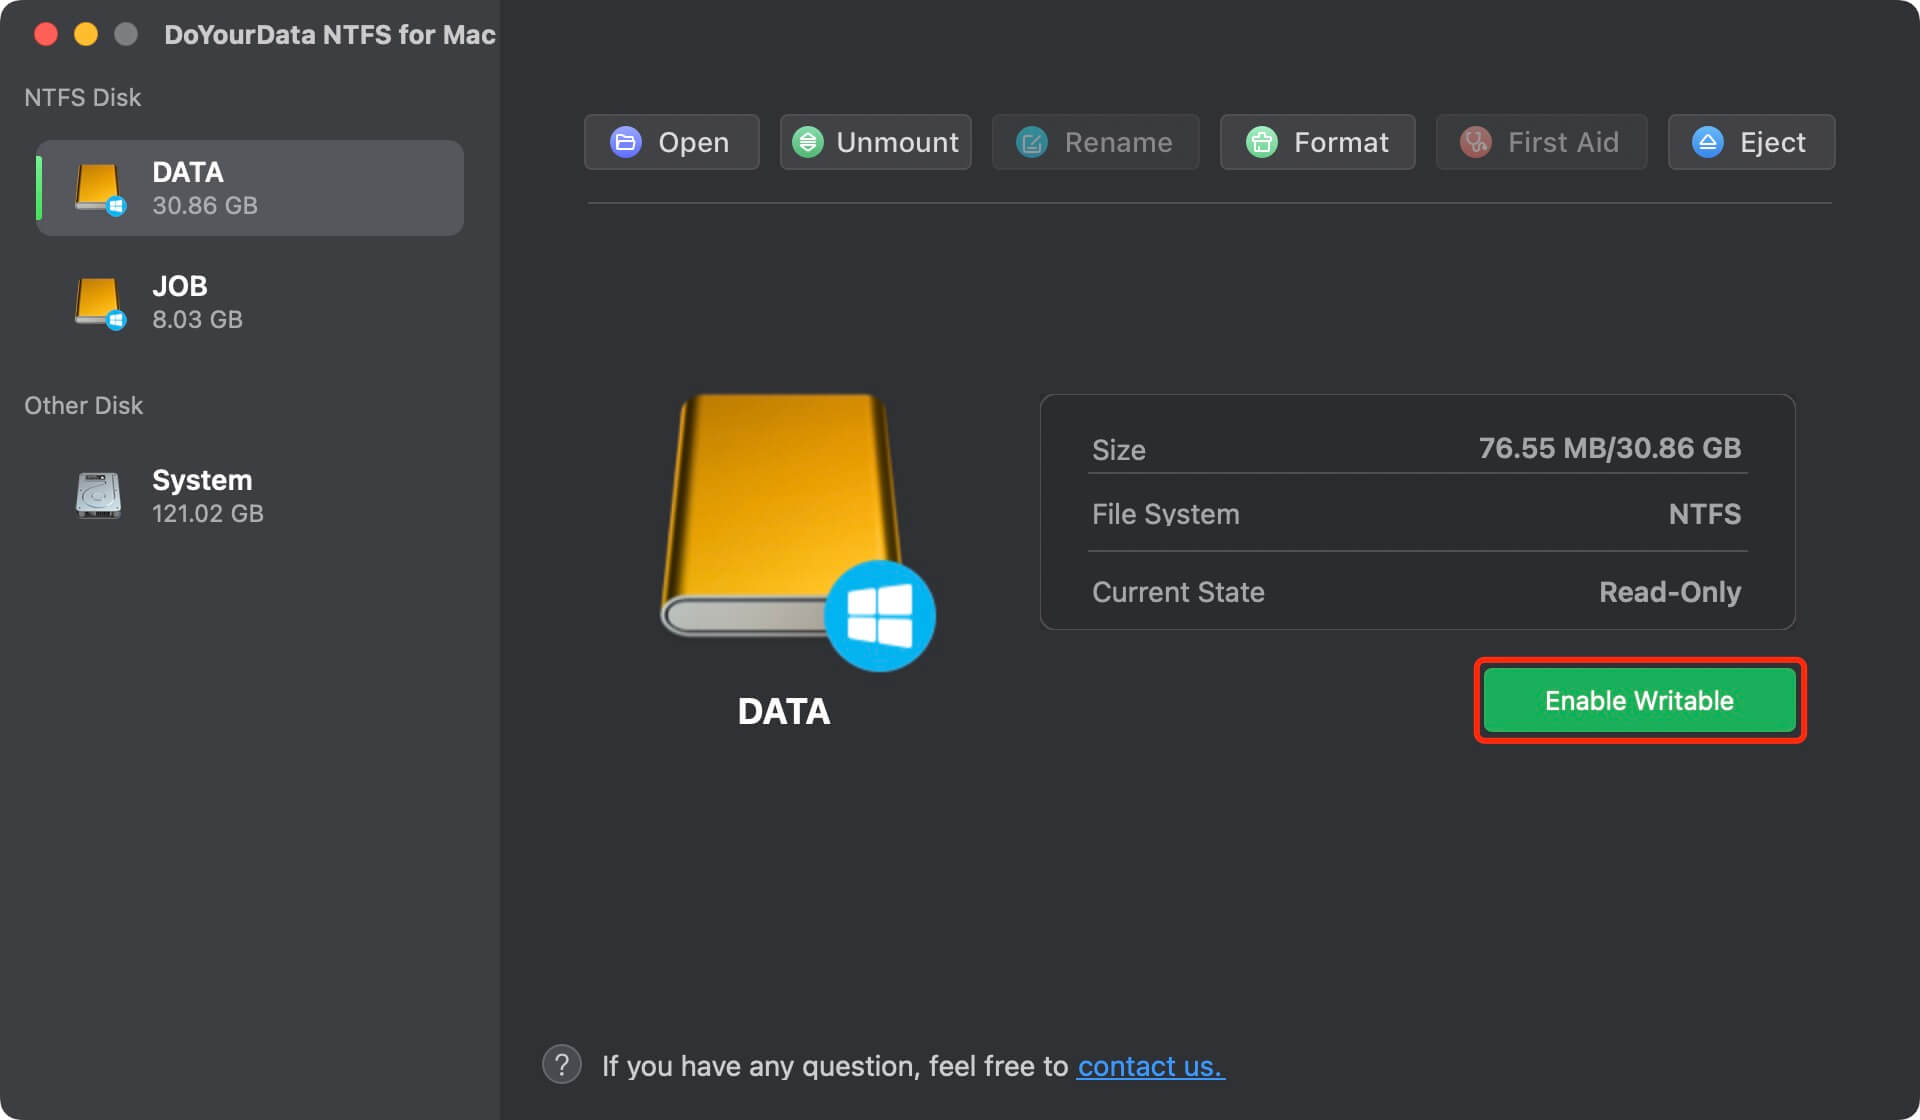
This NTFS for Mac tool also can help you repair crashed Lexar Portable SSD, format Lexar Portable SSD on Mac, etc.
Conclusion:
An annoying problem is when your Lexar Portable SSD doesn't appear on your Mac. But with the steps in this guide, you can quickly figure out what's wrong and fix it. By checking these issues, You can ensure that your Lexar Portable SSD works well with your Mac for easy data transfer and storage. If the problem keeps happening no matter what you do, you may need to contact Lexar's customer service for more help.
Written & Updated by Nancy
Nancy works as a tech columnist at DoYourData. She is familiar with macOS and Windows OS and writes computer solution, data recovery, disk clone, data erasure articles for DoYourData. She is a big fan of Mac products and is fond of testing utilities software (such as cleaner, recovery, eraser, NTFS for Mac, video editor, etc) on Mac.