Permanently Remove A Program from Your Windows 11 PC
![]() Updated by Jerena on 2021-08-28
Updated by Jerena on 2021-08-28

Methods to uninstall programs on Windows 11:
- #1 Uninstall Windows 11 programs via the Start Menu
- #2 Using CMD to uninstall programs on Windows 11
- #3 Uninstall Windows 11 programs via App Settings
- #4 Uninstall via Programs and Features Menu
- #5 Using Control Panel to uninstall programs on Windows 11
- #6 Uninstall Programs on Windows 11 via PowerShell
- # 7 Permanently uninstall Windows 11 programs with Super Eraser
Windows 11 comes with improved privacy and security features. The operating system offers you an excellent UI to install the Android app on Windows 11. But, at the same time, Windows 11 also comes with some pre-installed programs, which you may not found pretty helpful.
But, the best thing is that Windows 11 offers you multiple ways to delete these pre-installed or other irrelevant apps permanently. Looking for the best way to delete these apps, choose the one by continuing your reading.
How to permanently remove a program from your Windows 11 PC
Here are all the ways you can uninstall any app or application from the Windows 11 PC. So, get through them one by one to find the one the most suitable for you!
#1 Uninstall Windows 11 programs via the Start Menu
To delete the files by using the start menu, follow the given steps:
Step 1. Press the Windows button on the keyboard and select the start menu, or you can also click on the icon from the Taskbar.
Step 2. Find the app you want to delete.
Step 3. Right-click on the application you have just selected.
Step 4. Click uninstall and follow all the provided instructions.
Step 5. And that's it, and you have successfully deleted all the unnecessary files.
#2 Using CMD to uninstall programs on Windows 11
Well, you can also use the Command Prompt to delete unnecessary programs. And for this purpose, you can follow the under given steps:
Step 1. Press Windows + S on the keyboard.
Step 2. Search for the CMD.
Step 3. Click on Run As Administrator.
Step 4. Just after the launch of the CMD, type the following commands:
- a. wmic
- b. product get name
- c. product name where AppName is required and then uninstall the app
Step 4. Press enter once you have entered all the commands.
Step 5. And, for now, you would have to wait patiently until all of your files get deleted.
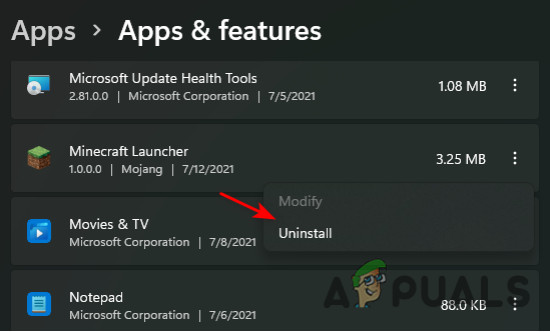
#3 Uninstall Windows 11 programs via App Settings
To permanently delete all the unnecessary files by using the App Settings, follow these steps:
Step 1. Go to the Settings.
Step 2. And choose the Apps and then Apps and Features to view all the programs you want to delete.
Step 3. On the screen, you will get both Windows Universal and standard desktop applications.
Step 4. Every program which has been installed on your computer will appear on the screen.
Step 5. Scroll down the list to find the program which you are interested in to remove.
Step 6. Click on the program and then select the uninstall.
#4 Uninstall via Programs and Features Menu
Many of us prefer to perform all the actions using the Control Panel, and if you are one of them, the under-given method will be the best for you. Fortunately, the Programs and Features interface is available in Windows 11.
You can get access to Programs and Features via Control Panel or even by Run Command. The Run Command will take you directly to the uninstallation Window. Follow the given steps to remove the programs from Windows 11 permanently:
Step 1. Press the Start key and then type the Control.
Step 2. Double click on the Control Panel.
Step 3. At the Control Panel interface, click on the Uninstall A Program just under the Programs.
Step 4.Note; to land directly in Programs and Features, you can press Windows key + R and then type appwiz.CPL and at the end press Enter.
Step 5. Once you have got the entry, get through the list of all the available programs and find the exact program or app you are interested to delete.
Step 6. Once you have got the app or program, right-click on it.
Step 7. Choose the Uninstall option just from the context menu, which has just appeared on the screen.
Step 8. You must follow the on-screen prompts from the uninstallation screen that has just seemed to complete the uninstallation process.
#5 Using Control Panel to uninstall programs on Windows 11
You can also delete or remove unnecessary applications by using the Control Panel. And for that purpose, follows the given steps:
Step 1. Press the Windows + S from your keyboard.
Step 2. Type in the Control Panel.
Step 3. Click and launch the apps once they appear in the search results.
Step 4. Click on the Programs and Features.
Step 5. A list of all the programs which have been installed on the computer would appear on your screen.
Step 6. Search for the program you are interested to uninstall.
Step 7. Select the app and then click on the Uninstall present at the top.
#6 Uninstall Programs on Windows 11 via PowerShell
Get rid of all the unwanted apps via PowerShell. The uninstallation command is pretty simple and easy to follow. So, follow the following steps to delete the programs which are necessary for you:
Step 1. Press the Windows + S on your keyboard and then type the PowerShell.
Step 2. Click on the Run As Administrator.
Step 3. Once you have successfully got the PowerShell window on the desktop, press the Remove > AppxPackage > Name of the program you want to delete.
Step 4. After pressing the command, press Enter.
Step 5. And that's I, just a few for a few minutes to get the program uninstalled.
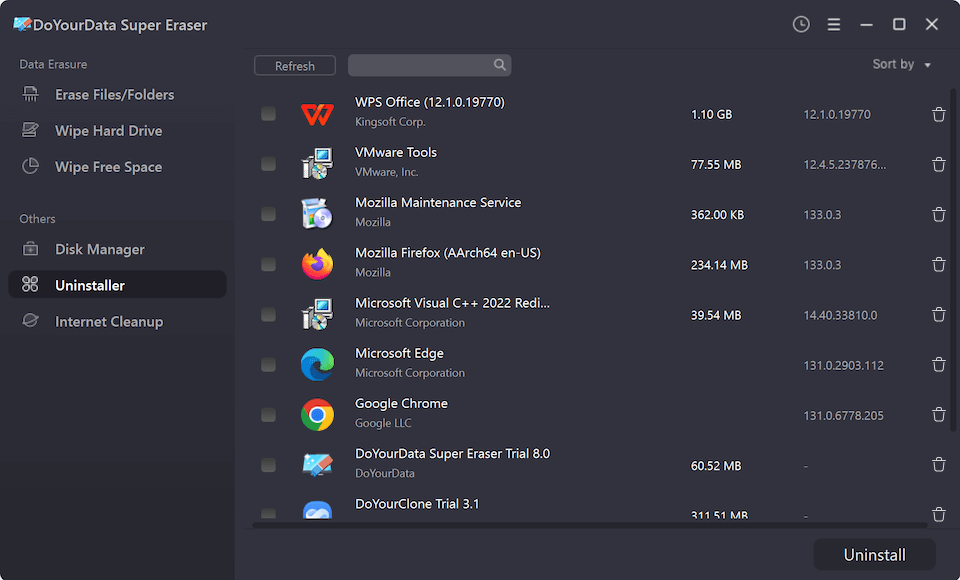
# 7 Permanently uninstall Windows 11 programs with Super Eraser
The 6 methods above can help you uninstall programs or apps on Windows 11. But, even you have uninstalled them from your Windows 11 PC, the files or information related the uninstalled programs still can be recovered by data recovery software. If you want to permanently uninstall programs on Windows 11 PC, just try data eraser software - such as DoYourData Super Eraser.
DoYourData Super Eraser
- Easily and permanently uninstall programs and delete all related files on Windows 11, 10, 8, 7, Vista and macOS.
- Permanently erase data, shred files, wipe hard disk drive to prevent data recovery.
- 100% safe data erasure software.
Follow the steps below to permanently uninstall programs on Windows 11 PC:
Step 1. Run DoYourData Super Eraser on your computer. Choose tool ‘Uninstaller’. Select the programs you want to uninstall and click on Uninstall button. DoYourData Super Eraser Uninstaller will uninstall the selected programs and delete all related data including app junk, registry files, caches, logs, etc.
Step 2. Choose tool ‘Wipe Free Space’ - this mode will help you wipe free disk space of the hard drive to permanently erase all already deleted/lost data on the hard drive. It will not erase the existing data.
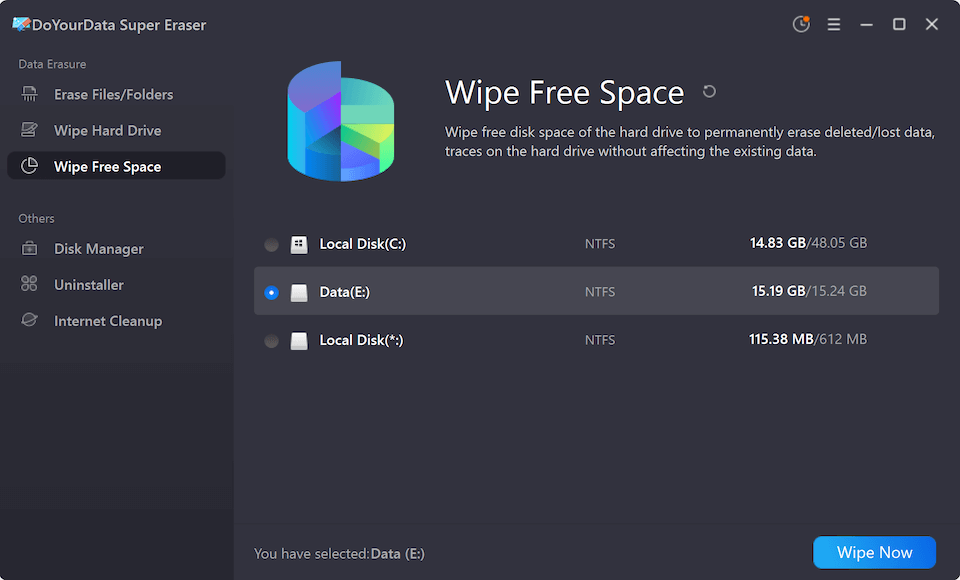
Select the hard drive where you install the programs, then click on Wipe Now button. Then DoYourData Super Eraser will permanently erase all deleted/lost data including the uninstalled programs on the hard drive.
With the two steps above, you can easily and permanently uninstall programs from your Windows PC, leaving no trace for data recovery.
Conclusion
Windows 11 have been launched recently, and it has collected great reviews from the public. The operating system offers you various new features and installs the Android app on your PC. Besides it, multiple programs and games have also been already installed in Windows. But, most people do not find these programs pretty helpful, thus searching for ways to uninstall them.
Therefore, here we have described all of those methods and approaches which would let you quickly delete the extra files or programs.
Before you sell, donate or dispose of your Windows 11 PC, you may need to uninstall some programs which contain sensitive information. DoYourData Super Eraser can help you securely and permanently uninstall programs from your Windows 11 PC to prevent data recovery. Try it.
Written & Updated by Jerena
Jerena is an senior editor of DoYourData. Since 2017, Jerena has written hundreds of articles about computer technology, Mac optimization, data recovery, data erasure, disk clone, hard drive fixes, NTFS for Mac, etc. She likes to help users to solve computer issues and recover lost data, etc.