The Complete Guide to Finding & Using the Right ASUS Disk Wipe Tool
With the most reliable and secure data wipe tool DoYourData Super Eraser, you can easily and permanently wipe data on ASUS and other computers. The software can ensure the wiped data is gone forever and no data recovery software can get it back.
 Updated by Shirly Chen on September 7, 2026
Quick Navigation:
- What Is an ASUS Computer Disk Wipe Tool?
- Method 1: Using native ASUS BIOS Secure Erase
- Method 2: Use the Best & Easiest Disk Wipe Tool
- Comparison: BIOS Secure Erase vs. Super Eraser
- FAQs about ASUS Computer Disk Wipe Tool
- MFinal Thoughts
Deciding to sell, donate, or repurpose your ASUS desktop or laptop is an exciting next step. However, before passing your device to a new owner, you face one non-negotiable task: permanently erasing all personal and sensitive files. Simply dragging files to the Recycle Bin or performing a basic drive format will not protect your personal privacy. To completely sanitize your hard drive or SSD, you need an effective ASUS computer disk wipe tool.
This comprehensive guide compares the leading methods for wiping an ASUS drive—ranging from native hardware tools to specialized data destruction software. By following this walkthrough, you will learn how to permanently destroy sensitive data, ensure compliance with privacy standards, and prepare your PC for its next user.
What Is an ASUS Computer Disk Wipe Tool?
An ASUS computer disk wipe tool is a dedicated software program or BIOS firmware utility engineered to permanently overwrite all stored data on a drive. When you delete a file in Windows, the system merely removes the file's index pointer while leaving the underlying binary code intact until overwritten by new data. Data recovery tools can easily extract these orphan files.
In contrast, professional disk sanitization utilities overwrite physical storage sectors with randomized bit patterns (zeroes and ones), often across multiple passes. This hardware-level overwrite permanently renders original data unrecoverable by any consumer or forensic recovery method.
Users generally choose between two primary methods to wipe an ASUS drive:
- Native Firmware / BIOS Tools: Built-in firmware utilities like ASUS Secure Erase or Media Sanitization embedded directly into the motherboard BIOS.
- Dedicated Data Erasure Software: Third-party applications such as DoYourData Super Eraser, which offer greater versatility, multi-drive compatibility, and automated workflows.
Essential Step: Back Up Your Data Before Wiping
CRITICAL WARNING: Data destruction executed via BIOS or software sanitization is absolute and irreversible. Always perform a full secondary backup of critical files prior to initializing any wipe tool.
Recommended Data Preservation Strategies:
- External Physical Backups: Transfer personal documents, financial files, and family media to an external USB hard drive.
- Cloud Storage Synchronization: Upload vital active project files to secure cloud platforms like Google Drive, Microsoft OneDrive, or Dropbox.
- Full System Imaging: Utilize native Windows Backup or disk cloning software to save an executable snapshot of your entire operating system.
Method 1: Using native ASUS BIOS Secure Erase
Modern ASUS motherboards and laptops feature a hardware-level utility built directly into UEFI BIOS known as ASUS Secure Erase (or Media Sanitization on newer models). This feature sends standard ATA/NVMe sanitize commands directly to solid-state drive controllers.
Step-by-Step Guide to BIOS Erasing:
- Access UEFI BIOS: Restart your computer and repeatedly tap the Delete or F2 key during startup.
- Navigate to Advanced Mode: If the BIOS opens in EZ Mode, press F7 to enter Advanced Mode.
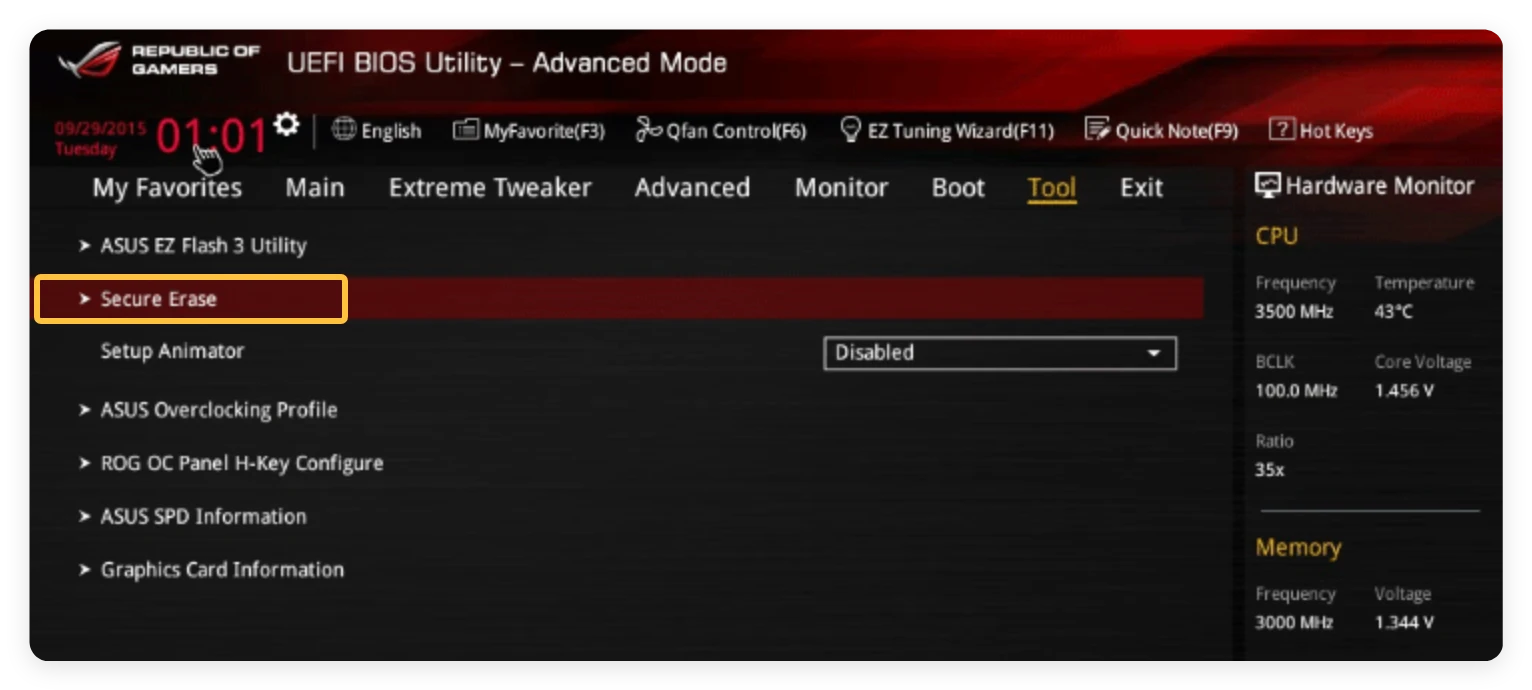
- Locate the Erasure Utility: Navigate to the Tool or Advanced tab and select Secure Erase (or Security > Media Sanitization).
![ASUS computer disk wipe tool]()
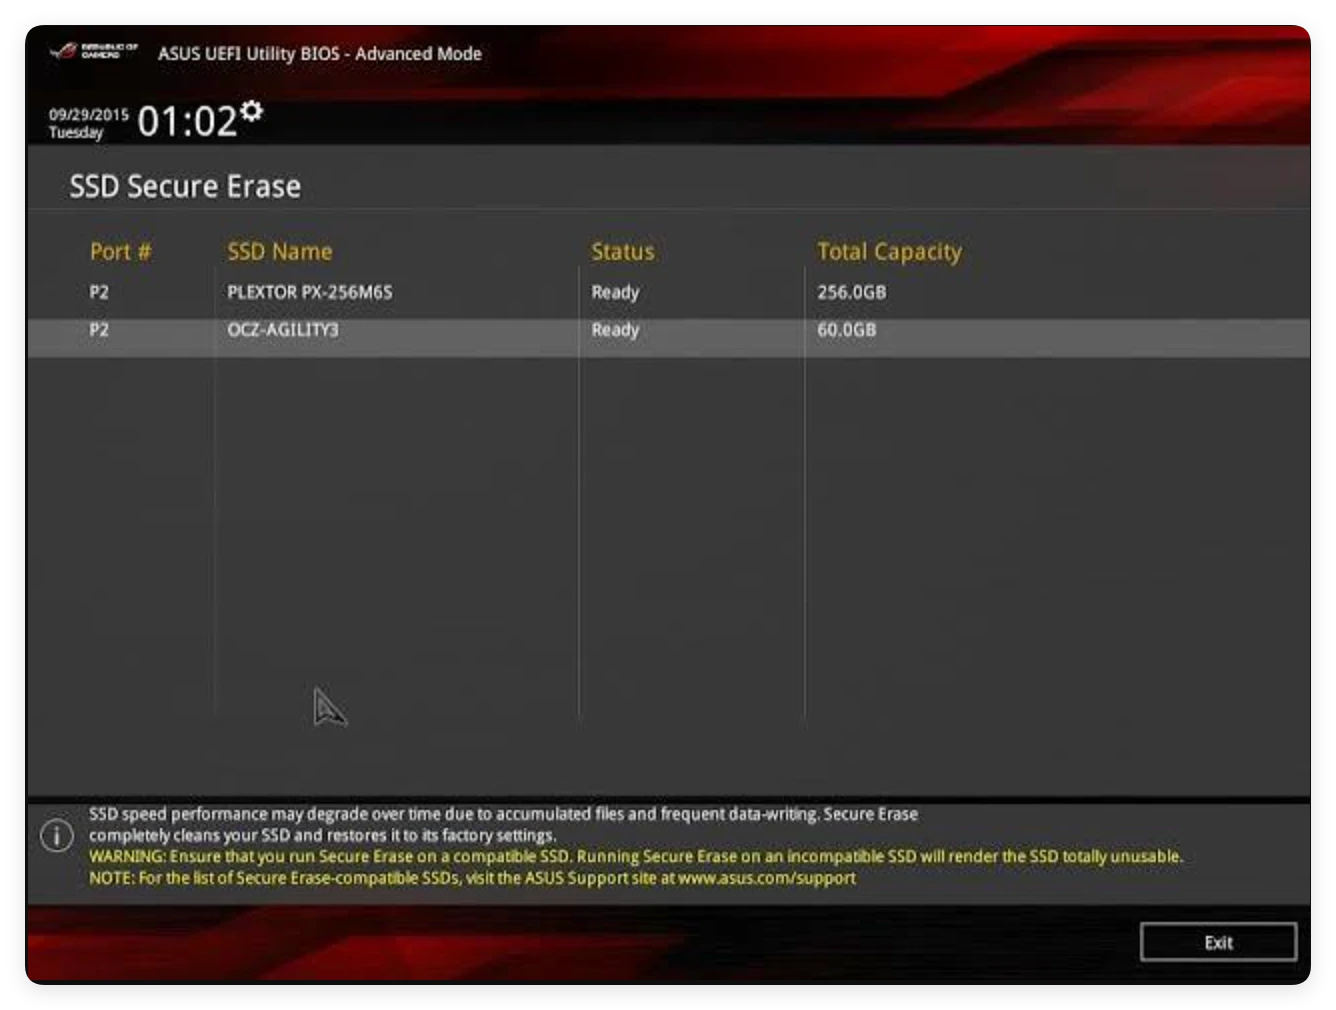
- Select the Target SSD: Choose the specific drive you wish to sanitize from the drive list.
![ASUS computer disk wipe tool]()
- Handle 'Frozen' Drive States: If your drive shows a 'Frozen' status, power-cycle the drive according to hardware prompts to release the security lock.
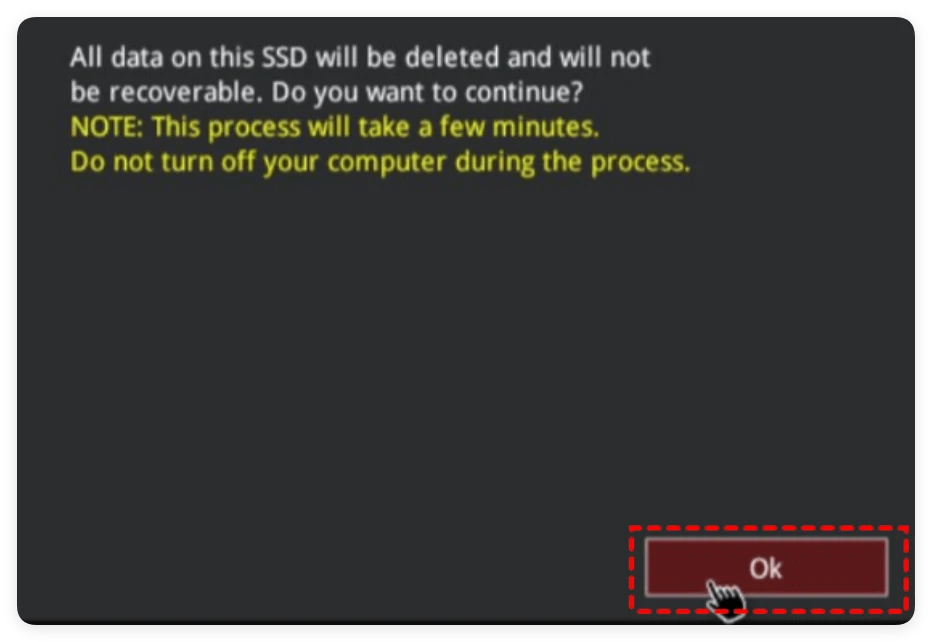
- Confirm Sanitization: Follow the remaining on-screen warnings to initiate the sanitization process.
![ASUS computer disk wipe tool]()
Limitations of the BIOS Method
While built-in BIOS tools are free and convenient, they present several operational challenges:
- Restricted Drive Compatibility: BIOS Secure Erase typically targets SSDs and NVMe drives; traditional Hard Disk Drives (HDDs) are rarely supported.
- RAID & Controller Locks: If SATA configuration is set to RAID or Intel VMD, the Secure Erase option may be hidden or completely disabled.
- Complex Operational Hurdles: A 'Frozen' drive state requires power-cycling or physical cable disconnection while powered on—a procedure that can intimidate non-technical users.
Method 2: Use the Best & Easiest Disk Wipe Tool
When BIOS configurations prove overly restrictive, third-party software offers an accessible, robust alternative. DoYourData Super Eraser is a premier solution recommended for users seeking zero-complexity data destruction across all drive types.
Key Advantages of DoYourData Super Eraser:
- Universal Compatibility: Works seamlessly across HDDs, SSDs, NVMe drives, USB flash drives, and external storage.
- Military-Grade Data Standards: Supports certified erasure protocols including DoD 5220.22-M, Peter Gutmann 35-pass algorithm, and HMG Infosec Standard 5.
- Flexible Sanitization Modes: Provides targeted file destruction, full volume wiping, and unallocated space cleanup.
How to Wipe Your ASUS Drive in 4 Steps:
Step 1: Download & Install: Download DoYourData Super Eraser from its official vendor website and install it on your PC.
DoYourData Super Eraser
- Shred files or wipe drive on ASUS and other computers.
- Permanently wipe data with certified erasure standards.
- Securely and easy to use data erasure software.
Step 2: Select Erasure Mode: Launch the application and select Wipe Hard Drive. Select the specific ASUS hard drive partition or external storage drive you wish to wipe.
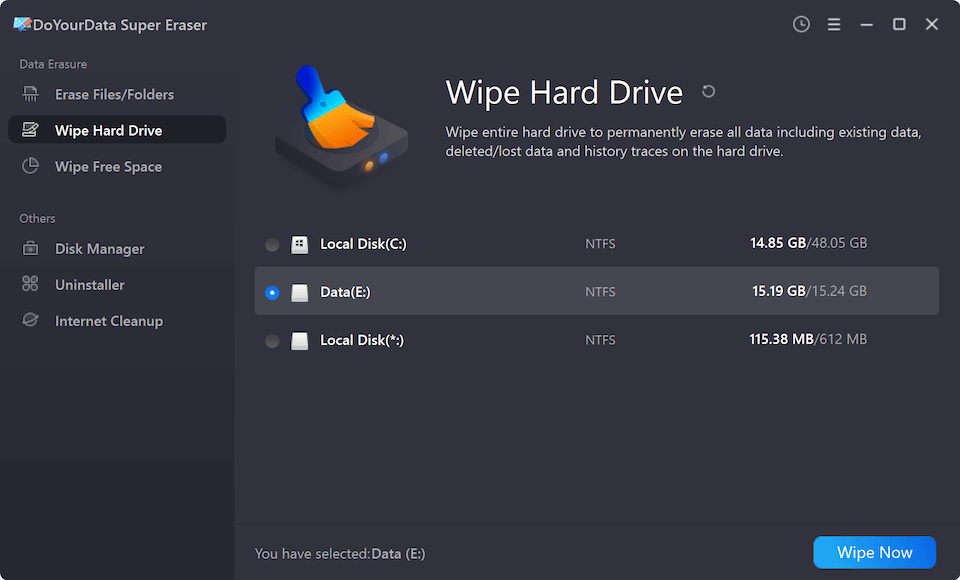
Step 3: Choose Data Wiping Method: Click Wipe Now button and then you can select a data wiping algorithm from the drop-down list. Please note that any algorithm can help you permanently wipe data.

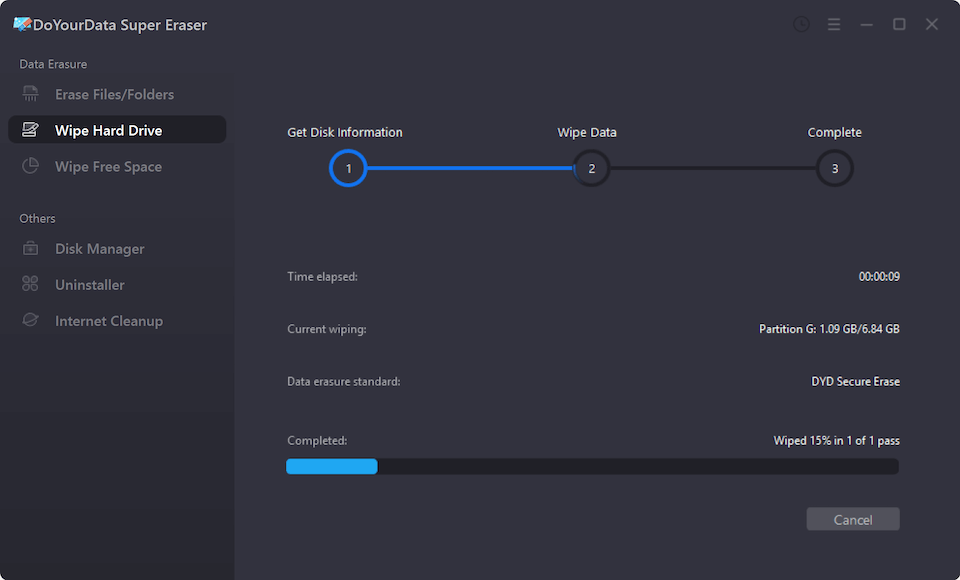
Step 4: Execute & Confirm: Click the Continue button and authorize the prompt. The software will begin permanently overwriting drive sectors.
Comparison: BIOS Secure Erase vs. Super Eraser
| Feature | ASUS BIOS Secure Erase | DoYourData Super Eraser |
|---|---|---|
| Supported Storage | SSDs & NVMe Drives Only | HDDs, SSDs, NVMe, USB, SD Cards |
| Ease of Use | Moderate to Advanced (BIOS dependent) | Beginner-Friendly (GUI Interface) |
| Handling Locked Drives | Requires manual hard reset / unfreeze | Automated sector-level bypass |
| Wiping Flexibility | Entire Drive Only | Files, Free Space, or Entire Drive |
| Compliance Standards | Standard ATA / NVMe Sanitize | DoD 5220.22-M, Gutmann, HMG Standard |
FAQs about ASUS Computer Disk Wipe Tool
Final Thoughts
Securing your digital privacy is essential when transitioning to a new computer or disposing of old hardware. While built-in ASUS BIOS tools offer effective hardware-level erasure for compatible SSDs, software solutions like DoYourData Super Eraser provide a reliable, versatile, and stress-free alternative for all drive types.
By following the steps outlined in this guide and ensuring a complete backup of your files, you can confidently wipe your ASUS computer drive and protect your privacy.
DoYourData Super Eraser
DoYourData Super Eraser, the award-winning data erasure software, offers certified data erasure standards including U.S. Army AR380-19, DoD 5220.22-M ECE to help you securely and permanently erase data from PC, Mac, HDD, SSD, USB drive, memory card or other device, make data be lost forever, unrecoverable!
Written & Updated by Shirly Chen
Shirly Chen has been writing data recovery, data erasure articles for DoYourData over 4 years. She has been working as a professional website content writer & editor for quite a long time. She also writes articles about disk clone, Mac optimization, disk backup, etc.