Recover deleted, formatted or corrupted data from hard drive or external device.
Free TrialStartup programs are applications that start automatically with Windows 11 without any user input. Such programs are usually not visible during startup but begin running in the background. They frequently have icons in your system tray.
Too many startup programs are harmful to your computer for two reasons. For starters, they will cause Windows to take longer to boot fully. Second, many background apps, beginning with Windows, use RAM and other system resources. As a result, the various methods for disabling unnecessary startup programs in Windows 11. Otherwise, if you want to enable startup apps in Windows 11, you can use any of the methods listed below.
What is Startup App in Windows 11?
A startup App is a program or application that runs automatically after the Windows 11 system boots up. These can be background services or applications.
The startup app option allows users to quickly begin using applications without having to launch them each time they log in or turn on their Windows 11 PC. This speeds up and increases user productivity.
The best example of a startup app in Windows 11 is the Windows 11 chat or Microsoft Teams application. When you turn on your laptop or Windows 11 device, these applications will be launched automatically.
How to enable apps at startup on Windows 11
Enable Startup Apps using Task Manager
Let’s look at how to use Task Manager to enable an app at startup in Windows 11.
Open Task Manager in the more details views by right-clicking on the Start button. Navigate to the Startup tab.
Likewise, to run the app at startup. Choose an app to enable and press the Enable button.
Close Task Manager once you’ve finished.

Add apps to the Startup folder
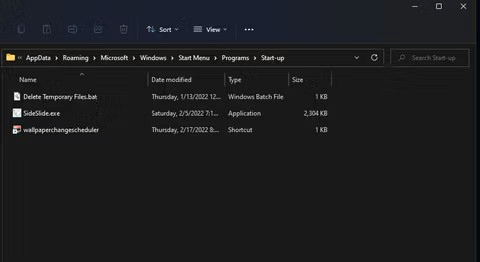
To add an app to the startup, place its shortcut in the Startup folder. The folder can be found at the following address:
C:\Users\Your user name\AppData\Roaming\Microsoft\Windows\Start Menu\Programs\Startup.
Carry out the following actions.
Enter shell: startup into the Run box by pressing Win + R. The Startup folder will be opened for you by this shell command.
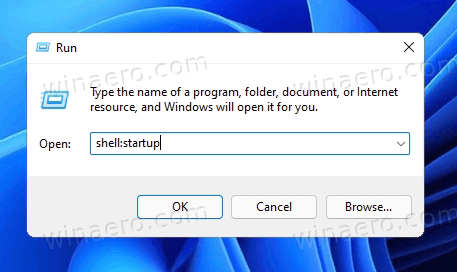
To start an app with Windows 11, copy its shortcut to this location.
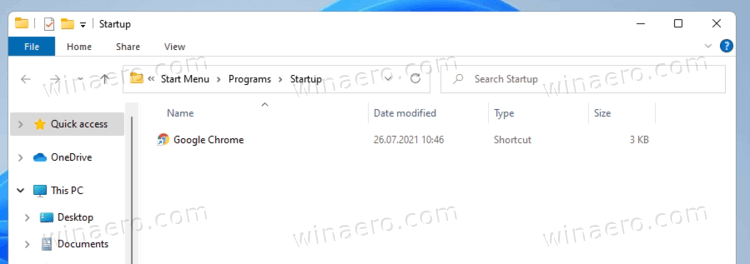
Additionally, you can drag and drop an executable file while holding down the Alt key. This will make a new shortcut to your executable file.
That is how shortcuts are added to the Startup folder.
Add Startup Apps in Windows 11 Registry
Open the Registry Editor app by pressing Win + R and typing Regedit.
Navigate to the following key:
HKEY_CURRENT_USER\Software\Microsoft\Windows\CurrentVersion\Run
There you will find existing startup items (if any) for the current user. Select New - > String value from the left pane by right-clicking.
Set its name to the name of the app you want to include in the startup, for example, “Notepad.”
Set its value data to the full path of the application you want to load when the computer boots.
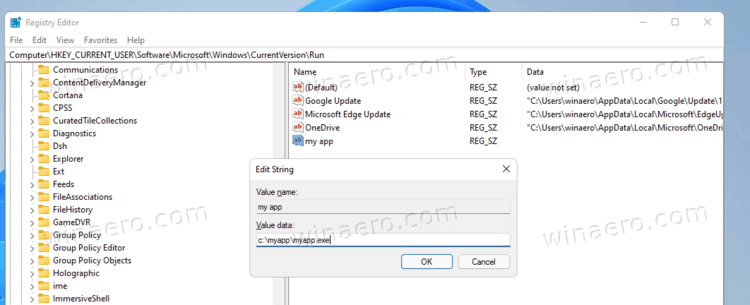
Repeat steps 3-5 for each app you want to have Windows launch automatically. The specified apps will be loaded automatically the next time you turn on the computer.
How to disable apps at startup on Windows 11
Disable Startup Programs With Task Manager
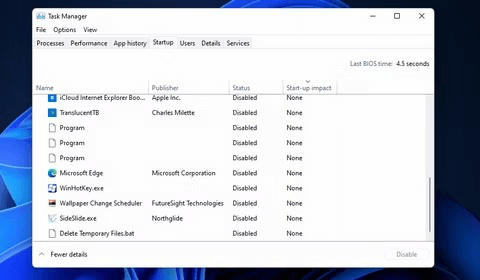
Task Manager is the primary startup manager and system monitoring tool in Windows 11. As a result, that is possibly the most prominent tool for disabling non-essential startup software in Windows 11. This is how you use Task Manager to remove startup programs.
Enter the Win + X key combination.
From the Power User menu, select Task Manager.
Then, as shown in the screenshot below, click the Startup tab.
To disable an enabled startup item, select it.
Select the Disable option.
Disable Startup Programs With Settings
The Settings app in Windows 11 includes an alternative startup manager to Task Manager. This is how you toggle listed startup programs on/off in the Settings Apps tab.
Press the Win + I keys at the same time.
On the left side of Settings, select Apps.
Select the option for Startup navigation.
Toggle the toggle switches for any startup apps that are enabled.

Disable Startup Programs From the Startup Folder
Windows includes a startup folder that contains shortcuts to startup programs. You can manually add software to the Windows startup in that folder. There won't be much in the way of startup items unless you've added something. Some apps, however, may continue to add their shortcuts there. You can see if there are any startup items in that folder by doing the following.
With Win + R, open the Run app.
In Run, type shell: startup and press OK.
With the cursor, select anything in that folder.
On Explorer’s command bar, click the Delete button.
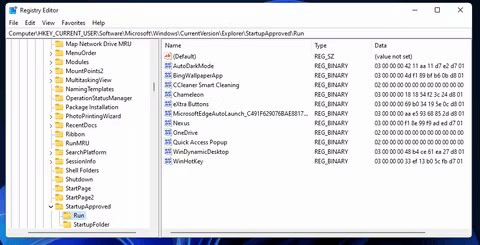
Disable Startup Programs With Registry Editor
You can also disable startup programs by removing their registry entries. However, before deleting such binary and string values, we recommend you back up the registry (or create a restore point). The Registry Editor can remove unnecessary software from a current user's startup, as shown below.
In the Start menu's search box, type Regedit.
For the Registry Editor search result, click Run as administrator.
Next, input: Computer\HKEY_LOCAL_MACHINE\SOFTWARE\Microsoft\Windows\CurrentVersion\Run in the Registry Editor’s address bar and press Enter.
To select it, press the Run key.
Select Delete from the context menu when you right-click a REG SZ string value for a startup item.

To delete the startup item’s registry entry, select Yes.
Other registry keys include startup items. Open this registry key to find more: Computer\HKEY_CURRENT_USER\SOFTWARE\Microsoft\Windows\CurrentVersion\Explorer\StartupApproved\Run.
To remove startup software entries from the Run key, right-click the REG BINARY values and select Delete.
Manage Your PC’s Startup in Windows 11
Startup programs are applications that are launched automatically when your computer boots up. Some applications on startup programs are valuable and necessary for the system to run correctly. Some, however, are unusual in that they lengthen boot time and slow down the PC.
Surprisingly, you have complete control over the Startup programs, which means you can add or remove them as you see fit. You can enable or disable startup programs using the Task Manager Startup option in Windows Settings.
This section describes the Startup folder and how to add programs. That's it. Thank you for sticking with me until the end. I hope you enjoyed the article.
DoYourData Products
Written & Updated by Ricky Lin
Ricky Lin is an senior editor of DoYourData who lives in Adelaide, Australia. He is interested in writing technology articles related with data recovery, computer issue fixes, disk clone, iPhone data recovery, video edit, Mac optimization, etc. He Joined DoYourData in 2019 and have written 500+ articles to help both Windows users and Mac users to solve data or computer problems.