Three Methods to Securely Erase Data on Mac - 100% Effective
When you need to remove some private or confidential files on Mac, it's not safe if you only delete them and empty the Trash. With data recovery software, it's easy to recover the removed files. To avoid data leakage, it's necessary to wipe the sensitive data permanently with reliable methods and software. You can use the macOS tools to secure erase data from drive or using professional data wiping tool to permanently wipe data from the drive on Mac.
![]() Updated by Shirly Chen on April 3, 2025
Updated by Shirly Chen on April 3, 2025
Quick Navigation:
- #1 How to remove Mac files permanently with a disk utility method
- #2 Method to permanently delete files on Mac OS with the terminal command
- #3 Method to permanently delete files on Mac with Data Eraser
- Conclusion
In the Mac system, there is nothing like a collection of files instead you are given the option to erase files. The difference between erasing and deleting the files is that the actual file and data remain on the Mac hard drive unless overwritten. However, the overall working of the Mac file eraser is similar to that of the file deletion function in Windows.
So if you want to permanently delete data from a Mac hard drive you have to understand the process of overwriting which will help in securing our data by complying with the eraser standard such as the DoD 5220.22-M, Peter Gutmann's algorithm, etc.
Various methods help you in securing your data by raising it and deleting all of its related information permanently. The most commonly used methods are.
- Disk Utility method
- Terminal command method
- Using a secure file eraser tool
Please note that after securely erase the data from Mac, the data is no longer recoverable in any way. If necessary, back up the important files to another place before wiping the data on Mac.
Let's proceed with these methods one by one and see how they can help in the deletion of Mac files permanently.
#1 How to remove Mac files permanently with a disk utility method
The first method we are introducing here is using Disk Utility. The tool is a free and macOS built-in disk management tool. With this app, you can also wipe data from a hard drive on Mac. Here are the steps:
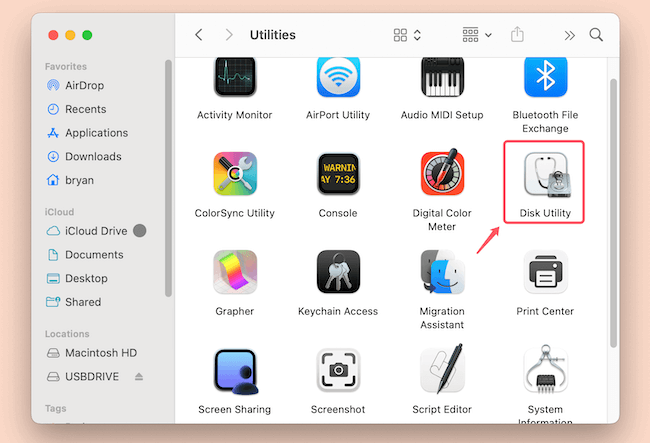
Step 1. Open the Applications folder in Finder, you will see various options. Go to the Utilities folder and open the Disk Utility.
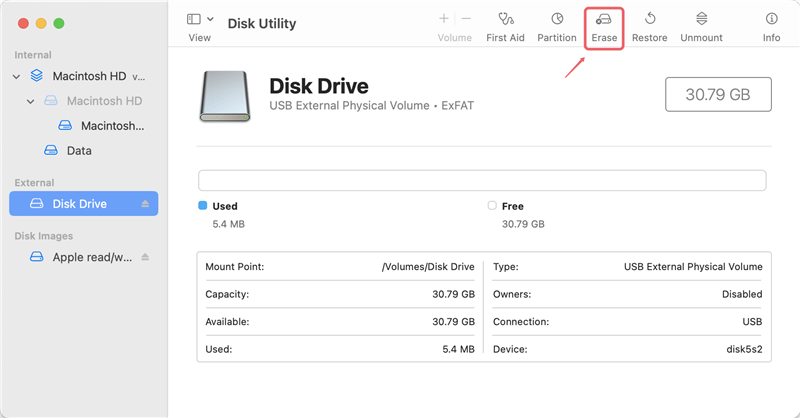
Step 2. Here you will see the option of adding the volume of the file that you want to erase permanently. Choose the hard drive volume that you want to remove. After adding the volume of the required file, look for the Erase option on the top.
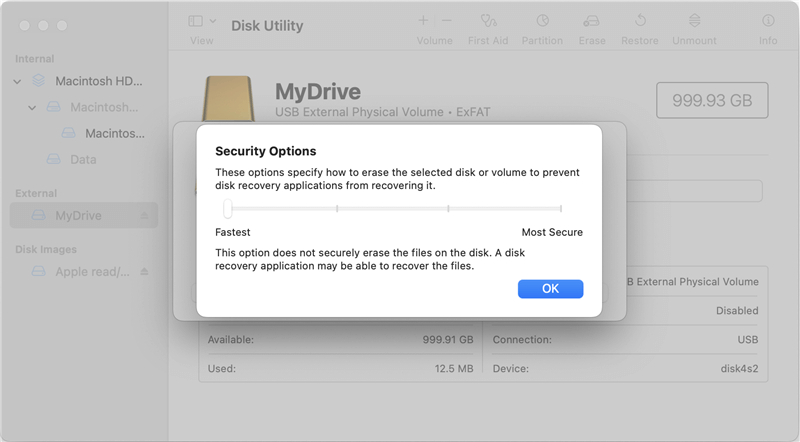
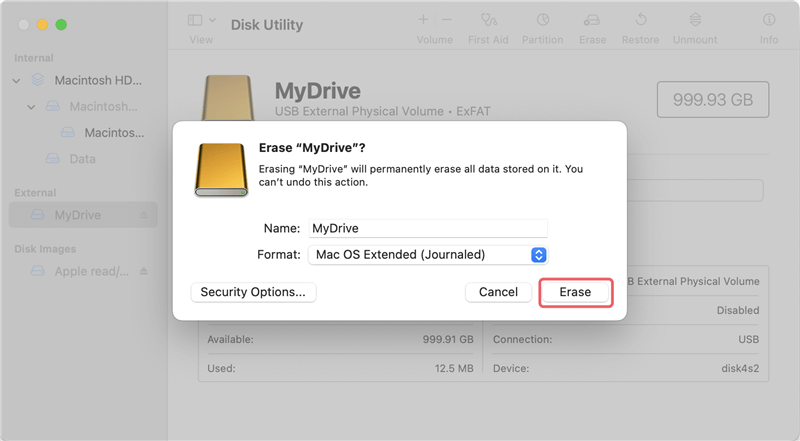
Step 3. Now you will be asked to fill the blanks in which you have to enter Volume, Name, Format, and Security options. You can first select the file system.
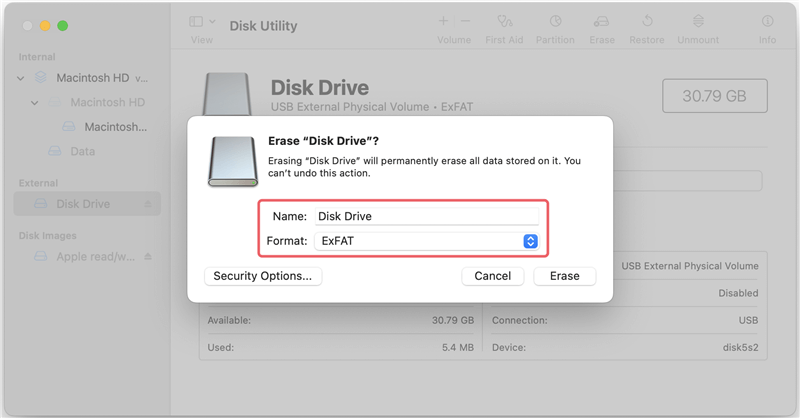
Step 4. While choosing the security option, make sure to choose the most secure one because it removes every bit of information from your Mac hard drive and ensures the maximum safety and security of your data.
Step 5. Confirm the settings and click on the Erase button at last. The drive will be formatted and all the data on the drive will be wiped permanently.
#2 Method to permanently delete files on Mac OS with the terminal command
Before proceeding with the terminal command method, you should remember that it does not require you to remove a particular hard drive volume, instead, it removes the entire disc. So this matter is particularly helpful if you want to increase the storage space on the Mac hard drive.
Let's proceed with the particle steps.
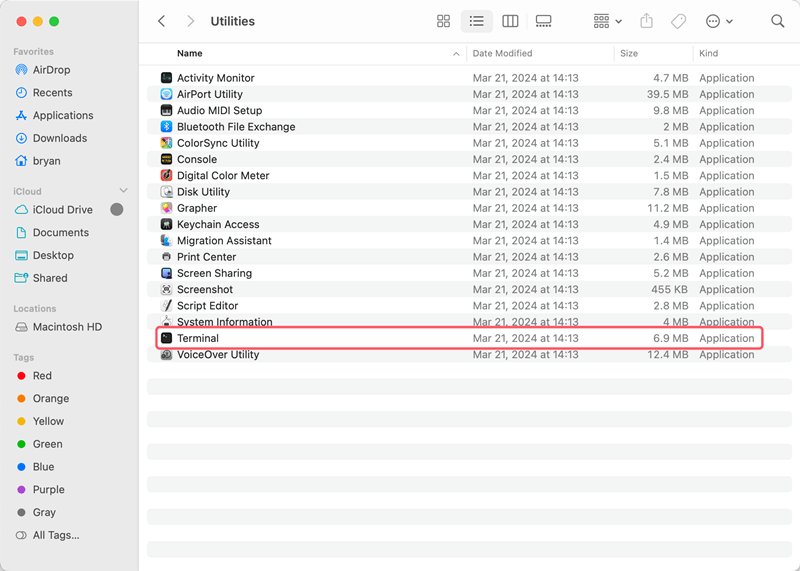
Step 1. Go to the Mac Applications and open the Utilities option. In the utilities, find the Terminal app.
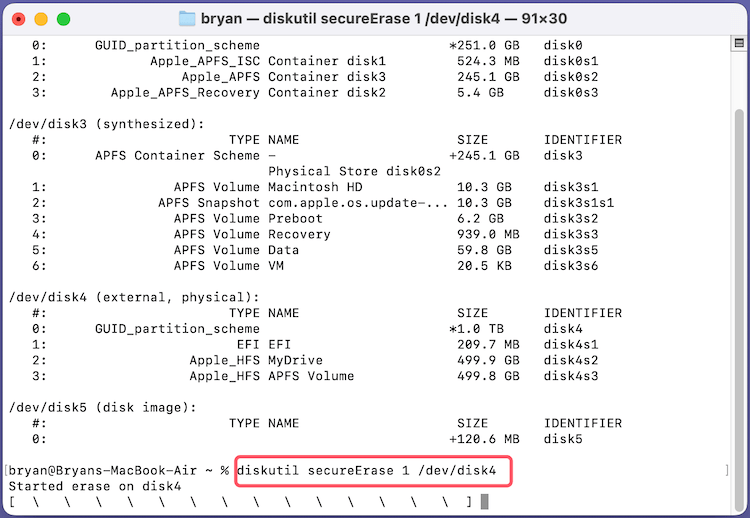
Step 2. Type diskutil list. This is a command that connects the hard disk and the volumes. So by inputting this command, the volume will automatically be connected with the hard disk. The command will appear on the screen that you have to copy or type in the required box.
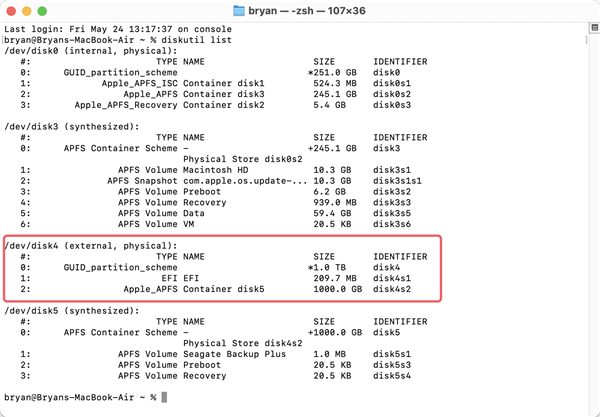
Step 3. In the terminal app, you will also see the option to add another command. In this step, you have to type diskutil secureErase 2 /dev/diskX which is another command.
Replace X with a hard disk number. Also, you can change 2 to 0, 1, 3, 4.
Here's how you can proceed with the removal of files from the Mac hard drive using the terminal command.
With the methods provided by macOS built-in tools, it's not flexible enough. For example, you cannot use the tools to wipe certain files/folders. These methods can only erase an entire hard drive. If you want to wipe data with more options in any case, you may have to look for a third-party data erasure software.
Now let's have a look at the simplest and the security method of removing the files from the Mac hard drive.
#3 Method to permanently delete files on Mac with Data Eraser
The two methods above can help you erase data on Mac, but it can not remove all traces permanently. With data recovery software, you still can recover partial erased data. If you want to permanently erase data on Mac and 100% avoid data recovery, you can try data erasure software, such as - DoYourData Super Eraser for Mac.
Now let's see how to remove and permanently delete files on a Mac hard drive in simple and easy steps.
Step 1. Download, install and launch the DoYourData Super Eraser for Mac on your Mac. It is fully compatible all macOS and OS X versions.
DoYourData Super Eraser for Mac
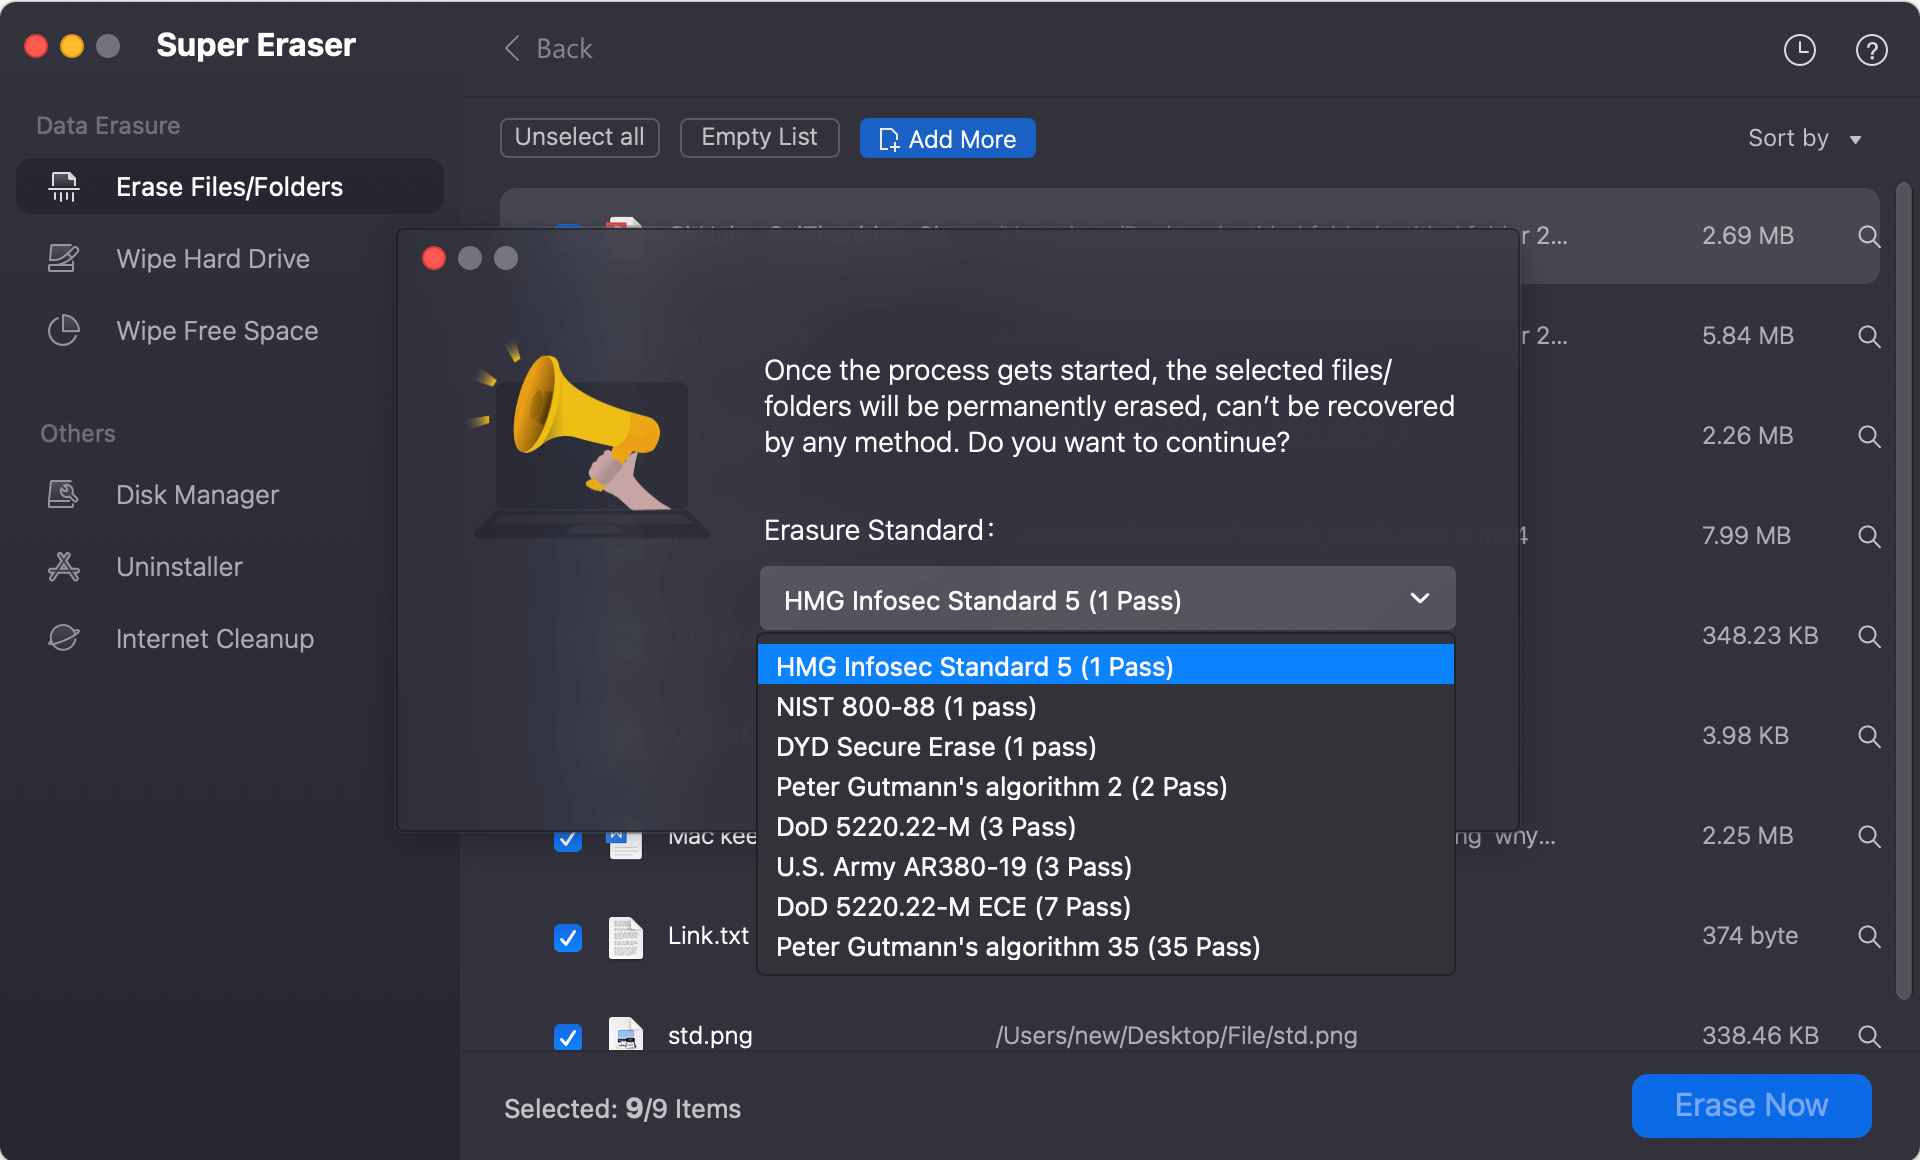
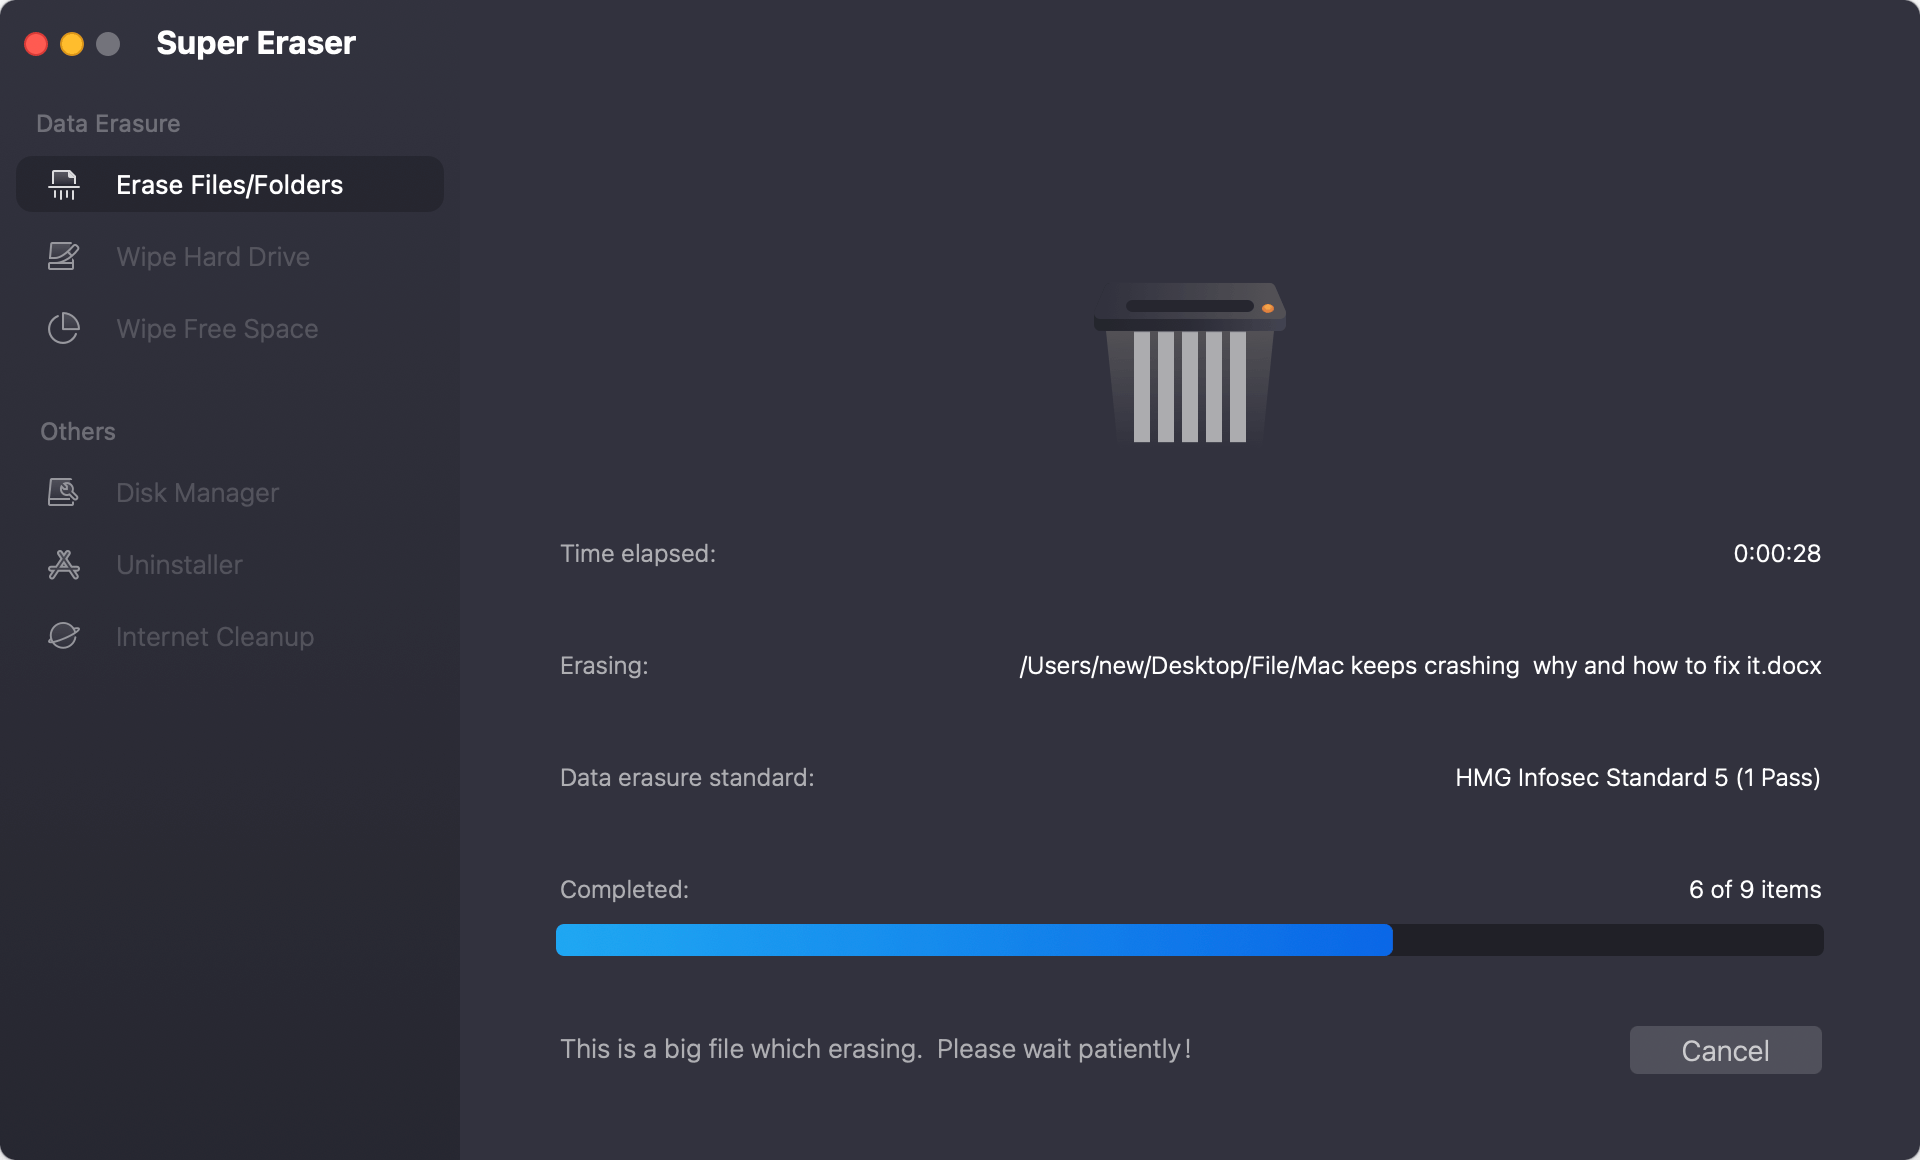
- Data erasure standards: HMG Infosec Standard 5 (1 pass), Peter Gutmann's algorithm 2 (2 passes), U.S. Army AR380-19 (3 passes), DoD 5220.22-M ECE (7 passes), Peter Gutmann's algorithm 35 (35 passes).
- Permanently erase data from any type of HDD, SSD, USB drive, memory card, digital camera, etc.
- Erase data on Apple Silicon chip Mac, T1/T2 chip Mac.
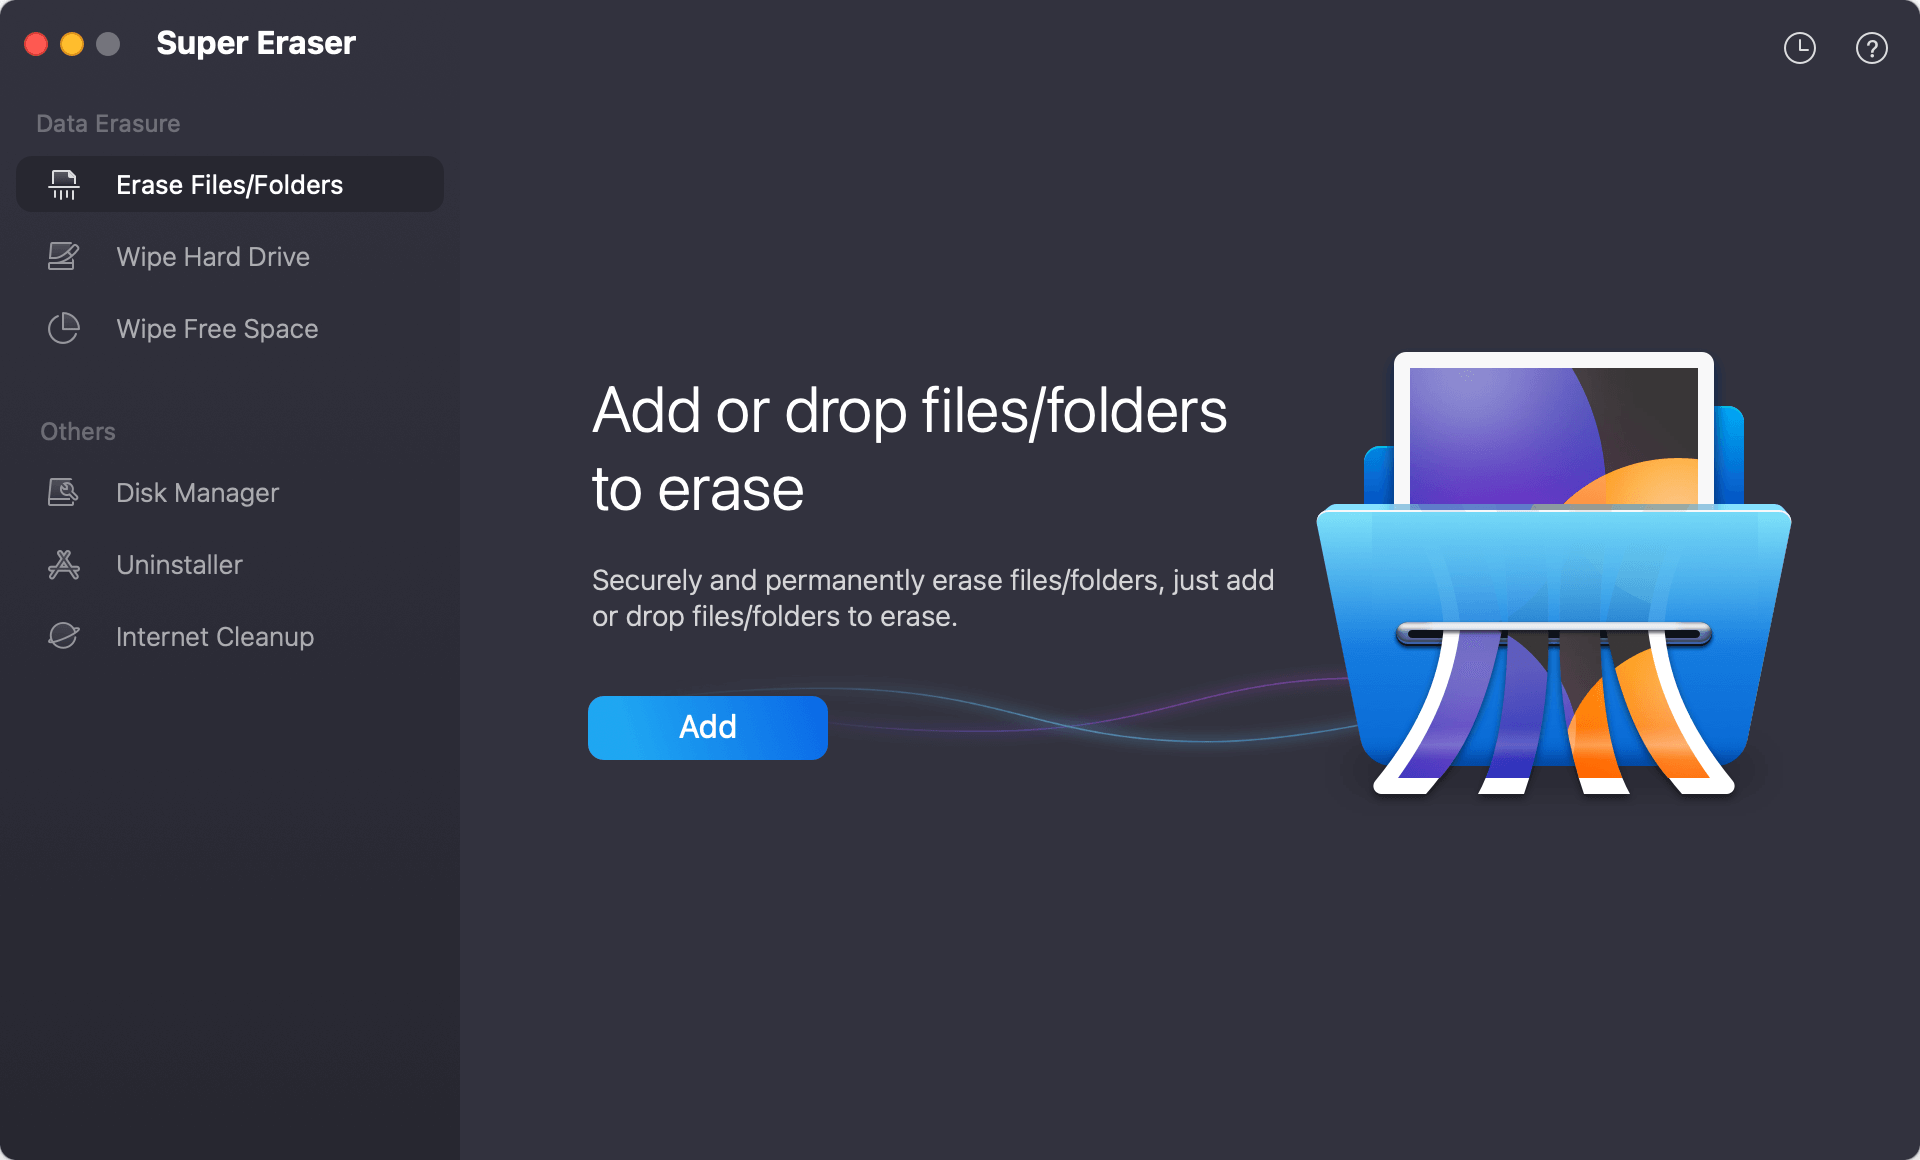
Step 2. Open DoYourData Super Eraser on your Mac, you will see three data erasure modes, just choose a right mode to help you securely and permanently erase your data.
- Mode 1 Erase Files/Folders - selectively shred files and folders on Mac.
- Mode 2 Wipe Hard Drive - wipe all data from a hard drive on Mac.
- Mode 3 Wipe Free Space - wipe free disk space of the hard drive and permanently erase the deleted/lost files on Mac.
Here we will show you how to erase specified files/folders with the software by using Erase Files/Folder mode.
Step 3. Click Add button to select the files or folders you want to shred. Or you can just drag the files or folders to the software interface to add them.
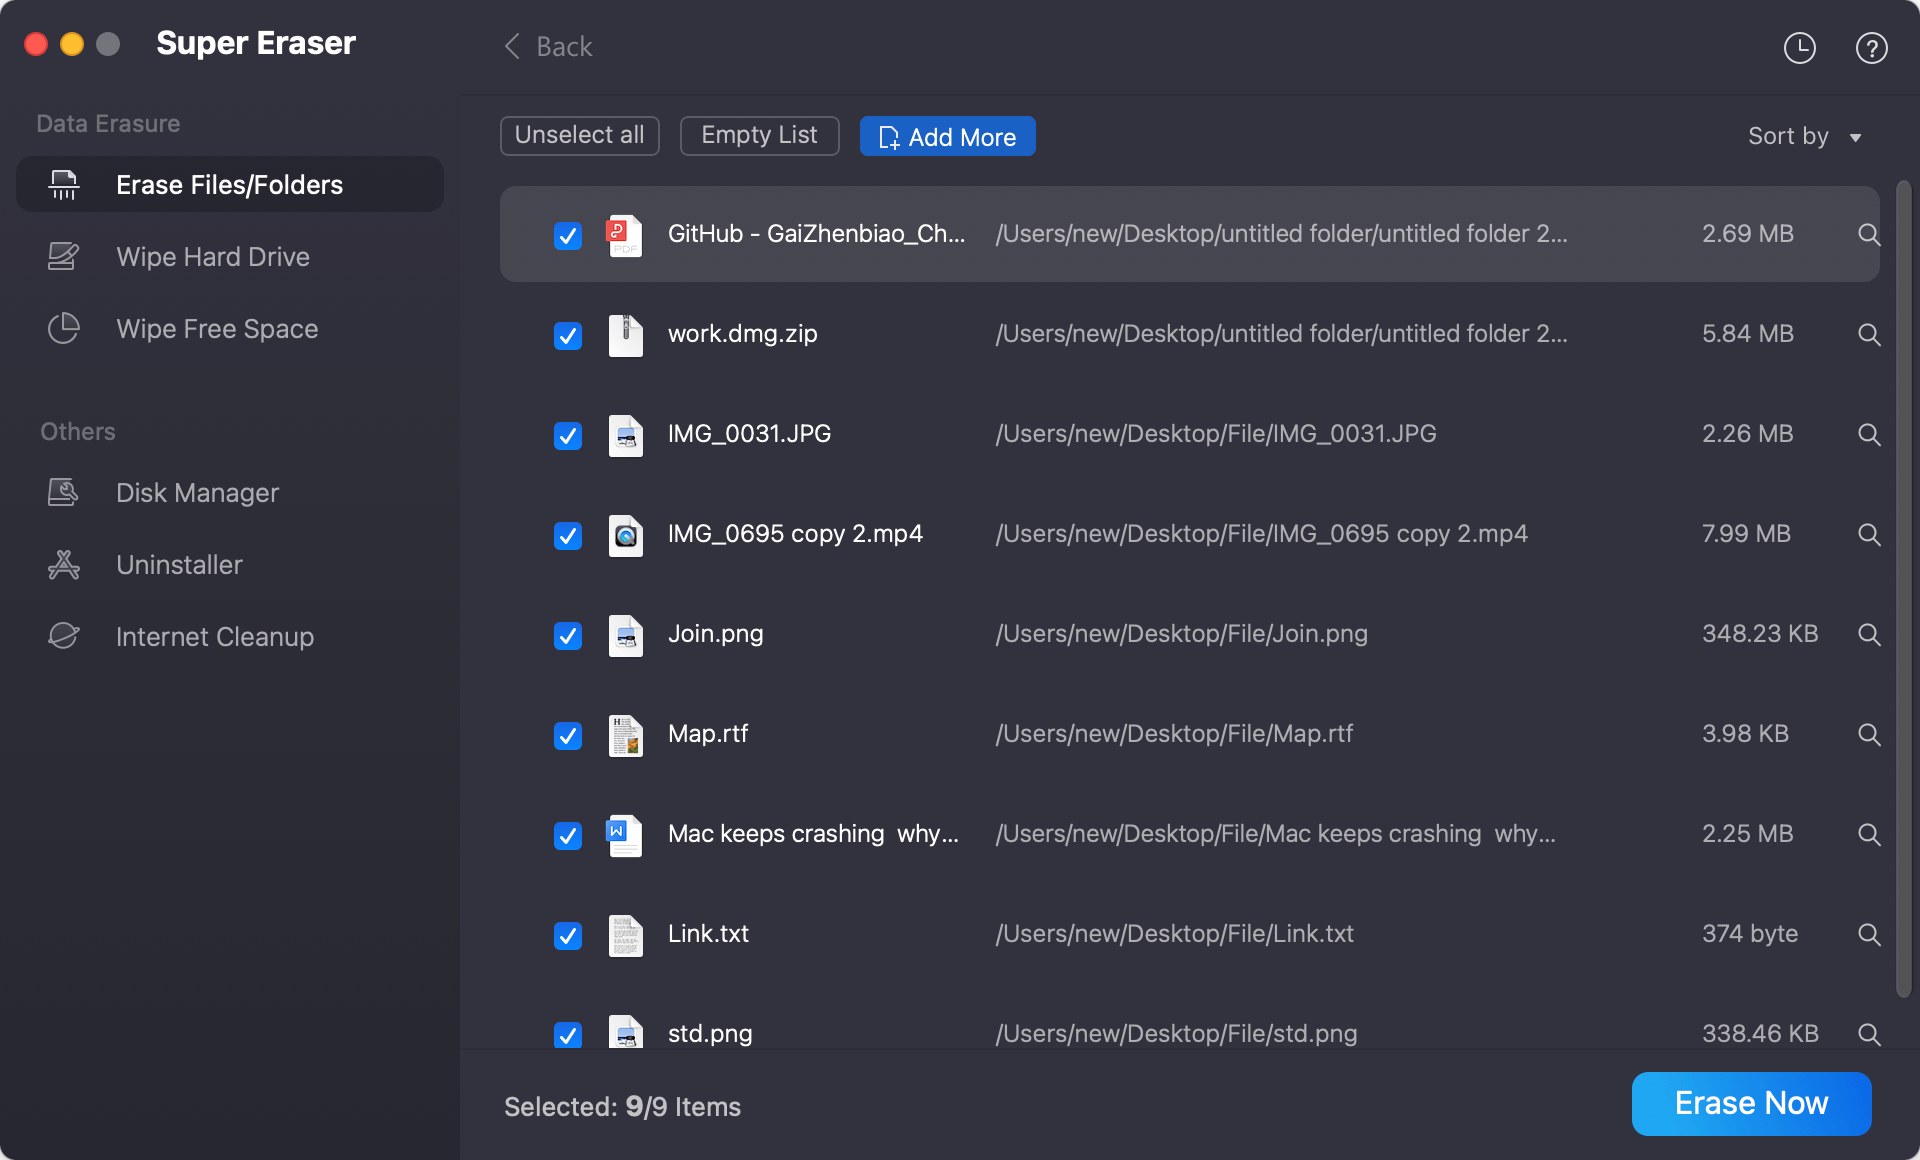
Step 4. After selecting the files or folders you want to erase, then click on Erase Now button. You will need to select a data erasure standard to wipe the files permanently.
Step 5. At last, start the data wiping process. It will take a while depending on the size of the files/folder you selected. Once it's done, all the selected files are gone forever from your drive.
This method will successfully and permanently remove all the sensitive information including confidential data such as card details, browsing history, saved passwords, and all that.
With the other 2 modes in the software, you can also use the software to wipe an entire hard drive with all the data. If you will resell or donate a drive, it's necessary to wipe the drive first. Also, if you have deleted some files and want to ensure the deleted files will not be recovered, you can use the software to wipe the free space of the drive. After wiping the free space of the drive, all the deleted or old missing data on the drive will be gone for good.
Please note that once your data is erased by DoYourData Super Eraser for Mac , your data will be gone forever, can't be recovered by any data recovery software.
Conclusion
Mac has inbuilt erasing systems that enable the users to proceed with the deletion of files on Mac. However, most of the inbuilt methods of the Mac system do not provide permanent erasing solutions and the files may be recovered using third-party software systems.
It is due to this reason you should also consider taking the help of a secure file eraser tool that will allow you to destroy all the individual files permanently.
So it is particularly important to go for a safe and secure third-party file erasing tool when you are super concerned about the removal of the sensitive information and want to erase it beyond the scope of recovery.
DoYourData Super Eraser for Mac
DoYourData Super Eraser for Mac is a 100% safe, powerful and easy-to-use data erasure program. It offers certified data erasure standards including Peter Gutmann, U.S. Army AR380-19, DoD 5220.22-M ECE to permanently erase data from Macs and external devices, making data recovery be impossible.
Written & Updated by Shirly Chen
Shirly Chen has been writing data recovery, data erasure articles for DoYourData over 4 years. She has been working as a professional website content writer & editor for quite a long time. She also writes articles about disk clone, Mac optimization, disk backup, etc.