The reliable Mac data recovery software to recover deleted or lost files.
Free TrialYou may wirelessly share various files to a nearby Mac, iPhone, iPad, or iPod touch via AirDrop, including websites, documents, images, videos, and more.
How does AirDrop work?
Transferring files is AirDrop’s sole function. It operates over WiFi and Bluetooth, locating nearby devices capable of receiving file transfers.
You can decide whether to accept files only from people on your contacts list or from everyone. Additionally, you can choose to have AirDrop block all incoming file transfers. However, doing so will also make your device invisible to other users, meaning that you won't be able to send any files.
AirDrop for the Mac entered a new era with OS X Yosemite. AirDrop for Mac and iOS could not communicate with one another before this release of OS X (now macOS). This made file transfers between a Mac and an iPhone or iPad challenging; now that both platforms work well together, this issue is resolved.
Where is AirDrop on Mac and iPhone?
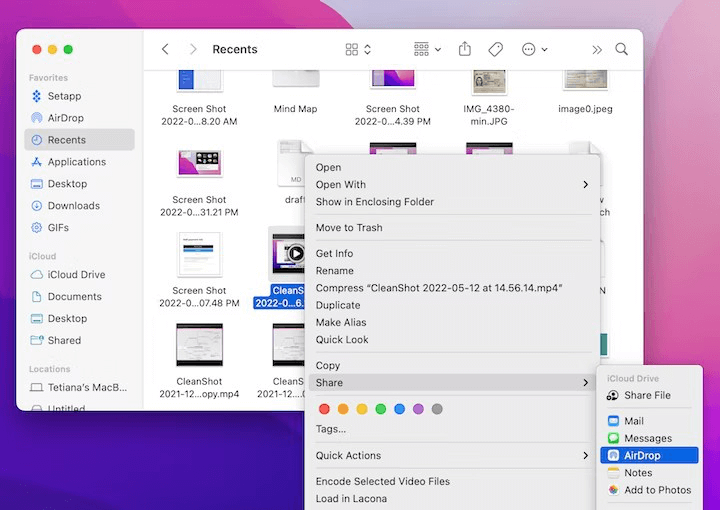
Naturally, a lot of users ask this question, but it's difficult to respond because AirDrop isn't a stand-alone app. When sharing a file with AirDrop, you have to right-click on the file or folder and select AirDrop from the share sheet. There will be a list of available devices to share with.
How to turn on AirDrop on Mac?
Although it might not be compatible with other devices, Apple devices natively support AirDrop. Let’s concentrate on enabling AirDrop on a Mac.
Apple doesn't display AirDrop well on the Mac, even though it is a pretty straightforward and powerful sharing solution. How to enable AirDrop on a Mac is as follows:
Choose “AirDrop” from the Favorites list on the window’s left side.
Select the discoverability option that is most appropriate for you at the bottom of the window once AirDrop is launched on a Mac.
Any Apple device nearby can send you files if you choose “Everyone” from the list. When in public, keep this in mind.
Activate Airdrop Mac.
AirDrop poses a security issue because it enables anyone to send files to your Mac, iPhone, or iPad. It might get onto your device without your knowledge if someone provided you with a file or link that contained malware.
How to Use AirDrop to Send Files From Your Mac?
Once AirDrop is enabled, you can begin sending files using it. You can accomplish this via the share sheet, the context menu, or the drag-and-drop approach.
Select the “AirDrop” option from the Finder window’s sidebar to use AirDrop on a Mac through drag and drop.
Watch for a list of AirDrop users within Bluetooth range of your Mac to appear.
Navigate to the file’s location that you want to share.
Drag the files you want to send to the window’s recipient image. Press “Send.”
Send items using AirDrop
You may send items using AirDrop on your Mac from the Finder, the desktop, or from applications like Safari or Maps.
From a Finder window or the desktop: To send something, control-click it, select Share > AirDrop from the shortcut menu, then pick the recipient device.
The Finder says: Drag the item to the device you want to transfer it to after selecting AirDrop in the Finder pane.
When using an app, select AirDrop from the Share menu in the toolbar, then choose the recipient device.
Receive items using AirDrop
You have the option to accept or save items that are sent to you via AirDrop on your Mac.
If you're signed into iCloud on both devices with the same Apple ID and transfer something from one to the further (for instance, from your iPhone to your Mac), the item is instantly accepted and saved.
Select an option by clicking the Accept pop-up menu in the AirDrop notice on your Mac.
Please find the file by checking your Downloads folder or the app where you saved it.
Ensure your Mac is configured to accept AirDrop deliveries if someone wants to send you a file but can't see it.
Allow others to send items to your Mac using AirDrop
To open a Finder window on your Mac, click the Finder icon in the Dock.
Click AirDrop in the Finder sidebar to begin.
Select an option by clicking the “Allow me to be discovered by” pop-up menu in the AirDrop window.
Where do AirDrop files go on Mac?
Unlike on an iPhone or an iPad, where they would automatically appear in the appropriate app, all files delivered to a Mac via AirDrop land in the Downloads folder. You might still wish to relocate the pictures you send this way to Photos and other places because of this.
Why is my Mac not showing up on AirDrop?
As with many technological innovations, AirDrop isn't always faultless. Here are a few potential causes for your Mac not to appear on AirDrop, as well as possible solutions.
Bluetooth or Wi-Fi aren't enabled on either your Mac or your iPhone
Bluetooth is used by AirDrop to find nearby devices, and Wi-Fi is used to transfer data. On your Mac, click the Bluetooth icon at the top of the screen to confirm that both are turned on. To turn Bluetooth on, click. Now select the Wi-Fi network you want to join by clicking the Wi-Fi icon at the top of the screen. Check the Control Panel on your iPhone to see if Bluetooth and Wi-Fi are turned on.
Your Mac is not discoverable in AirDrop
As mentioned above, confirm that your Mac is set to let your contacts or anyone find it.
Your Mac is asleep
In order for your Mac display to appear in AirDrop, it must be in use. Press any key to bring up your computer.
Conclusion
Using AirDrop, you may share a wide range of files, including websites, audio files, documents, map locations, photos, and videos. There is no file size restriction while utilizing AirDrop; however, be aware that lengthy transfers may take several minutes to finish.
Hopefully, after reading this comprehensive manual, you now completely understand how to utilize AirDrop on a Mac.
DoYourData Products
DoYourData Super Eraser for Mac
Permanently shred files or wipe hard drive to prevent data recovery on Mac.
Free TrialClone HDD, SSD, Mac OS, external disk, USB drive, and more under Mac OS.
Free TrialWritten & Updated by Justin Kenny
Justin Kenny is a writer & editor of DoYourData. He joined DoYourData in 2016 and focuses on writing articles about Windows data recovery, Mac data recovery, external device data recovery, hard drive clone, data erasure, Mac cleanup, computer issue fixes, etc. He is a super fan of Apple devices and is big on testing new digital device and system utility software.