When you attempt to save data to your USB flash storage, an error message appears. The notice saying the disk is "write-protected" appears whenever you try to save anything. Why is this the case?
There isn't even a choice to enable or disable write protection on the disk, preventing you from formatting it. Puzzled? This guide will show you how to re-use a write-protected USB flash disk.
What Does It Mean When A USB Drive Is "Write Protected"?
Write protection on USB devices or SD cards is a useful feature that aims to prevent unintentional file deletion and prevent suspicious data, such as malware and unauthorized sources, from being written to the device.
These days, many people utilize external data storage devices since they are small, light, and convenient to transport. It becomes read-only when a USB drive is write-protected. This means that any attempt to add or update data on that drive will be blocked. Writing activities, including adding or creating a new file, editing or deleting existing data, deleting files that already exist, formatting the current USB drive, etc., are all prohibited by this feature.
Another rationale for just granting reading access to a storage device is to restrict the transfer of data contained on the disk. You'll receive an error notice if you attempt to write data to such a disk. "The disk is protected from being written to." Use a different drive or disable the write protection.
Remove USB Drive Protection
It's possible to remove write protection from USB, pen drives, etc., by following these methods in this section:
Solution 1: Turn Off The Protection Switch
USB flash drives and pen drives are write-protected if you've already activated their Lock feature. It signifies that you are unable to reformat or make any other modifications to the device. USB write-protection may be unlocked by following these steps:
Locate the USB or pen drive's hardware switch.
Change the switch's state from ON to OFF.
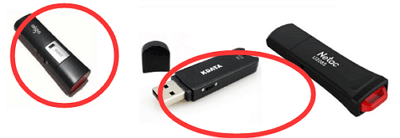
Now that the USB is connected to your PC, you have the option to re-access or reformat the storage device.
Solution 2: Using Cmd Diskpart
To delete the protection attribute property associated with the flash drive, you may use the command diskpart. Proceed by following the command line here.
When everything else fails, use the following command.
list disk
select disk *. It is necessary to replace * with your USB drive letter.
attributes disk clear readonly
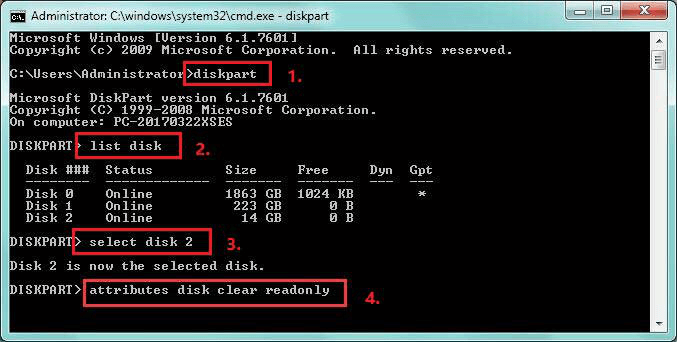
clean
create partition primary
format fs=fat32 (Or you may use 'format fs=ntfs' instead)
Solution 3: Disable Write Protection In Registry
Another option for resolving the "The disk is write protected" the problem is to edit the registry. It is possible to activate write protection in the Windows registry, and writing to USB devices is difficult. You may recover read and write access to portable disks by disabling this functionality in the registry editor. The following are the actions you may take to get the job done.
Start up Registry Editor. Press the enter key after typing "Regedit" into the search box on the Start screen. If a prompt from user account control appears, choose Yes. Regedit.exe may also be found by entering Regedit.exe in the Run command, which can be retrieved by pressing the Windows and R keys simultaneously. In Registry Editor's left pane, select:
HKEY_LOCAL_MACHINE\SYSTEM\CurrentControlSet\Control
Open StorageDevicePolicies if you haven't already. You can make one if one doesn't already exist. Right-click Control and select "New" and "Key," and call it StorageDevicePolicies.
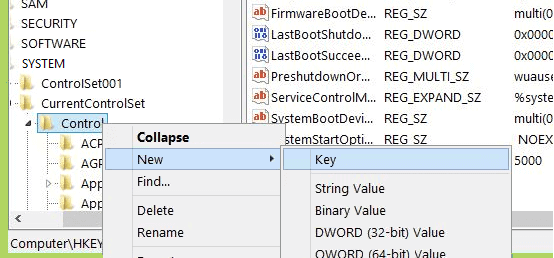
Click the StorageDevicePolicies key on the left, and then right-click the empty space on the right side of the screen. Choose New and the 32-bit DWORD value. Then rename it to WriteProtect.
Click OK after you've entered a value of 0 in the Value data field. Turn off Registry Editor and connect to your USB drive again.
How to Format A USB Drive After Removing the Write Protected Feature
You can simply format a USB drive if it doesn't have any write protection. Take these steps to accomplish this:
Left-click on This PC.
Right-click on your USB drive to choose it.
Select Format from the list and click it.
Be easy and wait for everything to be finished.
Recover Lost Data from USB Flash Drive
If you want to recover deleted, formatted or lost data from an USB flash drive, just try data recovery software - such as Do Your Data Recovery. This software can help you recover lost data from USB flash drive on Windows and Mac.
Do Your Data Recovery
- Recover deleted, formatted or lost data from USB flash drive.
- Recover inaccessible or protected data from USB flash drive.
- Recover lost data from damaged USB flash drive.
Step 1. Open Do Your Data Recovery on your computer, and connect the USB flash drive to your computer. Select the USB flash drive to start data recovery.
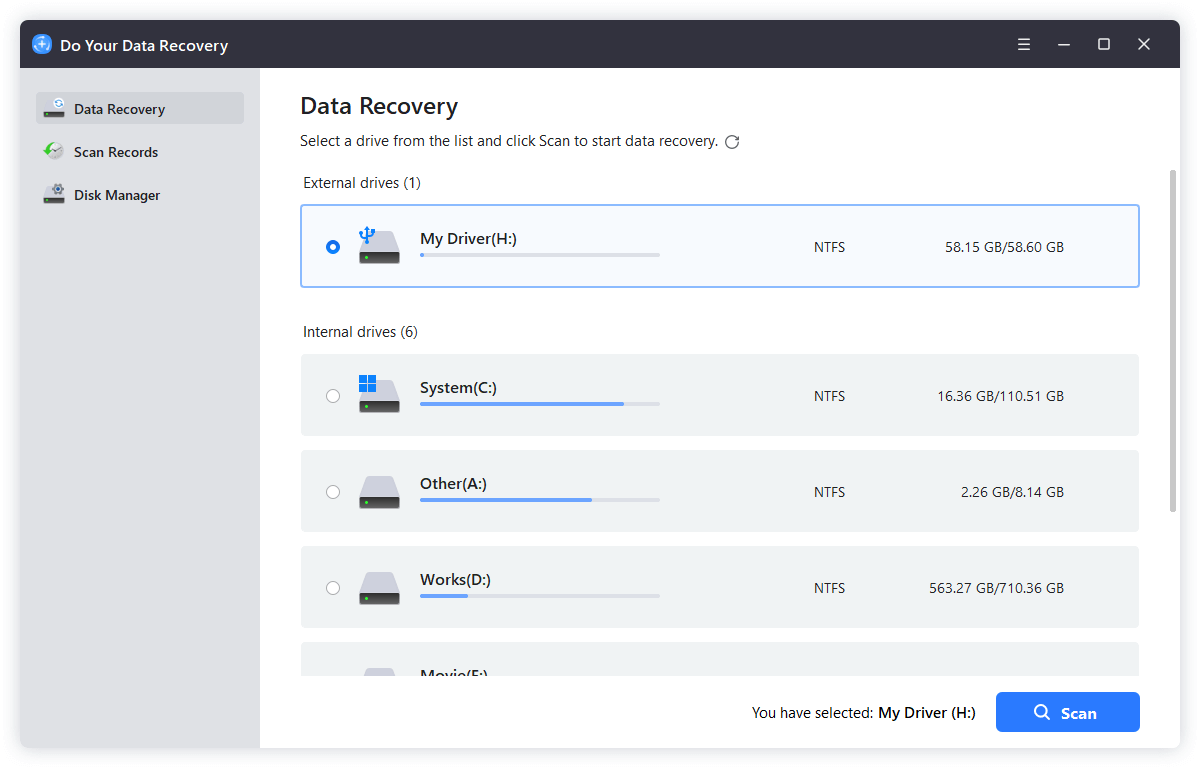
Step 2. Click on Scan button.
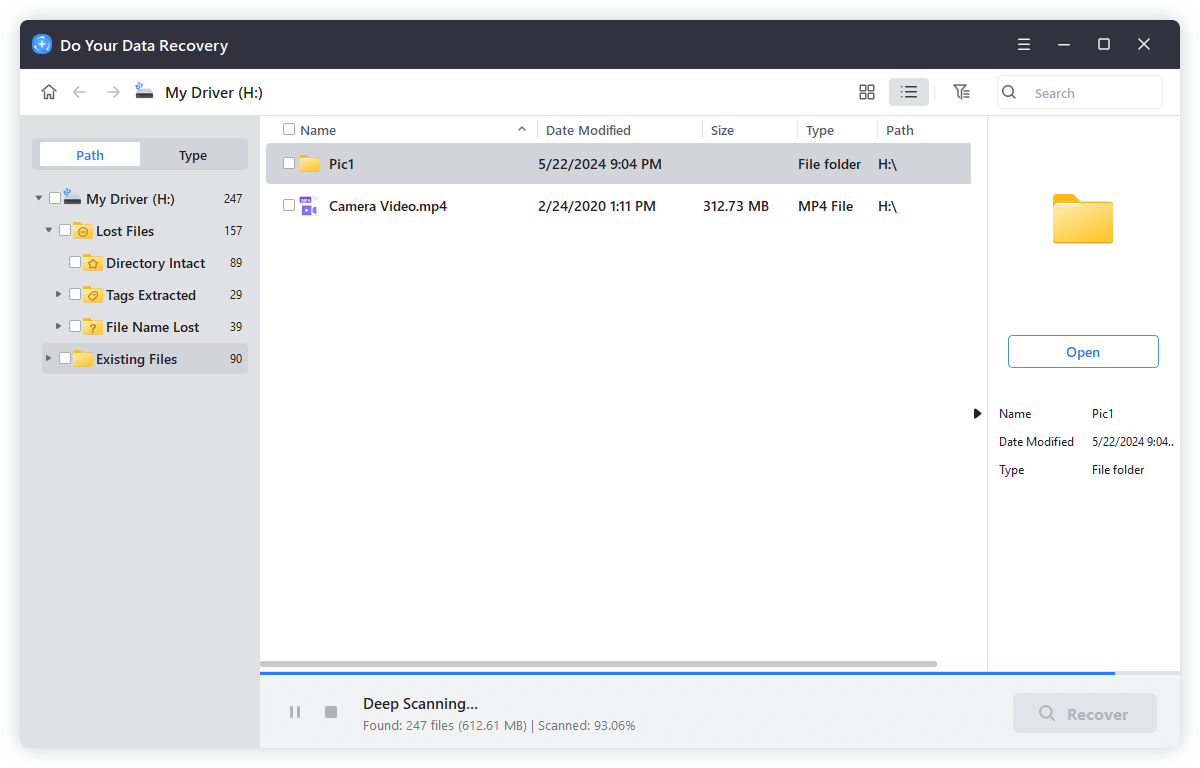
Step 3. Once the process gets finished, you can preview and recover lost files. If the quick scan can’t find all lost files, just try advanced recovery mode to find much more lost files.

Conclusion
When you can't format your USB drive because the system says it's write-protected, you should quit using it. Data may be permanently destroyed if an incorrect procedure is performed. Restoring data from a write-protected flash drive with data recovery software is possible.
It allows you to recover information from the USB drive as long as the device is not physically destroyed and data has not been erased. If you follow the above procedure, it's possible that your USB flash drive was successfully reformatted after you removed the write protection.
Written & Updated by Nancy
Nancy works as a tech columnist at DoYourData. She is familiar with macOS and Windows OS and writes computer solution, data recovery, disk clone, data erasure articles for DoYourData. She is a big fan of Mac products and is fond of testing utilities software (such as cleaner, recovery, eraser, NTFS for Mac, video editor, etc) on Mac.