Home > Hard Drive Solutions for Mac
How to Use NTFS-3G for macOS? How to Read-Write NTFS Drives on Mac?
NTFS-3G is a NTFS driver for Mac. Follow this guide to set up NTFS-3G on your Mac computer and use it to allow macOS to read-write NTFS drives on Mac. You also can try this easy-to-use NTFS for Mac tool - DoYourData NTFS for Mac to help you quickly enable writable for NTFS drives. This NTFS for Mac tool is much easier to use than NTFS-3G and have additional tools to help you mount NTFS drives, format NTFS drives on Mac.
![]() Updated by Justin Kenny on May 28, 2024
Updated by Justin Kenny on May 28, 2024
Quick Navigation:
- What Is NTFS-3G?
- How to Install NTFS-3G on Mac?
- How to Use NTFS-3G?
- Best NTFS-3G Alternative - DoYourData NTFS for Mac
- Conclusion
You may be annoyed that macOS doesn't work well with NTFS-formatted drives. You're not alone. Many Mac users have trouble because they can't write to NTFS drives, making it harder to get work done and organize their files. Luckily, there is a way out of NTFS-3G.
This free driver lets NTFS drives work at their best on macOS, letting you read and write without problems. Adding NTFS-3G to your Mac can change how you work with external storage as a student or a casual user.
This guide will show you how to install things, mount and unmount drives, change settings, and fix common problems. You'll know how to use NTFS drives on your Mac to their full potential, improving your experience and productivity.
What Is NTFS-3G?
NTFS-3G is a free driver for Unix-like operating systems, like macOS that lets you read and write to NTFS (New Technology File System) formatted drives. NTFS-3G was created as an alternative to macOS's read-only support for NTFS drives. It lets users communicate with NTFS drives without problems, going around the system's restrictions.
Based on the FUSE framework, which lets regular users build and change file systems without needing to access the kernel. With NTFS-3G, Mac users can move, edit, and organize files saved on NTFS drives right from macOS, which makes them more compatible and increases their productivity. Many people use NTFS-3G because it works well and is widely supported, making it a popular choice for Mac users who want full NTFS support.
Compatibility With macOS:
NTFS-3G works well with macOS, but there are a few things you should know:
- macOS Version
The main features stay the same, but how you install them might differ based on your macOS version. The main ideas in this guide will work for macOS Monterey (12) and later, but they can also be used with earlier versions. - Third-Party Alternatives
In addition to NTFS-3G, there are NTFS drivers that you can buy that may provide extra features or make the process easier to handle. Most of the time, though, these cost money.
How to Install NTFS-3G on Mac?
Building NTFS-3G from source code is possible, but using Homebrew, a package manager, is often easier. Homebrew makes loading easier and makes sure that everything works with your system. Learn how to install NTFS-3G on macOS Monterey (12) or later:
1. Install Xcode Command Line Tools
To open the Terminal window, go to Applications > Utilities > Terminal and type the following:
xcode-select –install
To install the Command Line Tools, press "Return" and follow any on-screen instructions.
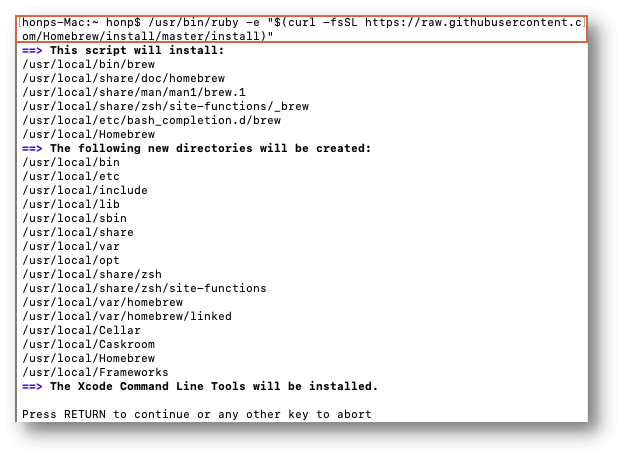
2. Install Homebrew
It's easy to get Homebrew. Just type this into Terminal:
/bin/bash-c"$(curl-fsSL
https://raw.githubusercontent.com/Homebrew/install/HEAD/install.sh)"
It gets the most recent version of Homebrew and is installed. During the startup process, follow the steps shown on the screen.
3. Install NTFS-3G
To install NTFS-3G, run the following command after setting up Homebrew:
brew install ntfs-3g
Homebrew will get the packages it needs and install them.
How to Use NTFS-3G?
When you install NTFS-3G, your Mac should find and mount most NTFS drives immediately. All of them can be found on your desktop or in "Locations" in the Finder.
Manually Mounting an NTFS drive
Sometimes, you may need to start an NTFS drive manually. Here is how to do it:
Identify the Drive: Go to "Applications > Utilities > Disk Utility" and open "Disk Utility." In the list on the side, find your NTFS drive. It's easy to spot because of its name or size.
Get The Device Identifier: Press Command + I and choose the NTFS drive in Disk Utility. Then click the "Get Info" button. In "General," write the number next to "Device." It will look like /dev/disk2s1.
Mount The Drive: To use the following command, open Terminal and change /dev/disk2s1 to the drive's real device identifier and /Volumes/NTFS to the name of the mount point you want to use:
sudo /usr/local/bin/ntfs-3g /dev/disk2s1 /Volumes/NTFS -o local,allow_other

Options Explanation:
- sudo: Grants administrative privileges to execute the command.
- /usr/local/bin/ntfs-3g: Path to the NTFS-3G executable.
- /dev/disk2s1: Replace with the actual device identifier of your drive.
- /Volumes/NTFS: This is the mount point where your NTFS drive will be accessible in Finder. You can choose any name you like.
- -o local,allow_other: These options enable read-write access and allow other users on your Mac to access the drive.
Unmounting An NTFS Drive
- Ejecting From Finder: Drag the NTFS drive icon from the desktop or Finder window to get to the Trash. But this will only work if you haven't made any changes that need to be synced with the NTFS file.
- Unmounting from Terminal: Startup Terminal and type the following command, changing /Volumes/NTFS to the name of the mount point you want to remove:
sudo umount /Volumes/NTFS
Fixing Common Problems
- Drive Not Mounting Automatically:
Check Disk Utility to ensure it sees your NTFS drive if it doesn't mount. You might have to mount it by hand using the steps we discussed. - Permission Errors:
If you get permission problems when you try to access files on the NTFS drive, you may need to use the Terminal commands chown and chmod to change who owns or can access the files. - Performance Issues:
It's possible that NTFS-3G won't work as fast as a native driver, especially when writing. It is something that the technology can't do. If speed is very important, consider looking into widely available drivers. - NTFS-3G Not Found:
Ensure the path is right in your Terminal settings if the ntfs-3g command doesn't work after installation. Run echo $PATH to see if this is true.
Additional Considerations
- Permissions: NTFS-3G lets all users on your Mac read and write data by default. Using the "Get Info" panel in Disk Utility or Terminal commands, you can change permissions to limit who can view the file.
- Disk Repair: The built-in disk repair tools in macOS are better than those with NTFS-3G. You may need to use Windows tools like chkdsk if your NTFS drive has problems.
- Security: NTFS-3G lets you view NTFS drives, but it doesn't promise that all of NTFS's features, like file encryption, will work with it.
Best NTFS-3G Alternative - DoYourData NTFS for Mac
DoYourData NTFS for Mac is much easier to use than NTFS-3G and it is fully compatible with macOS 10.13 or later and can be used on Apple silicon Macs. With this NTFS for Mac tool, you can easily read-write NTFS drives on Mac, mount NTFS drives or format NTFS drives on Mac, etc.
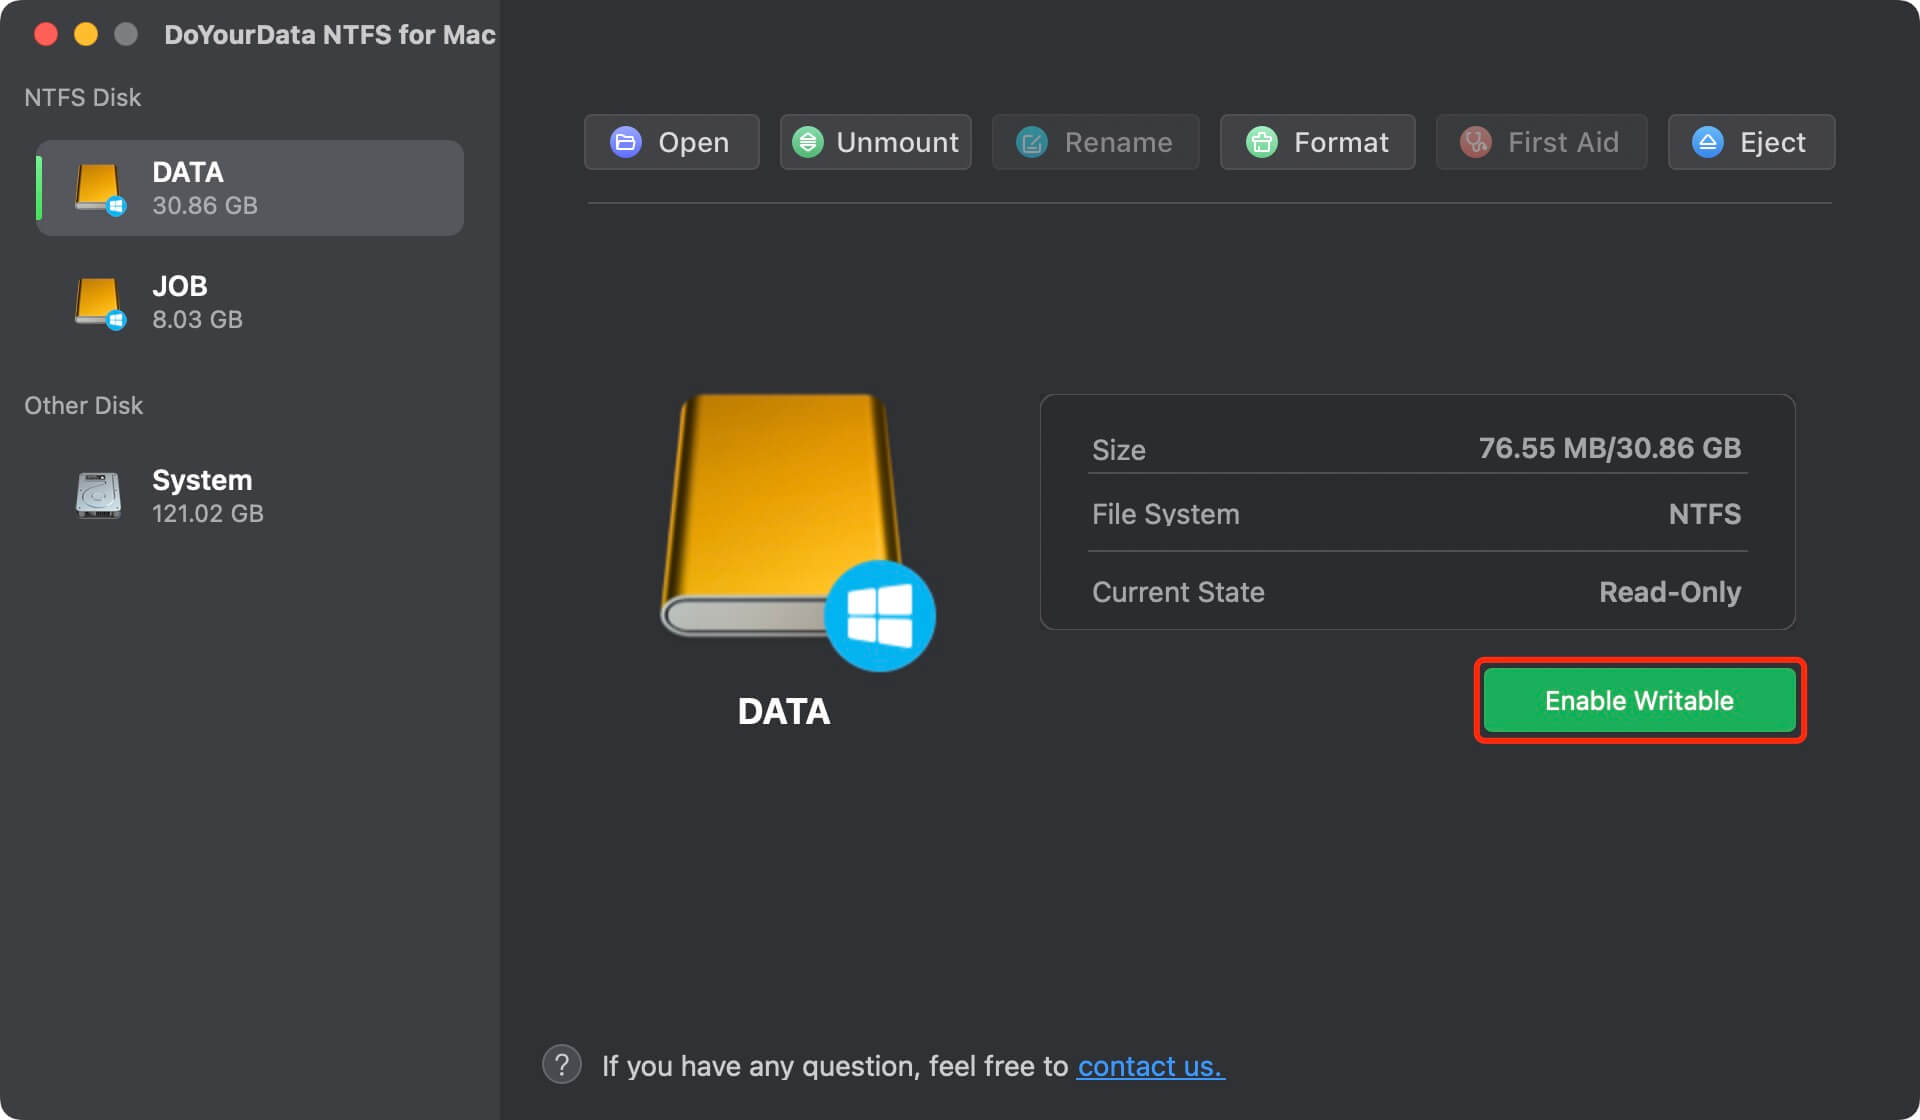
Step 1. Download and install DoYourData NTFS for Mac and connect the NTFS drive on the Mac.
Step 2. Open DoYourData NTFS for Mac, then select the NTFS drive, click on Enable Writable button. Then you can read-write any NTFS drive on Mac without any limitation.
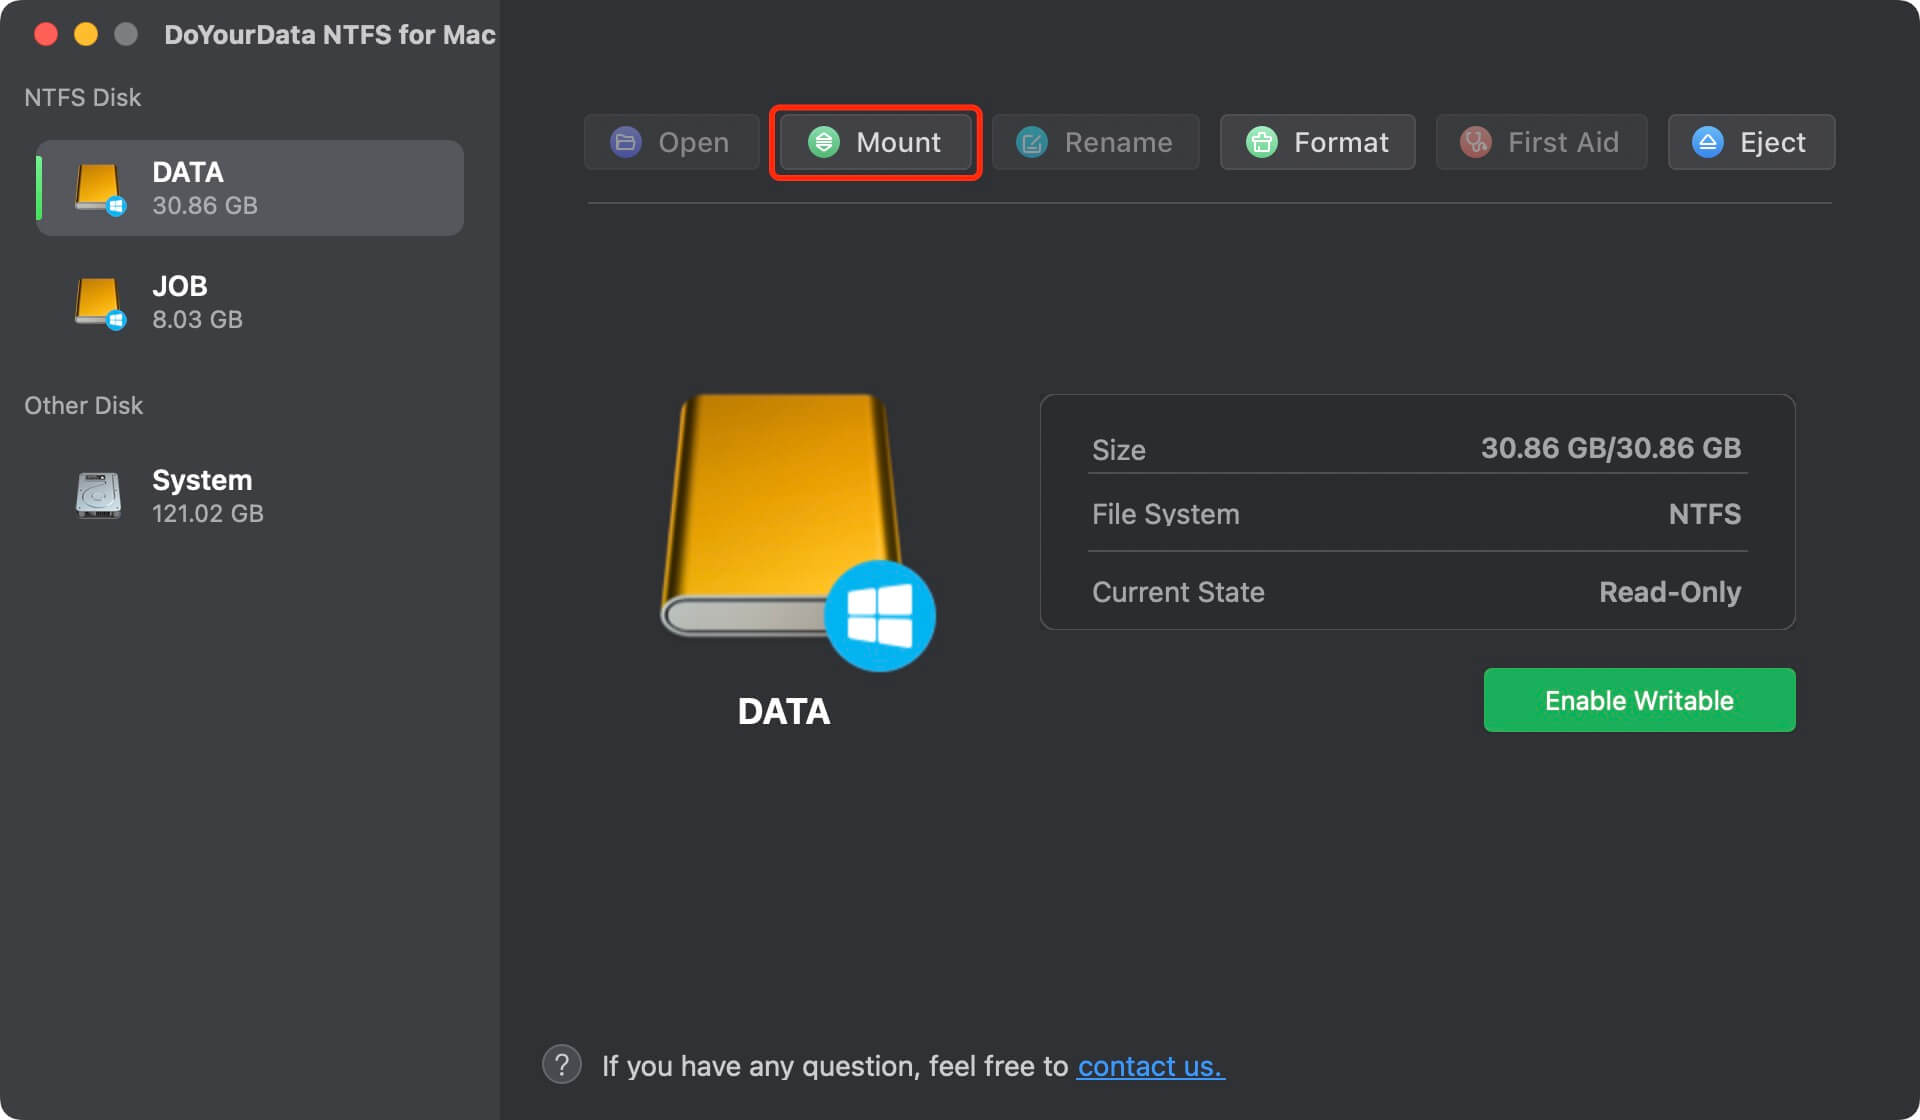
If the NTFS drive is not mounting on the Mac, click on Mount button.
Conclusion:
When you add NTFS-3G to your macOS workflow, you can manage and deal with NTFS-formatted drives in many ways. You can get the most out of NTFS drives on your Mac if you follow the startup steps, learn how to mount them manually, and know how to fix common problems.
NTFS-3G improves your experience by letting you read and write to NTFS drives without problems, whether a student or a casual user. It makes you more productive and gives you more options. Use NTFS-3G's power to make your Mac use more efficiently and flexibly.
DoYourData NTFS for Mac
DoYourData NTFS for Mac is a safe, powerful and easy-to-use NTFS for Mac tool. It allows macOS to read & write files on NTFS drives without any limitation. It is also a comprehensive disk management tool for Mac to mount/unmount disk, format disk, repair disk, read-write disk...on Mac.
Written & Updated by Justin Kenny
Justin Kenny is a writer & editor of DoYourData. He joined DoYourData in 2016 and focuses on writing articles about Windows data recovery, Mac data recovery, external device data recovery, hard drive clone, data erasure, Mac cleanup, computer issue fixes, etc. He is a super fan of Apple devices and is big on testing new digital device and system utility software.