Recover deleted, formatted or corrupted data from hard drive or external device.
Free TrialHow to Disable/Enable Automatic Updates on Windows 11?
![]() Updated by Ricky Lin on 2022-02-06
Updated by Ricky Lin on 2022-02-06
Do you want to disable Windows 11 automatic updates? Here are three ways to do this.
Windows 11 receives conservation and security updates automatically every month and as needed to patch vulnerabilities, fix bugs, ameliorate the overall performance, and (sometimes) add new features. Although this approach keeps devices updated with the final bits, it's one of the most frustrating features since the quality control of updates has been questionable.
This isn't only because they still bear a renew to finish applying the changes that can disrupt your workflow but also because the number of updates with bugs negatively affecting the experience has increased significantly in recent times. We've seen updates breaking features, causing drivers and app comity problems, decelerating down performance, and causing the Blue Screen of Death (BSoD). While it's always recommended to keep up with updates, if you find more problems than enhancements or have a good reason, Windows 11 includes a many options to disable automatic updates using Settings, Group Policy, and Registry.
In this Windows 11 companion, we will walk you through the way to help Windows Update from automatically downloading updates onto your laptop.
How to disable automatic updates with Settings
When you try to avoid a specific update, you don't have to disable the Windows Update feature permanently. You can simply use the option in the settings to pause updates for up to five weeks. This option is available for Windows 11 Home and Windows 11 Pro.
To disable updates for Windows 11 temporarily, use these steps:
1. Open Settings.
2. Click on Windows Update.
3. Use the "Pause updates" setting and select the number of weeks (up to five) you want to disable automatic updates for Windows 11.

Once you complete the steps, Windows 11 will no longer download and install updates automatically during the time you specified in the settings.
If you want to resume updates, you can use the same instructions shown above, but on step 3, click the Resume updates button.
How to disable automatic updates with Group Policy
On Windows 11 Pro and higher, you can use the Local Group Policy Editor to permanently disable automatic updates or change the Windows Update settings to decide when your computer gets serviced. Disable updates completely To disable automatic Windows 11 updates permanently, use these steps:
1. Open Start.
2. Search for gpedit.msc and click the top result to launch the Local Group Policy Editor.
3. Navigate to the following path:
Computer Configuration > Administrative Templates > Windows Components > Windows Update > Manage end user experience
4. Double-click the Configure Automatic Updates policy on the right side.
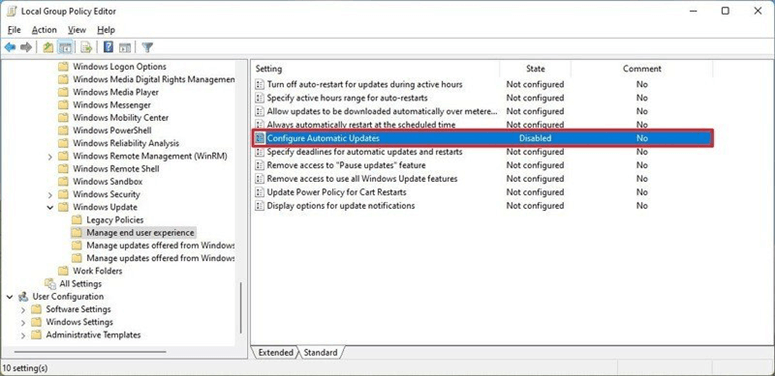
5. Check the Disabled option to turn off automatic updates permanently on Windows 11.
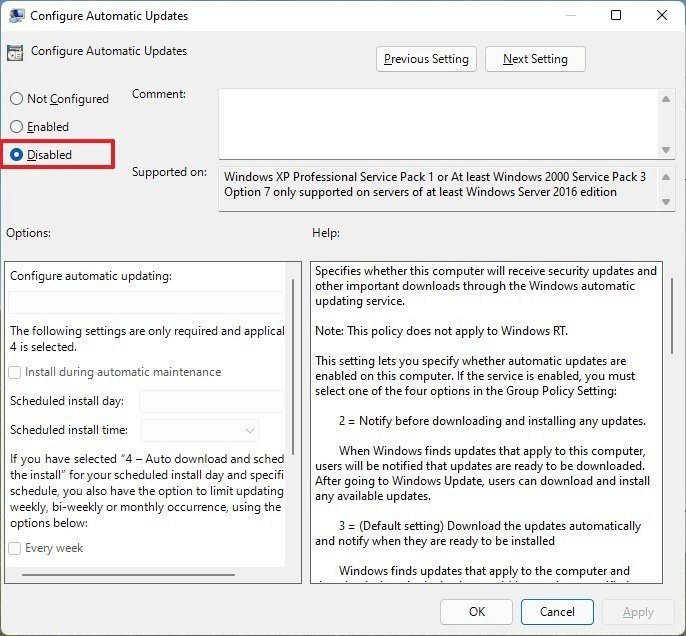
6. Click the Apply button.
7. Click the OK button.
After you complete the steps, Windows 11 will stop downloading and installing updates automatically.
If you need to update the system, you must do it manually from Setting > Windows Update and click the Check for updates button.
If you want to re-enable automatic updates, you can use the same instructions outlined above, but on step 5, make sure to select the Not Configured option.
Change updates settings
The Windows Update policy also lets you decide how to disable automatic updates on Windows 11.
To manage automatic Windows 11 updates download with Group Policy, use these steps:
1. Open Start.
2. Search for gpedit.msc and select the top result to launch the experience.
3. Navigate to the following path:
Computer Configuration > Administrative Templates > Windows Components > Windows Update > Manage end user experience
4. Double-click the Configure Automatic Updates policy on the right side.

5. Check the Enabled option to turn on the policy.
6. Under the "Options" section, select the 2 — Notify for download and auto install option.
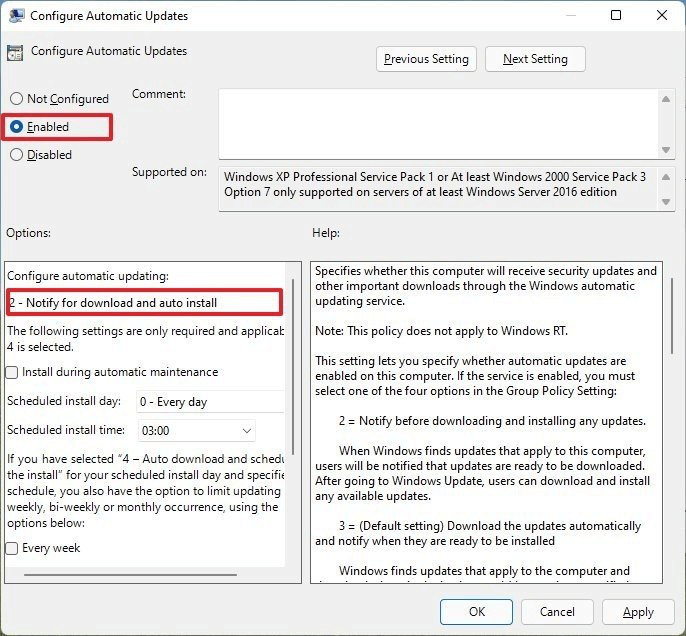
Quick note: Since there's no specific option to disable the feature, the closest alternative to disable Windows Updates is the 2 — Notify for download and auto install option. If you choose this option, updates won't download automatically. Instead, on the Windows Update settings page, you will see an "Install now" button to manually download and install the patches.
7. Click the Apply button.
8. Click the OK button.
Once you complete the steps, automatic updates will no longer occur on Windows 11. However, when new updates become available, you can choose to install them manually from the Windows Update settings page.
If you lose data due to Windows 11 update, check this guide: recover lost data after Windows 11 update >>
DoYourData Products
Written & Updated by Ricky Lin
Ricky Lin is an senior editor of DoYourData who lives in Adelaide, Australia. He is interested in writing technology articles related with data recovery, computer issue fixes, disk clone, iPhone data recovery, video edit, Mac optimization, etc. He Joined DoYourData in 2019 and have written 500+ articles to help both Windows users and Mac users to solve data or computer problems.