Quick Navigation:
- Three Primary Methods for Hiding Mounted Disks on Your Mac
- Method 1: Finder Preferences (Finder Setings): An Easy Way to Do It
- Method 2: Command Line Mastery - Unmasking the Power
- Method 3: Third-Party Applications - Expanding Functionality
- Conclusion
Are you sick of how those portable drives make you look? You might have a disk with important information that must be kept secret. You can get rid of those annoying disks from your Mac in just a few minutes by following the steps in this guide.
We'll look at three ways, from simple clicks in Finder to using the Terminal. We'll even talk about some cool third-party apps that can add features like password safety to make your disk safer. Are you ready to clear off your desk and keep your private things private?
Three Primary Methods for Hiding Mounted Disks on Your Mac
- Utilizing Finder Preferences (Finder Settings): With this method, you can use built-in settings to prevent certain disks from appearing on your screen.
- Command Line Magic: This method shows you how to use Terminal tools to change how disks are shown.
- Third-Party Applications: Look into software programs that manage and hide mounted files.
We'll explain each method in detail, including the steps needed and the pros and cons of each. We'll also discuss some essential things you should consider when hiding files.
Method 1: Finder Preferences (Finder Setings): An Easy Way to Do It
There is an easy way to hide mounted disks from your desktop in the Finder settings. How to do it:
Step 1. Open Finder. Pick up Finder and go to Preferences (for macOS Ventura or later, click Finder on Apple menu, choose Settings).
Step 2. Click on the General tab in the Preferences (Finder Settings window) box.
Step 3. Find the part that says, "Show these items on the desktop." A list of choices will appear, such as Hard disks, External disks, and Connected computers.
Step 4. If you want to hide a disk type, uncheck the box(es) next to it. For instance, uncheck the box next to External disks to hide external drives.
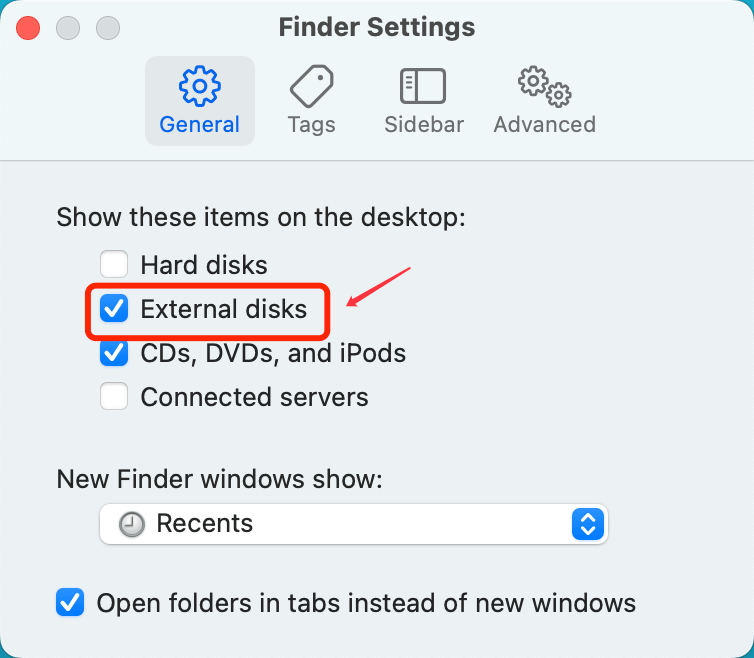
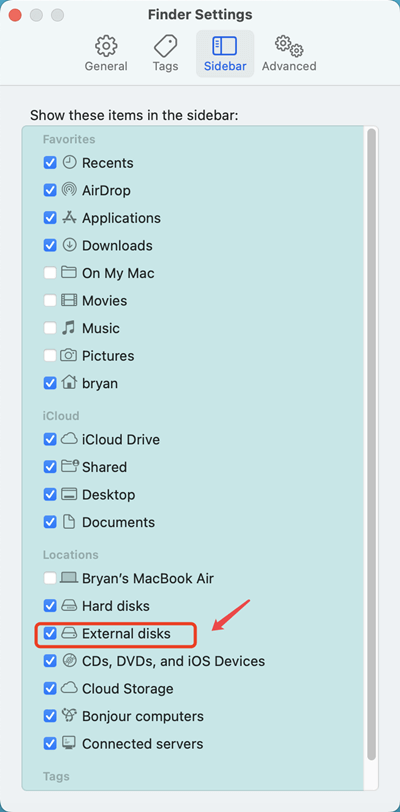
If you want to hide the drive on Finder side bar, just click Sidebar and uncheck External disks.
Advantages:
- Straightforward for people to use.
- You don't need any extra software or technical know-how.
Limitations:
- Disks can still be reached through Finder even after this method hides them from the desktop.
- You can only hide whole categories, like external drives, not individual disks.
Method 2: Command Line Mastery - Unmasking the Power
The Terminal lets you manage mounted disks in a more detailed way. With the chflags command, here's how to hide a disk:
Start up Terminal. You can get to it by going to Applications > Utilities.
Pick out the disk you want to hide. With the diskutil list command, you can see a list of all the mounted disks and the mount points that go with them. The path to the disk in Finder is called the mount point. For example, an external drive might have a mount point of /Volumes/MyDrive.
Once you know the mount point, use this command to hide the disk: chflags hidden /Volumes/MyDrive. Note that you should replace /Volumes/MyDrive with your disk's mount point.

Use Terminal's ls -l /Volumes/ command to see if the disk is hidden. You should no longer see the hidden disk listed.
Unhiding a Disk:
To unhide a disk, use the following command in Terminal:
- chflags nohidden /Volumes/MyDrive
Advantages:
- It offers greater control by allowing you to hide specific disks.
- Useful for advanced users comfortable with the Terminal.
Limitations:
- It requires some technical knowledge of Terminal commands.
- Mistakes in command could lead to unintended consequences.
Important Note: The chflags command only hides the disk from view. It doesn't affect its accessibility through Finder or by using the open command in Terminal.
Method 3: Third-Party Applications - Expanding Functionality
Several third-party applications offer advanced features for managing and hiding mounted disks. Here's a quick overview of two popular options:
Hider 2: This free and lightweight application allows you to hide and lock disks with password protection. It provides a user-friendly GUI and drag-and-drop functionality for easy management.
Disk Utility Guru: This paid application offers a comprehensive set of disk management features, including hiding, mounting, and formatting. It caters to users who need more granular control over their drives.
Advantages:
- User-friendly interfaces for easy management (application-specific)
- Additional features like password protection for improved security (application-specific)
- Granular control over hidden disks (application-specific)
Limitations:
- Requires installing and learning a new program.
- Free choices have limited features compared to paid applications.
Conclusion:
Safeguarding private information and keeping it private is essential for modern computers, especially Mac users. Hide-mounted files are a valuable way to keep private data safe from people who shouldn't have access to it. Mac users can hide mounted disks in several ways, including through Terminal commands and third-party apps. Using these methods, users can make their data safer and rest easy, knowing that no one else can see their information.
Written & Updated by Ricky Lin
Ricky Lin is an senior editor of DoYourData who lives in Adelaide, Australia. He is interested in writing technology articles related with data recovery, computer issue fixes, disk clone, iPhone data recovery, video edit, Mac optimization, etc. He Joined DoYourData in 2019 and have written 500+ articles to help both Windows users and Mac users to solve data or computer problems.
Hot Articles
- Fix External Hard Drive Read-Only Issue on Mac
- How to Wipe Trash Bin on Mac?
- Recover Lost Data from WD (Western Digital) External Hard Drive on Mac
- Fix External Hard Drive Not Showing Up on Mac
- How to Wipe SD Card on Mac?
- Mount and Unmount the External Hard Drive on the Mac
- Run First Aid on Mac to Repair Disks
- Fix Can't Save Files to An External Hard Drive on Mac
- (Solved) External SSD Not Detected in Disk Utility on Mac
- Why Can't Format A Hard Drive To NTFS on Mac? Can We Fix It?