Fix External Storage Device Not Showing Up on Mac
External hard drive not showing up on your Mac? Here are some efficient ways to help you quickly solve this problem. If you have lost data due to fixing unrecognized external hard drive, USB flash drive, SD card on your Mac, just use a data recovery app - such as Do Your Data Recovery for Mac to help you get the lost data back. It also can help mount external hard drive on Mac, fix corrupted SD card on Mac, recover lost data from unrecognized device, etc.
![]() Updated by Nancy on June 21, 2024
Updated by Nancy on June 21, 2024
Quick Navigation:
- Methods to Fix External Storage Device Not Showing/Not Detected/Not Recognized on Mac
- How to Recover Lost Data from Unrecognized or Erased Drive on Mac?
- NTFS Drive Not Showing Up on Mac? Fix It Now
- Conclusion
- FAQs About Fixing External Storage Device Not Showing Up on Mac
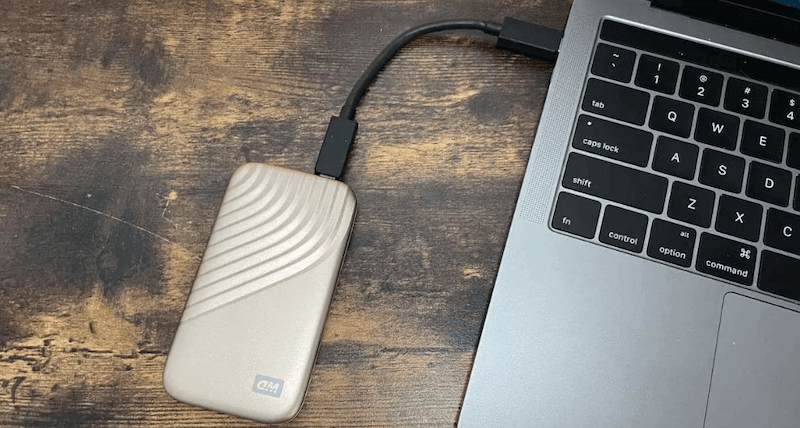
External storage devices are essential for increasing the space on Mac computers and keeping data safe. It can be confusing and scary when these devices don't appear on the Mac. That is especially true when important data is at stake. A USB flash drive could cause this problem, as an external HDD/SSD or an SD card may not link properly. It could also be caused by software conflicts or problems with compatibility.
This guide covers all possible reasons why external storage devices (such as external hard drive, USB flash drive, memory card, digital camera) might not appear on Mac computers and gives step-by-step instructions on fixing these problems. By carefully following these steps, Mac users can get back to seeing their external storage devices, making it easier to view their data and manage their storage.
Let's look at the steps to fix it so things work again and stop being frustrated about missing external storage devices on macOS.
Methods to Fix External Storage Device Not Showing/Not Detected/Not Recognized on Mac
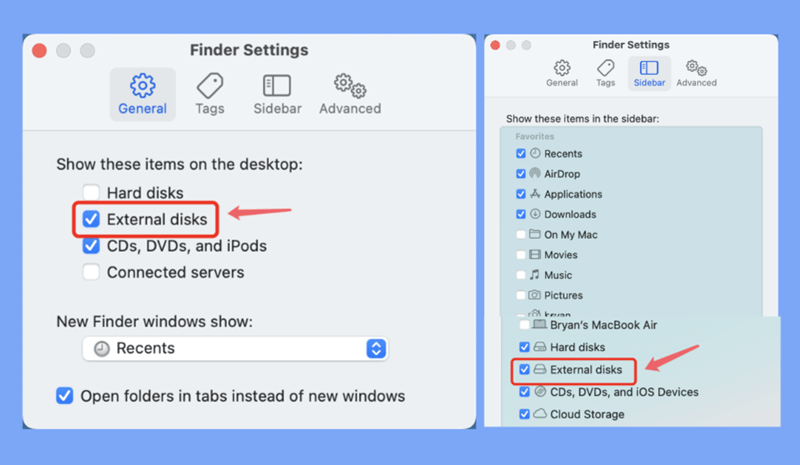
1. Edit your Finder Settings
The external storage device doesn't always show up on Mac because it's not set up to do so. On a Mac, you can use Finder to find an external device if you can't find it otherwise.
Step 1. Open a Finder, then click Finder on Apple menu, choose Settings
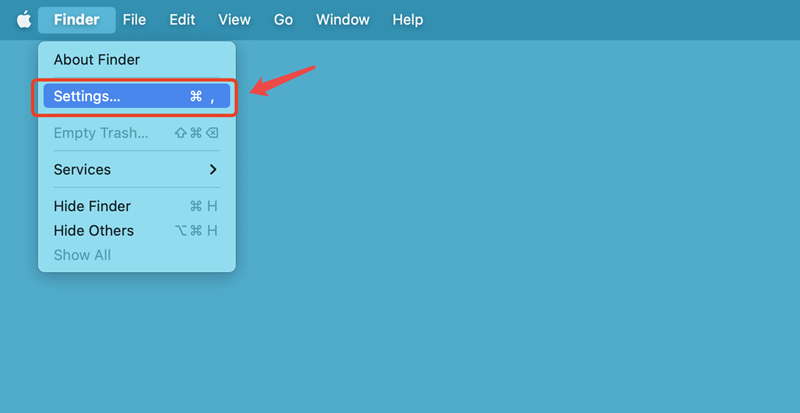
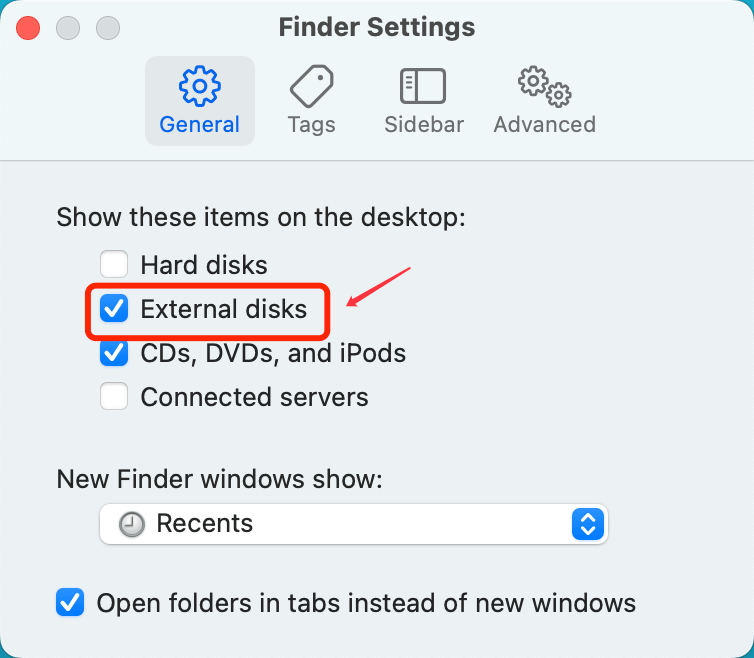
Step 2. Open Finder Settings, choose External disks from the General tab.
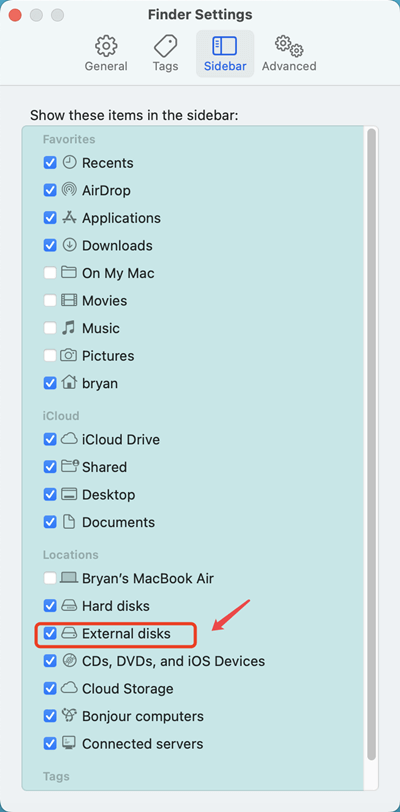
Step 3. Click Sidebar, make sure External disks is selected.
Then close Finder Settings window and check if you can see the external storage device on Finder and Mac desktop.
2. Try a different USB cable
If the USB cord is broken, the external drive won't be able to connect to your Mac normally. That's why your Mac doesn't see the hard drive. You can reconnect your external hard drive with a different wire that works with it.
3. Verify Device Compatibility
Make sure that the external hard drive works with your Mac:
- Check macOS Compatibility: Check to see if the external device works with the macOS version on your Mac. It might be possible that older devices won't work with updated versions of macOS.
- Check Device Format: For external drives, macOS usually works with types like APFS, HFS+, and FAT32/ExFAT. Make sure that your gadget is set up correctly.
Note:
- If the external hard drive has been formatted to NTFS, it may not mount on your Mac. Open Disk Utility, erase the drive to APFS/HFS+ or ExFAT, then check if it would be recognized by your Mac.
- NTFS for Mac tool can help you mount NTFS drive on Mac and allow you to read-write NTFS drive on your Mac without reformatting it.
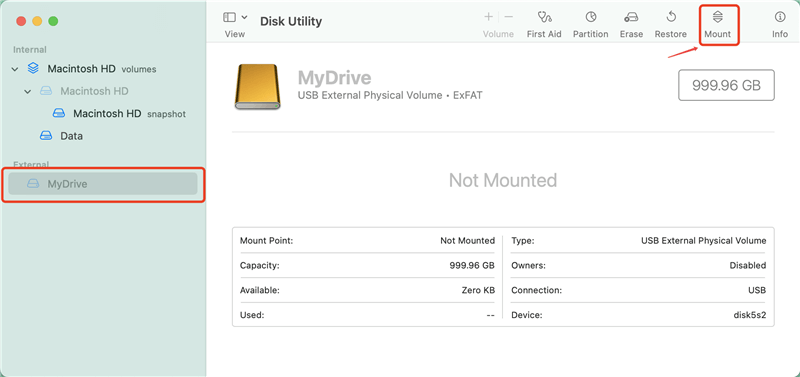
4. Engage Disk Utility
Go to Applications > Utilities and open Disk Utility. Any external drives will show up in the tab on the left. That's where you should be able to see your hard drive.
When you click on the volume, a choice will show up. There will be a way to unmount the gadget if it has already been mounted. The drive won't work on your Mac if you can't see a file list. You won't be able to mount it either.
If the external storage device is not mounted, just click on Mount button.
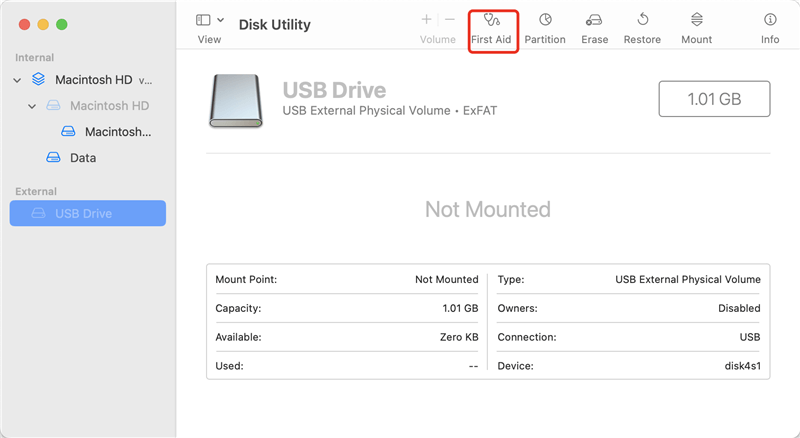
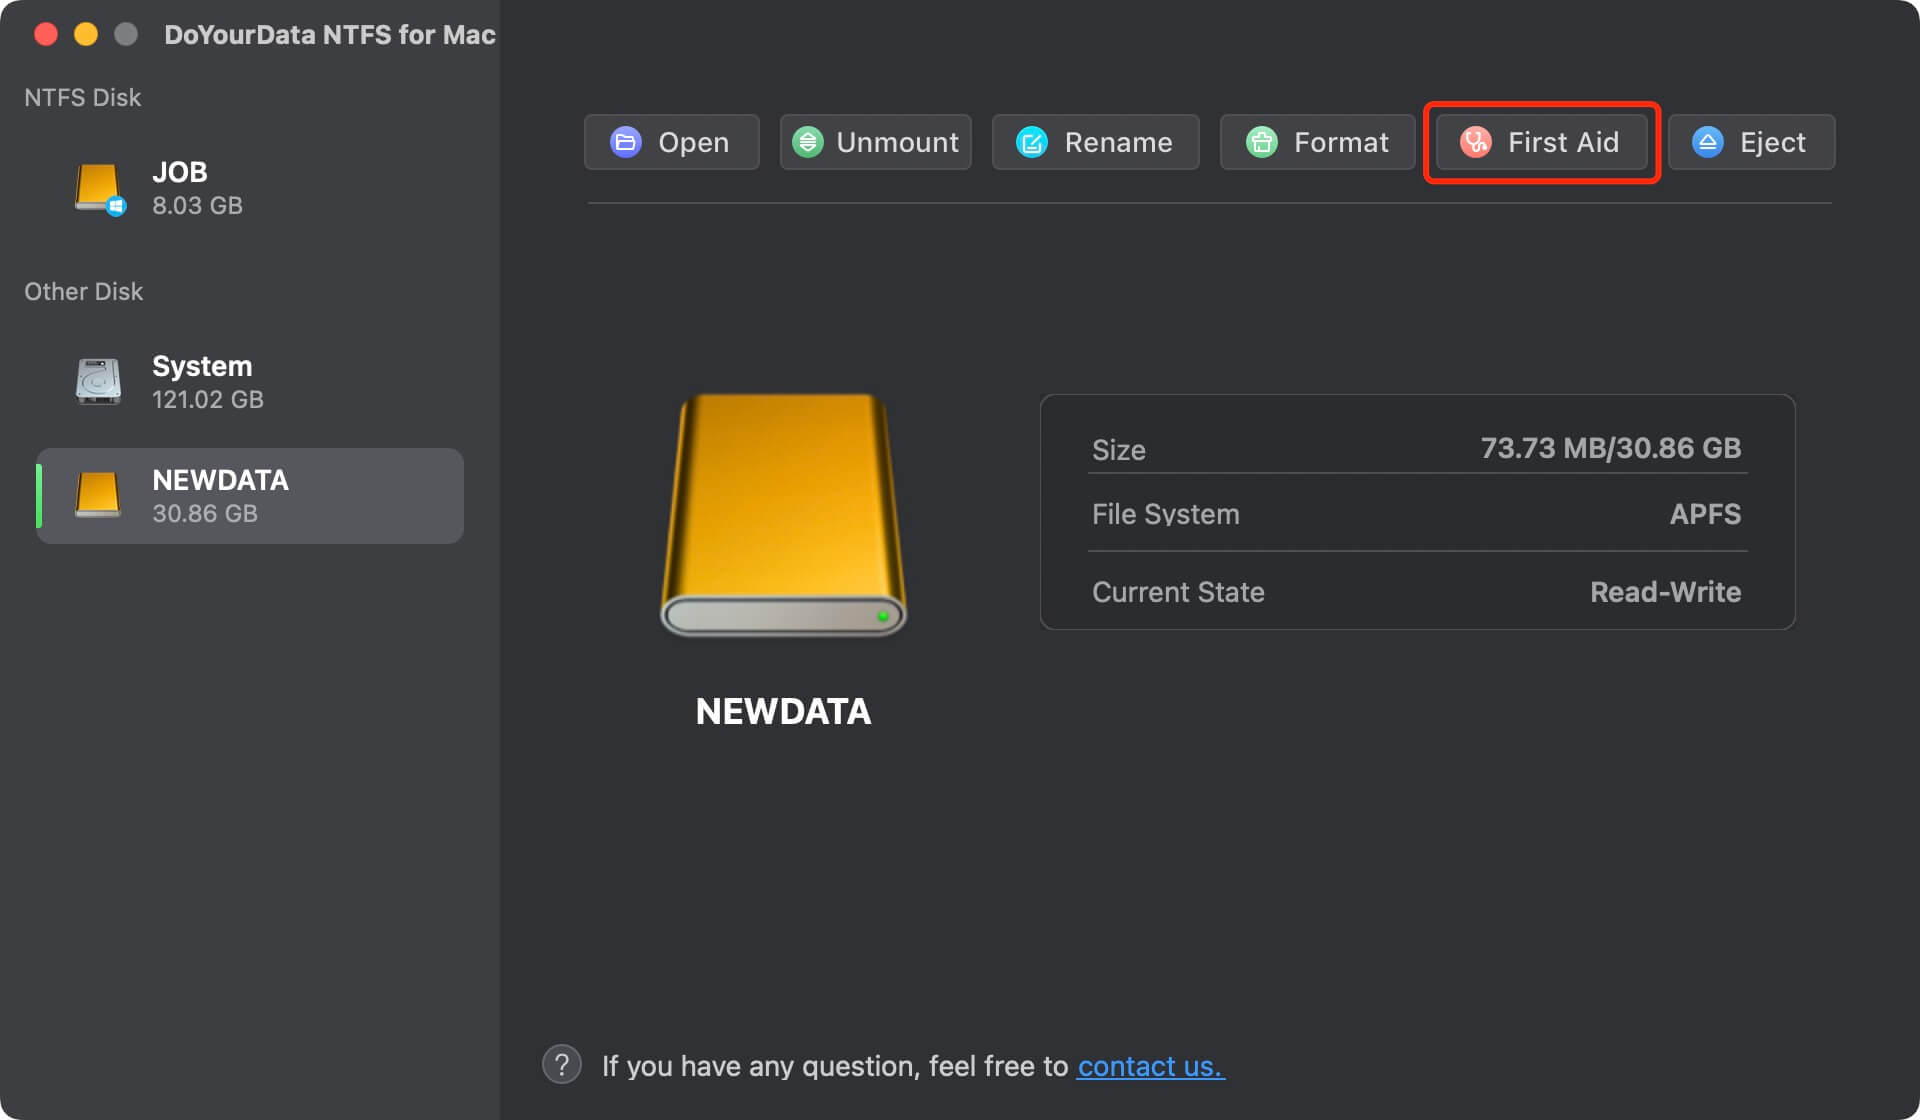
5. Run First Aid
If an external hard drive isn't showing up on your Mac, running First Aid might help. This Mac disk repair tool looks at the disk for any mistakes that might be stopping the external HDD from mounting on your Mac and tries to fix them.
To open Disk Utility, go to Applications > Utilities. Pick your external hard drive from the list on the left, then click First Aid.
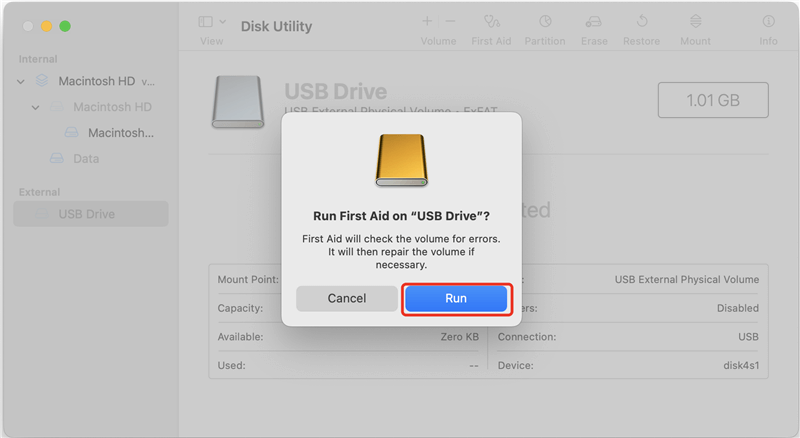
Press Run.
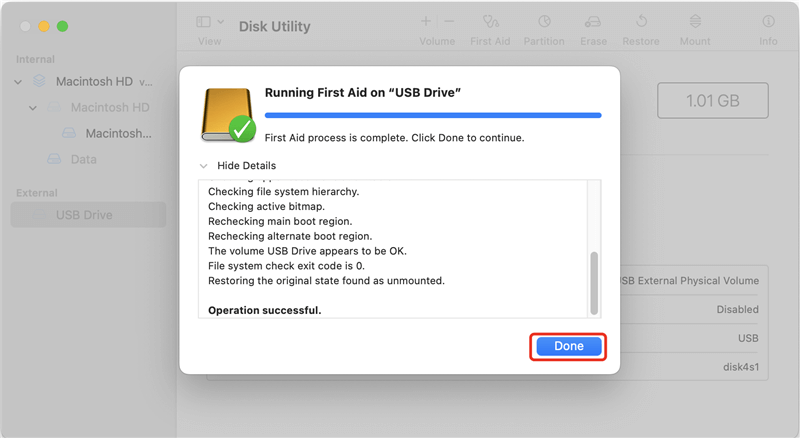
Click Done when it's done.
6. Reset NVRAM
Random-access memory that doesn't lose its data (NVRAM) saves local settings like volume, screen resolution, and hard drive information. The software on your Mac can mostly get to this data before it starts to boot up again when you restart it. On the other hand, NVRAM bugs cause many problems, like a hard drive or USB flash drive not showing up.
When you reset the NVRAM on an Intel Mac, it can fix many different problems. How to do it:
- Restart your Intel Mac.
- Hold down Command+Opt+P+R when you hear the start-up sound.
- That makes your Mac start up again. Let go of the keys when you hear the starting sound a second time.
- You can't restart the NVRAM by hand if your Mac has an Apple Silicon processor. If your Mac finds a problem when it starts up, it will do it.
7. Try plugging it in slowly
External drives may join and work better if you plug them in more slowly. That is because of how some USB drives start up. Because they're meant to touch the USB port first, the power contacts in your USB connection are longer.
8. Try a different drive
If you've tried all of the above solutions and macOS still doesn't see your external drive, try putting in a different external hard drive to find the source of the problem. If the drive can read another file, the issue may be with the drive itself. Have you dropped it or let water damage happen to it recently? Look for any problems with the gear. The worst thing that could happen is that you'll have to replace the drive.
Key to Prevention:
If you do these things, you can lower your chances of having problems with external files in the future:
- Safely Eject Drives: Always use the "Eject" tool in Finder before taking out your external drive. It ensures the drive finishes any writing processes and keeps the data from getting damaged.
- Regular Backups: Set up a regular way to back up your important files. This way, you won't lose important info even if the drive fails.
- Keep Software Updated: Make sure that the operating system and gadget drivers on your Mac are the most recent versions. Updates often fix bugs and make things more compatible, which can keep you from having problems with external storage.
How to Recover Lost Data from Unrecognized or Erased Drive on Mac?
When your external hard drive, USB flash drive, memory card is not showing up on your Mac, you should find a way to recover your data whether you've formatted the external storage device or not. Just follow the steps below.
Step 1. Download the best Mac data recovery software - Do Your Data Recovery for Mac. Then run it on your Mac, it will automatically recognize the external storage device.
Do Your Data Recovery for Mac
- Recover lost data from unrecognized drive on Mac.
- Recover lost data from formatted or erased drive on Mac.
- Recover lost data from damaged drive on Mac.
Step 2. Choose the external storage device to start data recovery.

Step 3. Click on Scan button to scan the external storage device. This Mac data recovery software will deeply scan the storage device and find all recoverable files.
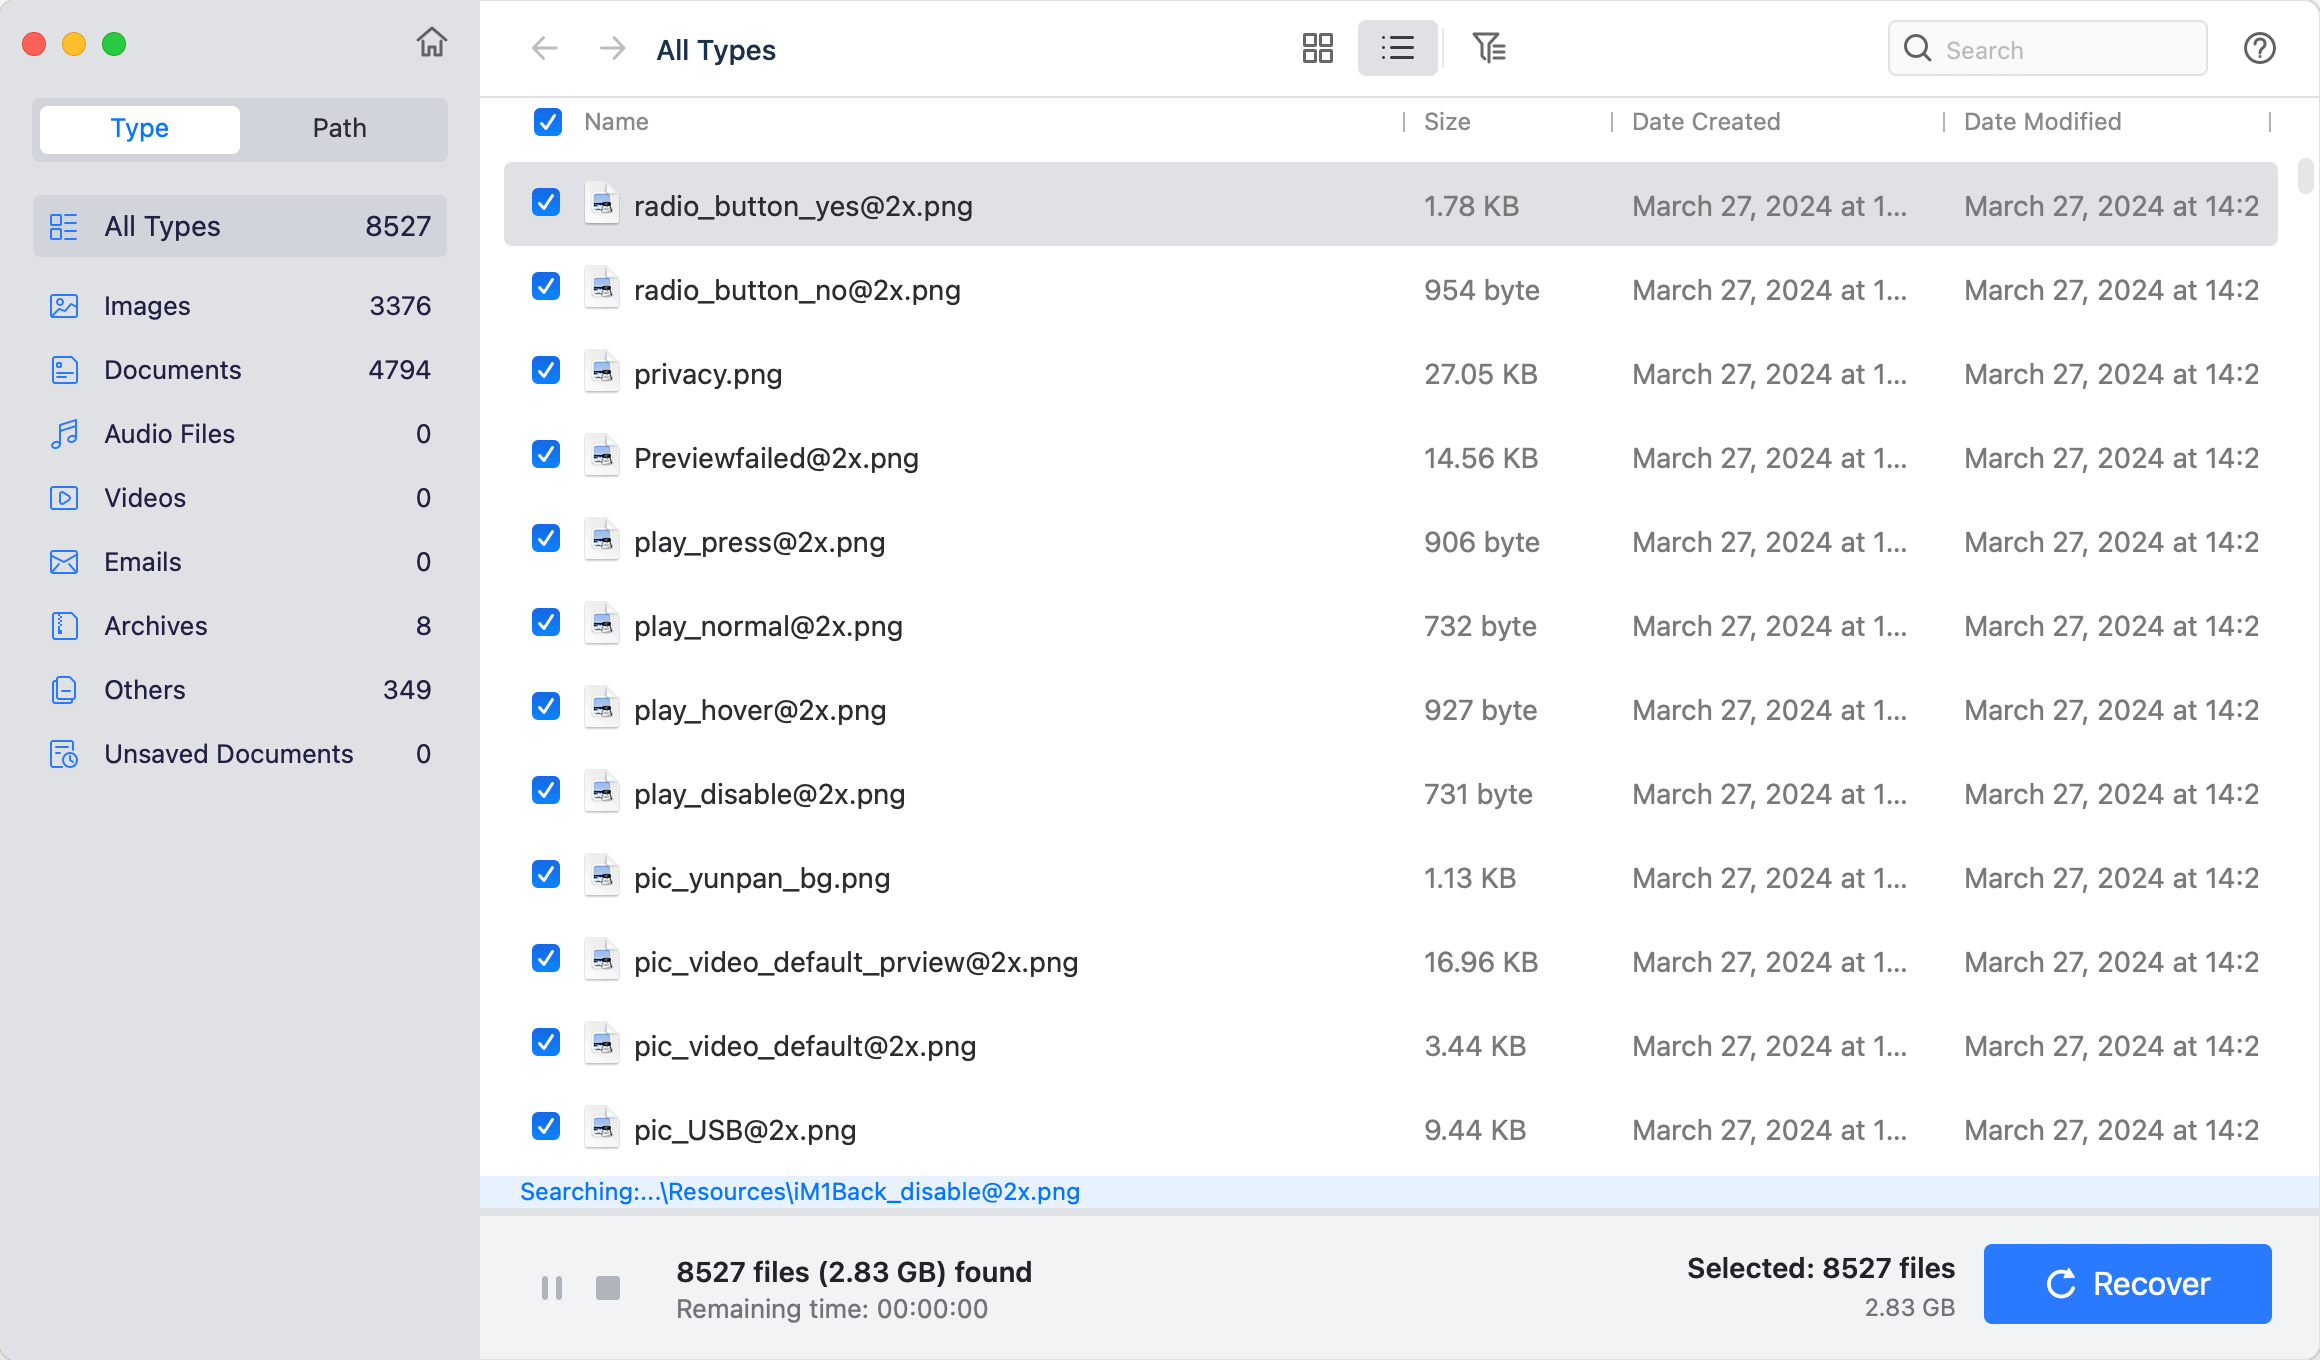
Step 4. Once the scan is completed, just preview all recoverable files. Then select the wanted files and save them.

Do Your Data Recovery for Mac also offers Disk Manager to help you mount drive, repair drive, format drive on Mac.

NTFS Drive Not Showing Up on Mac? Fix It Now
If you want to use an NTFS drive on your Mac, just try NTFS for Mac tool. DoYourData NTFS for Mac tool is an easy-to-use NTFS for Mac tool. It can add NTFS support on Mac.
Step 1. Download and install DoYourData NTFS for Mac on your Mac, open it.
Step 2. Select the NTFS drive, click on Mount button.
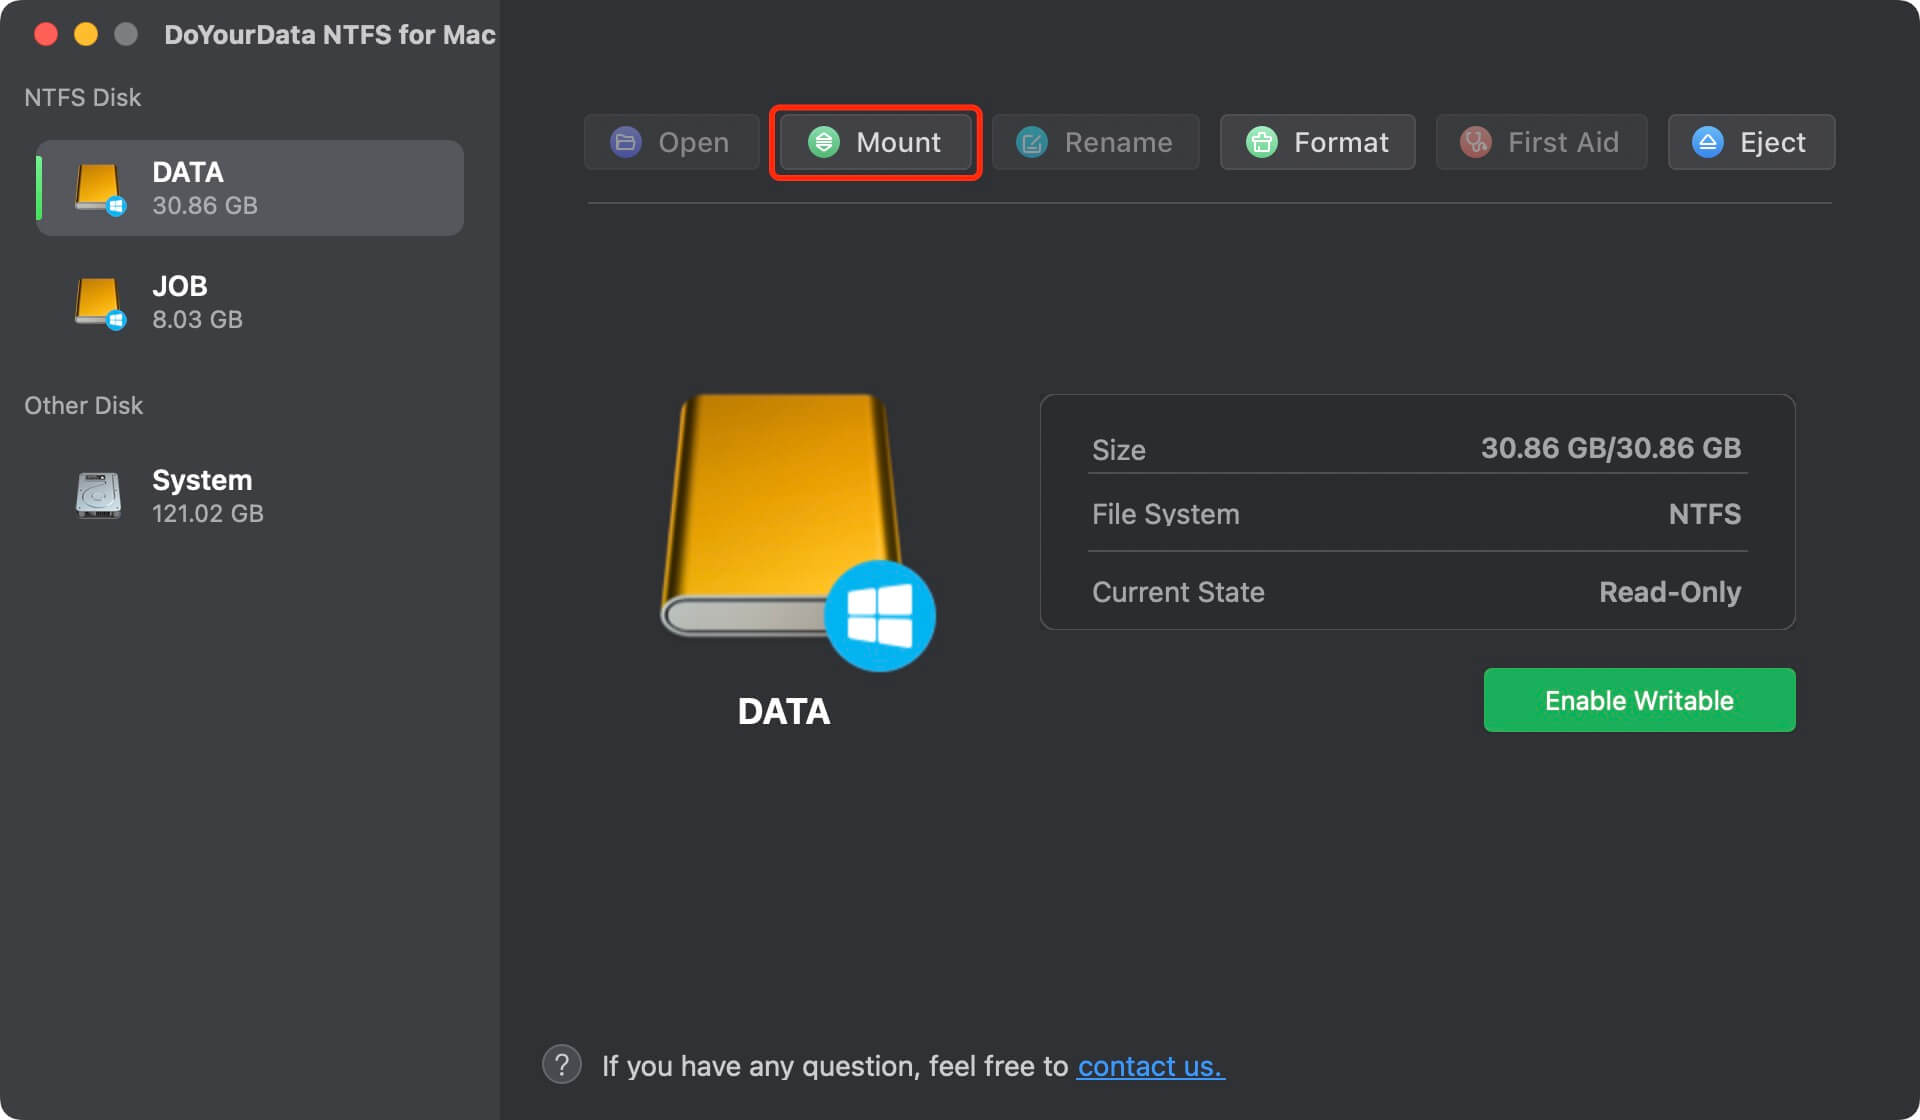
Step 3. Then click on Enable Writable button to allow your Mac to read-write NTFS drives on Mac.
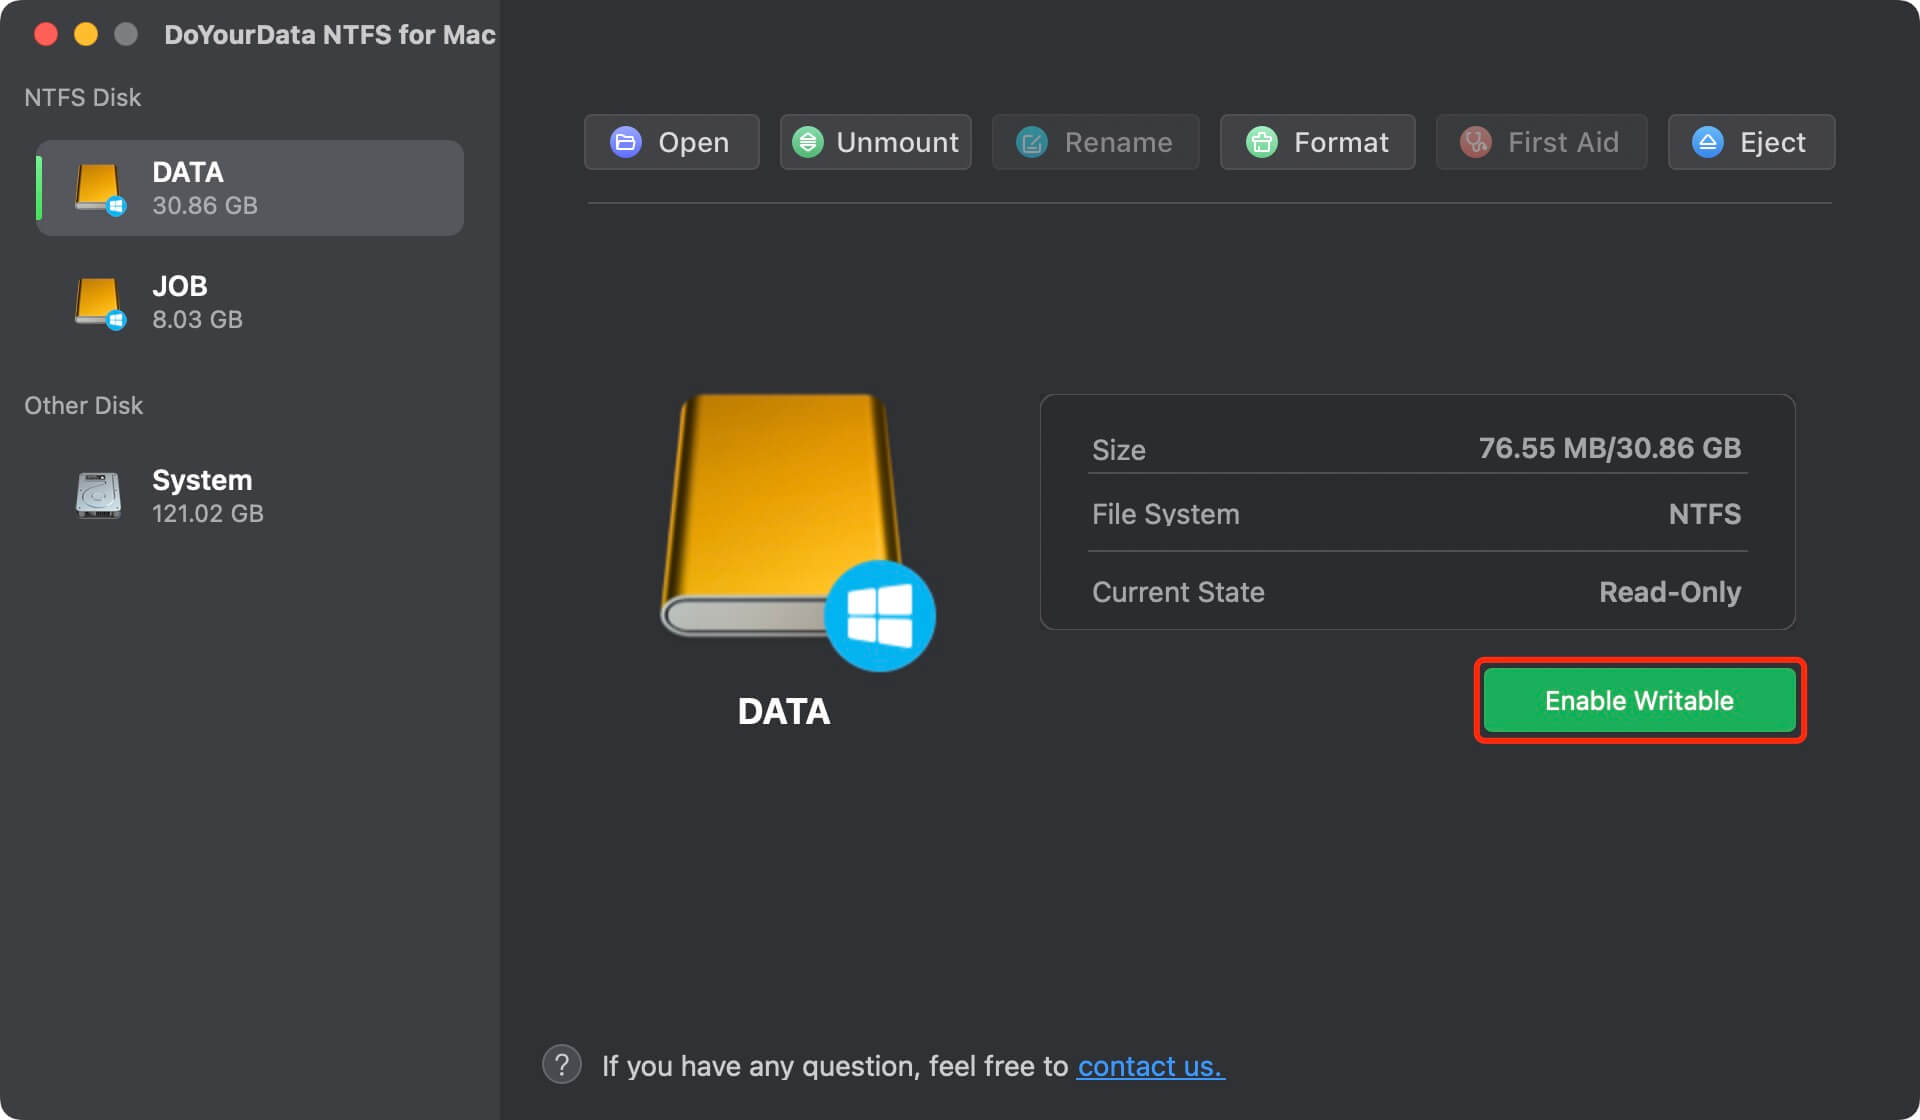
DoYourData NTFS for Mac also can help you repair damaged NTFS drive or format NTFS drive on Mac.
Conclusion:
Problems with an external storage device that doesn't appear on your Mac can be annoying, but you can usually fix the issue with organized testing and the suggestions above. You can get back into your external storage device and ensure your data stays safe and accessible by doing basic checks like ensuring it works with your macOS system and using tools like Disk Utility.
You can also try more advanced methods like resetting the system or using Terminal commands. If the problems don't go away, don't be afraid to contact Apple Support or a trained technician to fix any hardware problems that might be at the root of the problem.
FAQs About Fixing External Storage Device Not Showing Up on Mac
1. Why external storage device not showing up on Mac?
Normally, the reasons below would result in an external hard drive/USB flash drive/memory card not showing up on your Mac.
- Improper Finder Settings.
- Bad USB cable or Thunderbolt port.
- macOS or software update issue.
- Mac is infected by virus files or malware.
- Motherboard issue.
- The external hard drive/USB flash drive/memory card gets damaged.
2. How to fix external hard drive not showing up on Mac?
Most of Mac users own one or several external storage devices such as external hard drive, memory card, USB flash drive. These external storage devices can be used for data backup, data transfer, etc. Normally, when you connect an external hard drive, USB flash drive or memory card to your Mac, you can find it on the desktop, Finder and Disk Utility. If you can't find the external storage device, just check the Finder Settings:
- Open a Finder, then click Finder on Apple menu, choose Settings.
- Under General and Sidebar, make sure External disks has been selected.
If the external storage device is not mounted, just open Disk Utility, select the device and click on Mount button.
3. How to repair a damaged external hard drive on Mac?
- Connect the external hard drive to your Mac.
- Go to Launchpad > Other > Disk Utility, open Disk Utility.
- Select the external hard drive.
- Click on First Aid button to repair the damaged external hard drive.
4. How to recover lost data from an unrecognized drive on Mac?
Download and install Do Your Data Recovery for Mac, run it to scan the drive, then select the wanted files, click on Recover button to save these files.
5. How to mount an NTFS drive on Mac?
If you cannot mount NTFS drive via Disk Utility, just use NTFS for Mac tool to mount the drive. It also can help you read-write NTFS drives on your Mac.
Written & Updated by Nancy
Nancy works as a tech columnist at DoYourData. She is familiar with macOS and Windows OS and writes computer solution, data recovery, disk clone, data erasure articles for DoYourData. She is a big fan of Mac products and is fond of testing utilities software (such as cleaner, recovery, eraser, NTFS for Mac, video editor, etc) on Mac.