Quick Navigation:
- How Do You Use An USB Flash Drive on Mac?
- Conclusion
- DoYourData Hot Solutions for Managing USB Drives on Mac
In the ever-changing digital teamwork and data management world, the USB drive is still a reliable friend connecting the physical and digital worlds without problems. For Mac users, adding a USB drive opens the door to more productive work, safe data sharing, and flexible storage options. This guide starts with the basics of connecting a USB drive to your Mac and then moves on to file management techniques, speed optimization, and even more advanced topics like making bootable installers.
Also, the article explains everything about USB drives in the Mac environment, from how to transfer files to how to run programs directly from a USB drive. It gives users the tools they need to get the most out of their USB drives.
How Do You Use An USB Flash Drive on Mac?
Connecting the USB Drive:
Connecting the USB drive to your Mac is the first thing you must do to use its power. Only plug the USB drive into a USB port on your Mac to use it. It makes it easier to use than other devices. Most Macs have either USB-A or USB-C ports, so make sure your USB drive works with your Mac or use an adapter that does.
Recognizing the USB Drive:
When you connect the USB drive, your Mac should find it and mount it on the desktop immediately. You can look in the Finder window to see if the USB drive shows up. It should be in the left tab under "Devices." Still can't see the drive? There could be a problem with the drive, the USB port, or the cord.
Formatting the USB Drive:
It's important to ensure that the USB drive is set up in a way that works with your Mac before you start using it. Even though most USB drives are already formatted in FAT32/ExFAT, a commonly used file system, it's best to format it using HFS+ or APFS, which is macOS's native file system.
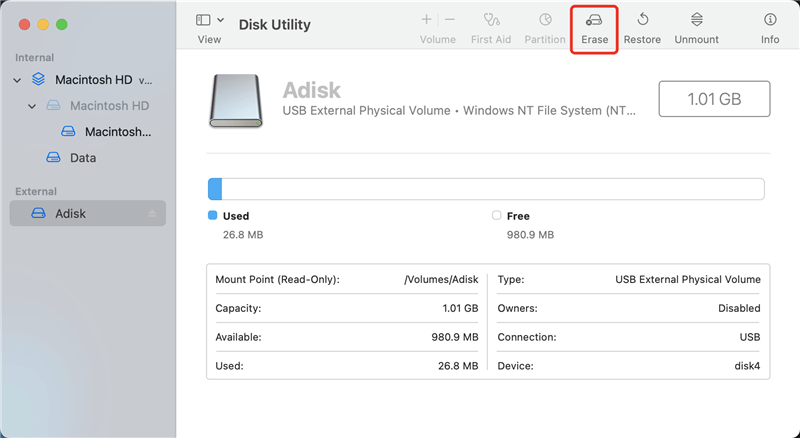
If the USB drive has no file system or the file system gets crashed or the file system such as NTFS is not compatible with macOS, you can format the drive using Disk Utility.
Step 1. Go to Launchpad > Other folder, then find the Disk Utility app, open this app.
Step 2. Connect the USB drive to your Mac, then select the USB drive, click on Erase button.
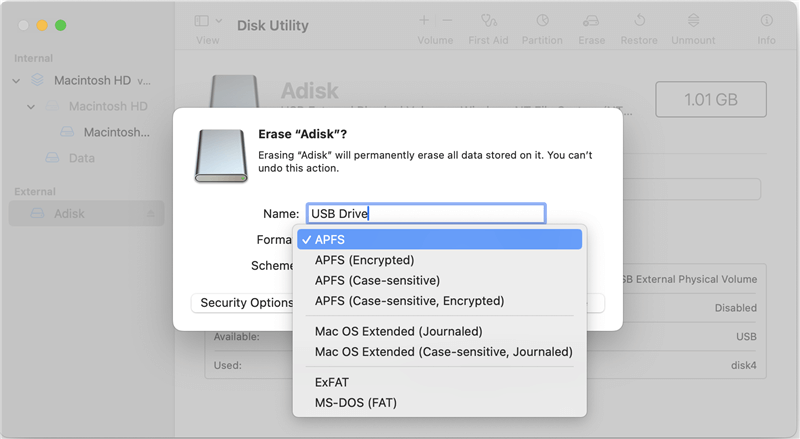
Step 3. Type a new name if needed, then select a file system which is compatible with macOS (ExFAT/APFS/Mac OS Extended).
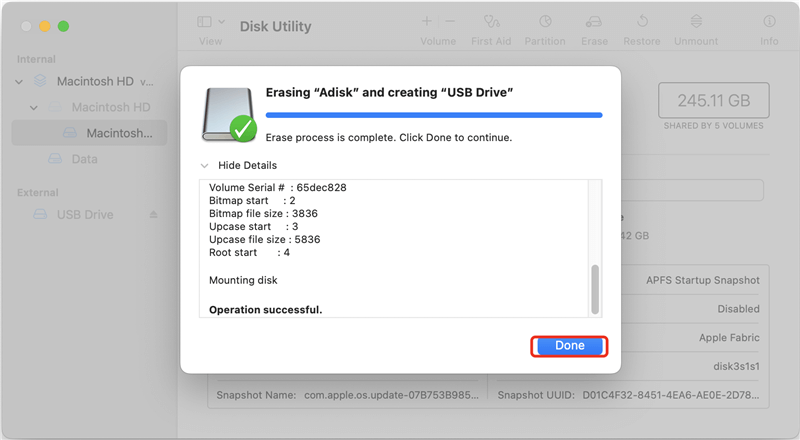
Step 4. Click on Erase button again, then format the USB drive. Once the process gets finished, click on Done button.
Transferring Files:
You can move files between your Mac and the external drive when properly formatting the USB drive. Drag and drop files or use the "Copy" and "Paste" tools are all you need to do this. You can send any file, like photos, movies, documents, etc.
- Get the Finder window open and find the things you want to move.
- Choose the files you want to move and drag them to the USB drive icon on the desktop or in the Finder window.
Optimizing File Management [optional]:
Handling your files is important as your USB drive grows into an extra storage space for your Mac. Here are some tips to help you organize your files better:
- Make Folders: Sort your files into folders based on projects, categories, or any other organization that makes sense to you.
- Use Clear, Descriptive Names: Name your folders and files in a simple, easy-to-remember way so you can find them again.
- Regular Cleanup: Check and clean up your USB drive occasionally to get rid of old or useless files and ensure it works at its best.
Running Applications from a USB Drive [optional]:
A USB drive can do more than just store files; it can also run programs straight from it, making it portable and useful. Some programs are made to be mobile and don't need to be installed on the host machine.
- You can download portable apps that work with macOS.
- You should put the app on your USB drive.
- To Run the App on your Mac, double-click on it straight from the USB drive.
Creating a Bootable USB Drive [optional]:
Making a bootable launcher for macOS is one of the most useful things you can do with a USB drive. It can be very helpful when fixing problems or restarting the operating system.
- Get the macOS application from the App Store.
- Open Disk Utility and put it in your USB drive.
- Press the "Erase" button, pick the USB drive, and set the file to "Mac OS Extended."
- To make the USB drive usable, open Terminal and run a command.
- To finish, follow the steps shown on the screen.
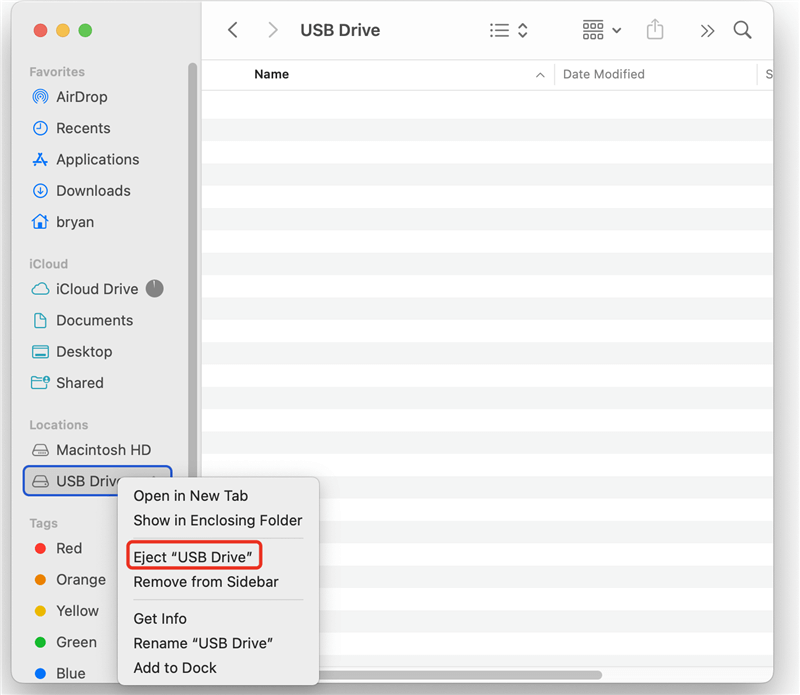
Ejecting the USB Drive:
It's important to properly eject the USB drive before taking it out of your Mac so you don't lose or damage any data. To get rid of the drive:
- On the Finder, right-click on the USB drive icon.
- "Eject" can be chosen from the choices that appear.
Conclusion:
In conclusion, adding an USB drive to your Mac is a simple process that makes storing, moving, and backing up your data easier. It doesn't matter if you're a creative professional managing big media files, a student organizing schoolwork, or an IT professional fixing systems - an USB drive on a Mac is very useful. You can get the most out of your USB drive and make it fit in with your Mac-centric lifestyle by following the steps in this guide and using the best file management and security techniques.
DoYourData Hot Solutions for Managing USB Drives on Mac


Written & Updated by Ricky Lin
Ricky Lin is an senior editor of DoYourData who lives in Adelaide, Australia. He is interested in writing technology articles related with data recovery, computer issue fixes, disk clone, iPhone data recovery, video edit, Mac optimization, etc. He Joined DoYourData in 2019 and have written 500+ articles to help both Windows users and Mac users to solve data or computer problems.
Hot Articles
- Fix External Hard Drive Read-Only Issue on Mac
- How to Wipe Trash Bin on Mac?
- Recover Lost Data from WD (Western Digital) External Hard Drive on Mac
- Fix External Hard Drive Not Showing Up on Mac
- How to Wipe SD Card on Mac?
- Mount and Unmount the External Hard Drive on the Mac
- Run First Aid on Mac to Repair Disks
- Fix Can't Save Files to An External Hard Drive on Mac
- (Solved) External SSD Not Detected in Disk Utility on Mac
- Why Can't Format A Hard Drive To NTFS on Mac? Can We Fix It?