The reliable Mac data recovery software to recover deleted or lost files.
Free TrialWhat Should You Know About DFU Mode on Mac? How to Enter Mac into DFU Mode?
![]() Updated by Justin Kenny on 2022-06-21
Updated by Justin Kenny on 2022-06-21
Those who tend to use Mac computers are familiar with the issues that a Mac computer could face for several reasons.
You'd have tried various things to restore or reset your device to eliminate the issue you're facing. However, despite trying many things, if the problem you were dealing with persists, you've got a DFU mode to restore or revive a Mac pretty quickly.
Booting the Mac in DFU mode may have seemed straightforward, but it takes a lot of your effort as it contains various techniques.
Moreover, DFU mode is similar to macOS Recovery mode, which also helps you tackle various software glitches or bugs. However, DFU mode helps you to fix any hardware issue by booting up the Mac.
This article will discuss DFU mode and how to enter the DFU mode on your Mac.
Quick Navigation:
- 1. Part 1: What is DFU mode?
- 2. Part 2: What is the difference between Recovery and DFU mode?
- 3. Part 3: What are the requirements to put Mac into DFU mode?
- 4. Part 4: How to put Mac OS into DFU mode?
Part 1: What is DFU mode?
DFU is the abbreviation of Device Firmware Update Mode. Your Mac can enter into DFU mode without loading its operating system.
If your macOS doesn't run properly, you can put the Mac in DFU mode to fix the bugs by restoring the Mac OS. However, placing the device into DFU is rare, citing the availability of various troubleshooting tools. You might consider the device into DFU under the following scenarios.
- If you fail to install macOS Bit Sur on your MT Mac, you might have to put the device in DFU mode.
- You can put the Mac into DFU mode if it refuses to reinstall macOS.
- If you find it hard to finish the macOS combo or delta update, putting the device in DFU mode won't be a bad idea.
- When your PC stops working, you've got an opportunity to put the device into DFU mode to fix the issue.
Part 2: What is the difference between Recovery and DFU mode?
When you first heard it, you'd find it challenging to differentiate between DFU and Recovery mode. You're not alone, as many people assume these two methods are the same entity.
Although both Recovery and DFU hold the ability to restore Mac without having to load up the operating system, they tend to work pretty differently.
When you talk about macOS Recovery mode, it turns out that apart from being part of an operating system from a hidden recovery partition, it is also a part of boots. You can describe it as an operating system having the tools to repair or verify the OS.
When a macOS update comes, macOS Recovery mode updates automatically.
DFU isn't a software-related method. Instead, it is the part of hardware in the shape of SecureRom. It isn't designed for the end, but people tend to use it when the recovery partition gets corrupted.
Part 3: What are the requirements to put Mac into DFU mode?
Entering DFU mode on Mac isn't a cup of tea as you'll need to consider several requirements to serve your purpose. If you don't follow the instructions carefully, you won't be able to put the Mac into DFU mode.
We've listed the requirements below to make your job easy to put the Mac into DFU mode.
- You'll need a healthy Mac (Host Mac) and a troubled Mac (Target Mac) to initiate the DFU mode.
- Both Host and Target Mac must contain the same version, and you should be using OS version 10.15.6 or later.
- Your Target and Host Mac should contain USB-C ports.
- You should also maintain a USB-C to USB-C cable that is compatible with data and power. Opting for Apple white charge cable will bring good things for you. Although Apple doesn't reportedly support Thunderbolt 3, it works fine, according to some people.
- It would help if you had a strong internet connection for Host Mac.
- Downloading the Apple Configurator 2's latest version on your Host Mac is also pretty important.
- You'll need to plug the cable of Host Mac into any port, but you must plug the USB-C cable into the Target Mac port.
- If you're using Intel MacBook, you'll need to plug your cable into the USB-C port's front side closest to the Trackpad.
- If you have M1 MacBook, putting the cable into the USB C port's backside will help your cause.
Part 4: How to put Mac OS into DFU mode?
After having done all the configurations and preparations, it still isn't easy to put the Mac OS into DFU mode. You'll need to follow the steps below carefully to complete your job.
Step 1: To begin with, you'll need to turn off your Mac computer. You can hold Mac's button for 5 seconds to turn the Mac PC off.
Step 2: In this phase, all you do is connect your two Mac computers via USB-C cable.
Step 3: Launch Apple Configurator 2 tool on your Host Mac, and you'll need to ensure that you've connected both Macs before launching Apple Configurator 2 software.
Step 4: Press the Left option key+ and right shift key+ on your Target MacBook and hold the power button icon for 10 seconds to restart your Target MacBook.
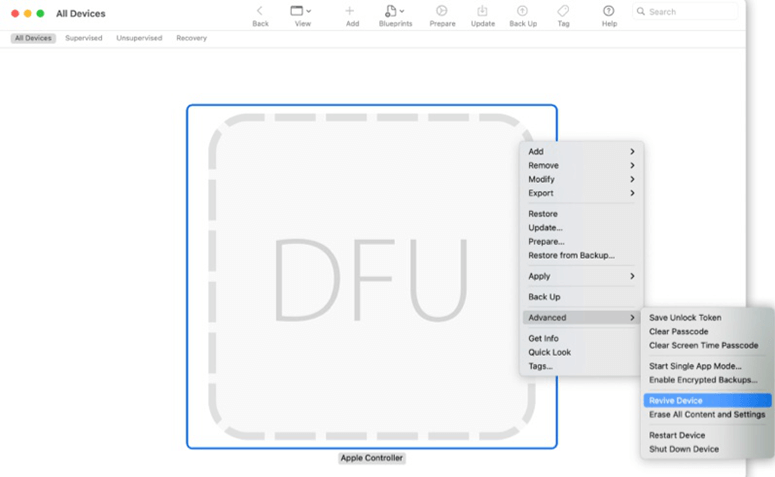
Step 5: After restarting the Target Mac, you'll need to click on the DFU icon on your Host Mac. Next, select Revive Device or Relaunch your Mac device for reviving your Apple Silicon Mac.
Step 6: All you need to do is wait a few moments before the Apple logo appears on your Target Mac. It indicates that you've successfully put the target Mac into DFU mode.
Final Words
If your macOS runs into any error and finds it hard to solve the issue, putting the Mac OS to DFU mode might help your cause. Apart from giving you the overview of DFU mode, we've also revealed how to put the Mac computer into DFU mode.
Booting the Mac PC into DFU mode takes some doing as you'll need to meet specific requirements to get your job done. If you don't meet the criteria, you won't be able to put the Mac into DFU mode. You can read this guide and boot the Mac into DFU mode effortlessly.
DoYourData Products
DoYourData Super Eraser for Mac
Permanently shred files or wipe hard drive to prevent data recovery on Mac.
Free TrialClone HDD, SSD, Mac OS, external disk, USB drive, and more under Mac OS.
Free TrialWritten & Updated by Justin Kenny
Justin Kenny is a writer & editor of DoYourData. He joined DoYourData in 2016 and focuses on writing articles about Windows data recovery, Mac data recovery, external device data recovery, hard drive clone, data erasure, Mac cleanup, computer issue fixes, etc. He is a super fan of Apple devices and is big on testing new digital device and system utility software.