How to Move Windows 10 to SSD?
To update the HDD with SSD and speed up the PC, you can move Windows 10 to SSD. It can improve the computer performance without changing other hardware. With the best disk copy tool DoYourClone, you can move Windows 10 to SSD without reinstalling the operating system and programs.
![]() Updated by Darren on February 19, 2025
Updated by Darren on February 19, 2025
Quick Navigation:
- About SSD
- Why Windows 10 Must Be Moved to SSD
- Prerequisites and Considerations
- Steps to Clone Windows 10 to SSD
- Conclusion:
Each individual has distinct expectations for their machine; some want a PC with powerful gaming CPUs and little lag, while others want one with lots of memory so they can add all the essential data. To speed up Windows 10, it's suggested to update the HDD with an SSD.
This article will discuss how to move Windows 10 to a SSD. With disk cloning software, you can move Windows 10 to an local SSD or clone it to an external SSD and make it be bootable.
About SSD

Solid State Drive is referred to as SSD. It is a type of storage that saves data more quickly and effectively than HDD. The flash memory storage technology utilized in SSDs is the primary factor in their speed.
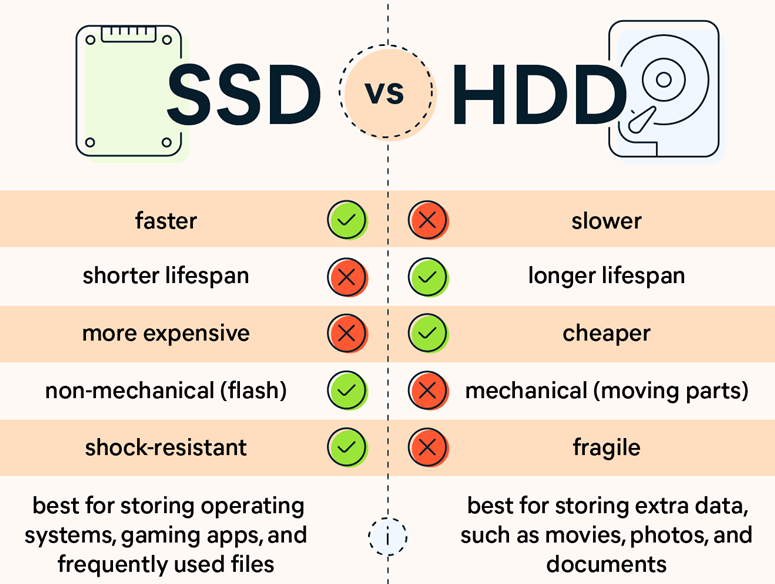
SSDs outperform HDDs in terms of speed, durability, energy efficiency, and noise levels. While SSDs are more expensive per gigabyte, their advantages make them ideal for performance-sensitive applications and portable devices. Here are the key benefits:
- Faster Performance: SSDs are much faster than HDDs, which means faster boot times, quicker file transfers, and better overall system performance. This is particularly noticeable when loading applications or booting up your operating system.
- Lower Power Consumption: SSDs use less power than HDDs, making them more energy-efficient. This is particularly beneficial for laptops, where battery life can be extended by using an SSD over an HDD.
- Silent Operation: SSDs are completely silent because they have no moving parts. In contrast, HDDs generate noise due to the spinning disks and the movement of the read/write head.
- Faster Access Time: SSDs have much lower access times because they don't need to physically move a head to locate data. This means faster read/write speeds, especially for random access tasks, which is ideal for multitasking and running high-performance applications.
- Compact and Lightweight: SSDs are typically smaller and lighter than HDDs, which can be an advantage in ultrabooks, tablets, and small form factor devices.
- Lower Heat Generation: SSDs generate less heat compared to HDDs, making them suitable for systems that require better cooling and for laptops that need to avoid overheating.
- More Durable in Extreme Conditions: SSDs are more resistant to extreme temperatures, vibrations, and physical shock compared to HDDs. This makes them better suited for use in environments where reliability is crucial, such as in rugged devices or mobile applications.
- Smaller and More Flexible Form Factors: SSDs come in various form factors, including 2.5-inch, M.2, and U.2, making them suitable for a wider range of devices, including ultrabooks and compact servers. HDDs are generally larger and more limited in form factor options.
Why Windows 10 Must Be Moved to SSD
To improve the system's speed and storage, Windows 10 is moved to another device. By moving Windows 10 to SSD, the system's speed and functionality improve, letting the user concentrate on the device's only purpose. Moving Windows 10 to an SSD (Solid State Drive) can greatly enhance your computing experience. Here are the key reasons why it's highly recommended:
- Faster Boot Times - When you install Windows 10 on an SSD, boot times are dramatically improved. With an HDD, Windows may take a minute or more to load, while an SSD can reduce boot time to under 30 seconds or even less, depending on the system.
- Quicker Application Launching - Applications that would take time to load from an HDD (such as web browsers, Office applications, or games) open significantly faster on an SSD. This means you spend less time waiting and more time working or enjoying your system.
- Improved System Responsiveness - SSDs drastically reduce the time it takes to load and execute tasks. You'll notice an improvement in system responsiveness for everyday activities such as opening files, switching between applications, and handling multitasking scenarios.
- Enhanced Multitasking - Windows 10 benefits from SSDs during multitasking scenarios. With faster read and write speeds, multiple programs can run simultaneously without the system slowing down, even when performing demanding tasks like video editing, gaming, or running virtual machines.
- Better Reliability - SSDs are more reliable than HDDs because they have no moving parts. This means less risk of mechanical failure due to physical damage or wear and tear over time. For systems running Windows 10, this translates into fewer crashes and longer system longevity.
- Improved File Transfer Speeds - Copying, moving, or saving large files on an SSD is much faster than on an HDD. This is especially beneficial if you're working with large files regularly, like video or design projects.
- Lower Power Consumption (Especially for Laptops) - Since SSDs consume less power compared to HDDs, laptops running Windows 10 will experience better battery life. This is particularly useful if you're using a laptop for work or school and need it to last through a long day.
- Increased Productivity - All the combined speed boosts result in a more fluid and responsive experience for everyday tasks like web browsing, word processing, and even light video editing. This can lead to a noticeable increase in productivity, especially for people working from home or professionals who rely heavily on their PC for day-to-day tasks.
Prerequisites and Considerations
While following the instructions for moving Windows 10 to an SSD, keep the following in mind:
- Retain in mind to keep the program's backup of the data.
- Ensure that Windows is accessible in case the system becomes corrupt.
- The laptop needs to be charged, and the power connection needs to be steady.
- Throughout the entire process, there shouldn't be any obstacles.
Steps to Clone Windows 10 to SSD
To move Windows 10 to SSD, it's essential to find a professional and trusted disk clone tool. With a reliable tool, it will be smooth to clone the drive to SSD and ensure the cloned SSD can be used as boot disk directly.
DoYourClone is a powerful, safe and easy to use disk cloning program. It can help you clone Windows 10 to a SSD and make it be bootable. It also can help you clone hard drive on Windows 11, Windows 8, Windows 7, Windows Vista, macOS and OS X, etc.
DoYourClone - Best Disk Cloning Software
- Clone Windows 10 to SSD.
- Create bootable clone for Windows 10.
- Clone HDD, SSD, USB Drive and other disk on Windows 10.
This Windows 10 disk cloning program is very easy to use. It takes only a few steps to securely and completely move Windows 10 to a SSD. Just check the steps below:
Step 1. Download and install DoYourClone on Windows 10 PC. Just open it and connect the SSD to this Windows 10 PC.

Step 2. Choose disk cloning mode - Clone Disk. Choose the Windows 10 disk as the source disk and select the SSD as the destination disk.

Step 3. Move to the next step. Then you can preview the cloning layout. Just tick 'Check the option if the destination is SSD', and click on Clone button.

Step 4. This software will completely clone the Windows 10 to the SSD and make it be bootable.

Once it's done, you can open the cloned SSD to check the files first. Then set it as boot drive and check if it's bootable.
Change boot disk to SSD
After clone, if you want to boot from the SSD, just set the SSD as the boot drive on your PC. Follow the steps below:
Step 1. Shut down the PC and connect the SSD to your Windows 10 PC.
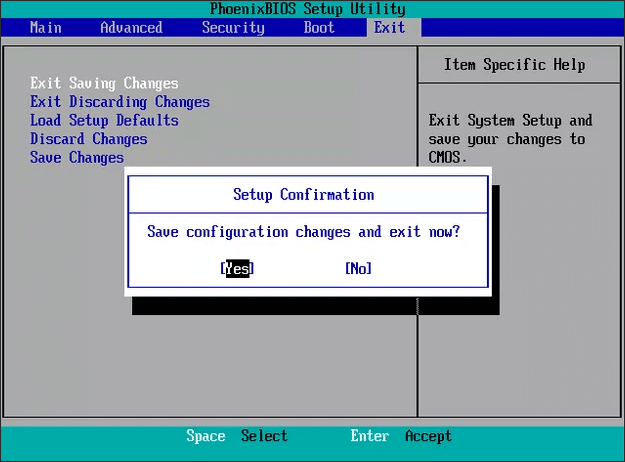
Step 2. Restart your PC & press Del or F2 or F8 key to enter BIOS.
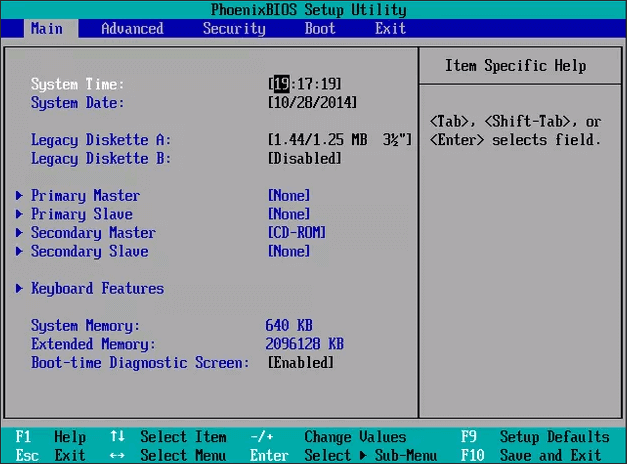
Step 3. Go to the Boot or Startup Column & set your computer to boot from the SSD.
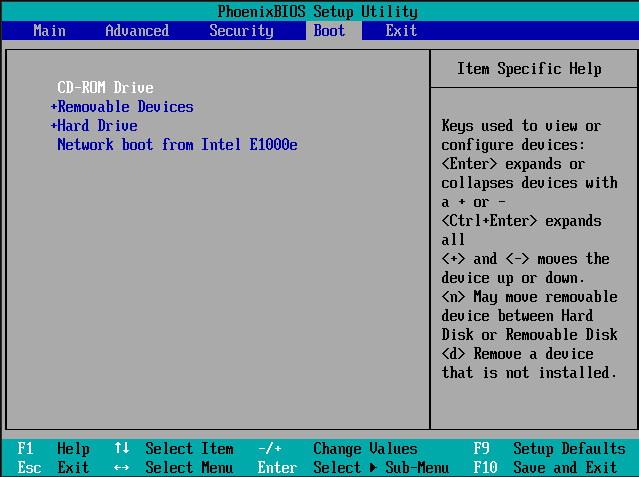
Step 4. Save all the changes & restart your computer. Now, you PC will boot from the SSD.
Most of Windows 10 users don't know how to move Windows 10 to SSD. With this tool DoYourClone, you can easily clone Windows 10 disk to a SSD and make it be bootable.
Conclusion:
Move Windows 10 to SSD it a popular way to improve the computer performance without changing more other hardware. SSD can make the computer boot up faster and transfer data more quickly.
To clone Windows 10 to SSD successfully and make sure the cloned SSD is bootable, it's highly suggested to use the excellent disk cloning software DoYourClone. The software can easily move Windows 10, along with the installed programs, settings, personal files to SSD. Then you can use the cloned SSD as boot drive.

DoYourClone - Best Disk Clone Software
DoYourClone is a 100% safe, powerful and easy-to-use disk cloning program. It supports to clone any hard drive, clone HDD to SSD, upgrade old drive to new drive, create bootable clone backup for Windows and macOS. With this program, you can easily clone any hard drive. It supports sector by sector clone, SSD upgrade clone, etc.
Written & Updated by Darren
Darren is an senior editor at DoYourData. Since 2021, Darren has written 100+ articles about data recovery, Mac file recovery, disk management, disk clone, computer issue fixes, etc. He helps lost of users to recover important data, get the reliable data backup solution, find optimization for PCs and Macs.