How to Remove Login Password in Windows 11?
This article will guide you through the steps to remove Windows 11's login passwords, explore the benefits and risks of doing so, and provide alternative security measures to ensure your computer remains protected.
![]() Updated by Shirly Chen on September 27, 2024
Updated by Shirly Chen on September 27, 2024
Quick Navigation:
- Why Remove the Login Password?
- Methods to Remove Windows 11's Login Password
- Potential Risks of Removing the Login Password
- How to Protect Your Privacy by Permanently Erasing Sensitive Data?
- Conclusion
For both individuals and organizations, security is of utmost importance in the rapidly evolving digital infrastructure. Passwords play a crucial role in protecting our personal and professional data from unauthorized access.
However, for some users, especially those who use their computers in a secure and private environment, the need to enter a password every time they log into Windows 11 can be seen as an unnecessary inconvenience. Fortunately, Windows 11 provides several methods to remove the login password requirement, allowing for a more streamlined and user-friendly experience.
Why Remove the Login Password?
Before diving into the steps to remove the login password, it's important to understand why someone might want to do this. Here are some common reasons:
1. Convenience🤦: Removing the login password can save time, especially if you are the only person using the computer and it is kept in a secure location. This is particularly beneficial for users who frequently need to log in and out of their computers throughout the day.
2. Accessibility🕵️: For individuals with disabilities or those who find typing difficult, removing the login password can make accessing the computer easier.
3. Personal Use🧑💻: If your computer is primarily used for personal purposes in a home environment where security is not a major concern, the login password may feel redundant.
4. Simplification👨🔧: Some users prefer a more streamlined and straightforward experience, free from additional steps like entering a password.
While these reasons are valid, it is crucial to compare the benefits against the potential security risks. Removing the login password reduces the security of your system, making it easier for unauthorized individuals to access your data if they gain physical access to your computer.
Methods to Remove Windows 11's Login Password
There are several ways to remove the login password in Windows 11. It is important to select the strategy that best satisfies your objectives because each has advantages and disadvantages.
Method 1: Using Netplwiz
Netplwiz, a legacy tool in Windows that allows you to manage user accounts and password settings. It provides a quick way to remove the login password.
Step 1: Press Win + R on your keyboard to open the Run dialog box.
Step 2: In the Run dialog, type netplwiz and press Enter. This will open the User Accounts window.

Step 3: Click the box next to User Accounts in the User Accounts window - "Users must enter a user name and password to use this computer."
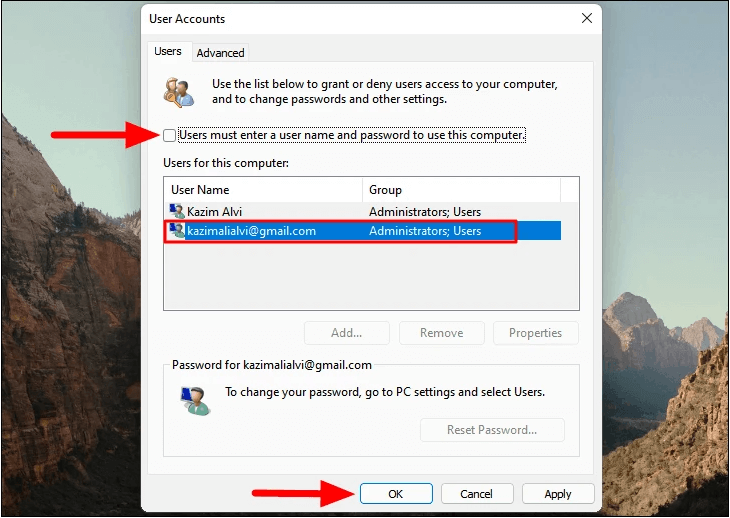
Step 4: Click Apply. A dialog box will appear asking you to enter your current password.
Step 5: Enter your current password and click OK to confirm.
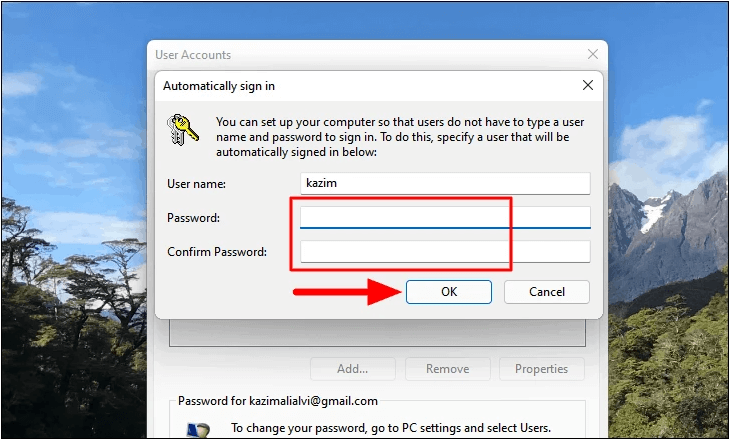
Step 6: Restart your computer to ensure the changes take effect. You should now be able to log in without entering a password.
Method 2: Remove Password Using Settings
Another method to remove the login password in Windows 11 is through the Settings app. This approach is especially helpful if you are logging in using a Microsoft account. Here's how to remove the password via Settings:
1. Press Win + I to open the Settings app.
2. Move to Accounts and then click on Sign-in options.
3. Under the Sign-in options section, locate the Password option and click on it.
4. Click on the Change button next to the Password option.
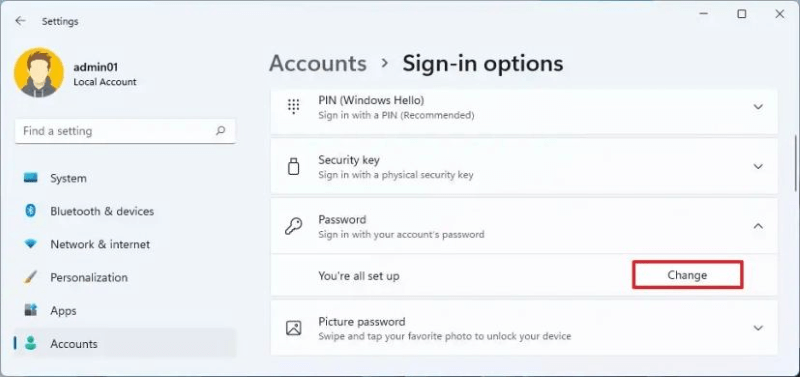
5. Enter your current password and click Next.
6. Click Next after leaving the sections for the new password, password hint, and password reenter empty.

7. Click Finish to complete the process.
After completing these steps, your Microsoft account will no longer have a password, and you will be able to log into Windows 11 without entering a password.Method 3: Use a Local Account Without a Password
Another way to remove the login password in Windows 11 is by using a local account without a password. Unlike a Microsoft account, a local account is not linked to your Microsoft services, and it can be set up without a password. Here's how to create a local account without a password:
1.Press Win + I to open the Settings app.
2.Navigate to Accounts and click on Your info.
3.Under Account settings, click on Sign in with a local account instead.

4.Make the username for the account.
5.Keep the New password and Confirm password option empty.
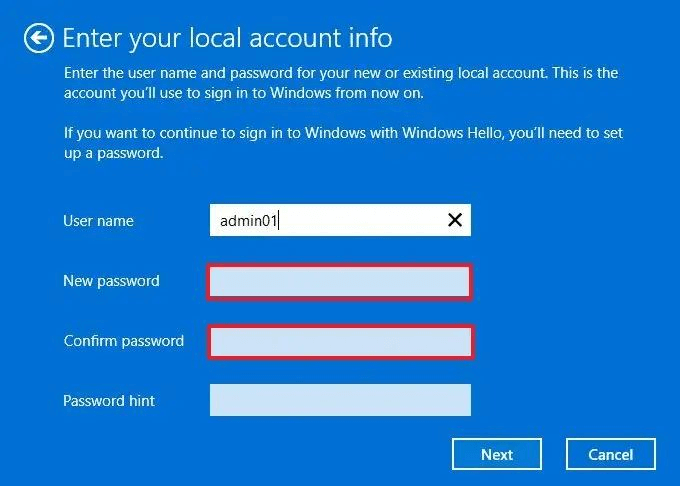
6.Click Next and then Sign out and finish.
After completing these steps, you will have a local account without a password, allowing you to log into Windows 11 without entering a password.
Method 4: Using Local Group Policy Editor (for Pro and Enterprise users)
You can set up settings in the Local Group Policy Editor to enable password-free login if you are using Windows 11 Pro or Enterprise.
1. Press Win + I to open the Run dialog box.
2. In the Run dialog, type gpedit.msc and press Enter to open the Local Group Policy Editor.
3. In the Group Policy Editor, go to Computer Configuration > Windows Settings > Security Settings > Local Policies > Security Options.
4. Find the policy "Accounts: Limit local account use of blank passwords to console logon only" and set it to Disabled.
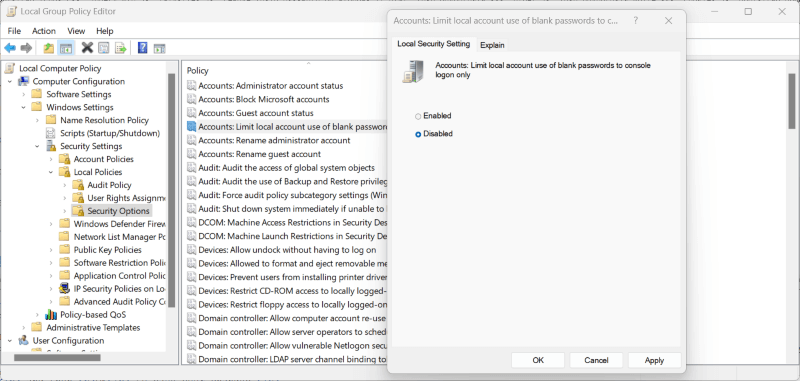
5. Click Apply and then OK to save your changes.
6. Restart your computer to apply the new settings.
This method is more advanced and should only be used if you're comfortable making changes to your system's policy settings.
Method 5: Remove the Password Using Command Prompt
For advanced users who prefer using the command line, the Command Prompt offers a method to remove the login password. Here's how to do it:
Type cmd into the search field by pressing Win + S, then choose Run as administrator to launch the Command Prompt with administrator rights.
In the Command Prompt, type the following command and press Enter:
net user UserName
Replace UserName with your actual username.
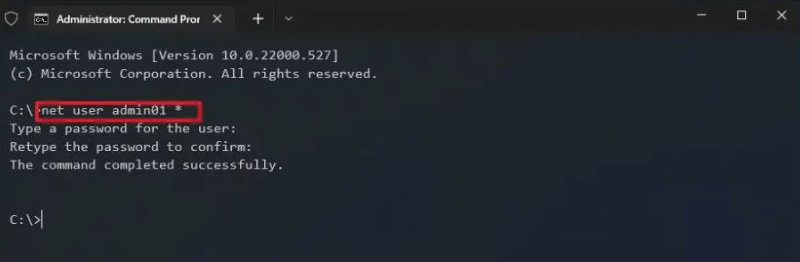
The Command Prompt will confirm that the command has been executed successfully, and your password will be removed. This method is quick and efficient but requires some familiarity with the command line.
Method 6: Disable the Password Requirement on Wake Up
If you don't want to completely remove the login password but find it annoying to enter the password every time your computer wakes up from sleep, you can disable the password requirement on wake up. Steps included:
1. Press Win + I to open the Settings app.
2. Go to Accounts and click on Sign-in options.
3. Under the Require sign-in section, click on the drop-down menu and select Never.
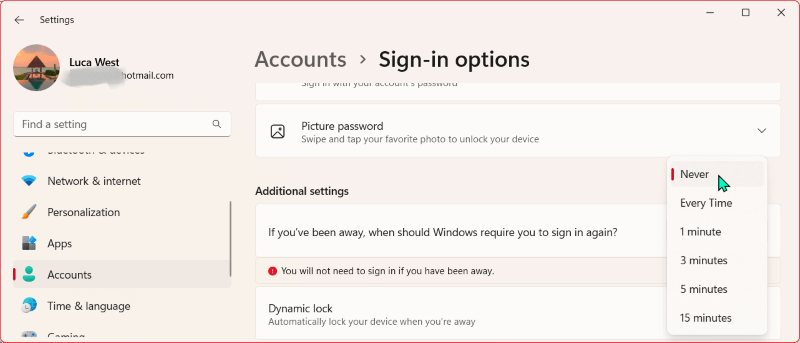
This will prevent Windows 11 from asking for a password when your computer wakes up from sleep, but it will still require a password when you first log in after a restart.
Potential Risks of Removing the Login Password
While removing the login password can enhance convenience, it also introduces several risks that should be carefully considered.
1. Reduced security🛡️ - The most significant risk of removing the login password is the reduction in security. Without a password, anyone who has physical access to your computer can easily log in and access your files, applications, and personal information. This is particularly concerning if your computer contains sensitive data, such as financial information, work-related documents, or personal photos.
2. Data theft🥷 - If your computer is stolen or lost, the absence of a login password makes it much easier for the thief to access your data. Even if you have other security measures in place, such as encryption or two-factor authentication, the lack of a password provides an additional entry point for unauthorized access.
3. Unauthorized changes👨🏾💻 - Without a login password, unauthorized users can make changes to your system settings, install malicious software, or tamper with your files. This can lead to data loss, corruption, or other security issues.
4. Compliance issues🔐 - In certain professional environments, removing the login password may violate security policies or regulatory requirements. For example, businesses subject to data protection regulations may be required to implement strong access controls, including login passwords, to protect sensitive information.
How to Protect Your Privacy by Permanently Erasing Sensitive Data?
If your Windows 11 PC is not protect by login password, you can try other methods to protect the data on the PC, such as encrypting the disk, erasing sensitive data, etc. Here is the way to permanently erase sensitive data on Windows 11 PC so that the data can’t be recovered by any data recovery software.
Step 1. Download a data erasure program for Windows 11.
DoYourData Super Eraser is a powerful, easy-to-use and safe data erasure program which offers certified data erasure algorithms to erase data securely. Download it here:
DoYourData Super Eraser
- Permanently erase data to prevent potential data recovery.
- Shred files, wipe hard drive, erase deleted files, etc.
- Once your data is erased by it, the data will be gone forever.
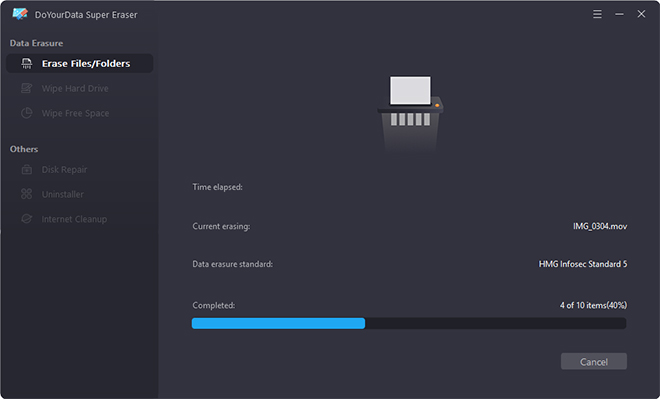
Step 2. Run DoYourData Super Eraser on your Windows 11 PC.
Open DoYourData Super Eraser, you can choose a data erasure mode to help you permanently erase your data. For example, choose “Erase Files/Folders” mode to help you permanently delete files and folders.
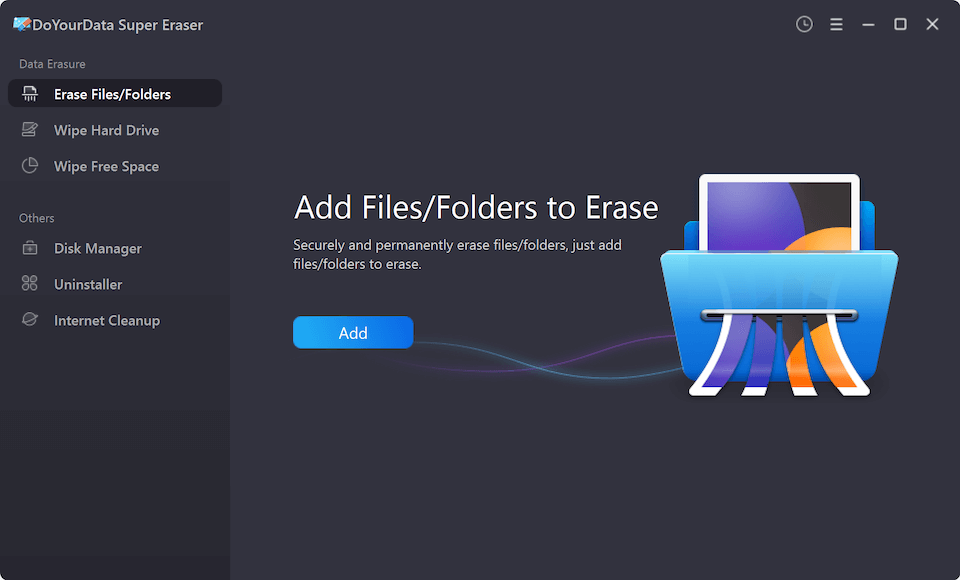
Step 3. Select the files/folders you want to erase.
Click on Add button to add files/folders you want to erase. Then you can preview the selected files and folders.
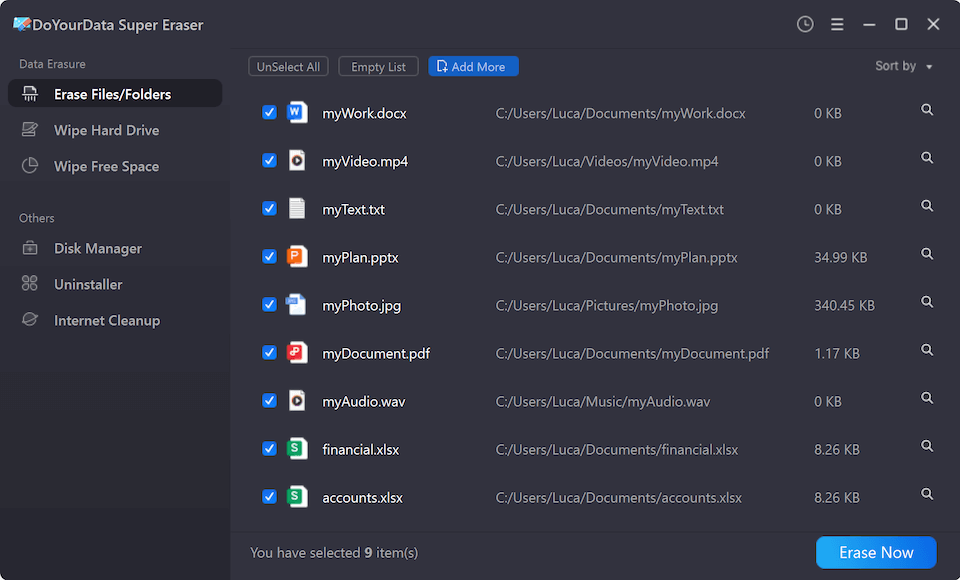
Step 4. Click on Erase Now button.
Click on Erase Now button. This software will permanently erase the selected files and folders. Once the process gets finished, all the selected files/folders will be gone forever, can’t be recovered by any data recovery software.
Conclusion
Removing the login password in Windows 11 can offer greater convenience and accessibility, especially in secure environments where the risk of unauthorized access is low. However, it's essential to carefully consider the potential risks and implement alternative security measures to protect your computer and data.
By using methods such as User Accounts settings, the Settings app, or the Command Prompt, you can easily remove the login password in Windows 11. Additionally, enabling features like BitLocker encryption, using a PIN or biometric authentication, and setting up guest accounts can help maintain a balance between convenience and security.
Ultimately, the decision to remove the login password should be based on your specific needs and the security requirements of your environment. By taking the necessary precautions, you can enjoy a streamlined Windows 11 experience without compromising the safety of your data.
DoYourData Super Eraser
DoYourData Super Eraser, the award-winning data erasure software, offers certified data erasure standards including U.S. Army AR380-19, DoD 5220.22-M ECE to help you securely and permanently erase data from PC, Mac, HDD, SSD, USB drive, memory card or other device, make data be lost forever, unrecoverable!
Written & Updated by Shirly Chen
Shirly Chen has been writing data recovery, data erasure articles for DoYourData over 4 years. She has been working as a professional website content writer & editor for quite a long time. She also writes articles about disk clone, Mac optimization, disk backup, etc.