How to Securely Wipe Hard Drive on Windows and Mac?
Do you know that the deleted and formatted data can be recovered by data recovery software? Before you sell or donate your old hard drive or an old computer, you should wipe the hard drive and permanently erase all data from it to prevent potential data recovery. Follow this guide to securely wipe HDD/SSD and external storage device on Windows or macOS. Make sure the data is lost for good, cannot be recovered by any method.
![]() Updated by Shirly Chen on April 22, 2026
Updated by Shirly Chen on April 22, 2026
Quick Navigation:
- How to Wipe A Hard Drive in Windows?
- How to Wipe A Hard Drive in macOS?
- Securely Wipe HDD/SSD with Disk Wipe Software [unrecoverable]
- Choose the Right Method to Wipe Your Hard Drive
- Final Thoughts
- FAQs About Wipe Hard Drive
Are you planning to sell or give away your computer? While you might have deleted your files and reinstalled Windows, there's one more crucial step you need to take: wiping the drive clean.
Simply deleting your data or formatting the drive isn't sufficient because files can often be recovered from the Recycle Bin or restored using specialized data recovery software. Regardless of your Windows version/macOS, there are built-in features to reset the OS to factory settings.
However, many modern computers use solid-state drives (SSDs), which are faster than traditional hard drives but can be more challenging to wipe securely. To ensure your data doesn't fall into the wrong hands, using a robust hard drive eraser utility is your best option for a thorough and secure wipe.
How to Wipe A Hard Drive in Windows?
You have several options for wiping a hard drive in Windows 11 or Windows 10. This guide will walk you through the procedures for both versions to ensure your data is securely erased.
Before You Start
Always back up your data before wiping a hard drive or making significant changes to your PC. Use cloud storage or external hard drives to keep your data safe in case something goes wrong. Cloning your hard drive creates a complete copy of your entire disk.
Save your passwords and any other important credentials, as wiped data cannot be recovered. If you don't plan to keep the computer, create a Windows recovery drive for reinstalling Windows on your new machine if needed.
Creating a recovery drive is the same in both Windows 11 and Windows 10. Here's how it looks in Windows 11:
Wipe Hard Drive in Windows 11
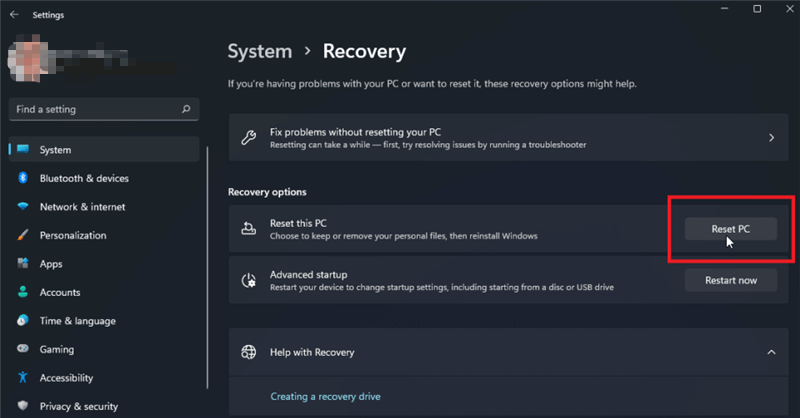
Wiping your drive in Windows 11 is quite similar to the process in Windows 10, with a few minor adjustments. Navigate to Settings > System > Recovery, and then click on Reset PC.
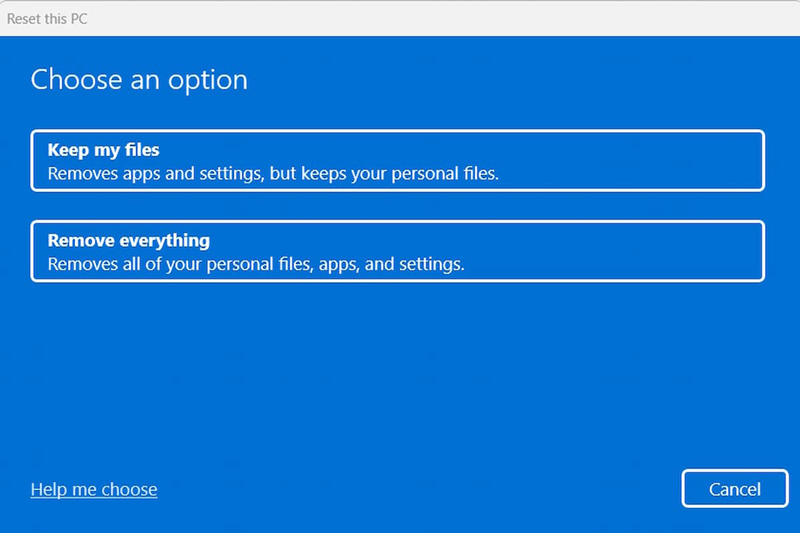
When prompted to choose what you want to erase, select Remove everything.
Opt for Local reinstall to reinstall Windows from your device, as it is typically faster than the cloud download.
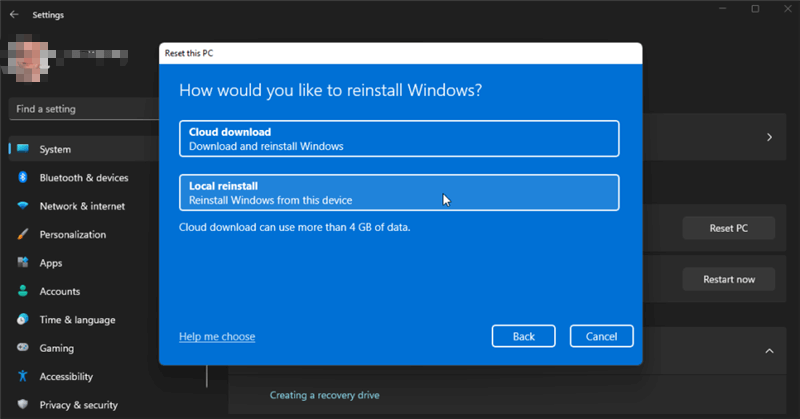
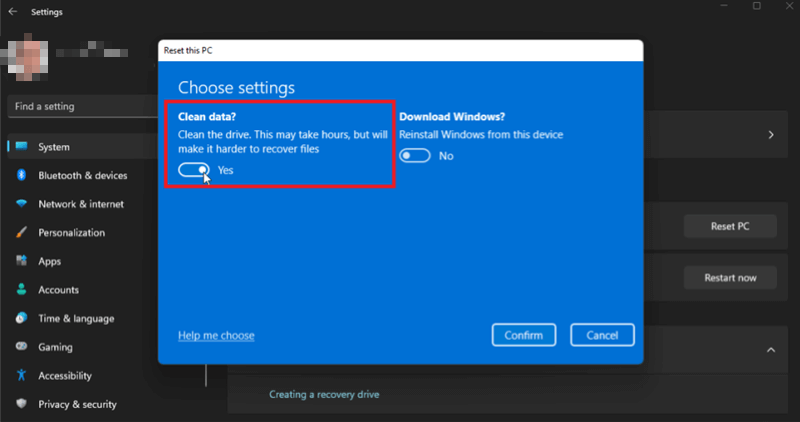
If that option fails, select Cloud download instead. In the Additional settings window, click on the Change settings link, turn on the Clean data switch, and then click Confirm.
Click Next to begin the process, then press the Reset button. Your computer will go through the reset procedure, wiping the drive and reinstalling Windows. If you plan to keep the computer, you can set up Windows again; otherwise, you can shut it down at this point.
Wipe Your Drive in Windows 10
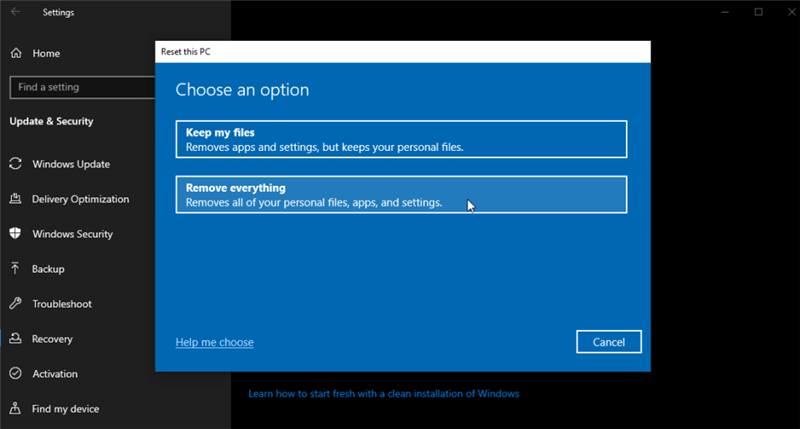
To wipe your drive in Windows 10, go to Settings > Update & security > Recovery, and then click the Get Started button. When prompted, choose the option for Remove everything. You should then choose the Local reinstall option to reinstall Windows from your computer.
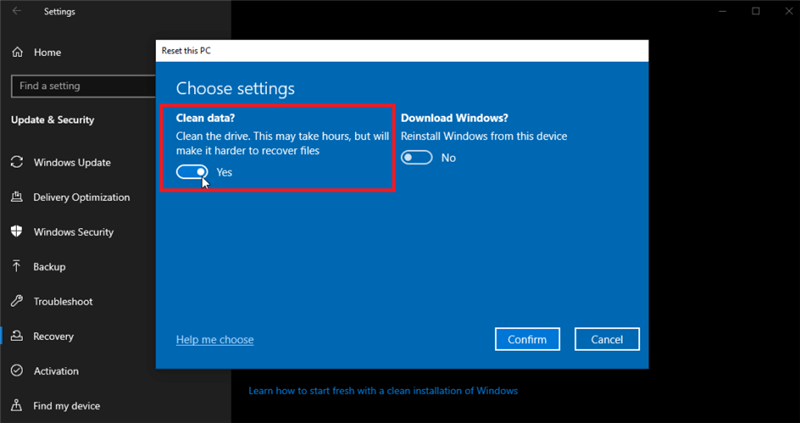
At the Additional settings window, click the Change Settings link and turn on the switch next to Clean data. Click Confirm and then click Next. Click Reset to start the process.
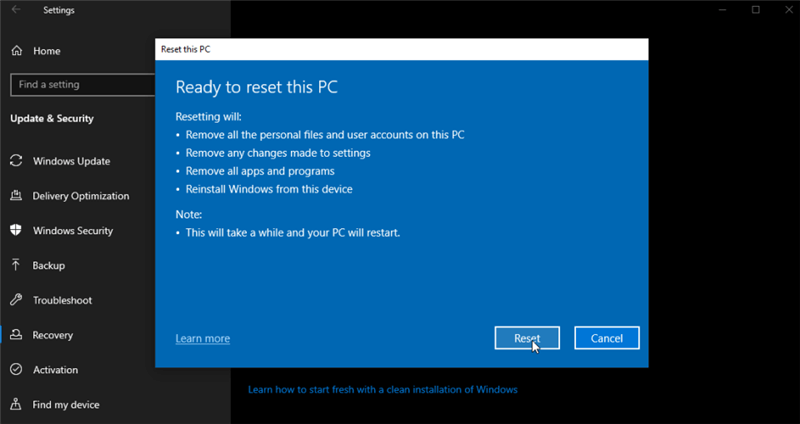
After the drive is wiped, Windows is reinstalled. If you plan to keep the computer, you can go through the Windows setup process again. But if you plan to get rid of the PC, just shut it down at this point.
Note: The lost data which is erased due to factory reset or reinstalling Windows is not lost for good and can be recovered by data recovery software.
How to Wipe A Hard Drive in macOS?
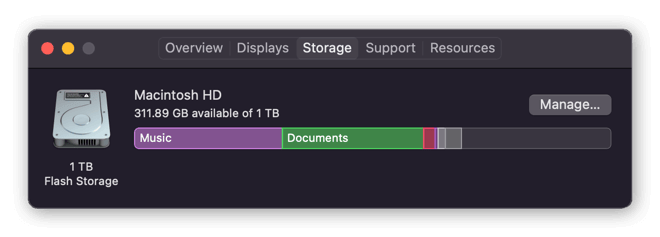
The process for wiping your hard drive on a Mac depends on whether you have a hard disk drive (HDD) or an SSD. To find out what's in your Mac, click the Apple icon, then click About this Mac. In the window that opens up, navigate to the storage tab. In this example, our Mac has a 1 TB SSD (referred to as Flash Storage).
Back up your data
Before wiping your drive, manually back up your data to an external storage device or to a cloud storage solution. You can also use Apple's built-in Time Machine utility to back up your Mac computer. You'll find it in your System Preferences or System Settings > General.
How to wipe a Mac with an Intel processor:
- Turn your Mac off. Then, press the power button and immediately hold down the Command + R keys until you see the Apple logo.
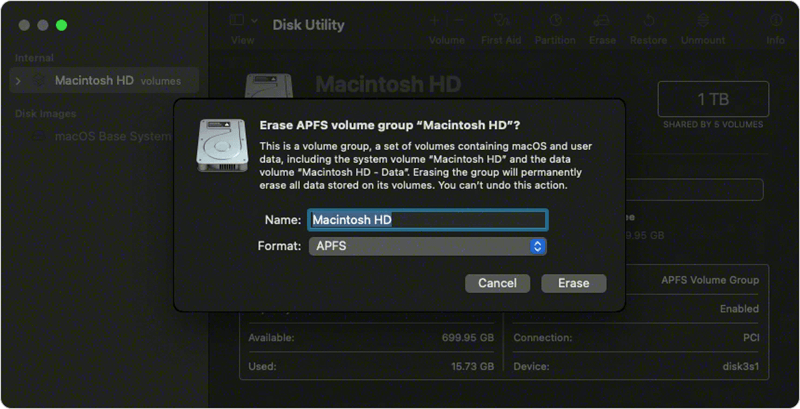
- Select Disk Utility from the options shown to you.
- Click Erase and choose a file system.
- Click Security Options if it's available, then move the slider all the way to the right for the most secure option. If you don’t see Security Options, it means that Disk Utility can’t securely wipe your drive.
- Select Erase, then click Done.
How to wipe a Mac with an Apple silicon chip:
- Turn your Mac off. Then, press and hold the power button until you see the Startup Options window. Choose Options and Continue.
- Click Disk Utility in the next window.
- Choose your Macintosh HD from the side menu.
- Click Erase and choose a file system for your drive, then click Erase.
How to wipe a Mac with an SSD:
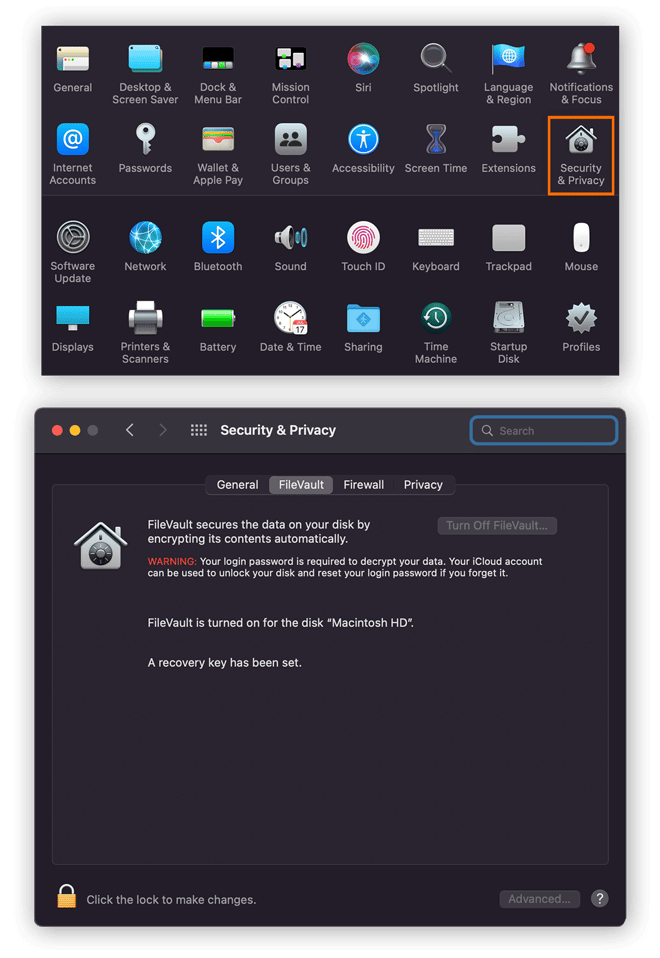
Disk Utility won't let you securely wipe an SSD. Instead, Apple encourages you to use the FileVault utility, which encrypts your drive to prevent anyone else from accessing the data on it. To turn on FileVault encryption, click Security & Privacy from your System Preferences, then click the FileVault tab.
If you don't choose to manage your FileVault encryption via your iCloud account, keep your recovery key safe.
Instead of wiping your drive, you can encrypt it, and then delete the FileVault key. Here's how:
- After using FileVault to encrypt your SSD, restart your Mac into Recovery mode using the procedures described above for either an Intel or M1 chip.
- Open Disk Utility, select your drive, then click Unlock.
- Erase your now-unlocked drive - this will delete your FileVault key and render the data on the drive unrecoverable.
Note: The data which is erased by Disk Utility is not lost for good, it can be recovered by Mac data recovery software.
Securely Wipe HDD/SSD with Disk Wipe Software [unrecoverable]
Software-Based Wiping - Software-based wiping involves using specialized tools to overwrite the data on a hard drive multiple times, ensuring it cannot be recovered.
DoYourData Super Eraser is one of the best data erasure programs. It supports to securely and permanently erase data from PC, Mac, HDD, SSD, USB flash drive, digital camera, etc. It offers flexible data erasure modes including shredding files, wiping hard drive, erasing deleted/lost data, etc. If you will sell or donate your old hard drive, you can use this tool to wipe the drive to permanently erase all data from it, making data recovery be impossible.
DoYourData Super Eraser
- Securely and permanently wipe a hard drive clean.
- Certified data erasure standards HMG Infosec, NIST 800-88, Peter Gutmann's algorithm, DoD 5220.22-M, U.S. Army AR380-19, etc.
- Once the data is erased, the data is lost for good, no trace left, cannot be recovered by any method
Before wiping your hard drive with DoYourData Super Eraser, make a backup of your data. Then follow the steps to wipe the hard drive:
Step 1. Download and install DoYourData Super Eraser on your computer. Open it, choose Wipe Hard Drive mode.
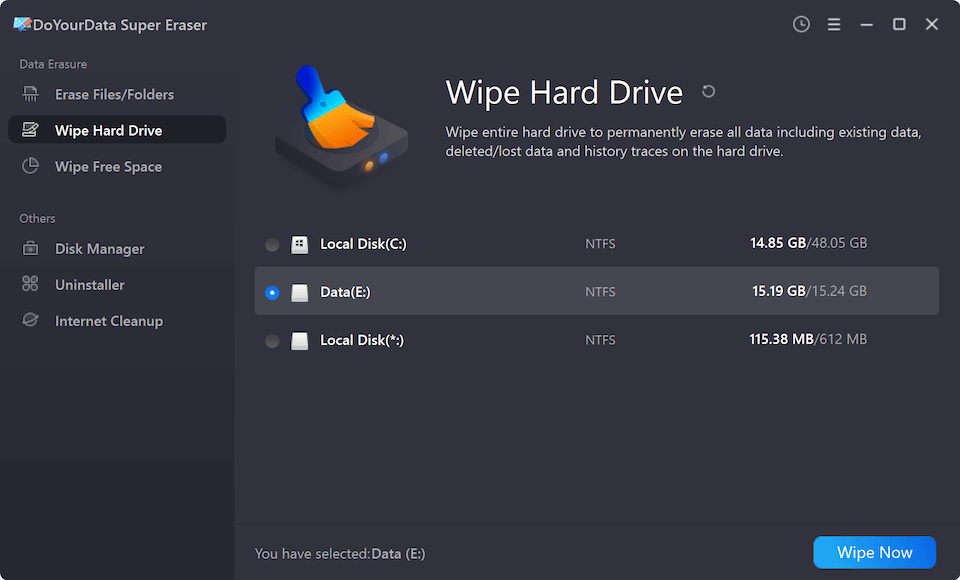
Step 2. Select the target hard drive, click on Wipe Now button.
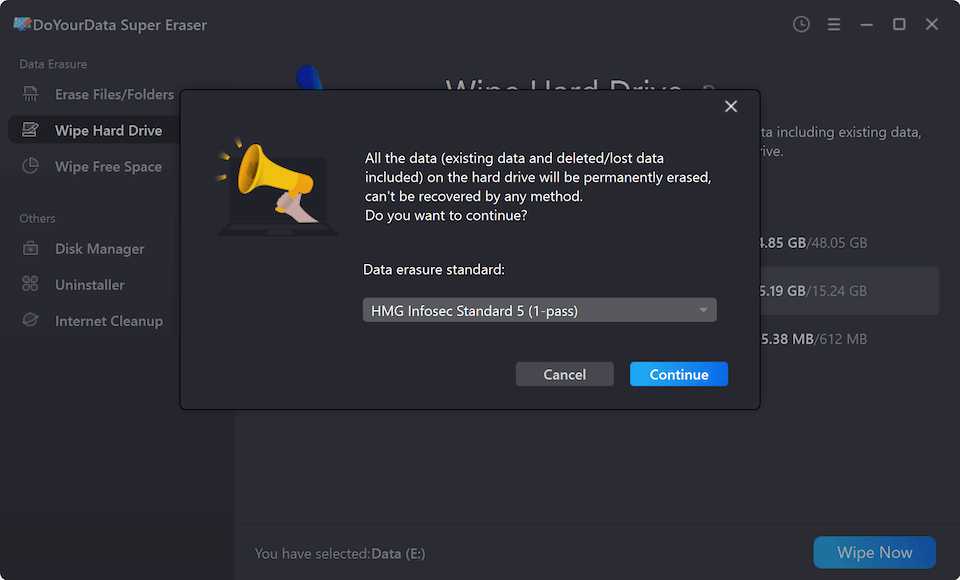
Step 3. Select a erasure standard, then click on Continue button to start wiping the hard drive.
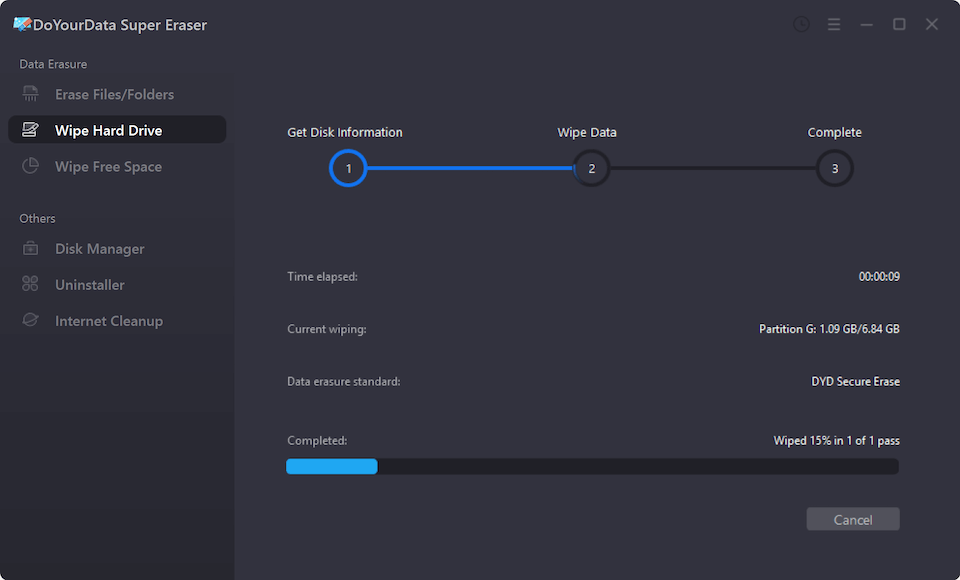
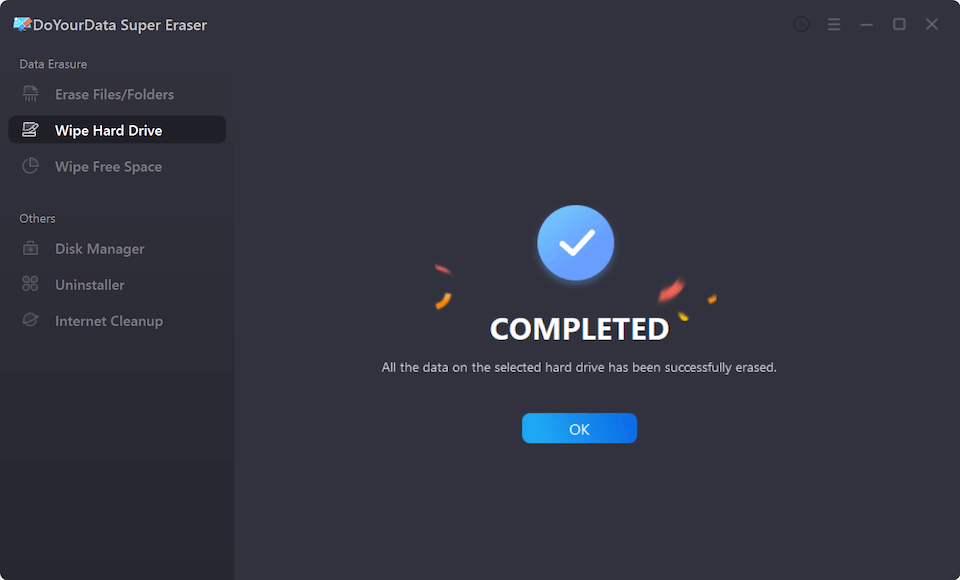
Step 4. Once the process gets finished, all data is gone forever, no way to recover it.
Another two popular software tools for secure data wiping are DBAN (Darik's Boot and Nuke) and Eraser.
DBAN (Darik's Boot and Nuke)
- What It Is: DBAN is a free and open-source program designed to securely erase all data on a hard drive.
- How to Use It:
- Download DBAN from the official website and create a bootable USB drive or CD.
- Boot your computer from the DBAN media.
- Follow the on-screen instructions to select the drive you want to wipe.
- Choose the appropriate wipe method (e.g., DoD Short, Gutmann Wipe).
- Start the wiping process and wait for it to complete.
Eraser
- What It Is: Eraser is a free software application for Windows that allows users to securely erase files, folders, and entire drives.
- How to Use It:
- Download and install Eraser from the official website.
- Open Eraser and create a new task.
- Select the target files, folders, or drives you want to erase.
- Choose the erasure method (e.g., DoD 5220.22-M, Gutmann).
- Start the task and wait for it to complete.
Choose the Right Method to Wipe Your Hard Drive
When selecting a data wiping method, several factors should be considered, including the type of data and regulatory requirements. Here's a comparison of build-in and third-party methods and recommendations for different scenarios:
Factors to Consider
- Type of Data:
- Sensitive Information: For highly sensitive data like financial records or personal information, thorough and irreversible wiping methods are crucial.
- Less Sensitive Data: Less sensitive data may require less stringent wiping methods.
- Regulatory Requirements:
- Compliance: Regulatory standards such as GDPR, HIPAA, or PCI-DSS may mandate specific data destruction methods.
- Legal Obligations: Organizations must adhere to legal requirements regarding data protection and privacy.
Comparison: Built-in OS Methods vs. Professional Erasure Software
| Feature | Built-in OS Methods (Windows Reset / Disk Utility) |
Professional Erasure Software (e.g., DoYourData Super Eraser) |
|---|---|---|
Primary Goal |
Reinstalling the OS or basic clearing. |
Permanent and total data destruction. |
Data Recoverability |
High. Standard formatting or "Remove Everything" often leaves data traces that recovery software can find. |
Zero. Overwrites data multiple times, making it 100% unrecoverable by any method. |
Security Standards |
Normally, no data overwriting. |
Certified Standards (DoD 5220.22-M, NIST 800-88, Peter Gutmann, etc.). |
SSD Optimization |
Limited. Disk Utility often cannot "securely" wipe an SSD due to wear leveling. |
Safe for SSDs. Uses specific algorithms that erase data without shortening the SSD's lifespan. |
Scope of Erasure |
Usually wipes the entire partition or drive. |
Flexible. Can shred specific files, wipe folders, or erase only "Free Space." |
Ease of Use |
Requires navigating recovery modes or system BIOS/Settings. |
One-Click. Simple desktop interface; no technical "booting into recovery" required. |
By carefully evaluating these factors and recommendations, individuals and organizations can choose the most suitable data wiping method to protect sensitive information and meet regulatory standards effectively.
Final Thoughts
Ensuring the secure wiping of hard drives is not merely a matter of data hygiene; it is a critical step in protecting sensitive information and complying with regulatory standards. Whether you are preparing to sell a computer, upgrading hardware, or disposing of damaged drives, the method you choose can have profound implications for data security.
Software-based wiping tools like DoYourData Super Eraser, DBAN and Eraser offer convenient solutions for personal use, providing effective erasure of data while maintaining usability of the drive. These methods are cost-effective and suitable for smaller volumes of data.
FAQs About Wiping Hard Drive
- Download and install DoYourData Super Eraser.
- Open DoYourData Super Eraser, select the target drive.
- Click on Wipe Now button.
- Securely and permanently erase data from the drive.
Once the data is erased by DoYourData Super Eraser, the data is lost for good, cannot be recovered by any method.
- Download and install DoYourData Super Eraser.
- Open DoYourData Super Eraser, choose Wipe Free Space mode.
- Select the drive and click on Wipe Now button.
- Securely wipe the deleted/lost data.
- DoYourData Super Eraser
- DBAN
- Eraser
- Donemax Data Eraser
- AweEraser
- Stellar Disk Wipe
- BitRaser
- Minitool Partition Assistant
- Blancco Data Eraser
- Kill Disk
DoYourData Super Eraser
DoYourData Super Eraser, the award-winning data erasure software, offers certified data erasure standards including U.S. Army AR380-19, DoD 5220.22-M ECE to help you securely and permanently erase data from PC, Mac, HDD, SSD, USB drive, memory card or other device, make data be lost forever, unrecoverable!
Written & Updated by Shirly Chen
Shirly Chen has been writing data recovery, data erasure articles for DoYourData over 4 years. She has been working as a professional website content writer & editor for quite a long time. She also writes articles about disk clone, Mac optimization, disk backup, etc.