The reliable Mac data recovery software to recover deleted or lost files.
Free TrialOrganizing files in a tree-like pattern is how computers store data. If you're new to macOS, getting the absolute path to a folder or file may seem daunting. In contrast to Windows, the folder's detailed path value is not accessible here. Knowing the many methods available on macOS to obtain the entire path to a file is helpful. You may require the pathname for an application, a shortcut, or simply as a point of reference.
File locations on Macs can be found using several different methods; Simply dropping the file into the terminal using drag and drop is one option. This article describes some additional methods available on Mac OS for obtaining a file's path.
What is a file path?
If you're using a Mac, you've probably heard of the term "file path," which specifies the location of a saved file. Depending on your organizational system, this could be as basic as a file on your Desktop or as complex as a folder nested within a folder. As an added complication, knowing the location of a file is often necessary for working with it or accessing it from another program.
Sometimes, while you work and save, you lose track of where you put things; this is when these come in handy.
Option 1: Get Location with Get Info:
If you need any information on a specific file, just go to Get Info on a file. The following are instructions for accessing Get Info.
Step 1. Click on Finder
To locate the document, use the Finder. Yes, you will discover the file, but it will only come up in the folder where it's kept.
Step 2. Go to get Info
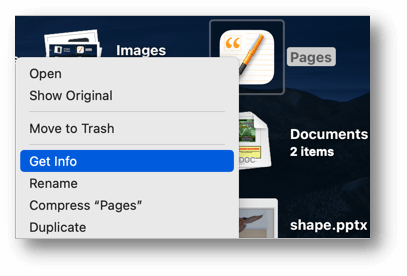
Right-click the file once the Finder has located it. A drop-down list will pop up. Locate the link labeled "Get Info" and choose it.
or
Select the file from which you need the path information, then press the "Command + I" keys on your keyboard. You may use the "Get Info" option by right-clicking the file.
Step 3. Check Location
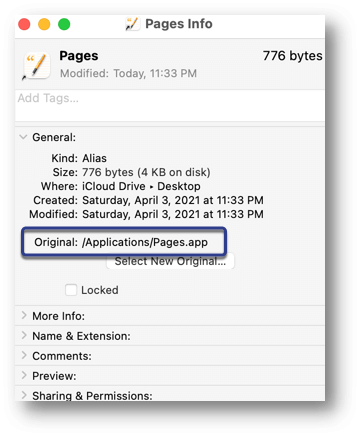
A new window will open in pop-up mode. To find Where to look in the General section of the pop-up window. The file's path can be found in that directory.
Option 2: See the Path in the Finder Title Bar:
If you find the Path Bar at the bottom of the Finder window to be a distraction, you may enable a complete path view in the title bar and tab bar of every Finder window with a sophisticated Terminal command. Mac OS 11.0 later truncates the whole path in the title bar, but you can see the complete path by hovering over the truncated version.
Initiate the process by launching the Terminal program. A Terminal window will open; to use it, click within it, paste the following command, and then press Return. (This toggles an obscure flag in the operating system, closes all Finder windows, and restarts them. There will be no information loss during the procedure.
When you reload Finder, the complete path to the folder will be displayed in the window's title and tab bar.
Option 3: Spotlight Search Open File Location:
Spotlight's search bar is the final resort for locating a file. To open Spotlight search and look for a specific file or application, press "Command + Space." The file's location is not displayed in the search results returned by Spotlight by default. Instead, choose the file and hit the command key. To see the file's path in the status bar, do as indicated below. When you click the file while holding the command key, Finder will open to that spot.
Find the path within a document.
The location of a file, image, or other saved item may usually be determined without leaving the current working window (the window in which you view that item).
Let's use a Word document as an illustration. If the file has been saved, you may view its full path by Control-clicking its name at the top of the window. The path will display the file's location relative to its parent folders.
Find file path in Automator:
You may also create an Automator script and run it from within an app by selecting Services from its menu.
Launch Automator, then choose File > New > Quick Action.
Set 'Workflow receives current' to a Finder folder or file in the upper-right corner of the Automator window.
Then, drag Copy to Clipboard from the Actions menu to the left.
You can save the action by giving it a name (FindFilePath sounds appropriate) and clicking the Save button.
Congratulations. You may now copy the location of a selected item in a Finder window by going to the menu bar, clicking Finder > Services, and then selecting FindFilePath.
Conclusion:
While knowing the complete file path may not be something you encounter frequently, it can be useful in various situations. But depending on the current needs, you can use any of numerous methods to expose a file path on a Mac.
DoYourData Products
DoYourData Super Eraser for Mac
Permanently shred files or wipe hard drive to prevent data recovery on Mac.
Free TrialClone HDD, SSD, Mac OS, external disk, USB drive, and more under Mac OS.
Free TrialWritten & Updated by Ricky Lin
Ricky Lin is an senior editor of DoYourData who lives in Adelaide, Australia. He is interested in writing technology articles related with data recovery, computer issue fixes, disk clone, iPhone data recovery, video edit, Mac optimization, etc. He Joined DoYourData in 2019 and have written 500+ articles to help both Windows users and Mac users to solve data or computer problems.