How to Fix External Hard Drive Not Showing Up on macOS 27 Golden Gate
If your external hard drive is not showing up on macOS 27 Golden Gate, start with basic hardware checks: inspect cables, switch USB-C ports, or connect to another Mac. If hardware works but the drive remains hidden, recover your data immediately using Do Your Data Recovery for Mac before attempting repairs. Finally, fix the drive by advanced methods.
 Ricky Lin updated on September 16, 2026
Quick Navigation:
- Perform Basic Hardware and Connection Checks
- Recover Data Before Performing Advanced Fixes
- Advanced Fixes for External Drive Not Showing Up
- Conclusion
Upgrading to the latest Apple operating system brings exciting features, refined interface tweaks, and enhanced security performance. However, major system updates can sometimes cause unexpected bugs and storage issues. One of the most frustrating problems Mac users encounter after updating is finding that their external hard drive is not showing up on macOS 27 Golden Gate.
Why does this happen? The issue can range from loose physical cables and outdated USB drivers to minor macOS system glitches, corrupt file systems, or permission changes enforced by macOS 27's updated security protocols.
Don't panic—your files are likely completely safe. In this comprehensive step-by-step guide, we will walk you through proven troubleshooting methods to resolve the external hard drive not showing up issue on macOS 27 Golden Gate safely and quickly.
Fast Troubleshooting Roadmap
- Basic Hardware Checks: Check connections, cables, USB hubs, and try another computer.
- Data Safety First: Recover vital files with Do Your Data Recovery for Mac before formatting or repairing.
- Software & System Fixes: Adjust Finder preferences, run Disk Utility First Aid, restart core services, or reformat.
Perform Basic Hardware and Connection Checks
Before digging deep into system settings or running complex command-line prompts, always rule out physical hardware issues first. Surprising as it sounds, bad connection hardware is the leading cause behind external hard drives failing to mount on Mac.
1. Inspect the Cable and USB-C Adapters
USB-C and Thunderbolt cables undergo significant wear and tear over time. A damaged pin inside the connector or a slight break in the wire can deliver power to the drive (making its light turn on) without transmitting data.
Action: Try swapping your current USB cable for a known working cable. If you are using a dongle, multiport USB-C hub, or adapter, connect the drive directly to your Mac's built-in port to rule out a faulty adapter.
2. Switch USB Ports on Your Mac
MacBook and Mac desktop ports can sometimes stop responding due to temporary system glitches or power draw issues.
Action: Unplug the external drive and insert it into a different USB or Thunderbolt port on your Mac. If your drive requires external power, make sure its power adapter is plugged securely into a wall outlet.
3. Connect the External Drive to Another Computer
Testing the drive on another device isolates whether the problem lies with the drive itself or with macOS 27 Golden Gate.
Action: Plug the drive into another Mac running macOS 27 or an older macOS version. Alternatively, plug it into a Windows PC. If the drive works on another machine, your drive hardware is healthy, and the issue is software-related on your main Mac.
4. Restart Your Mac
It sounds simple, but restarting your Mac flushes system memory, clears temporary background caches, and restarts background hardware control daemons.
Action: Disconnect the external drive safely if possible, click the Apple menu () > Restart, and reconnect the drive after your Mac boots back up.
Recover Data Before Performing Advanced Fixes
If basic hardware checks do not bring your drive back to life on desktop, your drive might suffer from a corrupted partition table or unreadable file system. Applying disk repair tools or terminal commands carries a slight risk of overwriting data or necessitating a full drive format.
To protect your photos, documents, and business files from permanent loss, your top priority should be recovering your data right now.
Even if your drive does not show up on your desktop or inside Finder, specialized Mac data recovery software like Do Your Data Recovery for Mac can still scan the raw storage blocks and extract your files safely.
Why Choose Do Your Data Recovery for Mac?
- High Compatibility: Fully compatible with macOS 27 Golden Gate, macOS Tahoe, macOS 15 Sequoia, macOS 14 Sonoma, and older versions.
- All Storage Formats: Supports APFS, HFS+, exFAT, FAT32, NTFS, and damaged RAW storage formats.
- Deep Scan Technology: Locates lost partitions, formatted drives, corrupted volumes, and hidden system files.
- Simple 3-Step Operation: Designed for users of all technical levels with no complex command steps.
🔹 Steps to Recover Data from Unrecognized External Drive:
Follow these simple steps to retrieve your files before fixing the drive:
Step 1: Download the software and install it on your Mac. Launch the program.
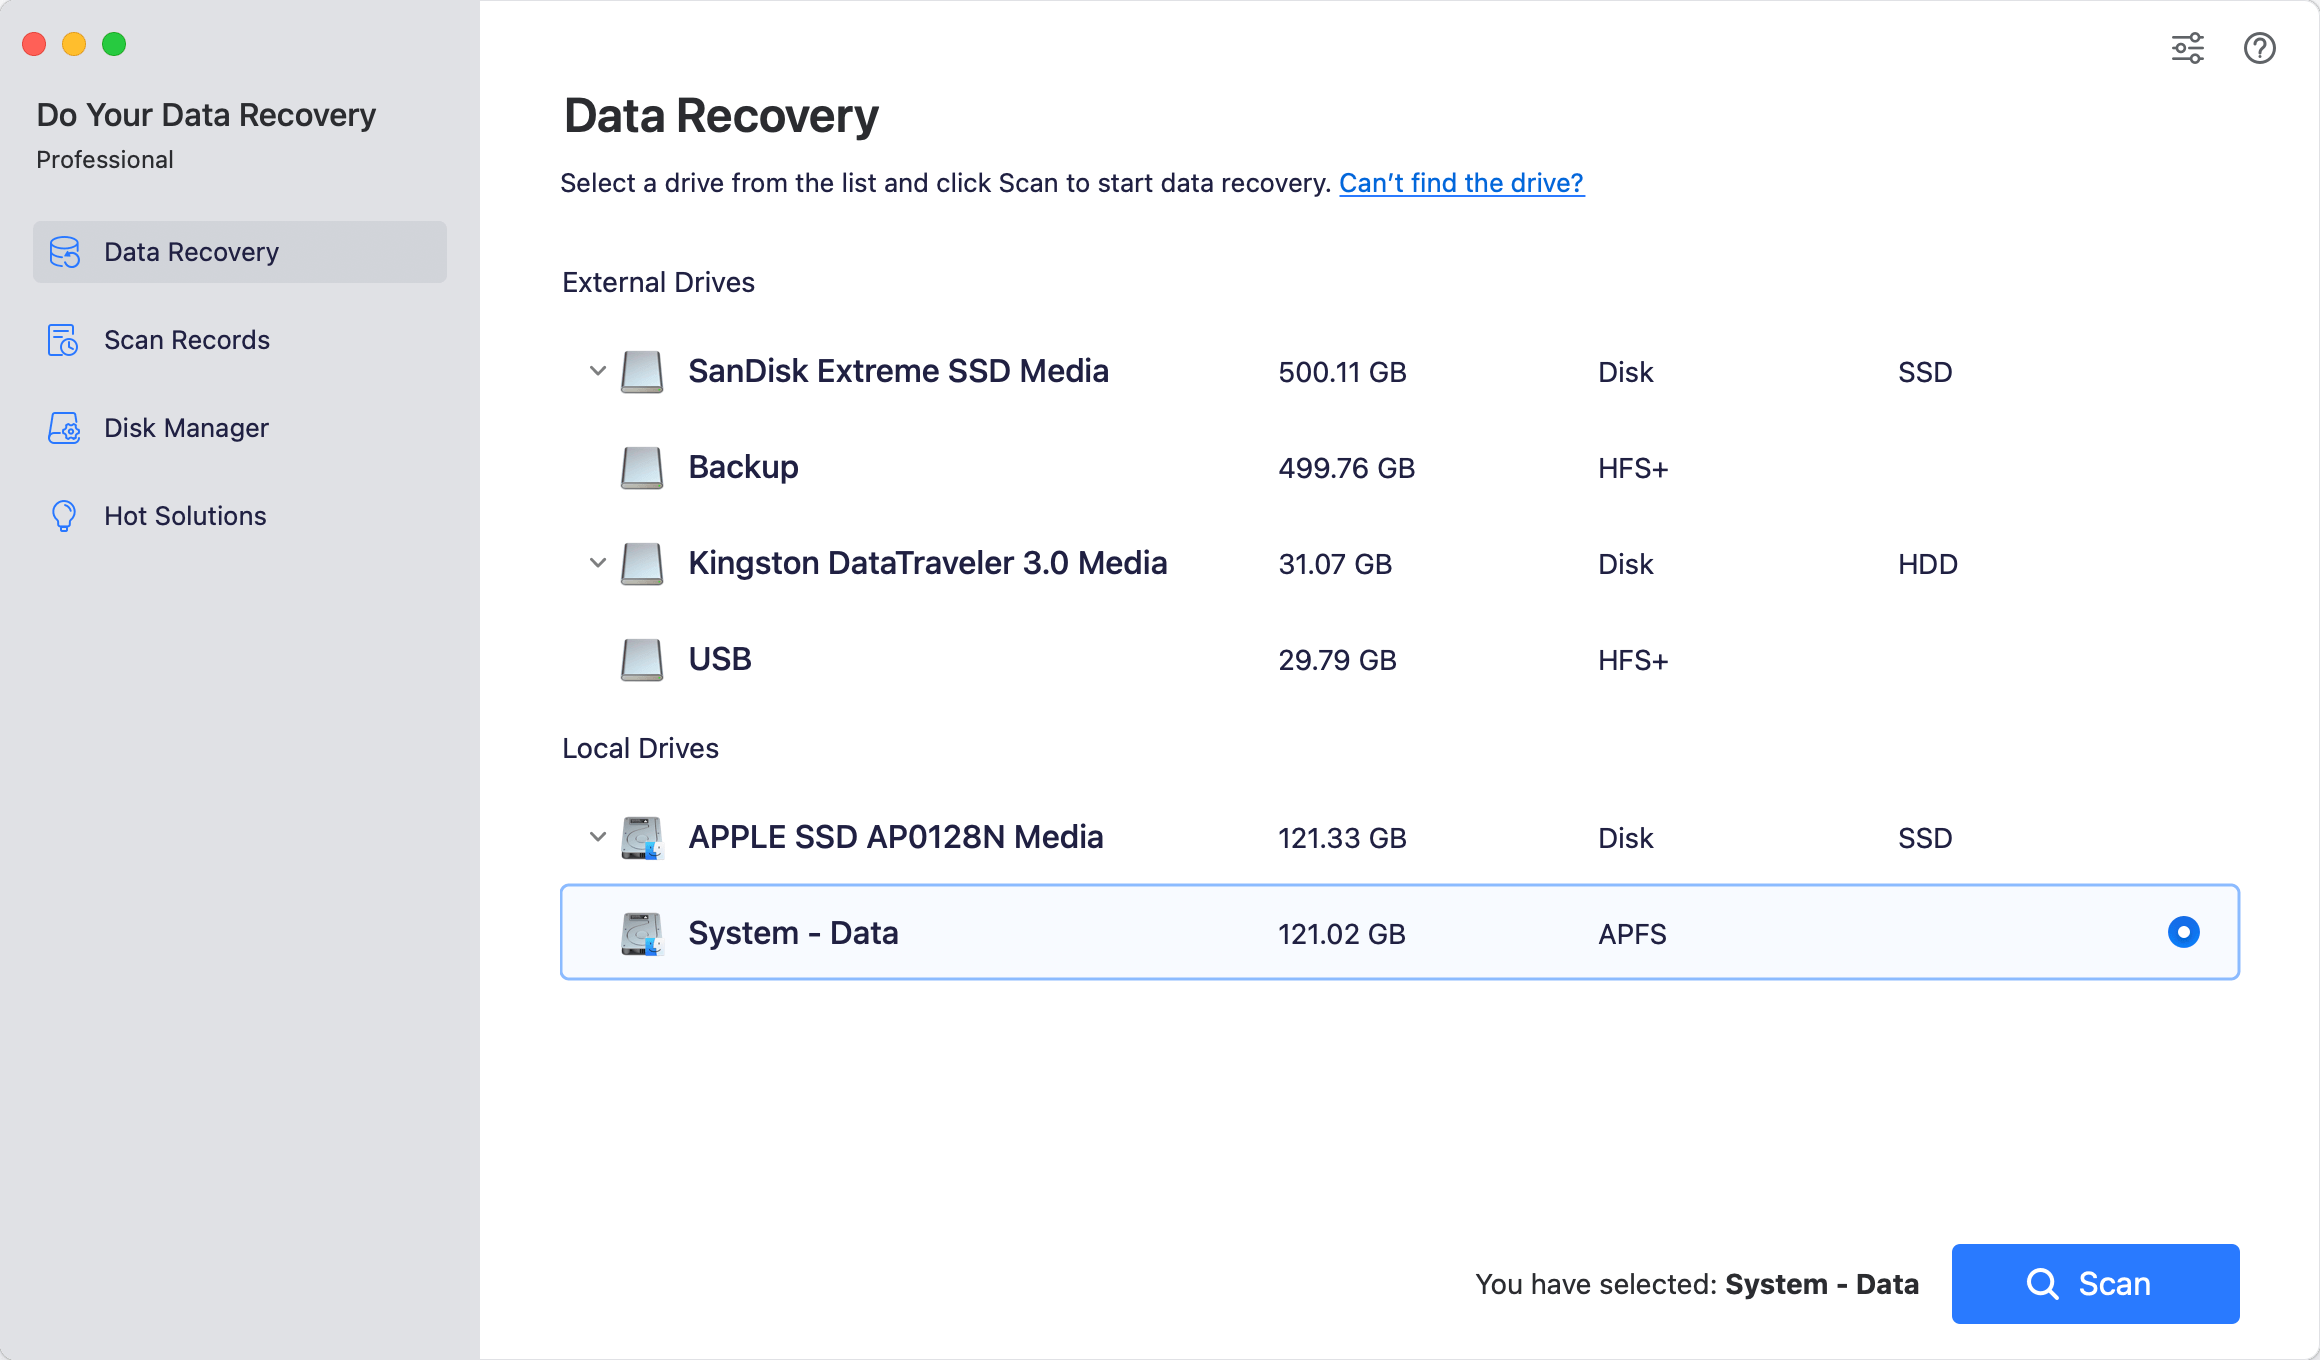
Step 2: The software will list all connected storage devices, including greyed-out or unmounted external hard drives. Select your drive and click the 'Scan' button.
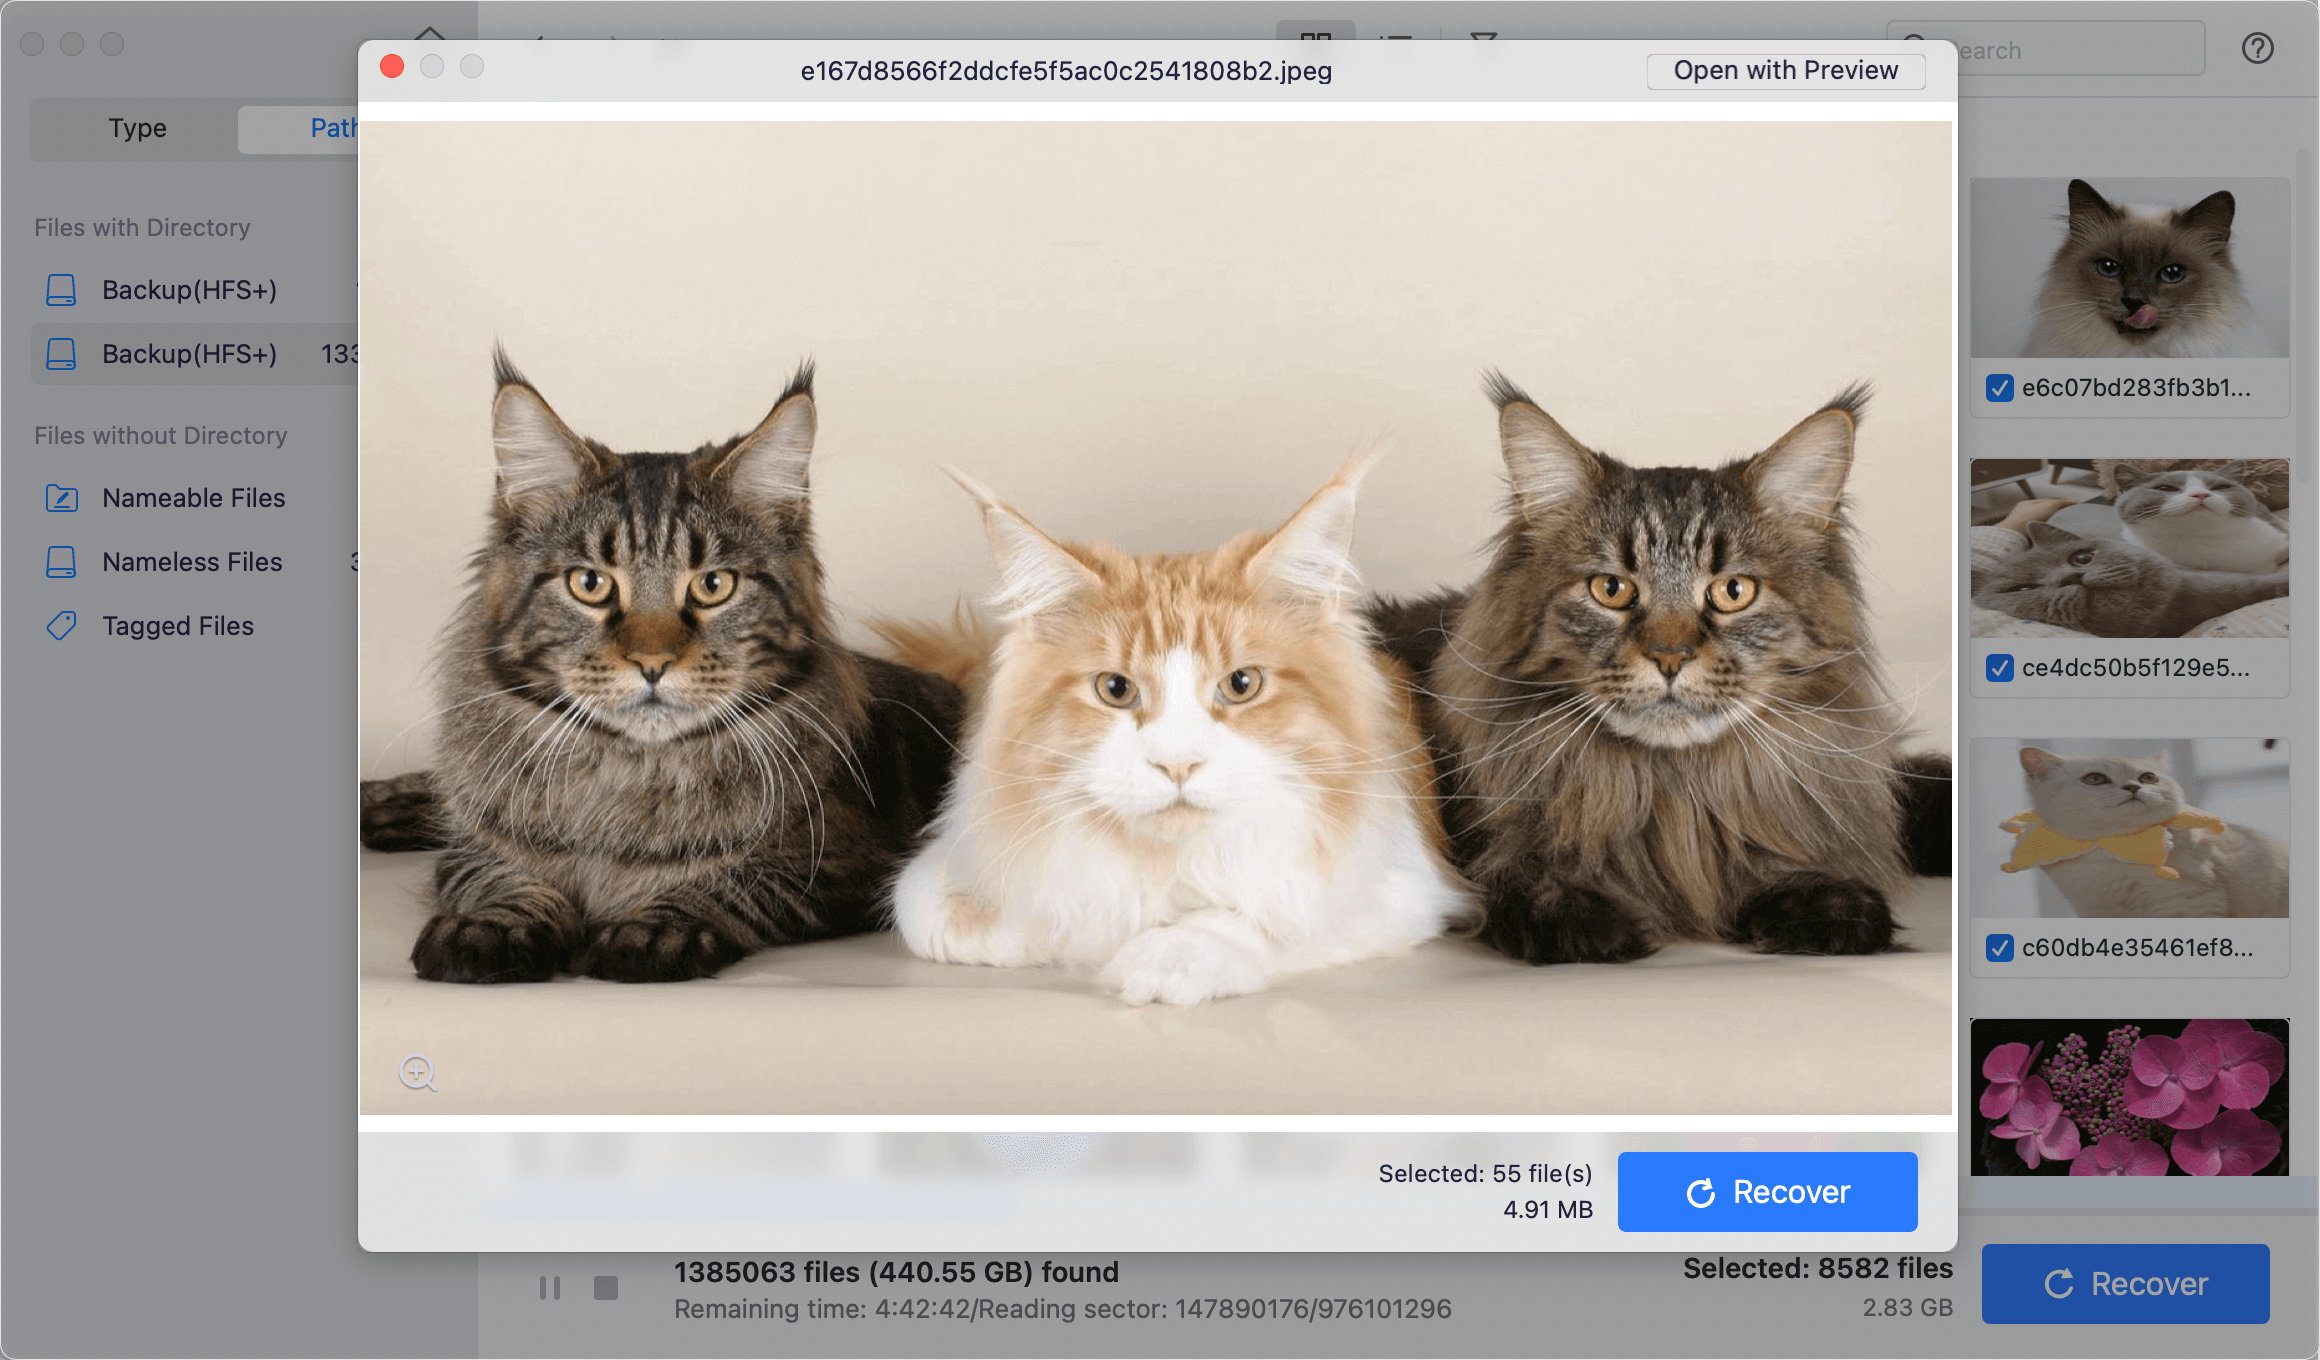
Step 3: Once the deep scan completes, browse through organized folders, preview your photos or documents, select the items you need, and click 'Recover' to save them onto your Mac's internal drive or another safe storage device.
💡 Tip: Never save recovered files back onto the affected external hard drive until you have completely repaired or reformatted it. Always save recovered files to your Mac's local storage or a secondary backup drive.
Advanced Fixes for External Drive Not Showing Up
Once your important files are safely recovered and backed up, you can confidently apply advanced software remedies to make your external hard drive show up on macOS 27 Golden Gate again.
Method 1: Adjust Finder Preferences and Desktop Settings
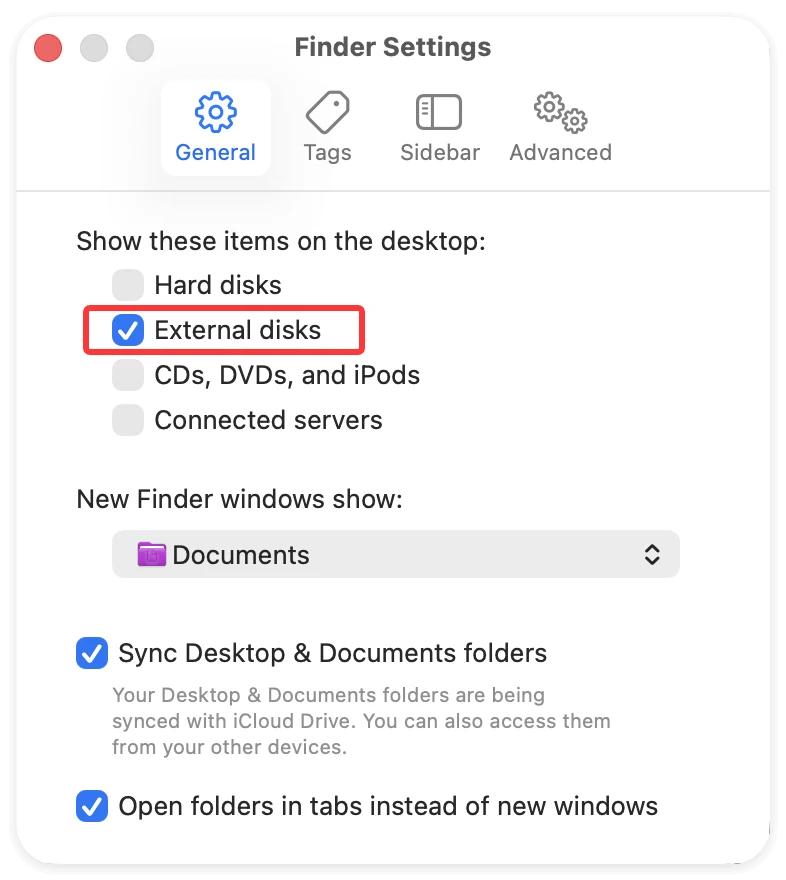
Sometimes the drive is mounted properly by the operating system, but macOS 27 Golden Gate settings are configured to hide external disks from your Desktop and Finder sidebar.
Step 1: Open a Finder window on your Mac.
Step 2: Click Finder in the top menu bar and choose Settings.
Step 3: Under the General tab, ensure 'External disks' is checked.
Step 4: Switch to the Sidebar tab and check 'External disks' under the Locations heading.
Check your Desktop and Finder sidebar to see if your drive icon reappears.
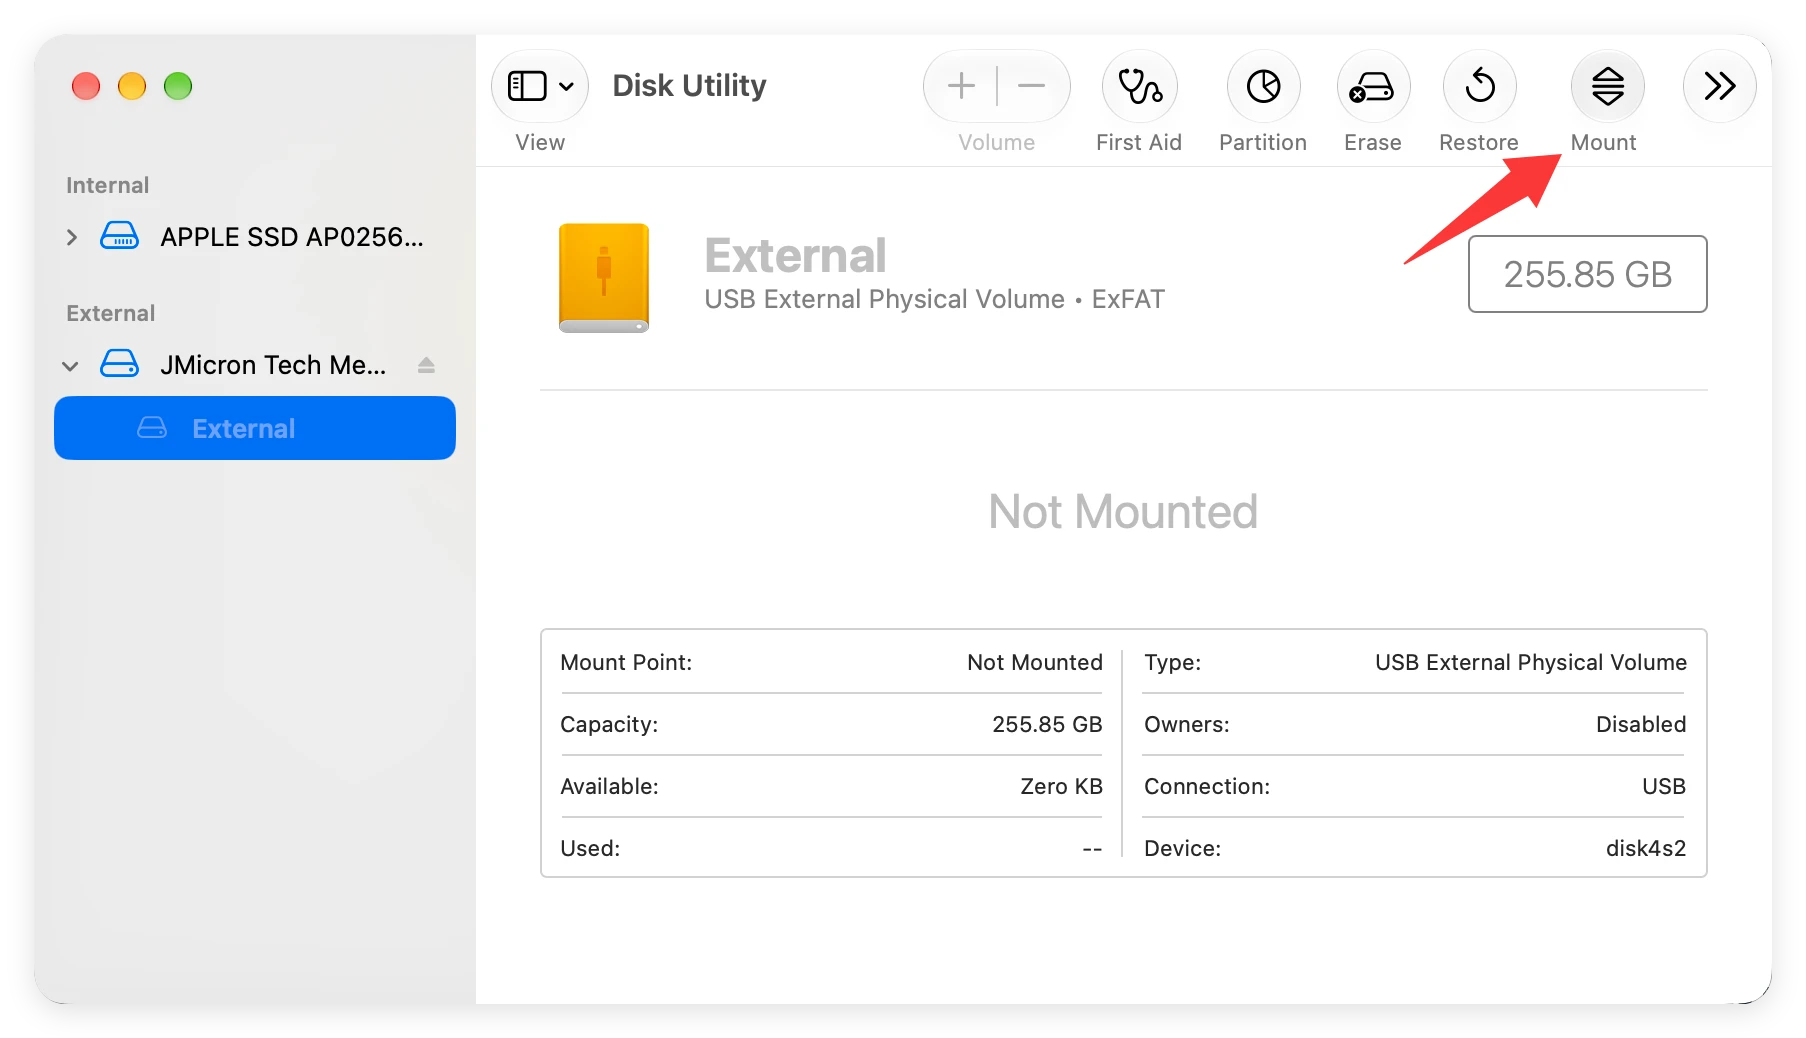
Method 2: Check and Mount Drive in Disk Utility
Disk Utility is Apple's built-in drive management tool. If the drive is recognized by your hardware layer, it will show up in Disk Utility even when hidden from Finder.
Step 1: Press Command + Spacebar to open Spotlight, type 'Disk Utility', and press Enter.
Step 2: Click View in the top-left corner of Disk Utility and select 'Show All Devices'.
Step 3: Locate your external drive in the left panel. If the drive name appears greyed out, it means the drive is unmounted.
Step 4: Select the greyed-out volume and click the 'Mount' button at the top menu bar.
Method 3: Run First Aid to Repair Drive Corruptions
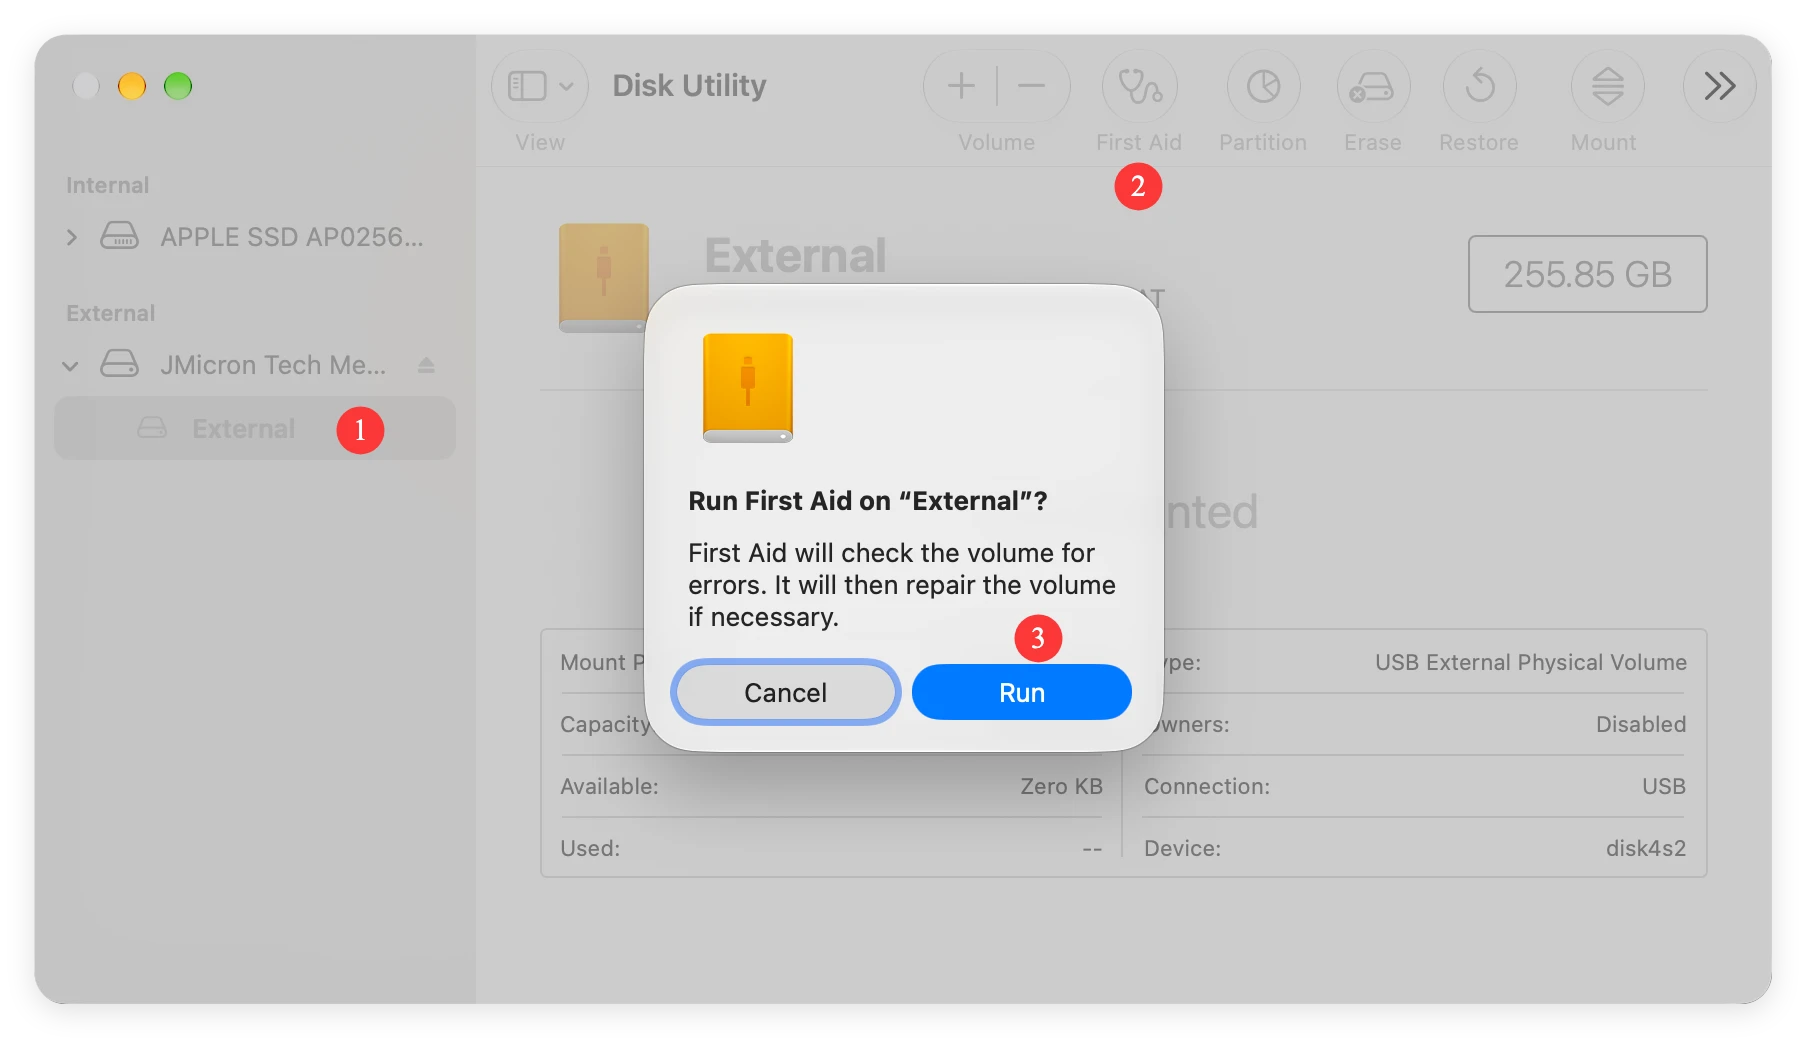
File system errors and corrupted directory indexes can prevent macOS 27 from mounting your drive normally. Disk Utility's First Aid feature can automatically scan and fix these disk errors.
Step 1: Open Disk Utility and select your external hard drive volume from the left sidebar.
Step 2: Click the 'First Aid' button at the top toolbar.
Step 3: Click 'Run' to initiate the diagnostic and repair process.
Step 4: Wait for Disk Utility to complete the check. If errors are found and repaired, unplug and reconnect the drive.
Method 4: Force Mount Drive via macOS Terminal
If Disk Utility fails to mount the disk, you can force the operating system to process the drive using macOS Terminal commands.
Step 1: Open Terminal (Applications > Utilities > Terminal).
Step 2: Type the command 'diskutil list' and press Enter to list all connected disks.
Step 3: Locate your external drive identifier (e.g., 'disk2' or 'disk2s1').
Step 4: Type 'diskutil mount /dev/disk2s1' (replace with your exact disk identifier) and press Enter.
Step 5: If force mounting fails, try force-ejecting first with 'diskutil eject /dev/disk2' and then re-plugging the drive.
Method 5: Restart fsck Daemon in Terminal
When you disconnect an external hard drive without ejecting it safely, macOS triggers a background process called 'fsck' (File System Consistency Check) to repair the drive upon re-insertion. Sometimes this process gets stuck in an infinite loop, blocking the drive from showing up.
Step 1: Open Terminal.
Step 2: Type 'ps aux | grep fsck' and press Enter to check if fsck is running.
Step 3: If you see an active fsck process, type 'sudo pkill -f fsck' and press Enter.
Step 4: Enter your Mac administrator password. Stopping the frozen fsck task often allows the drive to mount immediately.
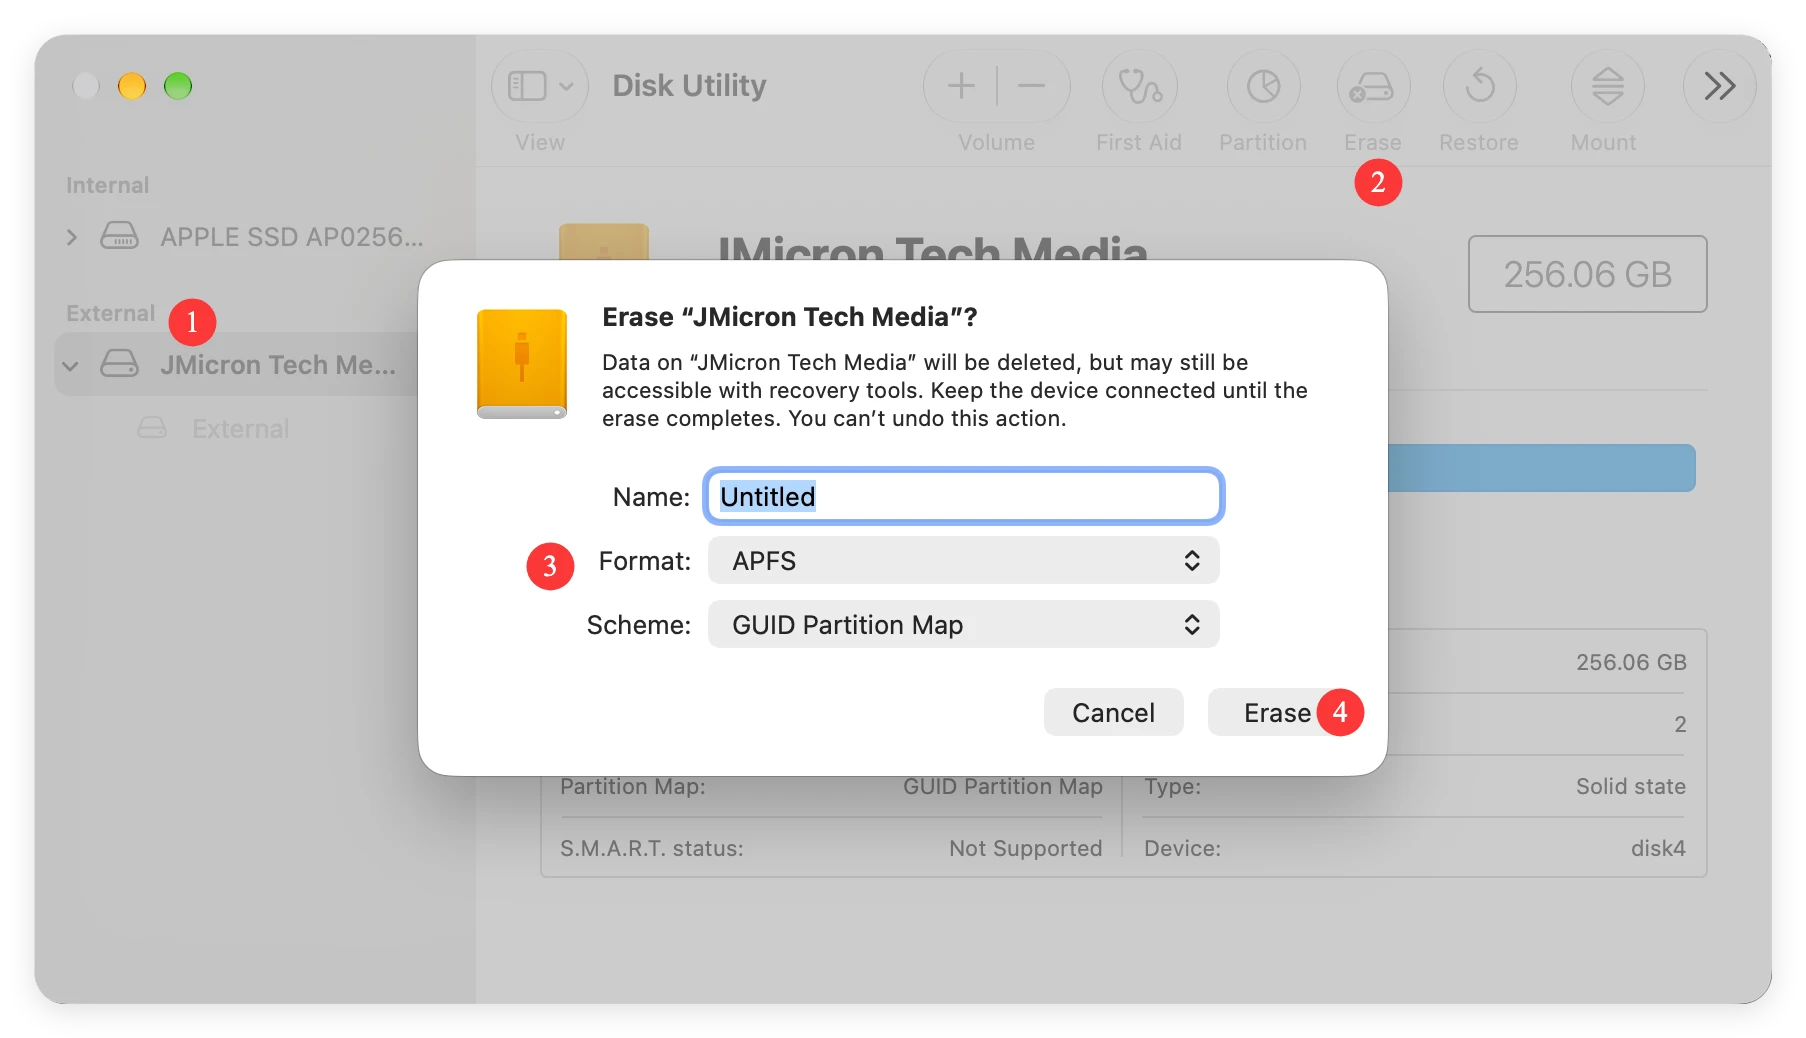
Method 6: Reformat External Drive to exFAT or APFS
If the drive file system is severely damaged or formatted with an incompatible file system (such as raw Windows NTFS without write drivers), reformatting will restore full functionality.
⚠️ Warning: Formatting will erase all data on the external drive. Ensure you have used Do Your Data Recovery for Mac to recover your files before performing this step.
Step 1: Open Disk Utility and select the root external drive.
Step 2: Click the 'Erase' button in the top menu.
Step 3: Assign a new name to the drive.
Step 4: Select 'APFS' (for Mac-only use) or 'exFAT' (for cross-platform compatibility with Windows and Mac).
Step 5: Select 'GUID Partition Map' as the Scheme and click 'Erase'.
Conclusion
Encountering an external hard drive not showing up on macOS 27 Golden Gate can interrupt your workflow, but in most cases, it is easily fixable. By systematically working through basic cable and port checks, you can quickly narrow down the root cause.
If the issue persists, remember to put your data safety first. Use Do Your Data Recovery for Mac to scan and retrieve your valuable files before attempting advanced repairs like Disk Utility First Aid, Terminal force mounting, or disk reformatting.
With your files safely secured, following our step-by-step repair techniques will get your external hard drive mounting smoothly on macOS 27 Golden Gate in no time.
Do Your Data Recovery for Mac
Do Your Data Recovery for Mac, one of the best Mac data recovery software, can help you easily and completely recover deleted, formatted or lost files from Mac HDD/SSD, external HDD/SDD, USB drive, memory card, digital camera, or other storage devices.
Written & Updated by Ricky Lin
Ricky Lin is an senior editor of DoYourData who lives in Adelaide, Australia. He is interested in writing technology articles related with data recovery, computer issue fixes, disk clone, iPhone data recovery, video edit, Mac optimization, etc. He Joined DoYourData in 2019 and have written 500+ articles to help both Windows users and Mac users to solve data or computer problems.
Hot Articles
- Fix External Hard Drive Read-Only Issue on Mac
- How to Wipe Trash Bin on Mac?
- Recover Lost Data from WD (Western Digital) External Hard Drive on Mac
- Fix External Hard Drive Not Showing Up on Mac
- How to Wipe SD Card on Mac?
- Mount and Unmount the External Hard Drive on the Mac
- Run First Aid on Mac to Repair Disks
- Fix Can't Save Files to An External Hard Drive on Mac
- (Solved) External SSD Not Detected in Disk Utility on Mac
- Why Can't Format A Hard Drive To NTFS on Mac? Can We Fix It?