The reliable Mac data recovery software to recover deleted or lost files.
Free TrialYou may have observed that an Activity Monitor process named callservicesd is using up all of your Mac's RAM or CPU and that it is frequently joined by a process called soagent. If you've ever wondered what callservicesd is or what to do when it uses a lot of memory or CPU, this post will answer your questions.
What is the definition of callservicesd?
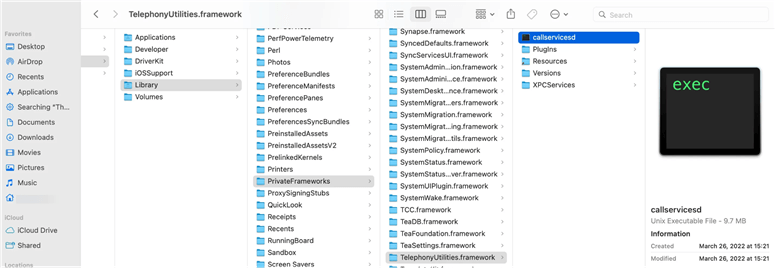
macOS callserviced is a system daemon that keeps track of incoming and outgoing calls. As a result, it's intimately linked to applications like Contacts, Messages, FaceTime, Zoom, and others. Macintosh HD/System/Library/PrivateFrameworks/TelephonyUtilities.framework/callservicesd is where you'll locate it. When callservicesd is running properly, it uses about 8MB of RAM and consumes no CPU.
callservicesd memory leak
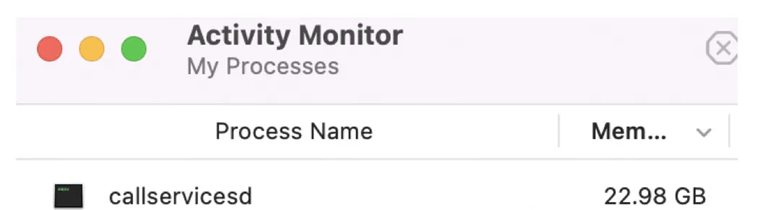
The callservicesd memory leak appears to be more common in macOS Monterey, and usually occurs after a Zoom or FaceTime group call. To free up RAM on your Mac, choose callservicesd in Activity Monitor and then click the cross icon to force it to quit. It will most certainly return, albeit with a considerably lower memory footprint. If that doesn't work, try a new reboot.
The use of a large amount of RAM by callservicesd is most likely due to a Monterey problem, which Apple may fix in future releases. If a new update is available, install it to see if the memory leak bug has been fixed. Also, if you've personalized your Mac's pointer, it's a good idea to restore it to its default settings, as pointer personalization has been shown to be a major source of memory leaks on Monterey. Here's how you can reverse the changes:
Accessibility may be found through the Apple menu > System Preferences > Accessibility. Select Display > Pointer from the drop-down menu.
Set the size of the pointer to normal, the outline color of the pointer to White, and the fill color of the pointer to Black.
Select Reset from the drop-down menu.
You can also make a clean reinstall of Monterey or downgrade to macOS Big Sur if callservicesd has become a major pain.
callservicesd High CPU usage
callservicesd CPU consumption is high. There's probably a Contacts synchronization issue if callservicesd and soagent are both using a lot of CPU. When syncing with many accounts, callservicesd can deplete your Mac's resources. If this is the case, keep an eye on Activity Monitor while disabling Contacts sync from one account at a time to rule out the culprit. It's best to have Contacts synced with only one account.
If you just sync Contacts with Google or iCloud, callservicesd may consume a significant amount of CPU if the syncing process becomes stalled due to defective contacts, errors, or other factors. In that situation, you can disable and then enable iCloud or Google Contacts sync.
To disable Contacts sync on a Mac, follow these steps:
Select System Preferences > Internet Accounts from the Apple menu.
Uncheck the box next to Contacts after selecting an account from the left side.
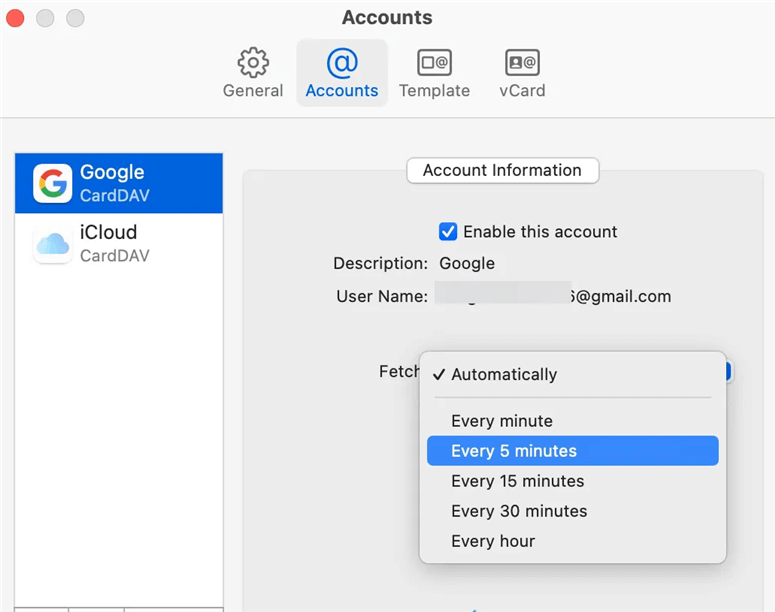
If you don't want to unsync your Contacts, you may make them retrieve every 5 minutes instead of instantly by following these steps:
Contacts are open.
From the top-left menu bar, select Contacts > Preferences.
Select "Every 5 minutes" from the drop-down option next to Fetch.
If none of the techniques above work, try removing all accounts from the Internet Accounts preference pane by choosing an account and clicking the minus (-) button, restarting your Mac, and then recreating them.
What if callservicesd wants to use the login keychain
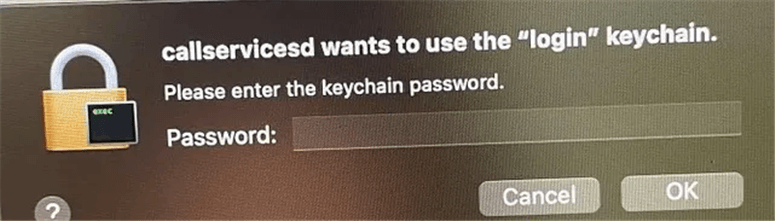
Occasionally, your Mac will display a notification that reads "The login keychain is desired by callservicesd. Please enter the password for the keychain." Regardless of whether you input the keychain password or click the Cancel button, the notification persists. If this happens to you, try the following suggestions:
Turn off the auto-lock feature on your keychain.
You may frequently hear the warning "callservicesd wants to use the keychain password." if your keychain is locked automatically while your mac is inactive or not in sync with the app or service you're using. You can prevent this from happening by disabling Keychain Access' auto-lock option.
Keychain Access may be done by finding for "keychain access" on Launchpad.
From the left sidebar, right-click on "login."
Click "Changes Keychain "login" Settings."
Uncheck the "Lock after" and "Lock when sleeping" boxes.
Save the file.
Start the computer in Safe Mode.
When your Mac's caches are damaged, callservicesd may repeatedly be requesting for a password. This may be fixed by booting into Safe Mode. When you are in Safe Mode, you should notice "Safe Boot." To enter Safe Mode, follow the instructions below:
On an Intel-based Mac, do the following:
Turn off your Mac.
Press and hold the power button while simultaneously pressing and holding the Shift key until the login window appears.
When prompted, log in to your Mac. It's possible that you'll be asked to log in twice.
On an Apple Silicon Mac:
Turn off your Mac if you're using an M1 model.
Hold down the power button until the message "Loading starting choices" appears.
Choose a volume level.
Click "Continue in Safe Mode" while holding down the Shift key.
DoYourData Products
DoYourData Super Eraser for Mac
Permanently shred files or wipe hard drive to prevent data recovery on Mac.
Free TrialClone HDD, SSD, Mac OS, external disk, USB drive, and more under Mac OS.
Free TrialWritten & Updated by Justin Kenny
Justin Kenny is a writer & editor of DoYourData. He joined DoYourData in 2016 and focuses on writing articles about Windows data recovery, Mac data recovery, external device data recovery, hard drive clone, data erasure, Mac cleanup, computer issue fixes, etc. He is a super fan of Apple devices and is big on testing new digital device and system utility software.