The reliable Mac data recovery software to recover deleted or lost files.
Free TrialYou can use old-fashioned iMac devices to help apply Target Display Mode on your Mac device. This way, you can enjoy better visuals on your Mac screen as the Target Display Mode feature comes with high definition resolution quality.
The most significant benefit of this method is that it allows you to enjoy watching your favorite TV shows on high definition screen.
If you want to know how to connect iMac and Mac to apply Target Display Mode, you'll need to skim through this guide; we'll talk about Target Display Mode in this post.
Stick to this guide as it will be super quick.
Let us start it.
iMac Target Display Mode Overview
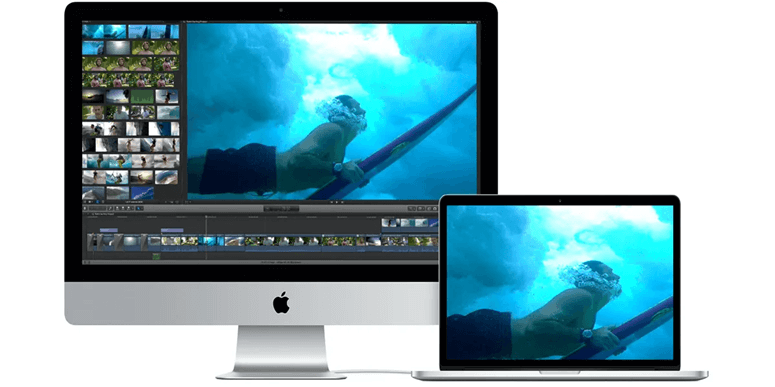
iMac of Apple comes with a brilliant Retina 4K Display that supports one billion colors and, as a result, makes the workstation more pleasing. Apple introduced the first iMac with the Target Display Mode feature in 2009.
Target Display Mode is a prolific feature that empowers the supported iMac models with a Thunderbolt interface or Mini DisplayPort Interface to perform different activities as an external monitor for your other Mac.
Suppose you're using a Mac that features Target Display Mode. In that case, you must be in a high resolution and high definition technicolor world as you've got the luxury to Apple your iMac device with TDM as your Mac PC's external monitor.
Moreover, you can also use the iPad as a second screen on your Mac as it offers a brilliant touchscreen environment and extensibility.
iMac models that can use Target Display Mode
Unfortunately, not all iMac devices are designed with Target Display Mode. Instead, Apple decided to remove the Target Display Mode feature from iMac devices in 2014. Hence, the iMac model released from 2009 to mid-2014 can apply TDM.
You can visit the "Apple Menu" and the "About This Mac" icon to check whether your Mac PC supports using Target Display Mode.
Here's the list of those iMac devices that support Target Display Mode.
- 27-inch and 24-inch iMac devices introduced in 2009.
- iMac models were invented in 2011.
- 27-inch and 24-inch iMac devices were introduced in Mid 2010.
- iMac devices were introduced in 2012.
- Mac devices were introduced in 2013.
- iMac devices were introduced in Mid 2014.
Suppose your Mac device model is listed above. In that case, luckily, you can use the TDM feature of iMac and enjoy an excellent and comfortable 4K Display by taking your iMac device as another Mac's external display.
How to enable or disable TDM?
Before enabling your iMac's Target Display Mode, you'll need to prepare the following prerequisites.
For 27-inch and 24-inch iMac devices launched in 2010 or 2009 that were used as displays:
1. If you want to use iMac as a display, you'll need to ensure that the device has installed macOS High Sierra 10.13.6.
2. Suppose the Mac device you're connecting uses MacOS Big Sur or MacOS Monterey. In that case, you'll need to downgrade the macOS version to macOS Catalina 10.15 or earlier.
3. The cable you're using to connect iMac with another Mac device has to be a Mini DisplayPort cable.
For iMac devices launched from 2011 to 2014 that use as a display
1. The iMac device you're using as a display should have installed macOS Sierra 10.13.6 or earlier.
2. The other Mac device you intend to connect to should've been launched in 2019 or earlier or must have installed the macOS Catalina 10.15 version.
3. The cable you're using to connect two Mac computers must be Thunderbolt 2 or Thunderbolt cable.
After making all the preparations, you'll need to start enjoying a fantastic visual experience by connecting two Macs and setting Target Display Mode.
Here's how to do it.
Step 1. To begin with, you'll need to turn on your Mac and iMac devices.

Step 2. Connect two Mac devices using a Thunderbolt cable or a Mini DisplayPort cable.
Step 3. You don't need to worry about the connection as it happens automatically. But, if things don't go your way, you'll need to press Command+F on the iMac device's keyboard to start running Target Display Mode.
Now, you can start enjoying the screen of your Mac device on the iMac's high definition and high-resolution Retina 4K screen.
Step 4. If you want to disable TDM, you'll need to press Command+F, or you can also disconnect the cable. If you enjoyed this experience, you should share it with your friends.
How to fix TDM not working?
If you're unable to see your Mac's desktop on iMac, you'll need to try the following methods to get your issue solved.
1. Restart either Mac or iMac device.
2. Check the Thunderbolt cable or Mini DisplayPort cable and try unplugging the cable from one Mac device and then plug it in again.
3. You can try pressing Command + F2 on iMac to fix your issue.
If nothing works for you, watch out for some more solutions below.
1. If you've signed in your account in the iMac device you intend to use as your external monitor, you'll need to visit Apple Menu and tap Log out from there. Next, all you need to do is tap Command+F2 again.
2. It happens that third-party and older keyboards don't support your iMac TDM. Hence, you'll need to fix the issue that occurred with your function keys in the first place. You'll need to navigate System Preferences after hitting the Apple Menu icon.
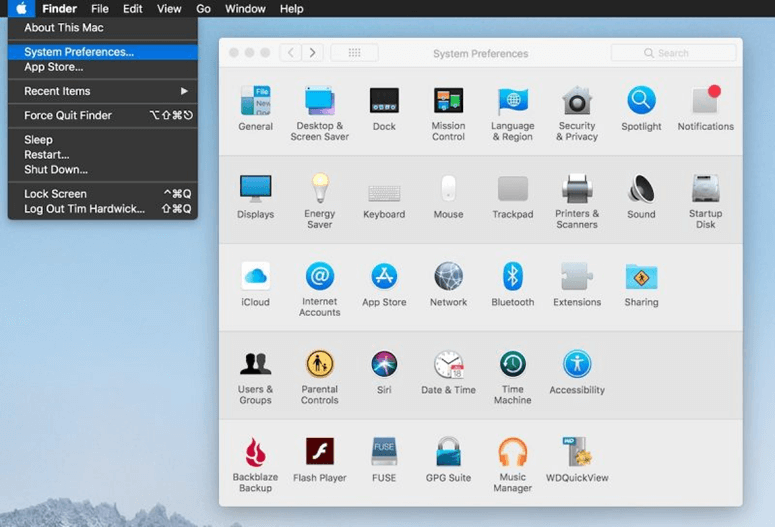
3. After tapping the Keyboard icon, you'll need to ensure that if Use F1, F2, etc., combinations as standard function combinations is selected, you'll need to press the Fn+F2 Command to run iMac TDM instead of the F2 Command.
Final Verdict
Thanks to the clear visual display and high definition, iMac devices enable you to enjoy a fascinating visual experience.
Apart from experiencing the high definition and high-resolution world, iMac devices can be used as an appropriate external monitor by applying Target Display Mode. It would help if you didn't hesitate before trying out the Target Display Mode.
DoYourData Products
DoYourData Super Eraser for Mac
Permanently shred files or wipe hard drive to prevent data recovery on Mac.
Free TrialClone HDD, SSD, Mac OS, external disk, USB drive, and more under Mac OS.
Free TrialWritten & Updated by Justin Kenny
Justin Kenny is a writer & editor of DoYourData. He joined DoYourData in 2016 and focuses on writing articles about Windows data recovery, Mac data recovery, external device data recovery, hard drive clone, data erasure, Mac cleanup, computer issue fixes, etc. He is a super fan of Apple devices and is big on testing new digital device and system utility software.