Quick Navigation:
- Why Is It Important to Wipe A Used External Hard Drive?
- Two Methods to Wipe External Hard Drive
- Conclusion
- FAQs About Wiping External Hard Drive
The information kept on our external hard drives is valuable, regardless of whether it may be considered personal documents, financial records, or memories we hold dear. Nevertheless, when it comes time to detach ourselves from these gadgets, ensuring that our data is deleted safely and securely becomes paramount.
When it's time to remove these devices, ensuring that our data is safely erased becomes the most important thing. Deleting files or resetting the drive is no longer enough to protect our information's privacy. This guide will look at many safe ways to wipe the external hard drive and permanently erase all data before selling, donating or disposing of it.
Why Is It Important to Wipe A Used External Hard Drive?
There are several important reasons you should wipe a used drive, but the main ones are data security and privacy. People who aren't supposed to see private information could get it if you sell, donate, or throw away a used drive without properly wiping its data. That is why it's important to wipe a used drive:
- Personal Information Safe
Many private and sensitive information, like bank records and passwords, can be found on used drives. It includes private photos and emails. If you don't delete this data before handing over control of the drive, it could lead to identity theft, financial scams, or other privacy breaches. - Data Leakage
Data can leak when used drives are thrown away incorrectly in a business setting, and private business information can be compromised. It could lead to big problems, like legal trouble, losing intellectual property, and harming your image. - Data Protection Rules
The General Data Protection Regulation in the European Union and the Health Insurance Portability and Accountability Act (HIPAA) in the US are two laws governing how private data can be handled and discarded. You could break the law and face fines if you don't properly delete data from used drives. - Avoid Data Recovery
If you delete files or format a hard drive, you don't delete the data; you eliminate the links to the files, meaning the data can be recovered with special tools. When you wipe a drive, the data is erased many times, making it almost impossible to return. - Concerns About Ethics
Even if the data on a used drive doesn't seem important, it's important to think about what it means to put someone else's personal information at risk. Wiping the drive shows that you care about other people's privacy and safety.
Two Methods to Wipe External Hard Drive
In this article, we will introduce two methods to help you securely wipe your used external hard drive. Wiping external hard drive will delete everything from the drive, if some files are still useful for you, back up them to another drive.
Method 1: Use High-level Format Method
On Windows PC:
Step 1. Connect the external hard drive to your computer, then find it in This PC or My Computer.

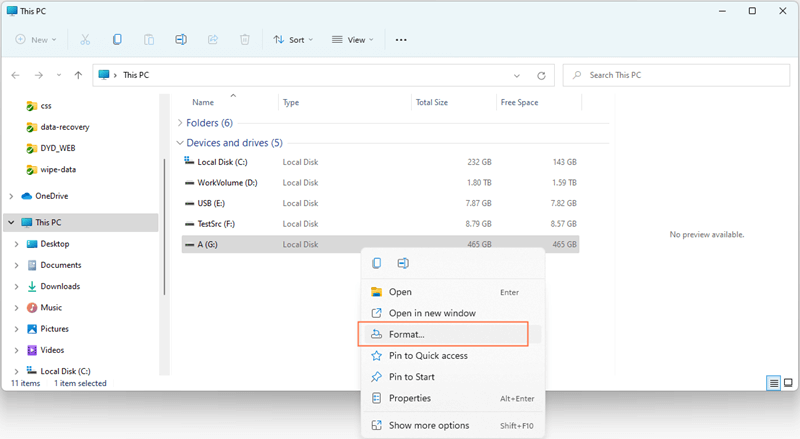
Step 2. Right-click the external hard drive and choose Format.
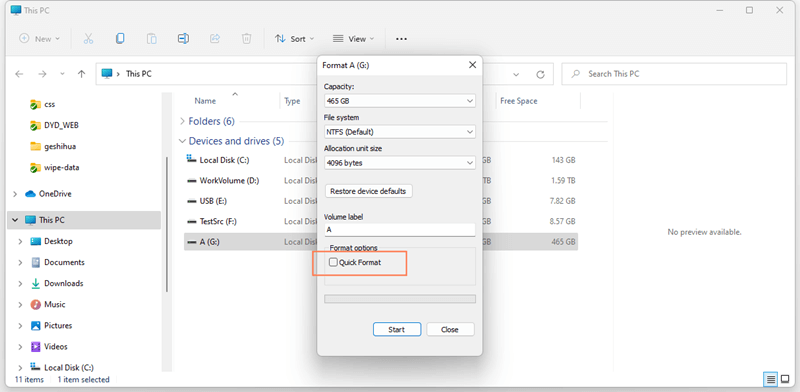
Step 3. Don't tick Quick Format under Format options. Then click on Start button to reformat the external hard drive.
On Mac:
Step 1. Connect the external hard drive to the Mac, then go to Launchpad > Other > Disk Utility, open this app.
Step 2. Select the external hard drive, click Erase.
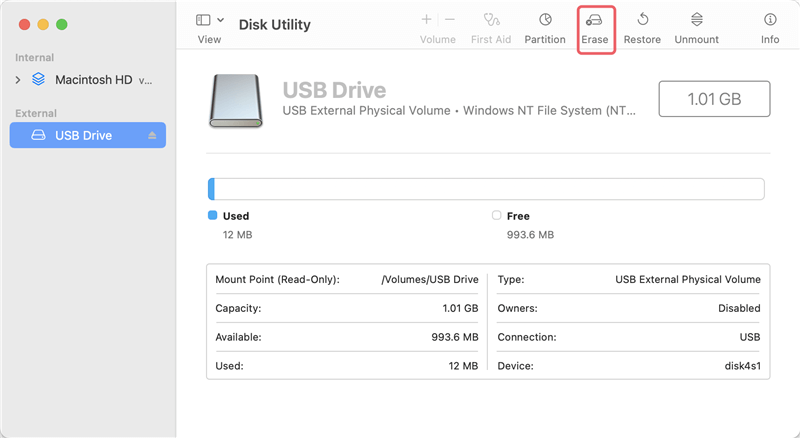
Step 3. Select a file system (such as APFS, Mac OS Extended, ExFAT), type a new name.
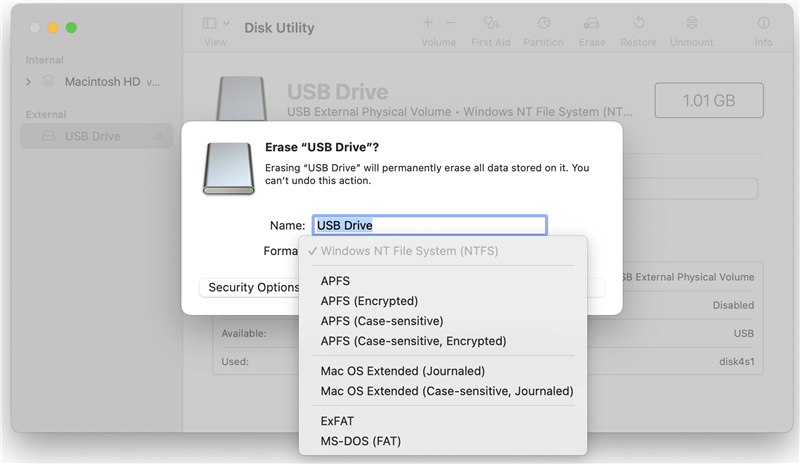
Then click Security Options, choose Most Secure erasure method.
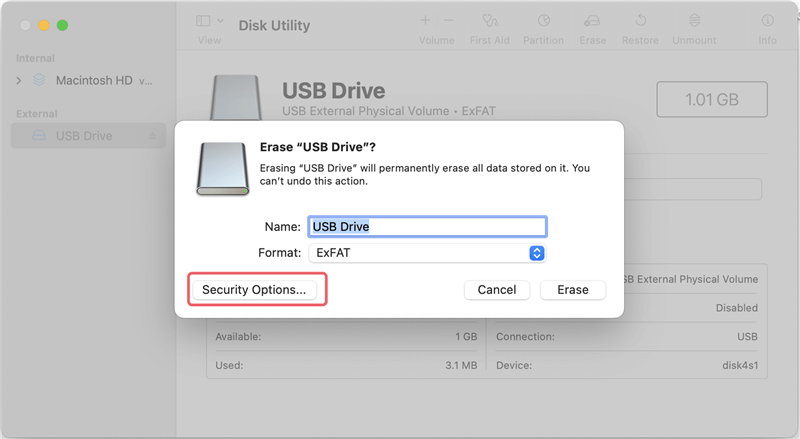
Step 4. Click Erase again to start erasing the external hard drive. Once the process gets finished, click Done.
Note: The formatted data is not lost for good, and it still can be recovered by data recovery software.
Method 2: Use Disk Wiping Software
Using disk wiping software to erase data from an external hard drive permanently makes sure that private information is safely and permanently erased from the device. Here are the steps you need to take to do this:
Step 1. Choose a reliable disk wiping software.
Pick a reliable tool that meets your needs and download or install it on your computer. In this guide, you can use DoYourData Super Eraser, a certified disk wiping software, to help you wipe the external hard drive and permanently erase all data from it, making data recovery be impossible. Just download and install this software on your Windows PC or Mac.
DoYourData Super Eraser
- Permanently erase data from HDD, SSD, external hard drive, memory card, digital camera, USB drive, etc.
- Wipe external hard drive and permanently erase all data from it.
- Data recovery is impossible once the erasure is completed.
Step 2. Choose data erasure mode.
Use the right cable or connection to connect the external hard drive to your computer. Make sure that your operating system can see the drive.
Then open DoYourData Super Eraser, choose data erasure mode - Wipe Hard Drive. This mode will securely format and wipe the external hard drive and permanently erase all data from it, no trace will be left.

Step 3. Wipe the external hard drive.
Find the external hard drive you want to wipe, then select it. Check again to ensure you picked the right drive so you don't accidentally lose any info.
Most file deletion tools offer multiple ways to delete a file, such as Quick Erase, the DoD 3-pass, the Gutmann 35-pass, and others. Choose the way of erasure that meets your security needs. Remember that higher-pass ways may delete data more safely but may take longer to finish.
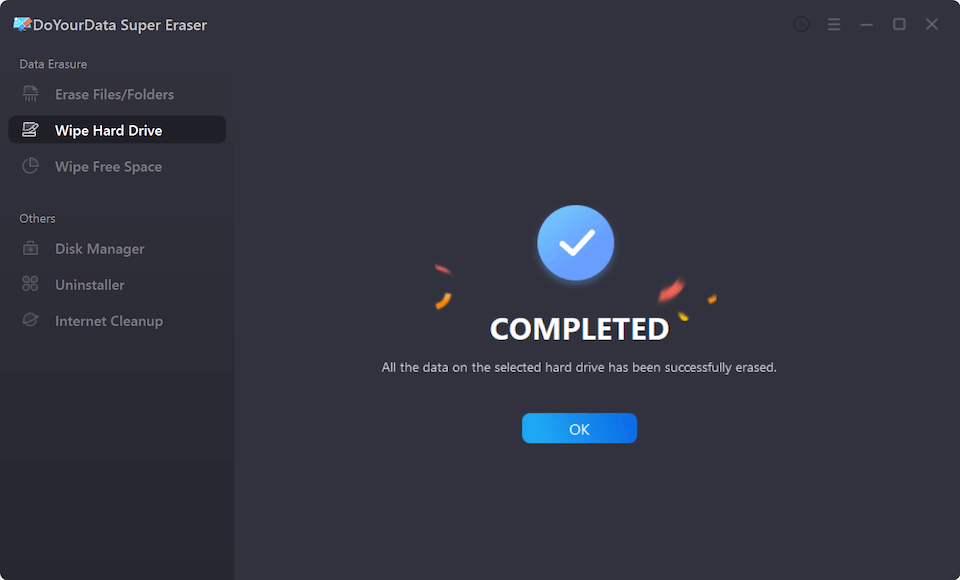
Click on Wipe Now button to start the erasing process once you've chosen the erasure method. Depending on the size of your external hard drive and the method you choose, the process could take a few minutes to several hours.
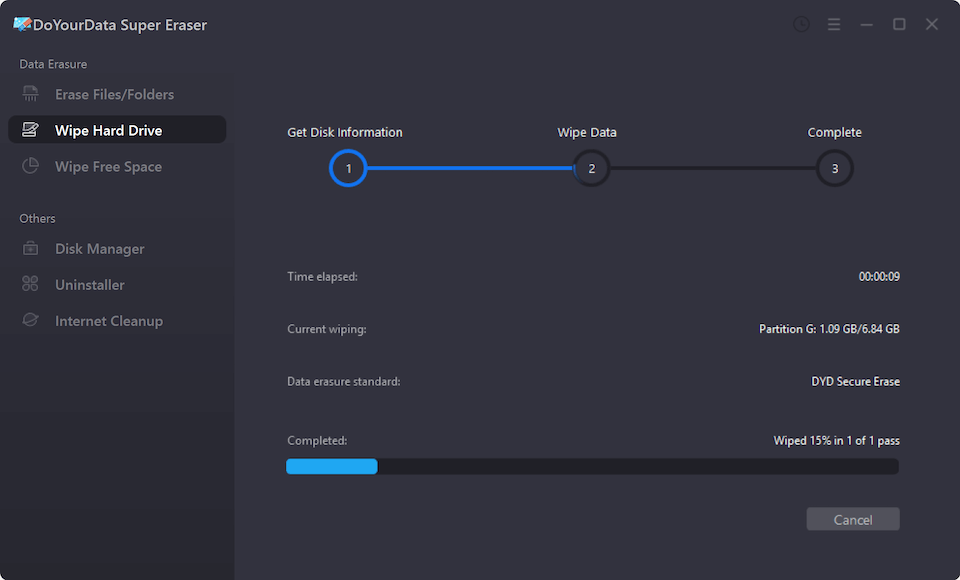
Please note that once the data stored on the external hard drive is erased by DoYourData Super Eraser, the data is lost for good, can’t be recovered by any method.
When you're sure the erasure process is finished, safely remove the portable hard drive from your computer.
Conclusion:
Ensuring that data is erased from external hard drives safely and securely is very important for keeping personal information private and stopping people from getting to it without permission. People must take steps to protect their data, whether using the full format method to delete all data quickly or data erasure tools to wipe the entire drive.
Reduce the risk of data breaches, follow the rules, and uphold ethical standards in data management by understanding the importance of wiping used drives and using the methods described in this guide. Remember that it is up to all of us to prioritize data security in an increasingly computerized world.
FAQs About Wiping External Hard Drive
1. Why should wipe the external hard drive?
In most cases, you don't have to permanently wipe data stored on the external hard drive. For example, if you only wan to regain the full storage of the external hard drive, you just need to format it to clean up all the existing files. But in some special cases, data erasure is critical. It means you have to permanently wipe external hard drive data to avoid data leakage. For instance:
- When you want to destroy sensitive data on the external hard drive, you have to wipe it to destroy data.
- When you are going to sell, donate or discard your used external hard drive, you should erase all your private files from it.
- When you are going to lend your external hard drive to other people, or when you are share an external hard drive with other people, you need to permanently wipe your files before you give it to other people.
2. How to wipe external hard drive?
Data erasure software, such as DoYourData Super Eraser can help you securely wipe an external hard drive:
- Download and install DoYourData Super Eraser, open it.
- Choose Wipe Hard Drive mode, select the external hard drive.
- Click on Wipe Now button.
- Permanently erase all data from the external hard drive.
3. How to use Command Prompt to erase data from external hard drive?
Using Command Prompt (CMD) to delete files from an external hard drive is a simple way for users to safely remove data from their storage devices. It's easy to do; follow these steps:
- Start by going to your Windows PC and opening Command Prompt. Search "cmd" in the Start menu and choose the Command Prompt app to do this.
- Once the Command Prompt is open, you must go to the area on the external hard drive. Type "cd" and the drive letter of your external hard drive, like this: cd E: then press "Enter."
- The "dir" command lets you see your external hard drive's files and groups. You don't have to do this step, but it can help ensure you're aiming at the right move.
- If you want to remove a file from the external hard drive, type "del" and then the directory name. To remove the file "example.txt," type "del example.txt" and press Enter. You can use wildcards, like "del *.txt," to eliminate all text files in a folder and delete all the files in that folder.
- The Command Prompt will ask to confirm that you want to delete each file. To be sure, type "Y" for "Yes" and press "Enter." Repeat this for every file you want to delete.
- After deleting the files you want to delete, you can empty the recycle bin to remove them.
- You can close the Command Prompt by writing "exit" and hitting Enter, or you can click the "close button" on the Command Prompt window when deleting files from the external hard drive.
4. How to permanently delete files from the external hard drive?
- Download and install DoYourData Super Eraser.
- Open this data erasure program, choose Erase Files/Folders mode.
- Add files and folders to the erasure list.
- Click on Erase Now button.
Once the files and folders are erased by DoYourData Super Eraser, the files/folders are lost forever, no trace left.
DoYourData Super Eraser
DoYourData Super Eraser, the award-winning data erasure software, offers certified data erasure standards including U.S. Army AR380-19, DoD 5220.22-M ECE to help you securely and permanently erase data from PC, Mac, HDD, SSD, USB drive, memory card or other device, make data be lost forever, unrecoverable!