How to Wipe Flash Drive Clean on Windows 11: 5 Easy Methods
Many users assume that hitting 'Delete' or performing a standard format permanently destroys their data. Surprisingly, standard formatting often leaves data intact in the background, making it easily recoverable with simple recovery software. If you want true privacy and security, you need to permanently wipe data with DoYourData Super Eraser.
 Updated by Shirly Chen on August 04, 2026
Quick Navigation:
- Important Pre-Wipe Checklist
- Choose the Best Wiping Method for Your Need
- FAQs about Wiping Flash Drives on windows 11
- Conclusion
USB flash drives are incredibly convenient for transferring photos, documents, and private files. However, there comes a time when you need to wipe a flash drive completely clean. Whether you plan to sell the drive, pass it to a colleague, clear out malware, or simply fix file system errors, knowing how to wipe flash drive clean on windows 11 is an essential skill.
In this comprehensive guide, we will walk you through 5 proven methods on Windows 11. From quick built-in formatting options to military-grade permanent wiping tools, you will learn step-by-step how to clean your flash drive safely.
Quick Key Takeaway:
To quickly reuse a USB drive on Windows 11, right-click it in File Explorer and choose 'Format'. You can also use Command Prompt with 'diskpart' and 'clean'. To permanently destroy sensitive data beyond any recovery, use a professional tool like DoYourData Super Eraser.
Important Pre-Wipe Checklist
Before wiping your flash drive, take a few seconds to complete these quick preparation steps:
- Back Up Crucial Data: Wiping a drive removes all accessible files. Copy any photos, personal documents, or work files to your computer or cloud storage first.
- Confirm the Drive Letter: Double-check the drive letter assigned to your USB stick (e.g., E:, F:, or G:) in File Explorer to avoid accidentally wiping an external hard drive or system partition.
- Save Needed Software: If your flash drive contains important portable software, ensure you have saved any configuration files or license keys.
Choose the Best Wiping Method for Your Need
Here is a quick comparison of the 5 methods available on Windows 11 so you can pick the right one immediately:
Method |
Security Level |
Data Recoverable? |
Best For |
|---|---|---|---|
1. File Explorer |
Basic |
Yes |
Quick cleanup for re-use |
2. Windows Settings |
Basic |
Yes |
Modern interface preference |
3. Disk Management |
Moderate |
Yes |
Fixing unallocated/raw drives |
4. Command Prompt |
High (Clean All) |
No (with Clean All) |
Removing hidden partitions |
5. DoYourData Super Eraser |
Maximum |
100% Unrecoverable |
Selling, privacy & compliance |
Method 1: Wipe Flash Drive Clean via File Explorer (Fastest)
If you just want to empty your USB drive so you can reuse it for store new files, using File Explorer is the fastest and most convenient route.
Step 1: Plug your USB flash drive into an open USB port on your Windows 11 PC.
Step 2: Press Win + E on your keyboard to open File Explorer, then click on 'This PC' in the left navigation sidebar.
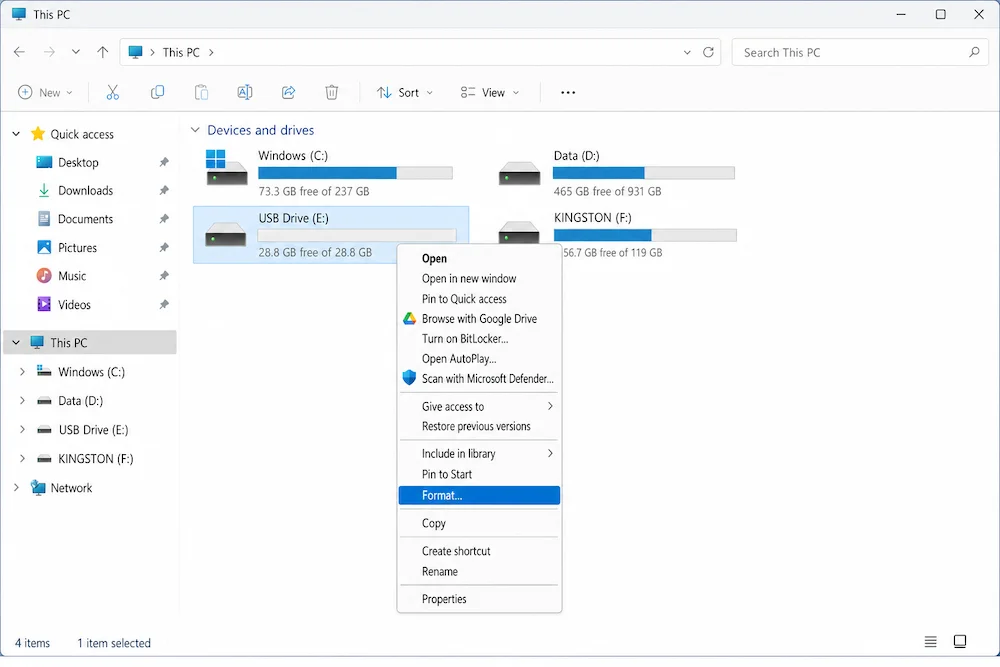
Step 3: Locate your USB flash drive under 'Devices and drives'. Right-click on it and choose 'Format...' from the context menu.
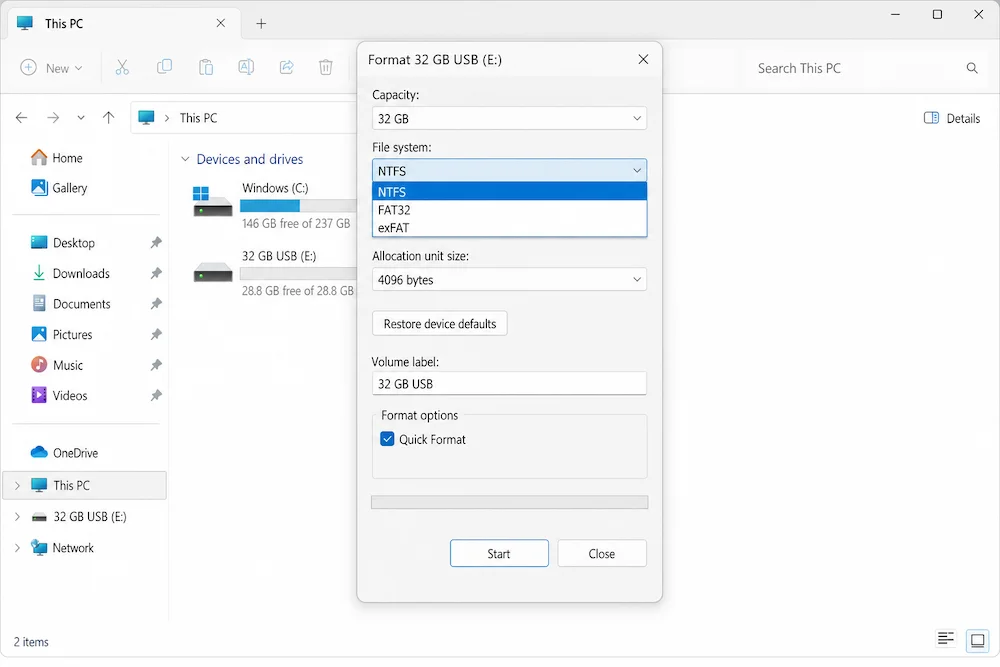
Step 4: In the Format window, select your preferred file system (NTFS for large files, FAT32 for compatibility, or exFAT for cross-platform use with Mac).
Step 5: By default, 'Quick Format' is checked. Keep it checked for a rapid wipe, or uncheck it for a full scan. Click 'Start' and confirm by clicking 'OK'.
Quick Format vs. Full Format Note
Quick Format simply deletes the file table indexing, making the drive appear empty in seconds. Unchecking Quick Format causes Windows 11 to scan the entire drive for bad sectors and write zeros, taking longer but offering better drive health checks.
Method 2: Wipe Flash Drive via Windows 11 Settings App
Windows 11 features a streamlined modern Settings interface that allows you to manage drives and volumes directly without opening legacy windows.
Step 1: Press Win + I to open the Windows 11 Settings window.
Step 2: Navigate to System > Storage on the main menu.
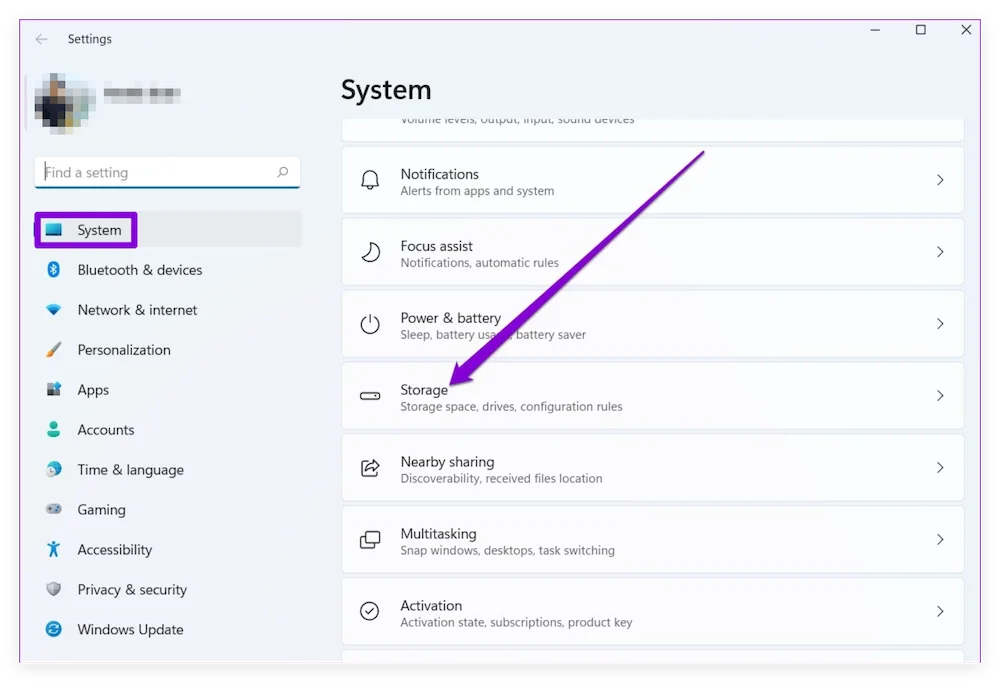
Step 3: Scroll down and click on 'Advanced storage settings', then select 'Disks & volumes'.
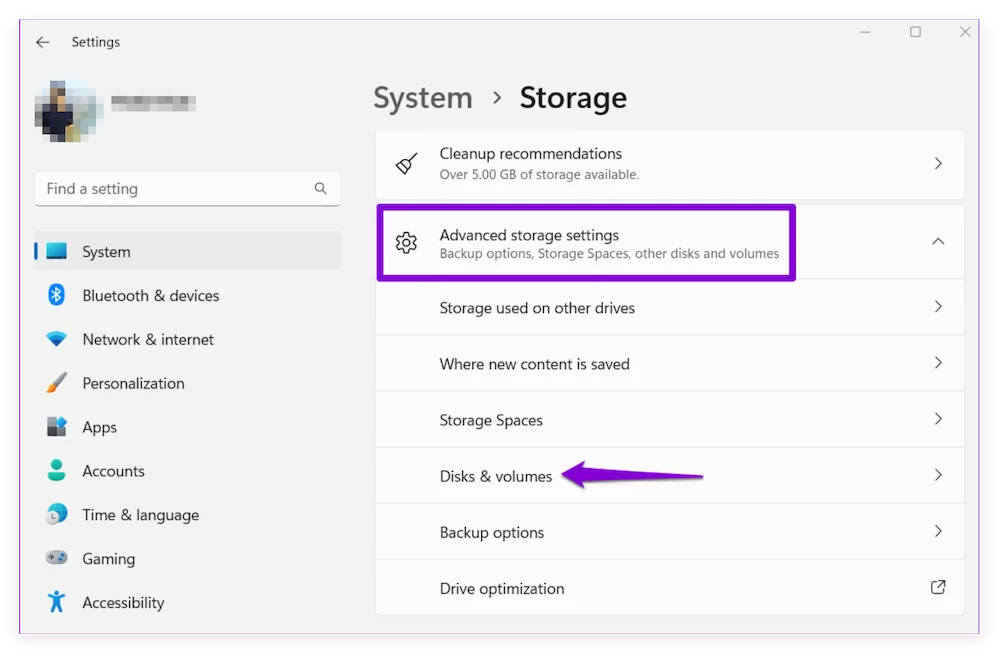
Step 4: Locate your flash drive in the list of disks. Click the 'Properties' button next to the drive volume.
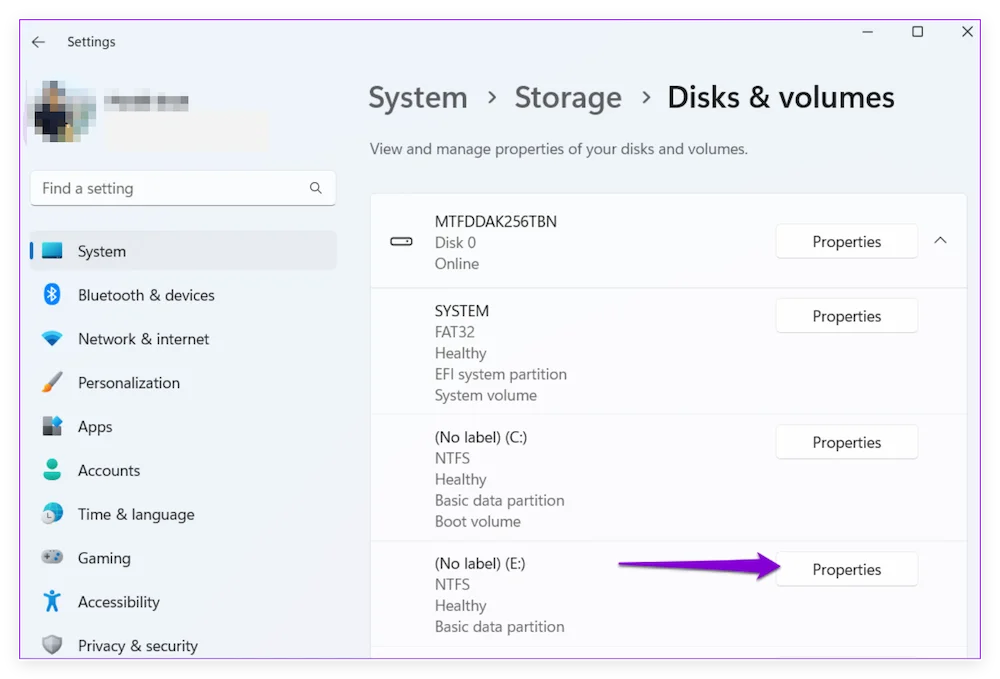
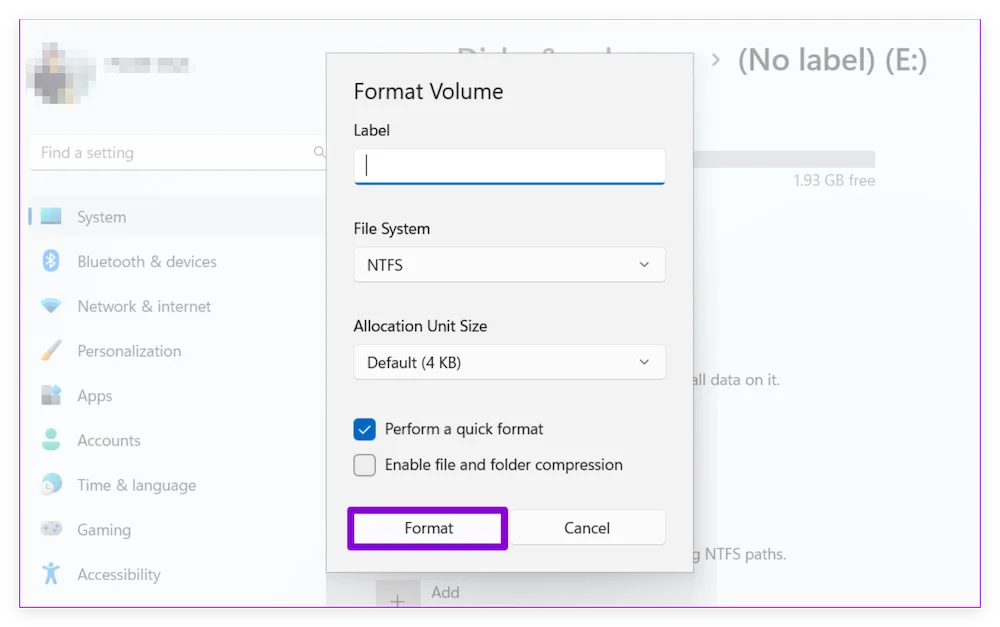
Step 5: Click on 'Format'. Enter a volume label, choose the file system, and click 'Format' to complete the process.
Method 3: Wipe Flash Drive via Disk Management
Sometimes a flash drive won't show up in File Explorer properly, or it has multiple unwanted partitions. Disk Management gives you visual control over partitions and formatting.
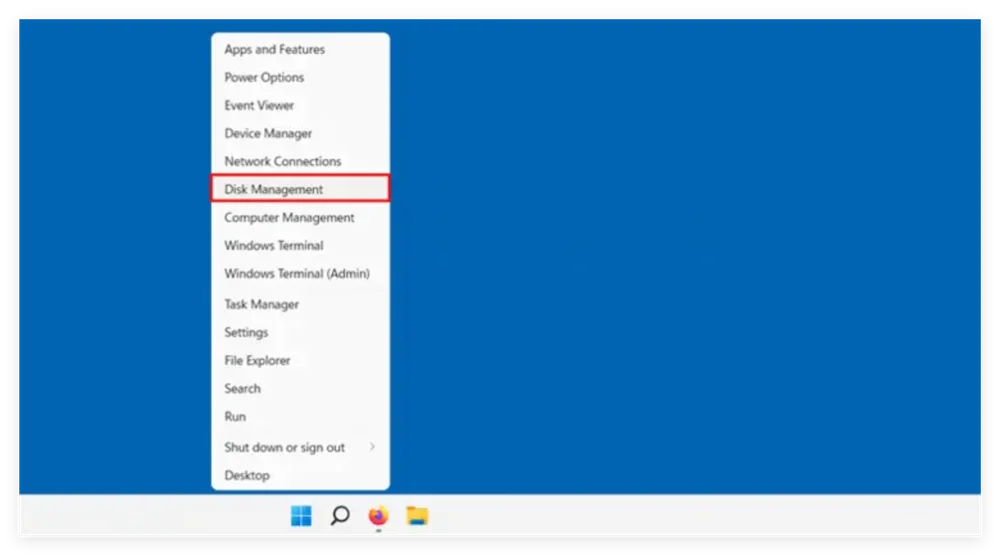
Step 1: Right-click the Start button on your Windows 11 taskbar and select 'Disk Management'.
Step 2: In the lower panel, scroll to find your USB flash drive (ensure you verify the disk number and size).
Step 3: Right-click the partition on the USB drive. If you want to wipe it directly, select 'Format...'.
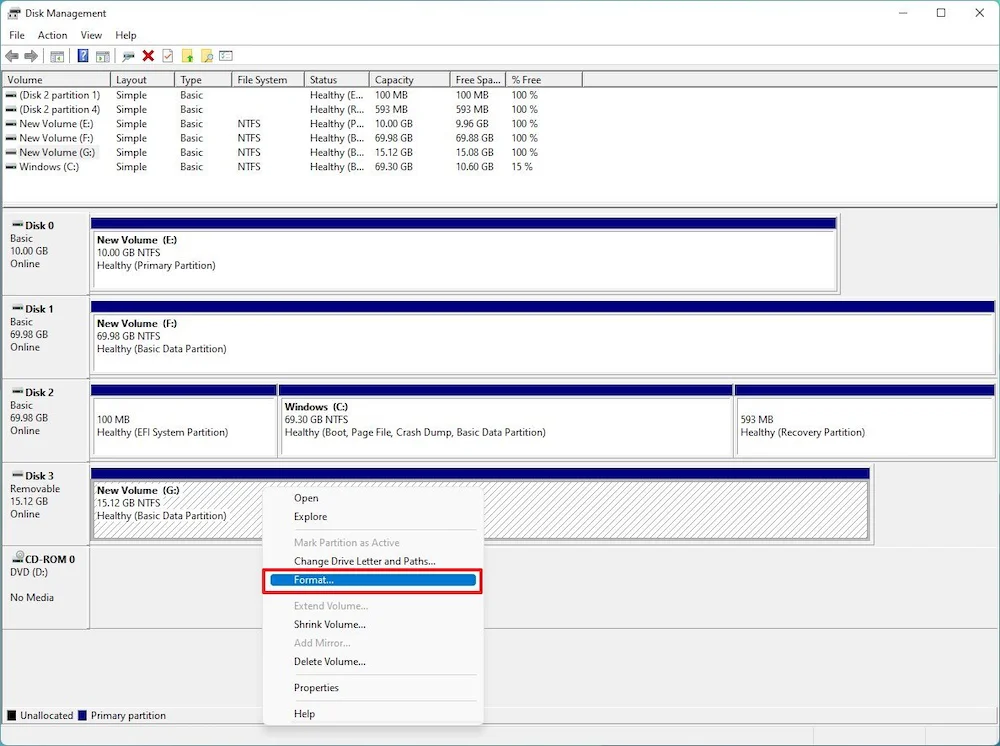
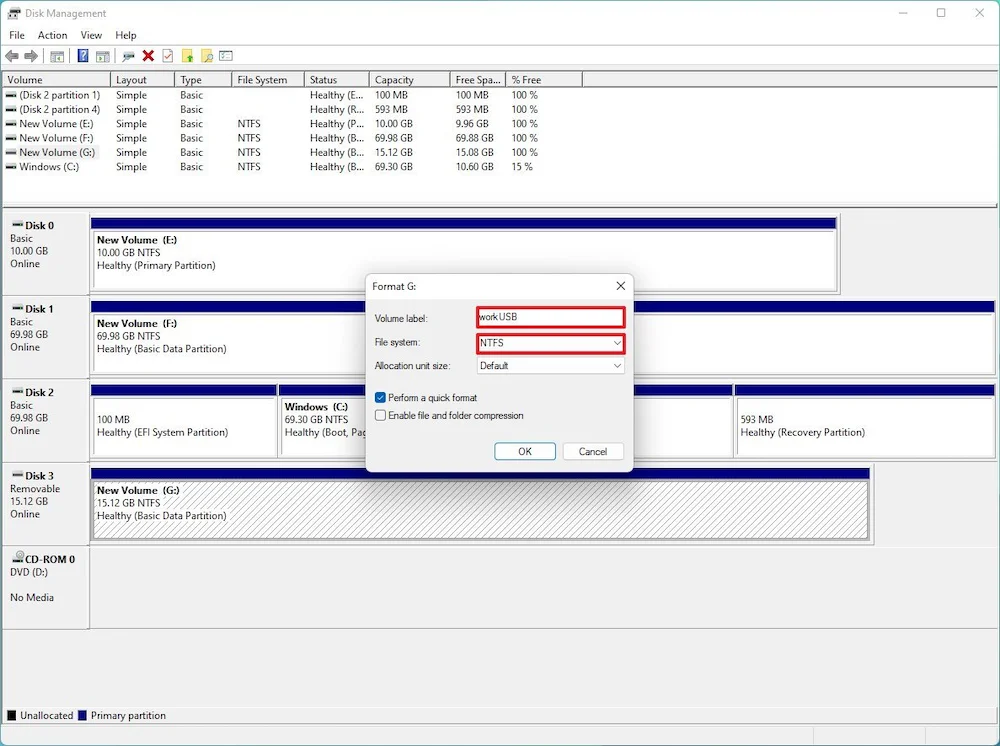
Step 4: Change the Volume label to a new wanted name. Select the File system for the drive, like NTFS, FAT32, or ExFAT. Click OK button to start formatting the drive.
Method 4: Deep Clean Flash Drive via Command Prompt (Diskpart)
For technical users, corrupted drives, or drives with stubborn hidden partitions, the Diskpart command-line tool provides a deep clean that resets the drive completely.
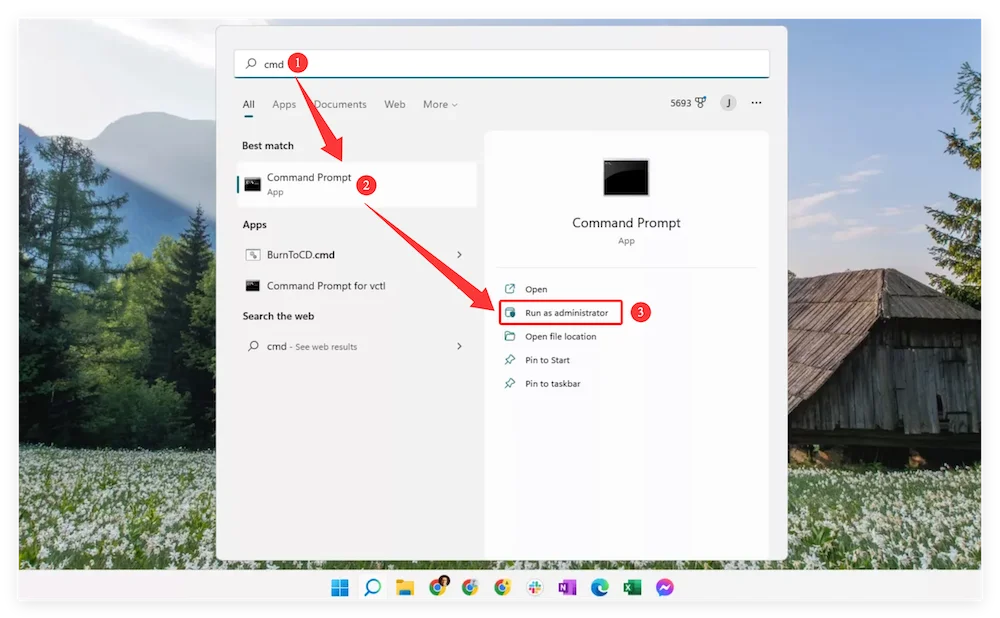
Step 1: Click the Start search bar, type 'cmd', right-click 'Command Prompt', and select 'Run as administrator'.
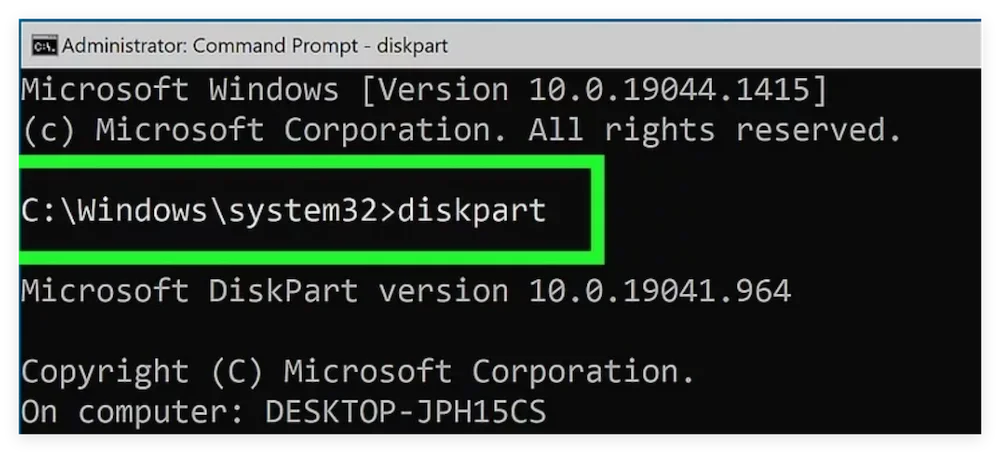
Step 2: Type 'diskpart' and press Enter to start the disk management utility.
Step 3: Type 'list disk' and press Enter. Carefully identify your flash drive number (e.g., Disk 1 or Disk 2) based on storage capacity.
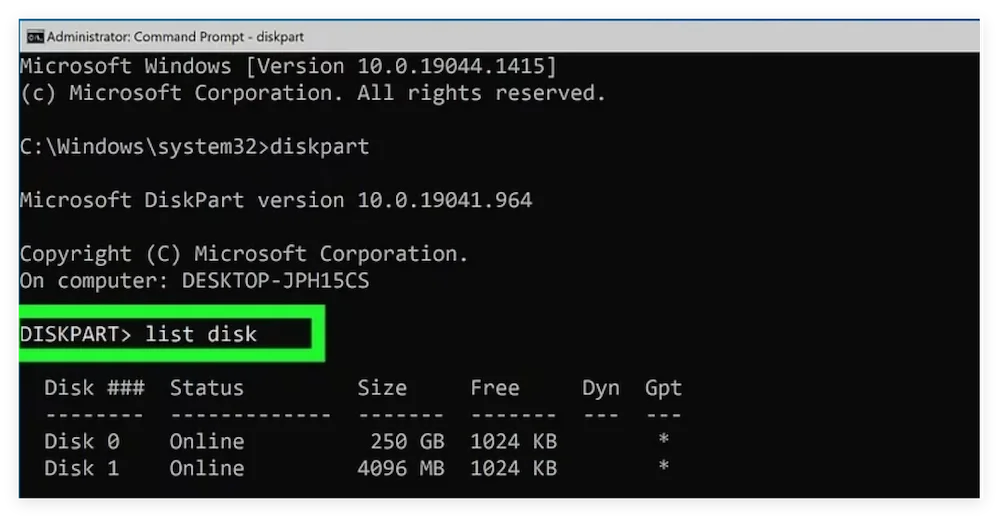
Step 4: Type 'select disk X' (replace X with your actual USB disk number) and press Enter.
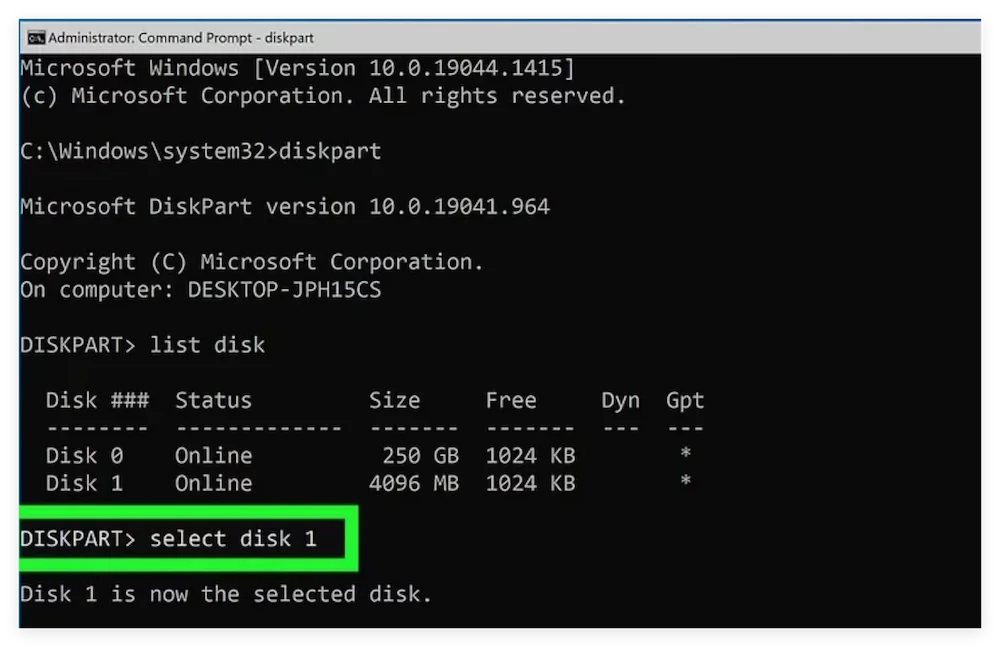
Step 5: To perform a standard clean, type 'clean' and press Enter. To write zeros over every sector and destroy data thoroughly, type 'clean all' and press Enter (this will take longer).
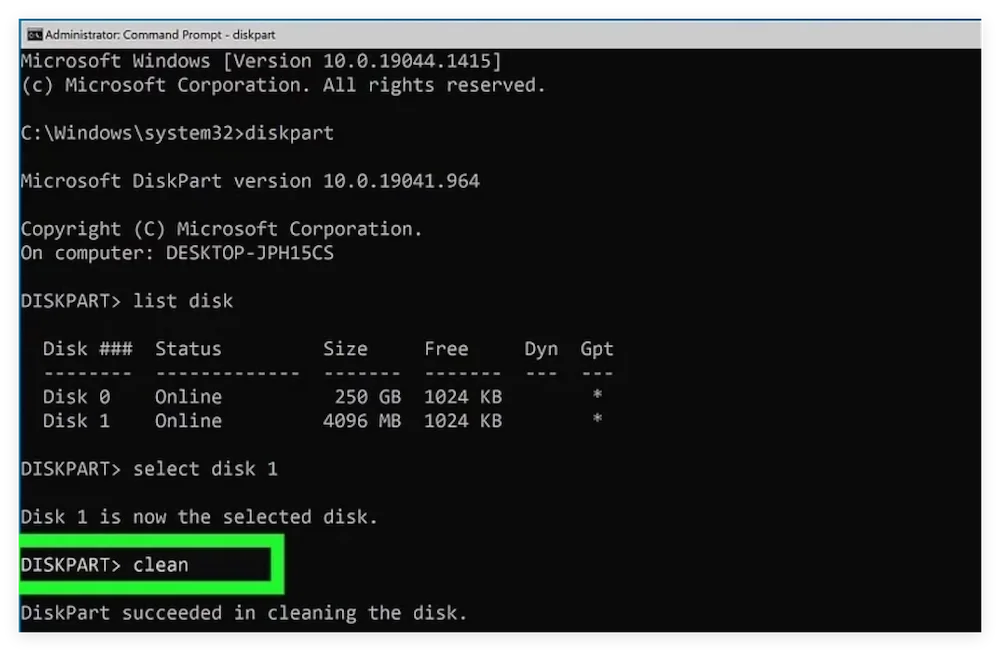
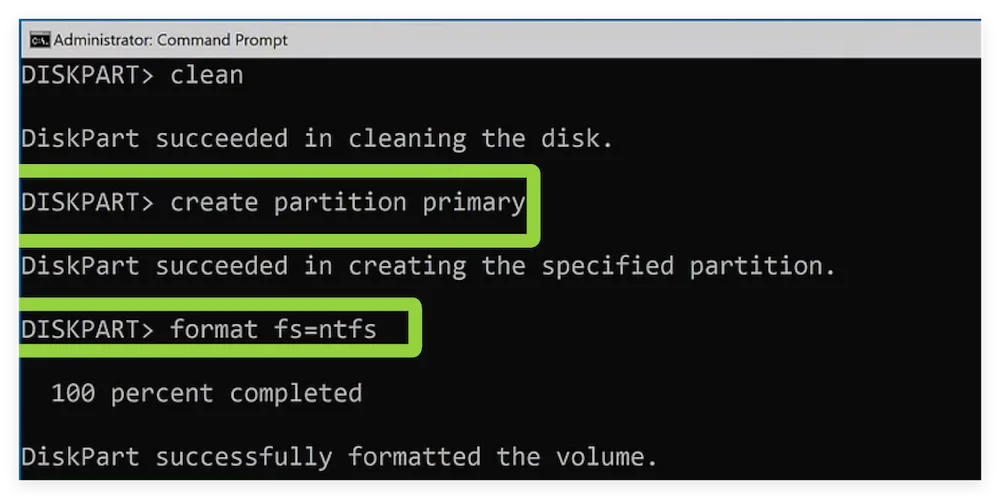
Step 6: Re-partition the drive by typing the following commands sequentially, pressing Enter after each:
create partition primary
format fs=ntfs (or fs=exfat)
Method 5: 100% Unrecoverable - Permanently Wipe with DoYourData Super Eraser
Did you know that standard formatting tools in Windows—including File Explorer, Settings, and standard Quick Format—do not permanently delete your underlying data? Anyone equipped with a free data recovery program can easily restore your deleted photos, financial records, or private files.
If you plan to sell, donate, return, or recycle your USB flash drive, relying on simple formatting is a serious privacy risk. To ensure your files are destroyed 100% permanently beyond any possibility of recovery, you need a dedicated professional data wiper like DoYourData Super Eraser.
Why Choose DoYourData Super Eraser?
- Military-Grade Overwriting: Uses government and military-grade algorithms, including DoD 5220.22-M, Peter Gutmann, NIST 800-88, and U.S. Army erasure standards.
- 100% Unrecoverable: Once wiped with DoYourData, data recovery software, forensic tools, and expert services cannot recover even a single byte.
- Easy & Safe: Designed with a intuitive user interface suitable for both beginners and advanced users.
- Windows 11 Certified: Fully certified and optimized for Windows 11, Windows 10, and earlier operating systems.
How to Wipe Flash Drive Clean Permanently with DoYourData:
Step 1: Download and install DoYourData Super Eraser on your Windows 11 computer.
DoYourData Super Eraser
- Reliable and safe data wiping software for Windows 11.
- Permanently erase data to prevent data recovery.
- 3 modes to shred files or wipe hard drive data.
Step 2: Plug your USB flash drive into the computer and launch DoYourData Super Eraser. Select the 'Wipe Hard Drive' mode from the main interface.
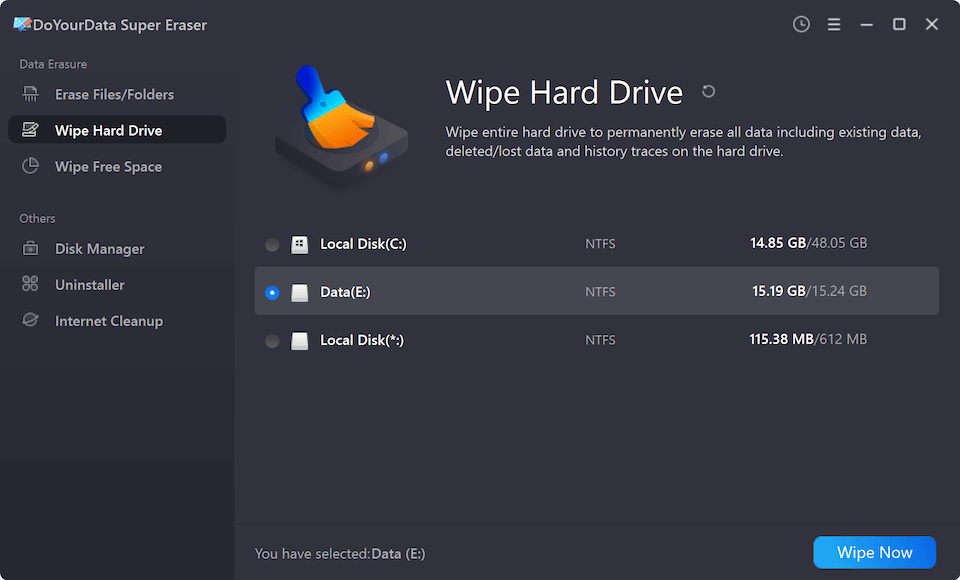
Step 3: Choose your USB flash drive from the list of available drives and click the 'Wipe Now' button. Select your desired erasure standard (e.g., DoD 5220.22-M 3 passes) and confirm the action.

Step 4: The software will overwrite every sector of the flash drive clean.
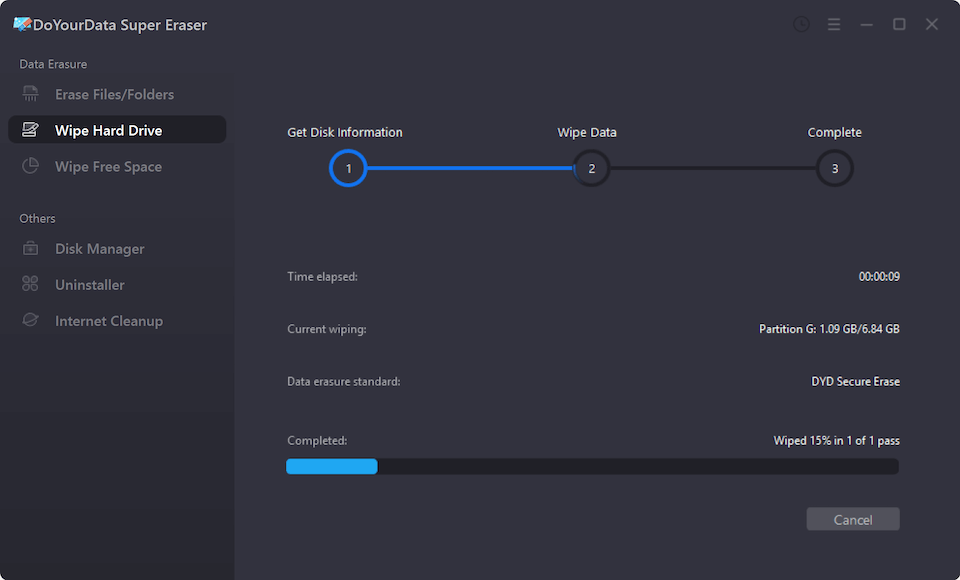
Note: DoYourData Super Eraser permanently destroys all targeted data. Ensure you have backed up any files you wish to keep prior to launching the wiping process.
FAQs about Wiping Flash Drives on windows 11
- FAT32: Choose FAT32 if your flash drive is 32GB or smaller and you need maximum compatibility across gaming consoles, TVs, and older devices.
- exFAT: Choose exFAT for drives larger than 32GB that you intend to use seamlessly on both Windows 11 and macOS.
- NTFS: Choose NTFS if you primarily use Windows 11 and plan to store single large files (over 4GB), such as high-definition video files.
Conclusion
Learning how to wipe flash drive clean on windows 11 is straightforward once you know which tool fits your goal. For everyday file clearing, File Explorer or the Windows Settings app works perfectly. For fixing stubborn drives or clearing hidden system partitions, Diskpart offers a deep clean.
However, if privacy, security, or selling your drive is your top priority, standard Windows tools are simply not enough. Using DoYourData Super Eraser ensures your private files are permanently wiped beyond any possibility of recovery, giving you total peace of mind.
DoYourData Super Eraser
DoYourData Super Eraser, the award-winning data erasure software, offers certified data erasure standards including U.S. Army AR380-19, DoD 5220.22-M ECE to help you securely and permanently erase data from PC, Mac, HDD, SSD, USB drive, memory card or other device, make data be lost forever, unrecoverable!
Written & Updated by Shirly Chen
Shirly Chen has been writing data recovery, data erasure articles for DoYourData over 4 years. She has been working as a professional website content writer & editor for quite a long time. She also writes articles about disk clone, Mac optimization, disk backup, etc.