How to Rescue Deleted RAW Image Assets from Micro Card on Mac Studio
To rescue deleted RAW image assets from micro card on Mac Studio, stop writing new files immediately and insert the microSD card via an adapter into the front UHS-II SDXC slot. Check the hidden .Trashes folder first, then run Do Your Data Recovery for Mac to deep-scan exFAT sectors and restore intact CR3, NEF, ARW, or DNG originals onto your Mac Studio SSD.
 Updated by Justin Kenny on Novmeber 12, 2026
Quick Navigation:
- Immediate First Steps on Mac Studio to Protect Your Lost RAW Files
- 4 Methods to Rescue Deleted RAW Image Assets on Mac Studio
- How to Verify Recovered RAW Files Before Reusing Your MicroSD Card
- FAQs about RAW Image Recovery on Mac Studio
- Conclusion
Accidentally deleting a batch of uncompressed RAW photos from a microSD card feels like a disaster, especially right after a commercial shoot or drone flight. Fortunately, pressing Delete in macOS Finder or erasing shots inside your camera does not immediately wipe the actual image data from your flash memory card.
When you delete a RAW file on an exFAT or FAT32 formatted microSD card, the file system simply removes the directory entry pointing to that file and marks those storage clusters as available space. The raw sensor data—whether Canon CR3, Nikon NEF, Sony ARW, Fujifilm RAF, or Adobe DNG—remains physically intact inside the NAND flash chips until new data overwrites those exact blocks.

Unlike internal Apple Silicon solid-state drives that run aggressive background TRIM commands, standard microSD cards connected to a Mac Studio do not automatically purge unallocated sectors upon deletion. This hardware behavior gives you a reliable window to rescue deleted RAW image assets from micro card on Mac Studio as long as you act before saving new files to the card.
Immediate First Steps on Mac Studio to Protect Your Lost RAW Files
The single biggest threat to recovering deleted RAW image assets is accidental data overwriting. Even small system operations by macOS can modify card sectors if you leave the memory card mounted unnecessarily.
Follow these five immediate precautions the moment you realize your RAW files are missing:
Step 1: Remove the microSD card from your camera, drone, or action cam immediately so the device cannot write background cache files or thermal logs.
Step 2: Slide the physical write-protect lock switch on the full-size SD adapter to the 'Lock' position before inserting it into your Mac Studio's front UHS-II SDXC slot.
Step 3: Dismiss any macOS Disk Utility 'First Aid' prompts or 'Initialize' warnings if the card reports minor directory errors, because repair routines alter file allocation tables.
Step 4: Disable Spotlight indexing or Time Machine scans for external removable media so macOS does not write hidden metadata folders onto the unallocated blocks.
Step 5: Prepare a destination folder on your Mac Studio's fast internal SSD or an external Thunderbolt RAID array—never save recovered RAW files back onto the affected microSD card.
Supported Camera RAW Formats & Mac Studio Recovery Behavior
| RAW File Extension | Camera Ecosystem | Embedded Preview | File Signature Recovery Reliability |
|---|---|---|---|
| .CR3 / .CR2 | Canon EOS R & DSLR Series | Full-Res / Medium JPEG | High (Distinct ISO Base Media Header) |
| .NEF / .NRW | Nikon Z & DSLR Cameras | Full-Resolution JPEG | High (TIFF-EP Structural Signature) |
| .ARW / .SRF | Sony Alpha & Cinema Line | 1616x1080 JPEG Preview | High (Exif/TIFF Container Markers) |
| .DNG | DJI Drones, Leica, Hasselblad | Variable JPEG Preview | Very High (Open ISO Standard Tagging) |
| .RAF / .ORF | Fujifilm X/GFX & OM System | Embedded JPEG Preview | High (Proprietary Header + JPEG Block) |
4 Methods to Rescue Deleted RAW Image Assets on Mac Studio
Depending on how the files were deleted and whether your microSD card still mounts cleanly on macOS, you can choose between built-in macOS recovery checks and deep sector-level scanning utilities.
Method 1: Check the Hidden .Trashes Folder on the MicroSD Card
If you deleted your RAW files while the microSD card was plugged into your Mac Studio via Finder, macOS moves those files into a hidden trash directory directly on the memory card rather than your desktop Trash bin.
Step 1: Insert the microSD card (via SD adapter or USB-C reader) into your Mac Studio and open its root folder in Finder.
Step 2: Press Command + Shift + . (Period) on your keyboard to reveal hidden system directories.
Step 3: Open the faded '.Trashes' folder, locate your deleted RAW image assets, right click the file and click Put Back (or drag them directly onto your Mac Studio desktop).
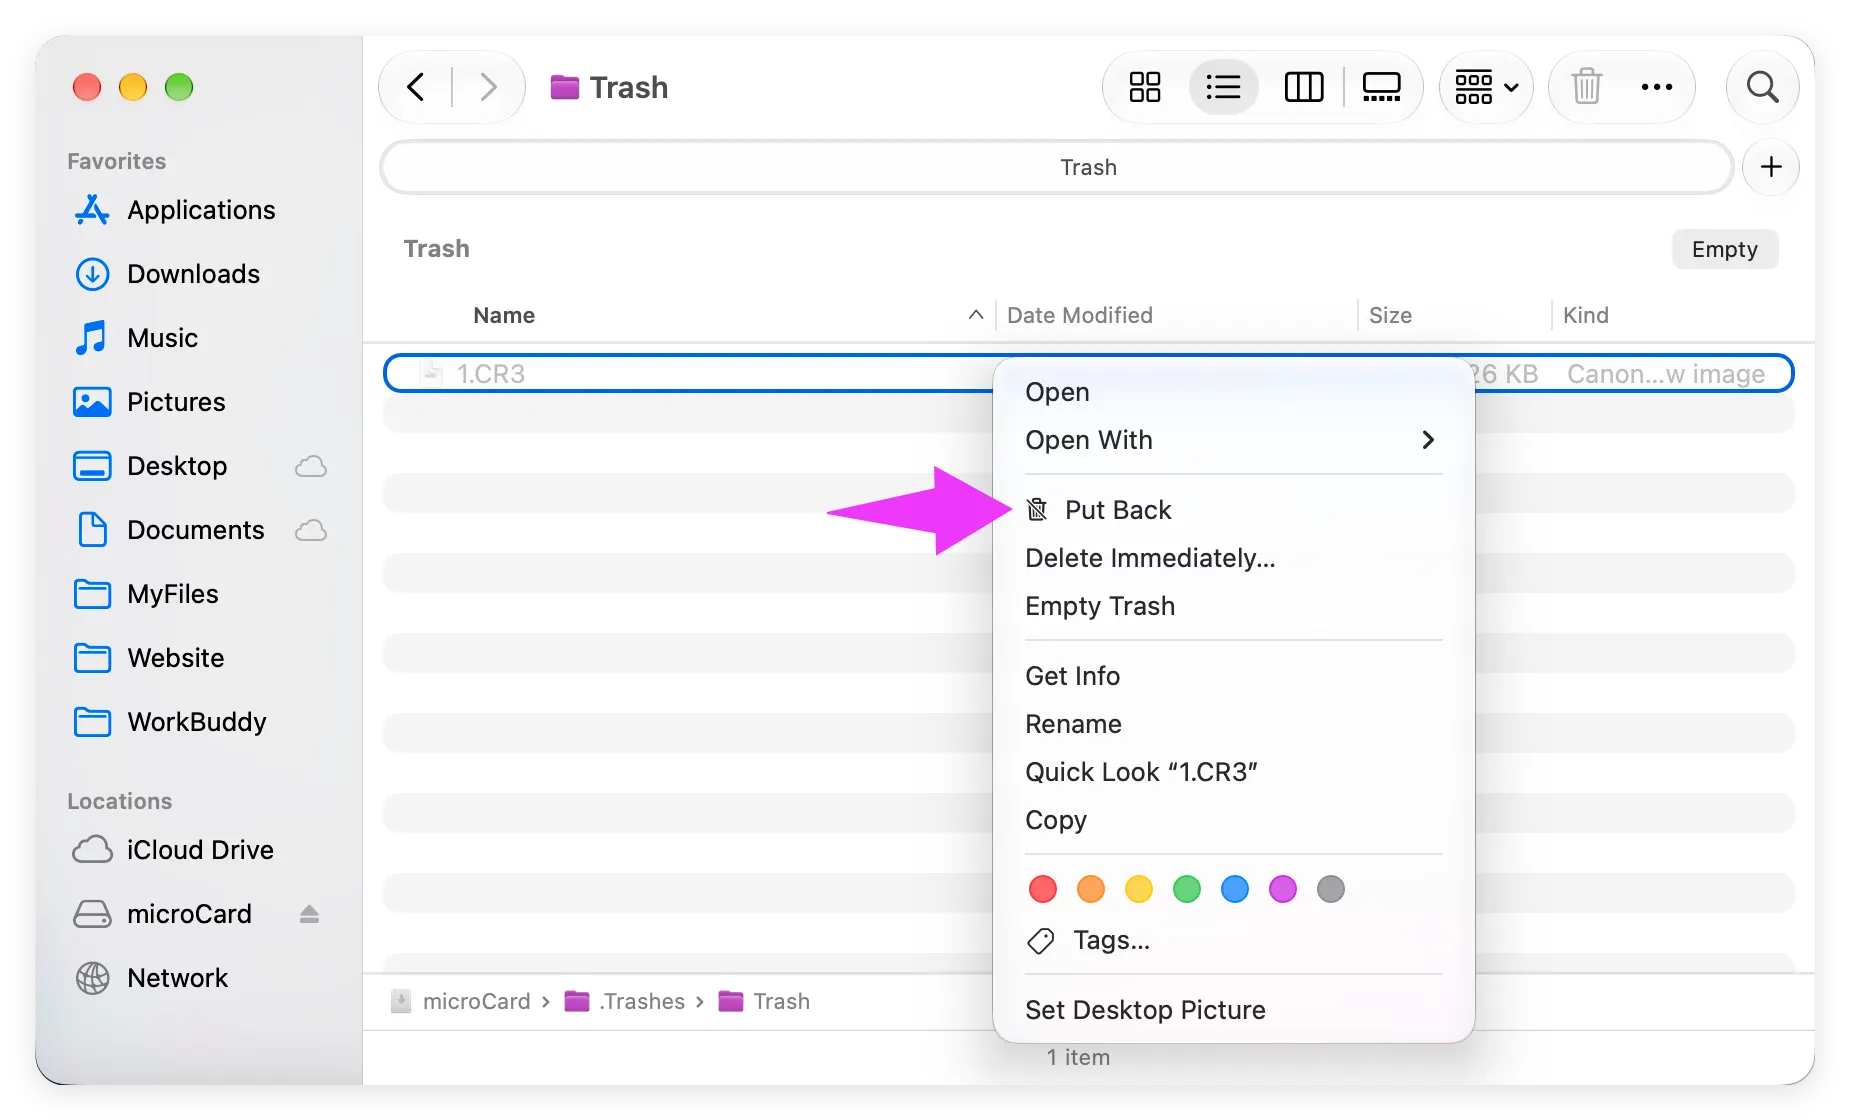
In new macOS versions, you may not able to see the hidden '.Trashes' folder directly on the micro card. Instead, you will see the deleted files in system Trash if you delete the files from the card on Mac.
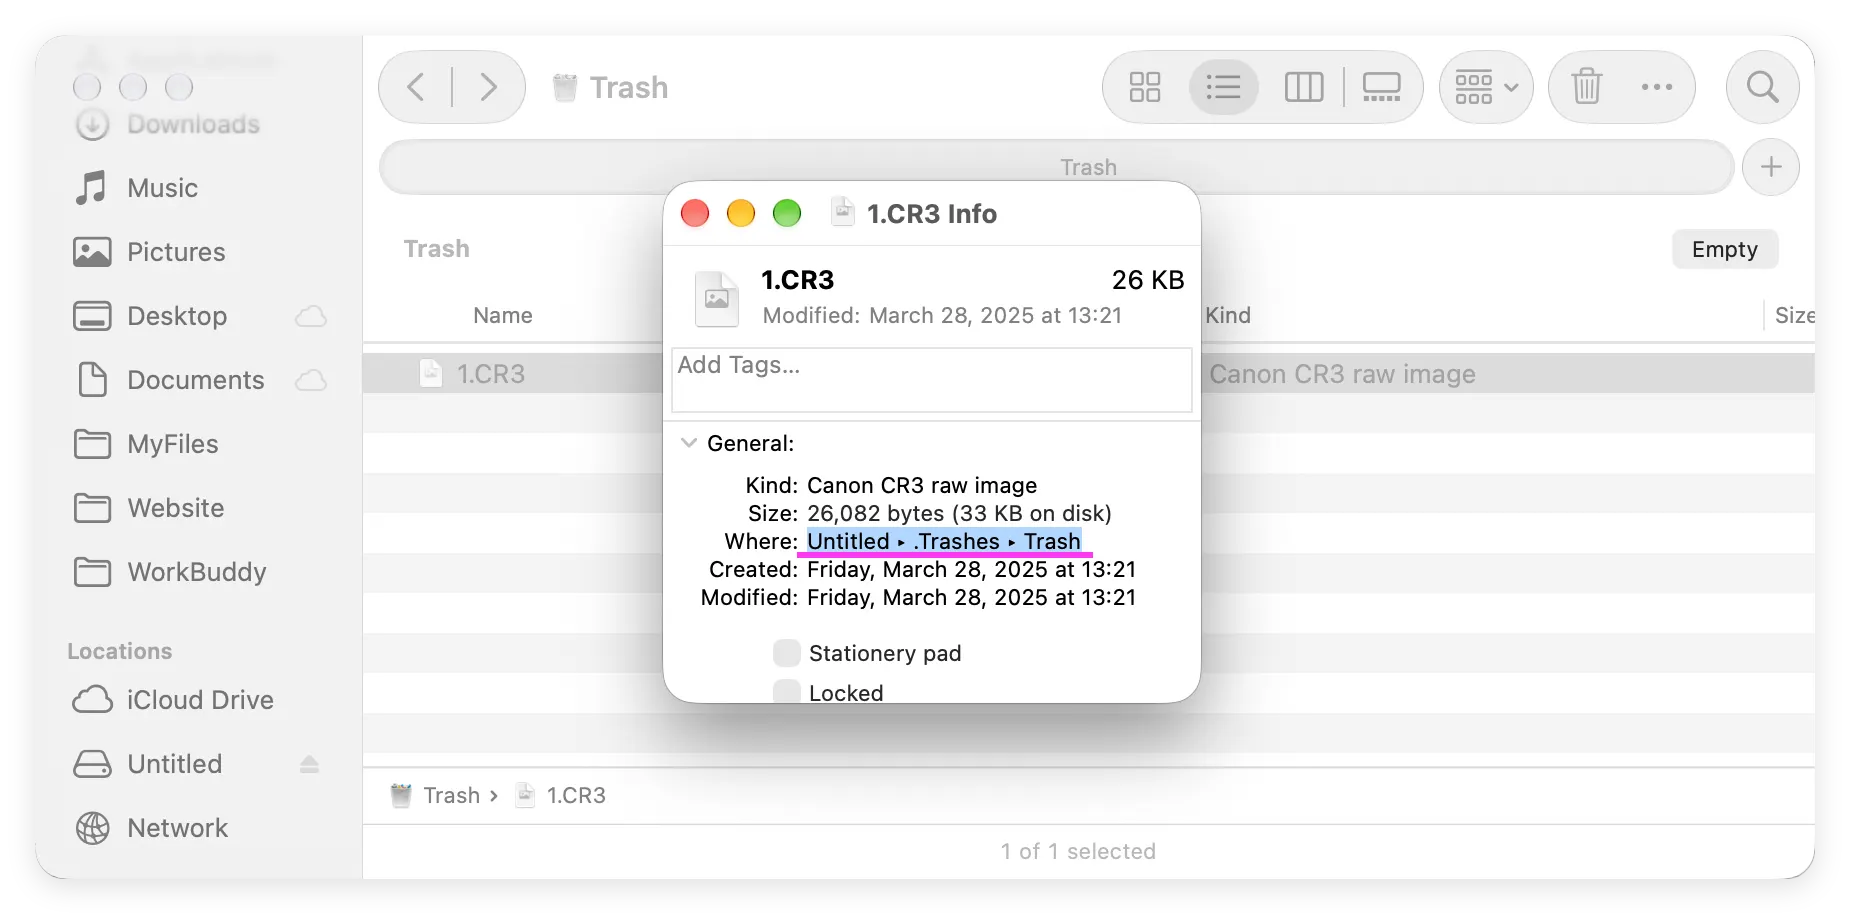
Step 4: Press Command + Shift + . again to hide system files once your originals are safely copied.
Method 2: Restore RAW Originals from Time Machine or Cloud Sync
If you previously imported your shoot onto your Mac Studio before deleting the card contents, macOS Time Machine local snapshots or iCloud Drive folders may still hold untouched copies of your RAW assets.
Step 1: Open the folder on your Mac Studio where you originally offloaded your camera card.
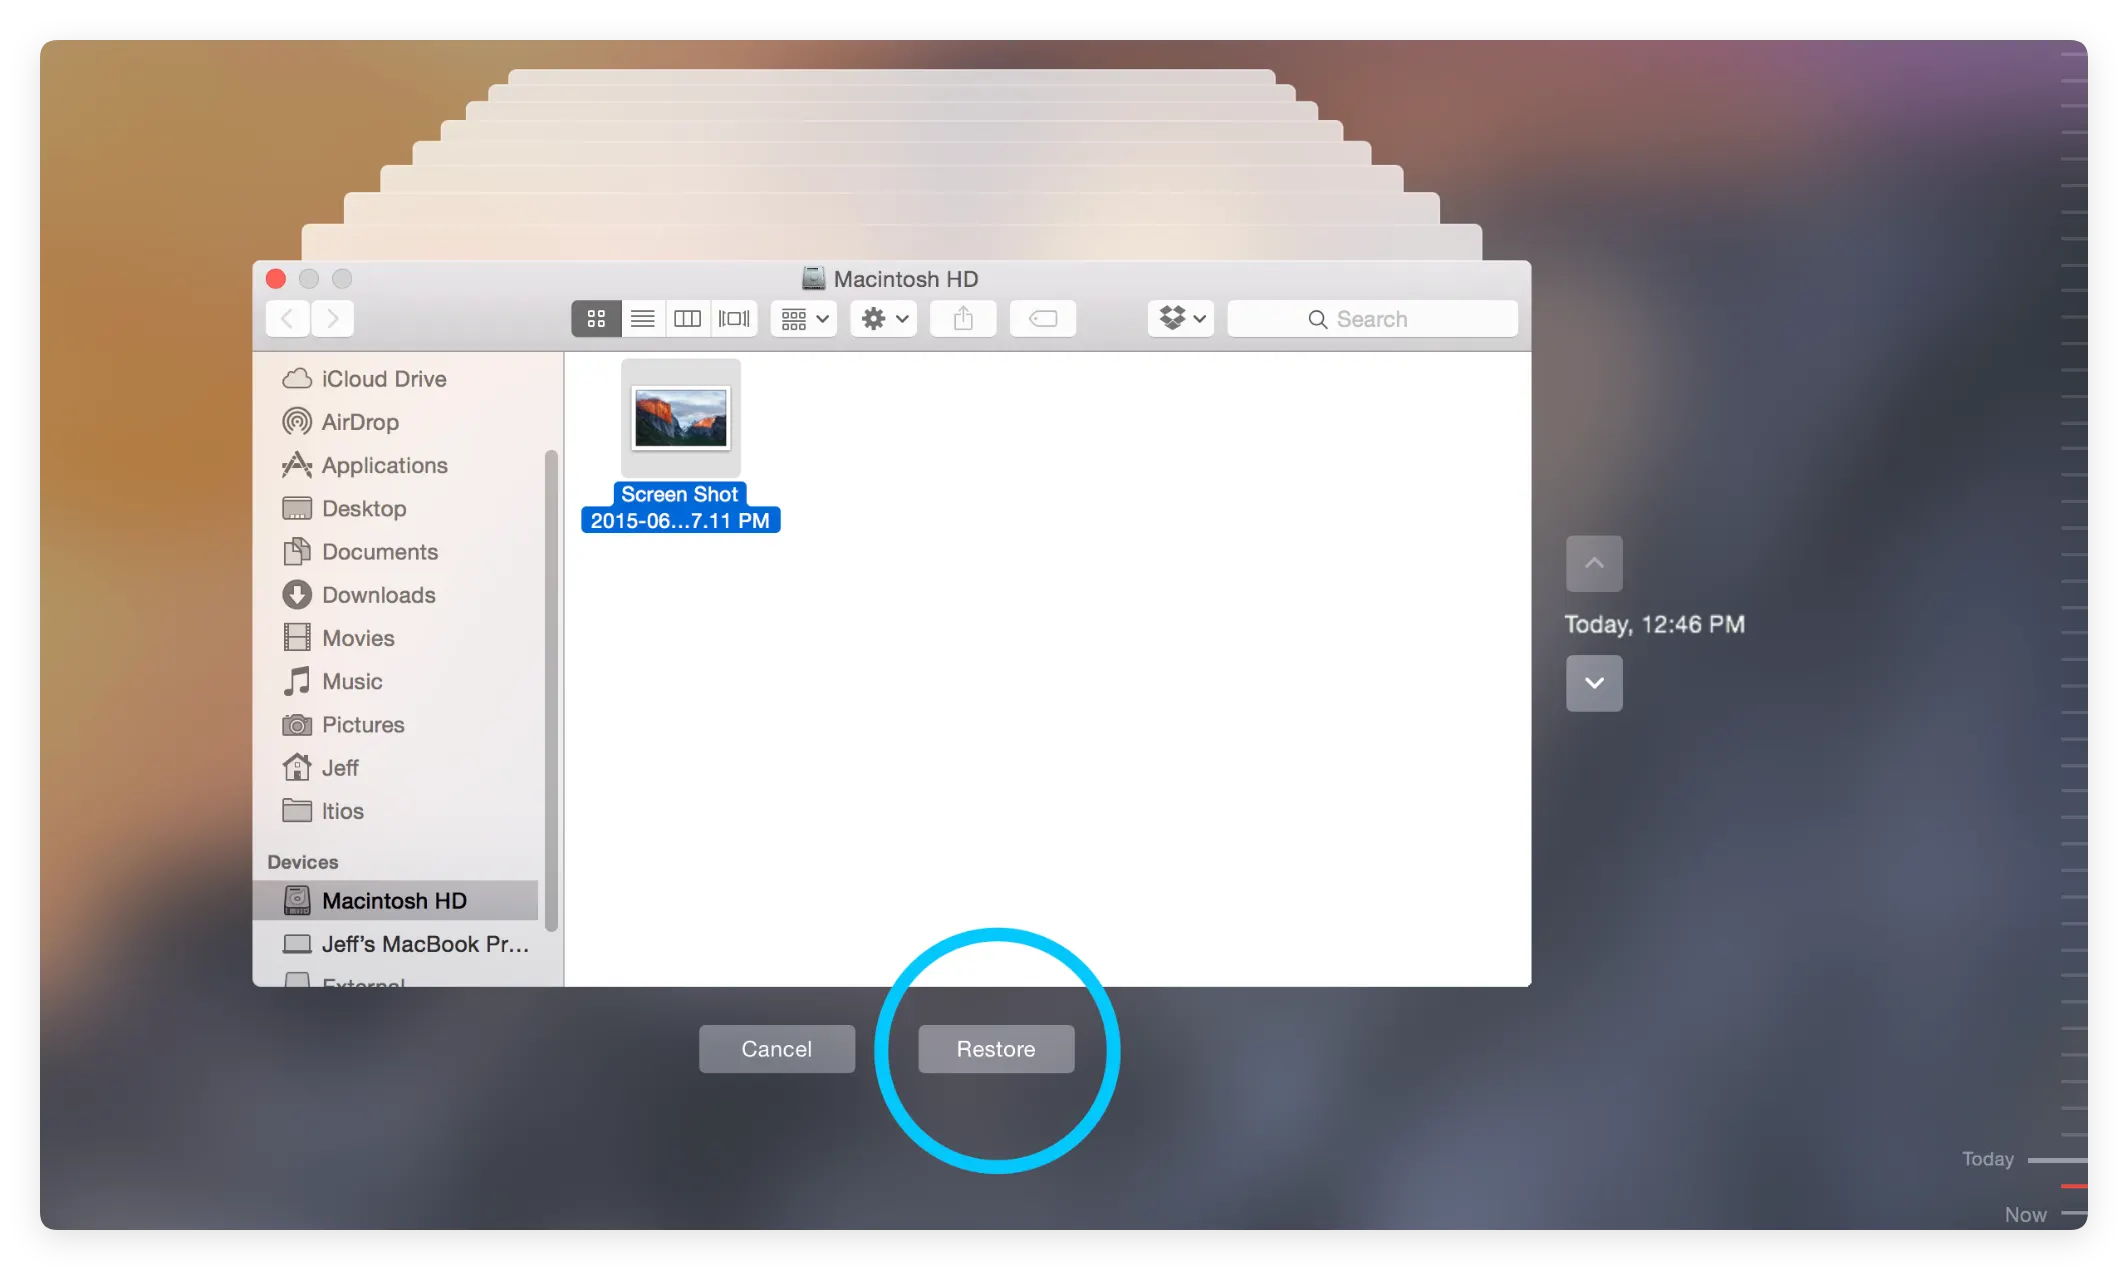
Step 2: Click the Time Machine icon in the top macOS menu bar and select 'Browse Time Machine Backups'.
Step 3: Scroll back to the timestamp prior to deletion, select your RAW files, and click 'Restore' to bring them back to your internal SSD.
Method 3: Deep-Scan with Do Your Data Recovery for Mac (Recommended)
When the microSD card was formatted in-camera, emptied from Trash, or corrupted by an improper ejection, standard Finder tricks cannot see the lost data. Do Your Data Recovery for Mac performs both file-system reconstruction and raw file-signature carving to rescue deleted RAW image assets from micro card on Mac Studio.
Step 1: Download and install Do Your Data Recovery for Mac on your Mac Studio.
Do Your Data Recovery for Mac
- Recover RAW photos and any other image files.
- Easy to recover deleted or lost files in a few steps.
- High recovery rate for any data loss scenarios.
Step 2: Connect your microSD card to the Mac Studio's front SDXC card slot (using a UHS-II microSD adapter) or a dedicated Thunderbolt/USB-C card reader. Launch Do Your Data Recovery for Mac, select your microSD card under the 'External Devices' list, and click Scan.
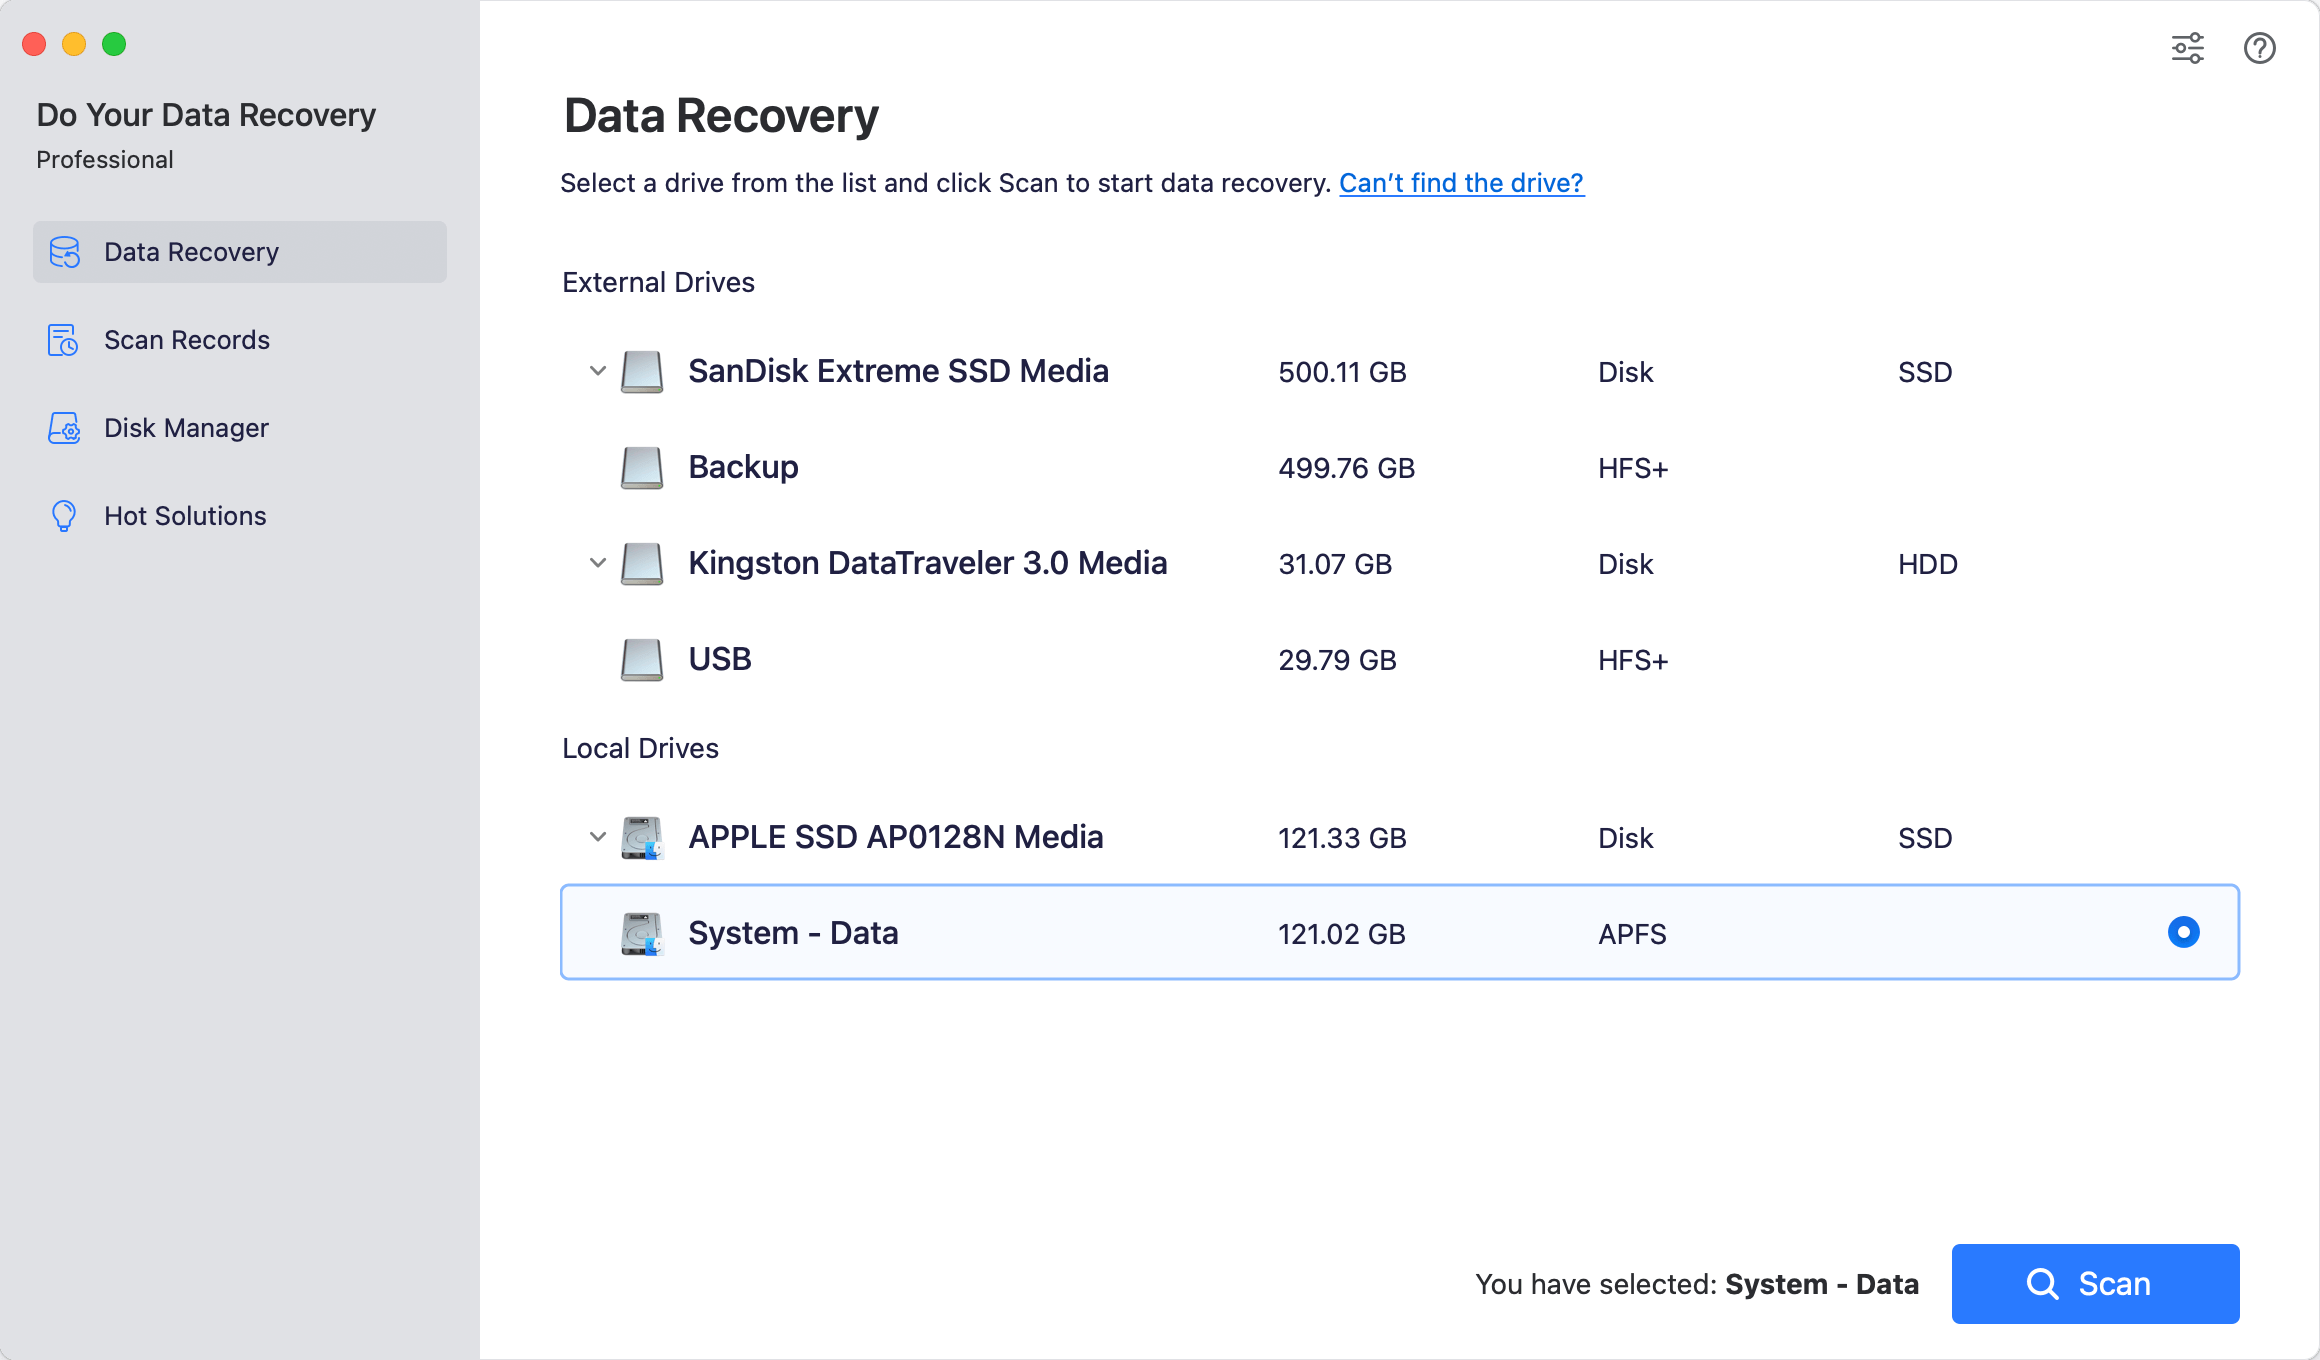
Step 3: Allow the software to complete both its Quick Scan and Deep Scan passes to locate every fragmented CR3, NEF, ARW, RAF, and DNG header.
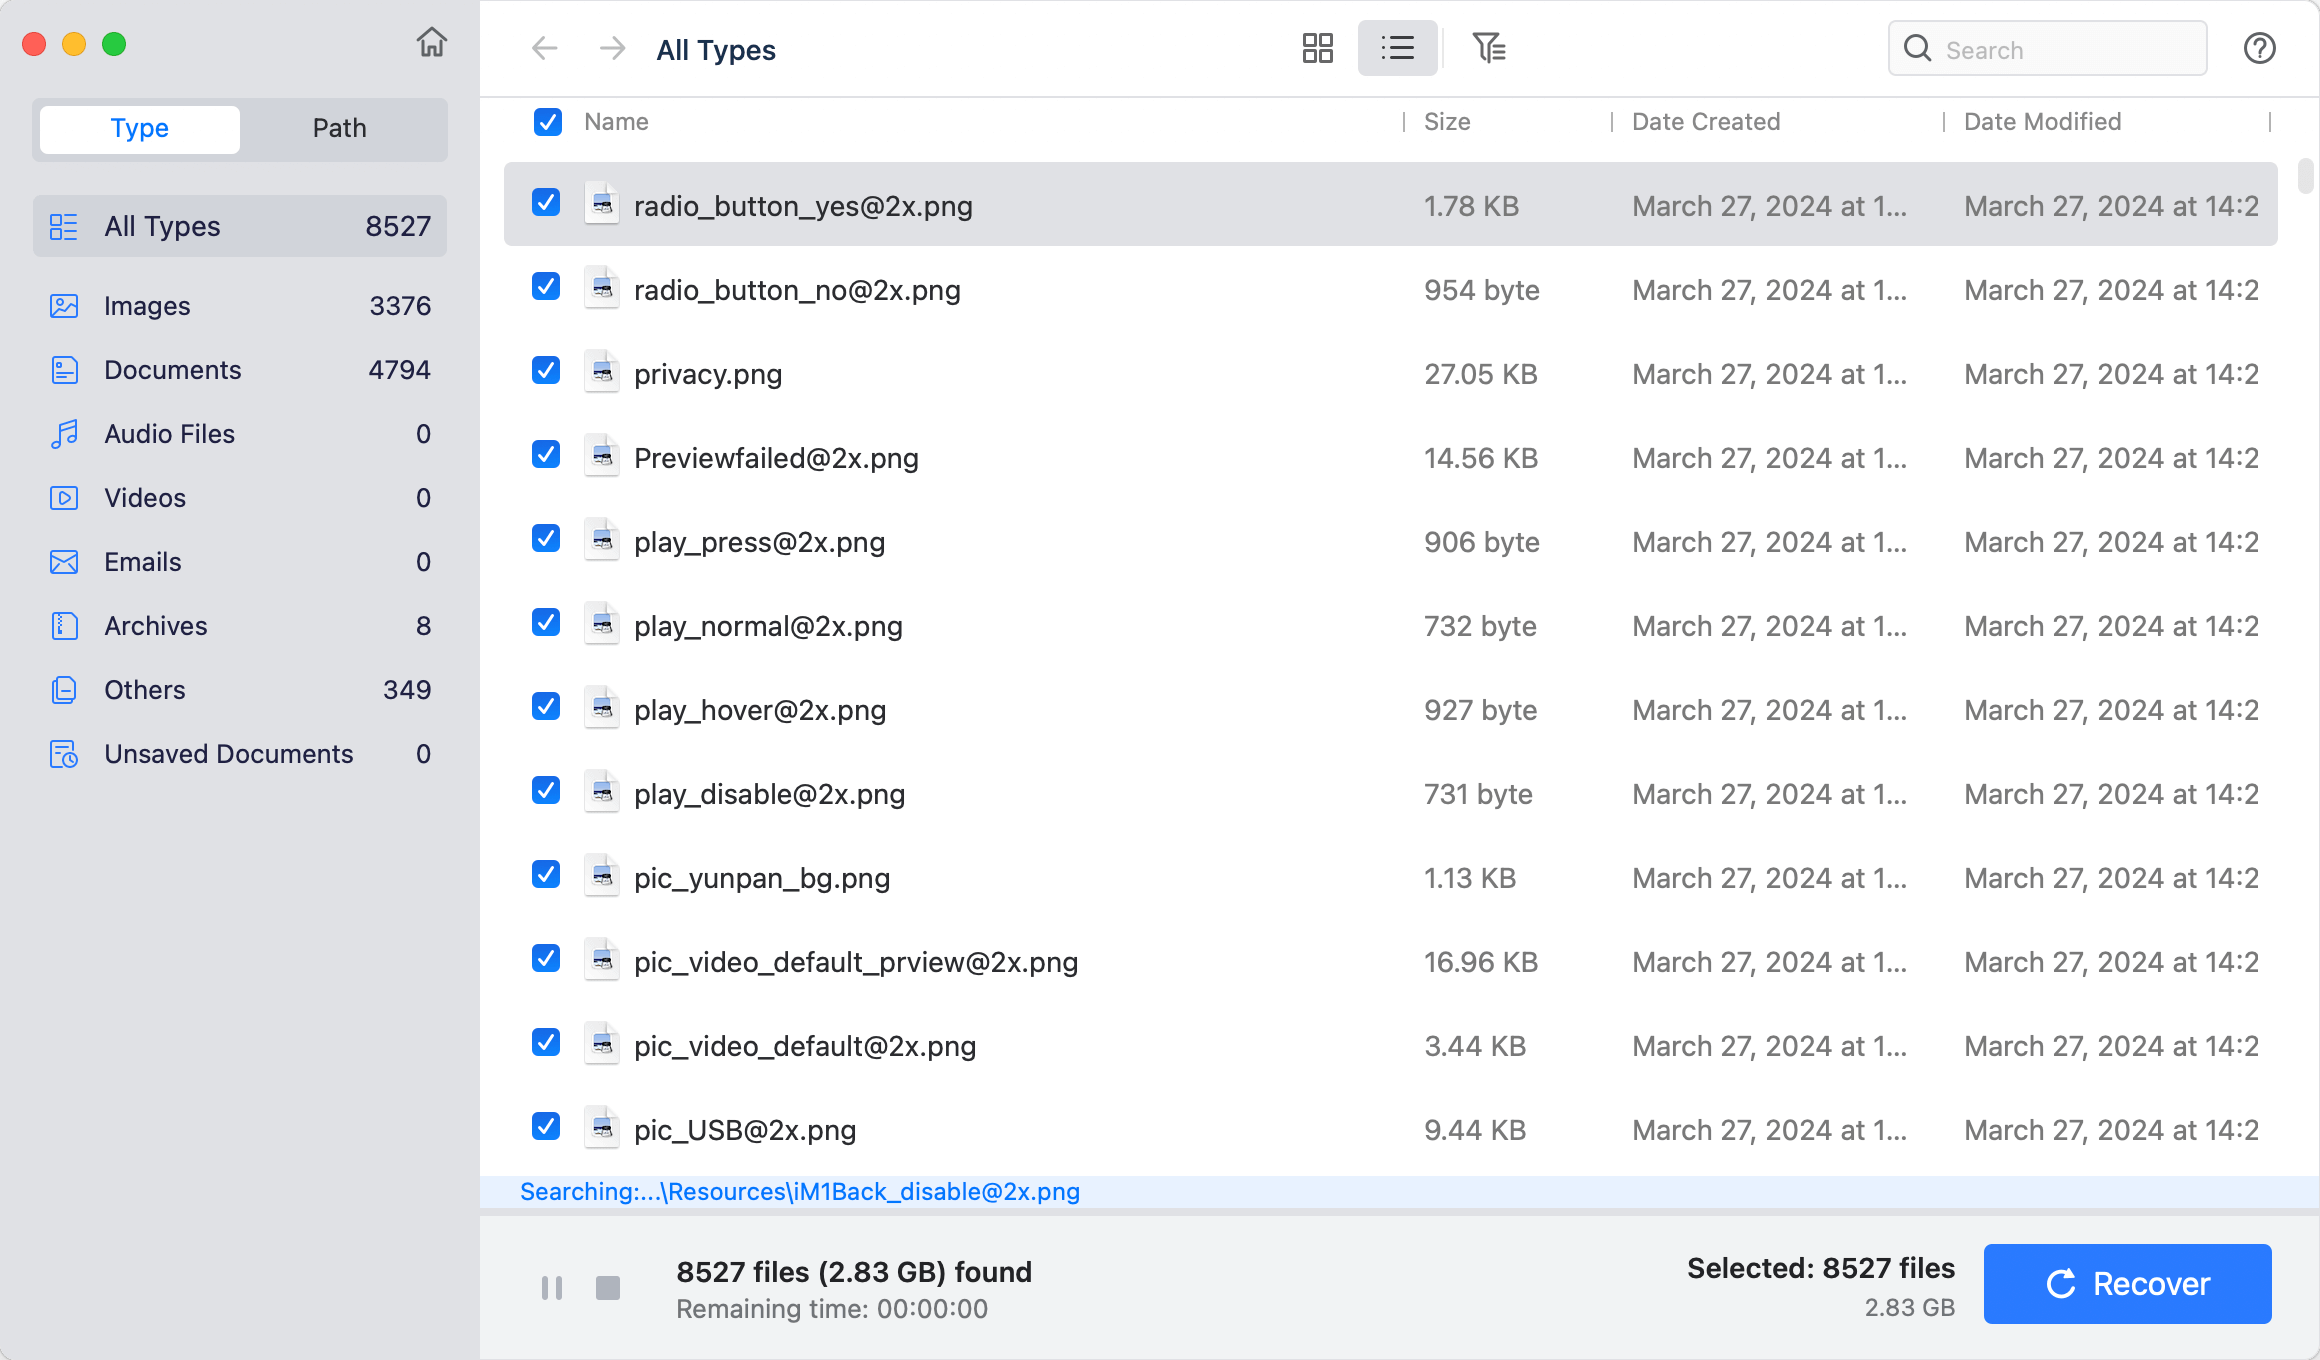
Step 4: Filter the scan results by file extension (e.g., Photos > RAW), double-click images to verify intact previews, select your assets, and click Recover to save them to your Mac Studio SSD.
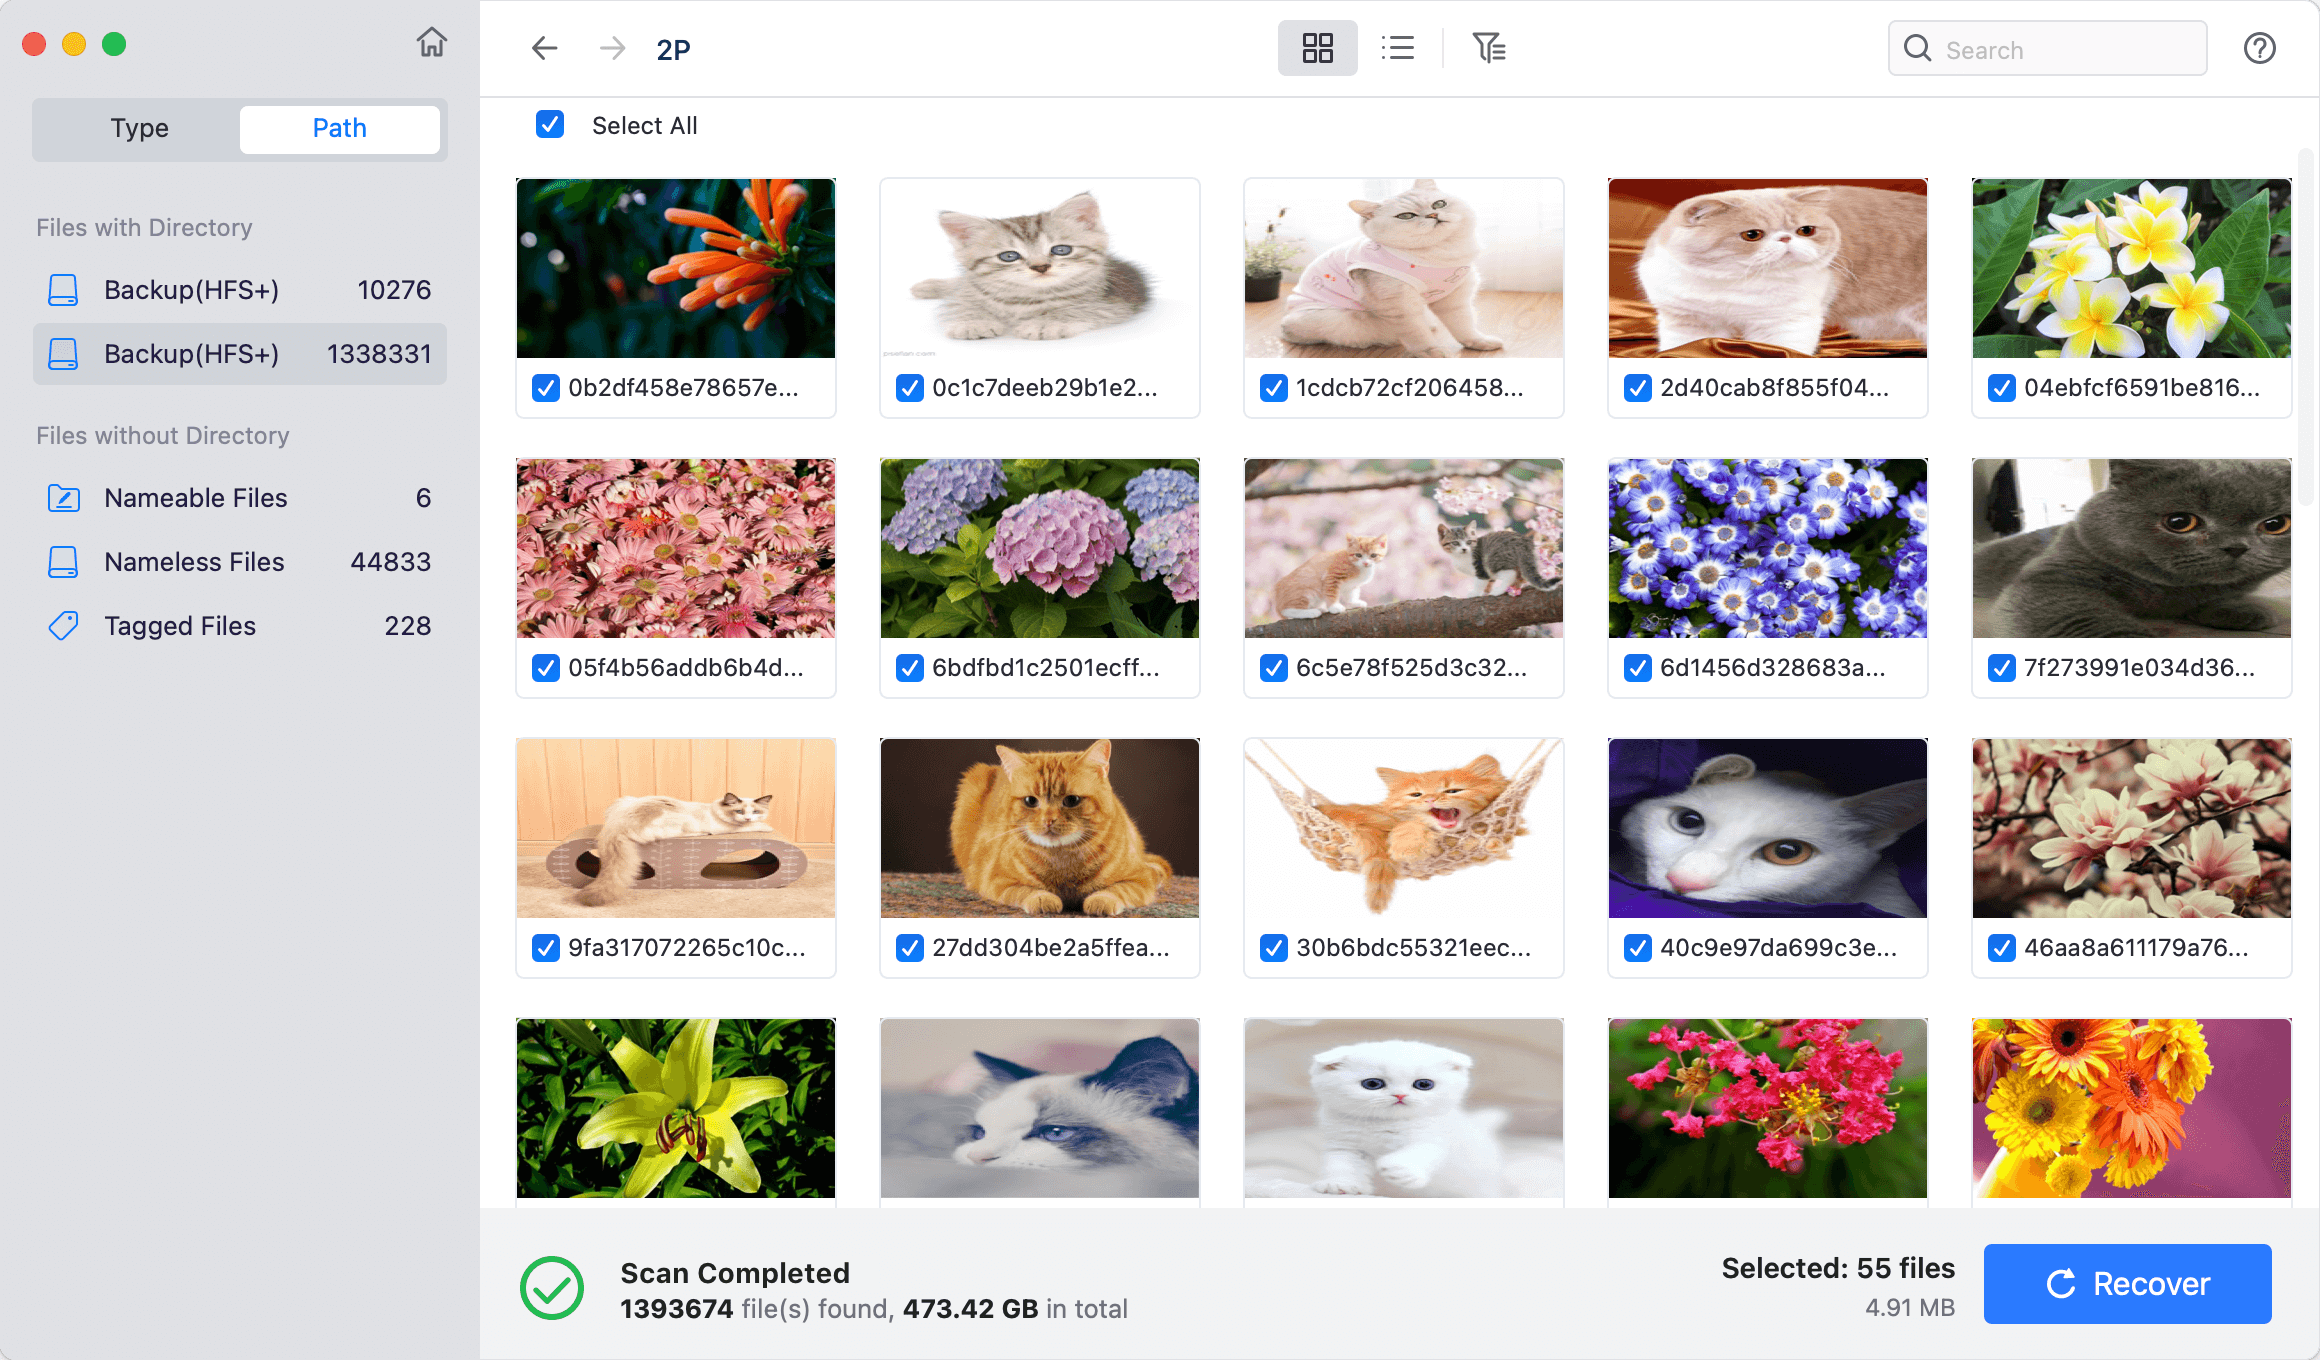
Method 4: Terminal Signature Carving via PhotoRec (Command-Line Alternative)
For advanced users comfortable with macOS Terminal, the open-source PhotoRec utility can carve unallocated sectors on a microSD card without a graphical interface, though it strips away original camera filenames and folder hierarchies.
Step 1: Open Terminal on your Mac Studio and install TestDisk/PhotoRec via Homebrew using 'brew install testdisk'.
Step 2: Run 'diskutil list' to identify the exact device identifier of your microSD card (such as '/dev/disk4').
Step 3: Execute 'sudo photorec' in Terminal, select your microSD card partition, choose 'Other' for exFAT/FAT32 file systems, and specify an output folder on your Mac Studio drive.
Comparison of RAW Image Recovery Methods on Mac Studio
| Recovery Method | Works After Card Format | Preserves Original Filenames | Ease of Use on Mac Studio | Best Use Case |
|---|---|---|---|---|
| Hidden .Trashes Folder | No | Yes | Very Easy (Finder Shortcut) | Files deleted in Finder without emptying Trash |
| Time Machine Backup | Yes (If Backed Up) | Yes | Easy (Built-in macOS UI) | RAW files already imported before card wipe |
| Do Your Data Recovery for Mac | Yes | Yes (When Directory Intact) | Easy (Visual RAW Preview) | Formatted cards, emptied Trash, corrupted exFAT |
| PhotoRec (Terminal) | Yes | No (Generic Names) | Advanced (Command Line) | Free signature carving when GUI tools unavailable |
How to Verify Recovered RAW Files Before Reusing Your MicroSD Card
Recovery tools frequently extract both full-resolution RAW sensor files and small embedded JPEG thumbnails. Verifying file integrity before reformatting your microSD card ensures you do not accidentally lose full-bit-depth originals.
Step 1: Open your recovered RAW images inside Adobe Lightroom Classic, Capture One, or Apple Preview to confirm that the full sensor resolution loads cleanly without horizontal color banding.
Step 2: Inspect the file sizes in Finder—authentic uncompressed or lossless compressed RAW files typically range from 25 MB to over 100 MB, whereas standalone embedded previews are under 3 MB.
Step 3: Check EXIF metadata fields (camera model, shutter speed, ISO, and capture timestamp) to verify that the file headers match your shoot.
Step 4: Back up the verified RAW folder to a second drive or cloud archive, then format the microSD card inside your camera body rather than in macOS Disk Utility to restore optimal factory cluster alignment.
FAQs about RAW Image Recovery on Mac Studio
Conclusion:
Acting quickly and keeping your memory card write-protected gives you the highest possible success rate when you need to rescue deleted RAW image assets from micro card on Mac Studio. By pairing the Mac Studio's high-speed UHS-II SDXC slot with Do Your Data Recovery for Mac, photographers and creators can safely bypass damaged directory tables, preview full-resolution RAW originals, and restore critical creative work without risking permanent data loss.
Do Your Data Recovery for Mac
Do Your Data Recovery for Mac, one of the best Mac data recovery software, can help you easily and completely recover deleted, formatted or lost files from Mac HDD/SSD, external HDD/SDD, USB drive, memory card, digital camera, or other storage devices.
Written & Updated by Justin Kenny
Justin Kenny is a writer & editor of DoYourData. He joined DoYourData in 2016 and focuses on writing articles about Windows data recovery, Mac data recovery, external device data recovery, hard drive clone, data erasure, Mac cleanup, computer issue fixes, etc. He is a super fan of Apple devices and is big on testing new digital device and system utility software.