How to Unformat Hard Drive on macOS 27 Golden Gate?
Check backups first if you lost data due to formatting hard drive on macOS 27 Golden Gate. If there is no backups available after data loss on macOS 27, what to do? Use Do Your Data Recovery for Mac to easily and quickly recover the formatted/lost data on macOS 27.
 Updated by Justin Kenny on July 20, 2026
Quick Navigation:
- What Happens after Formatting a Drive on macOS 27?
- The Best Way to Unformat Hard Drive on macOS Golden Gate
- Alternative: Restoring via Time Machine Backup
- Conclusion
- FAQs about Unformatting Hard Drive on macOS 27
Have you ever clicked that 'Erase' button in Disk Utility, only to feel your heart drop a second later? We have all been there. Losing important documents, family photos, or critical work files is incredibly stressful, especially after upgrading to Apple's brand-new operating system.
If you are running the latest macOS 27 Golden Gate on your M-series Mac or MacBook Neo, you might think that formatting a drive means your data is gone forever. Fortunately, that is usually not the case!

In this complete guide, we will show you exactly how to unformat hard drive on macOS 27 Golden Gate. You will see how the process works and how you can get your files back with just a few simple clicks.
What Happens after Formatting a Drive on macOS 27?
To understand how to reverse the process, it helps to understand what happens when you format a storage device on your Mac. When you use Disk Utility to erase an external hard drive, SSD, or USB flash drive, macOS does not instantly overwrite every single bit of data.
Instead, a standard format simply wipes the drive's file directory index. Think of it like removing the table of contents from a massive book. The chapters—your actual files—are still written on the pages, but the system no longer knows where to find them. The space is marked as 'available,' meaning it is ready to be written over whenever you save new files.
Because macOS 27 Golden Gate introduces deep architectural refinements, including advanced security structures and optimized background Neural Engine tasks, managing your storage properly is more critical than ever. But as long as you do not write new data to the drive, your old files remain intact and recoverable.
The Golden Rule: Stop Using the Drive Immediately!
Before doing anything else, you must follow the number one rule of data recovery: stop using the formatted drive immediately.
If you keep saving new files, installing applications, or even browsing the web while the target drive is connected, you risk overwriting the invisible files. Once a file is overwritten by new data, it truly becomes gone forever. Disconnect the external drive or close down active processes on your internal storage until you are ready to begin the recovery process.
The Best Way to Unformat Hard Drive on macOS Golden Gate
Since macOS does not include a built-in 'unformat' button, the easiest and most reliable solution is using professional data recovery software built for Apple Silicon. We highly recommend using Do Your Data Recovery for Mac.
This powerful, user-friendly tool is fully optimized for macOS 27 Golden Gate. It handles the modernized APFS, HFS+, operating layouts, and external file systems like ExFAT and NTFS smoothly. It scans deep into the drive to rebuild the missing directory index, allowing you to view and save your lost data safely.
Step-by-Step Guide to Recovering Your Data
Step 1: Download and Install the Software
Download Do Your Data Recovery for Mac. Make sure you install the software on your Mac's internal startup drive (or a separate working drive)—never download or install it onto the formatted hard drive you want to rescue.
Do Your Data Recovery for Mac
- Recover data from formatted/inaccessible hard drive.
- Support the latest macOS 27 Golden Gate.
- 100% safe and effective to recover deleted/lost data.
Step 2: Connect and Select Your Formatted Drive
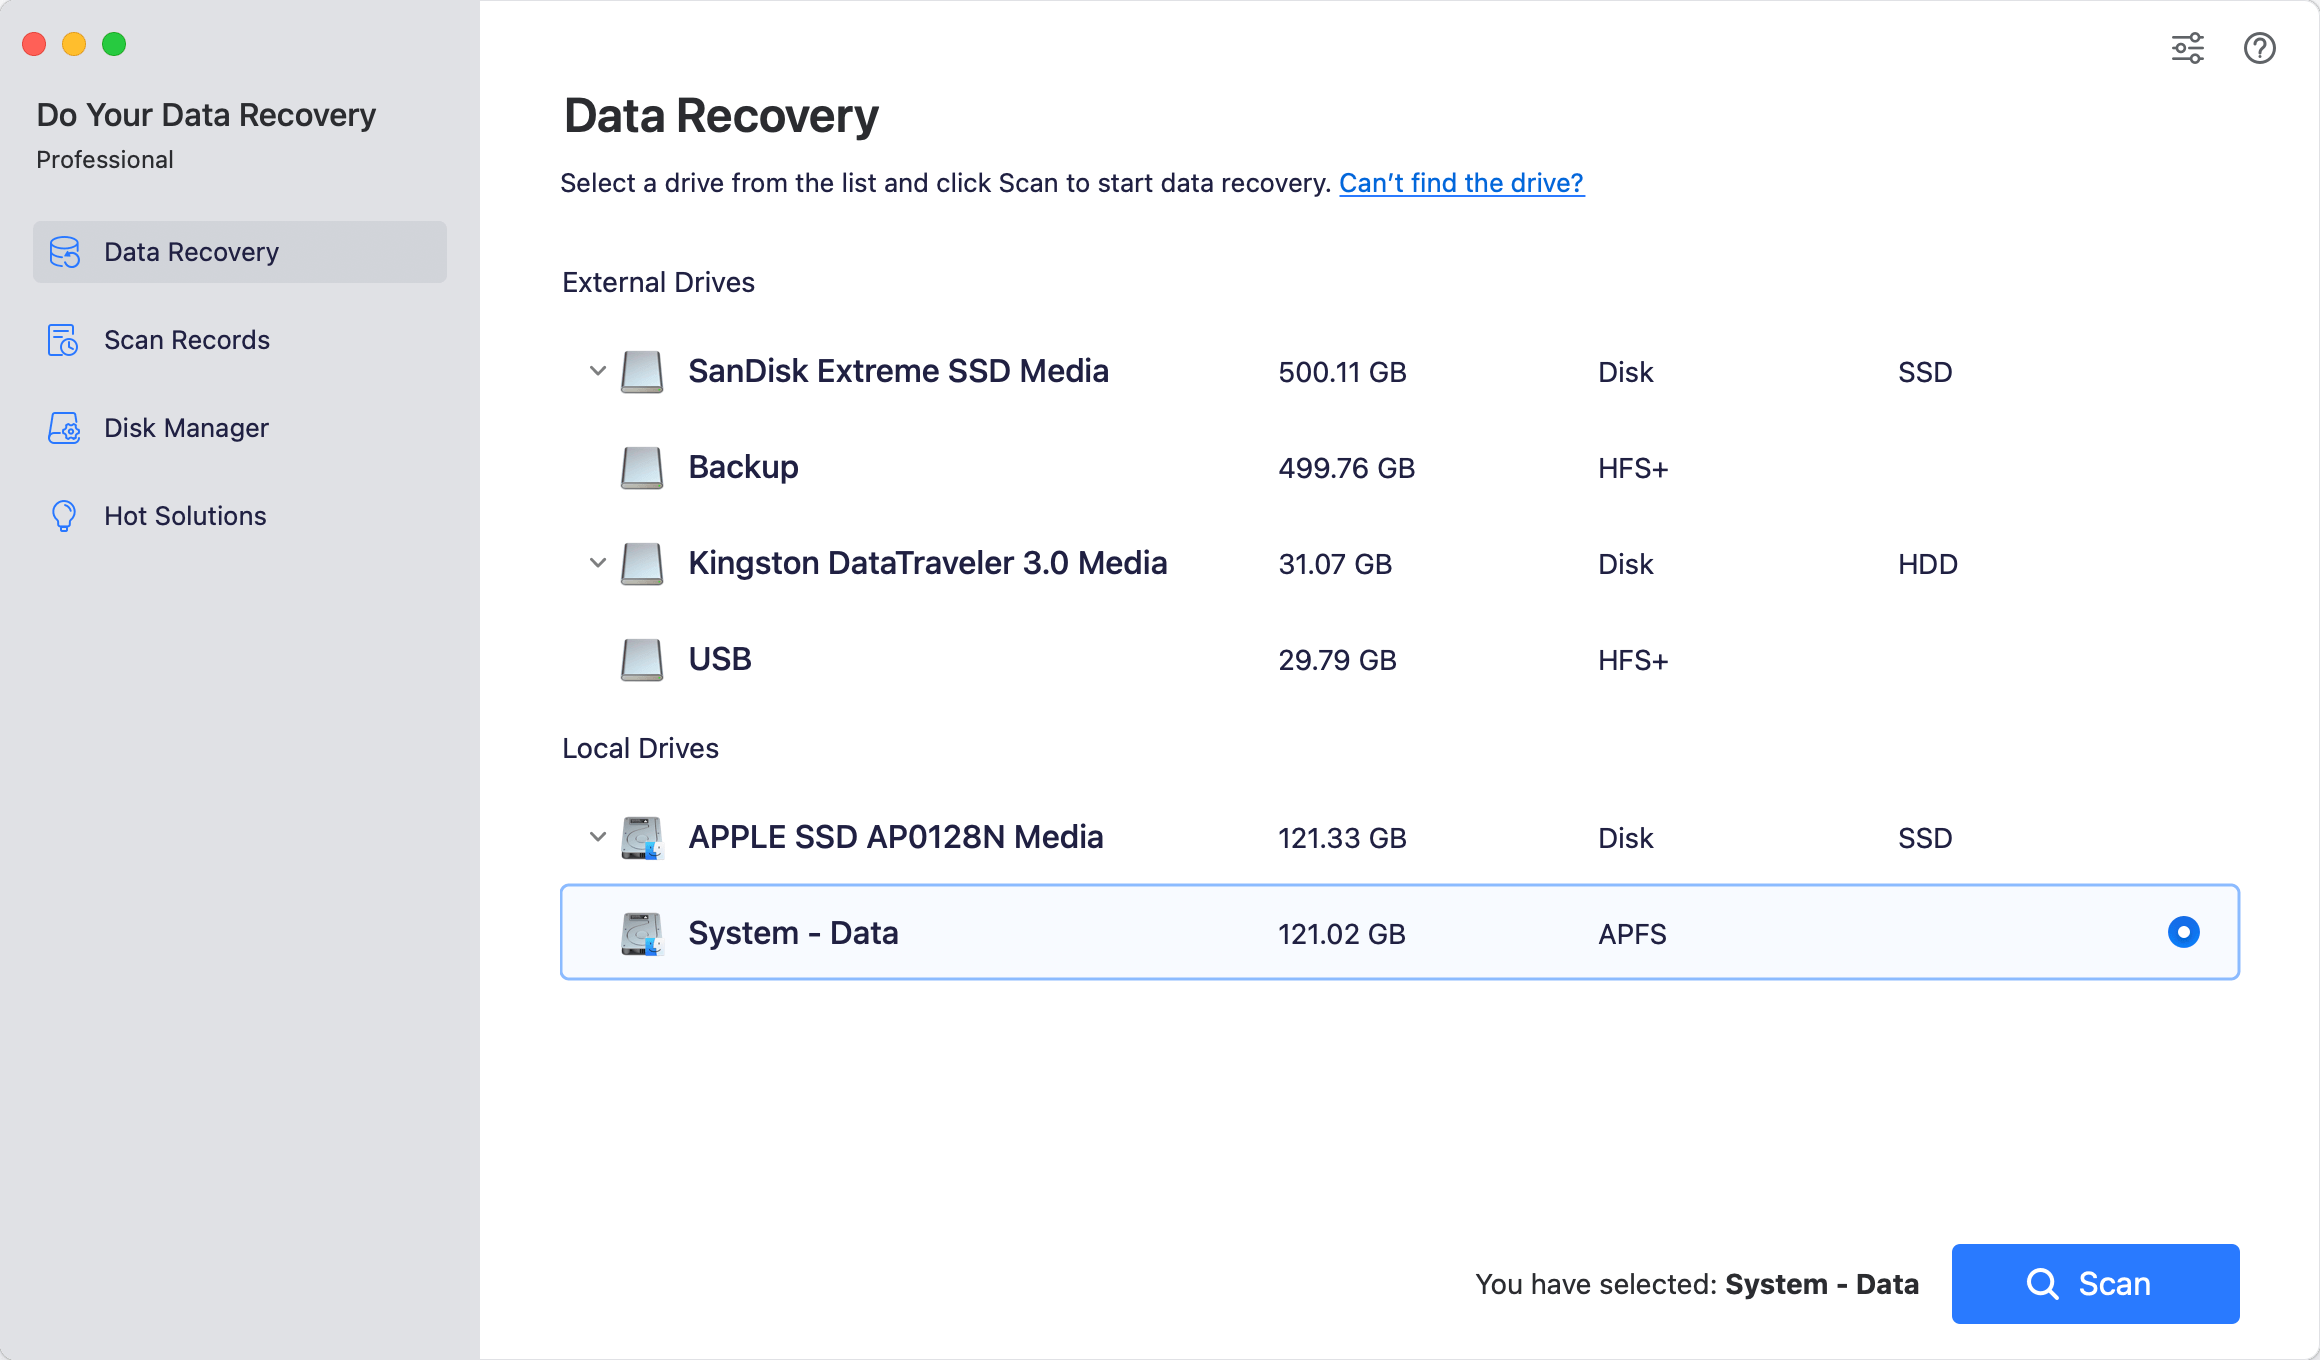
Launch the application from your Launchpad. On the clean, simple home screen, you will see a list of available storage locations. Plug in your formatted external hard drive or select the specific partition you accidentally erased, then click the Scan button.
Step 3: Scan for Lost Files
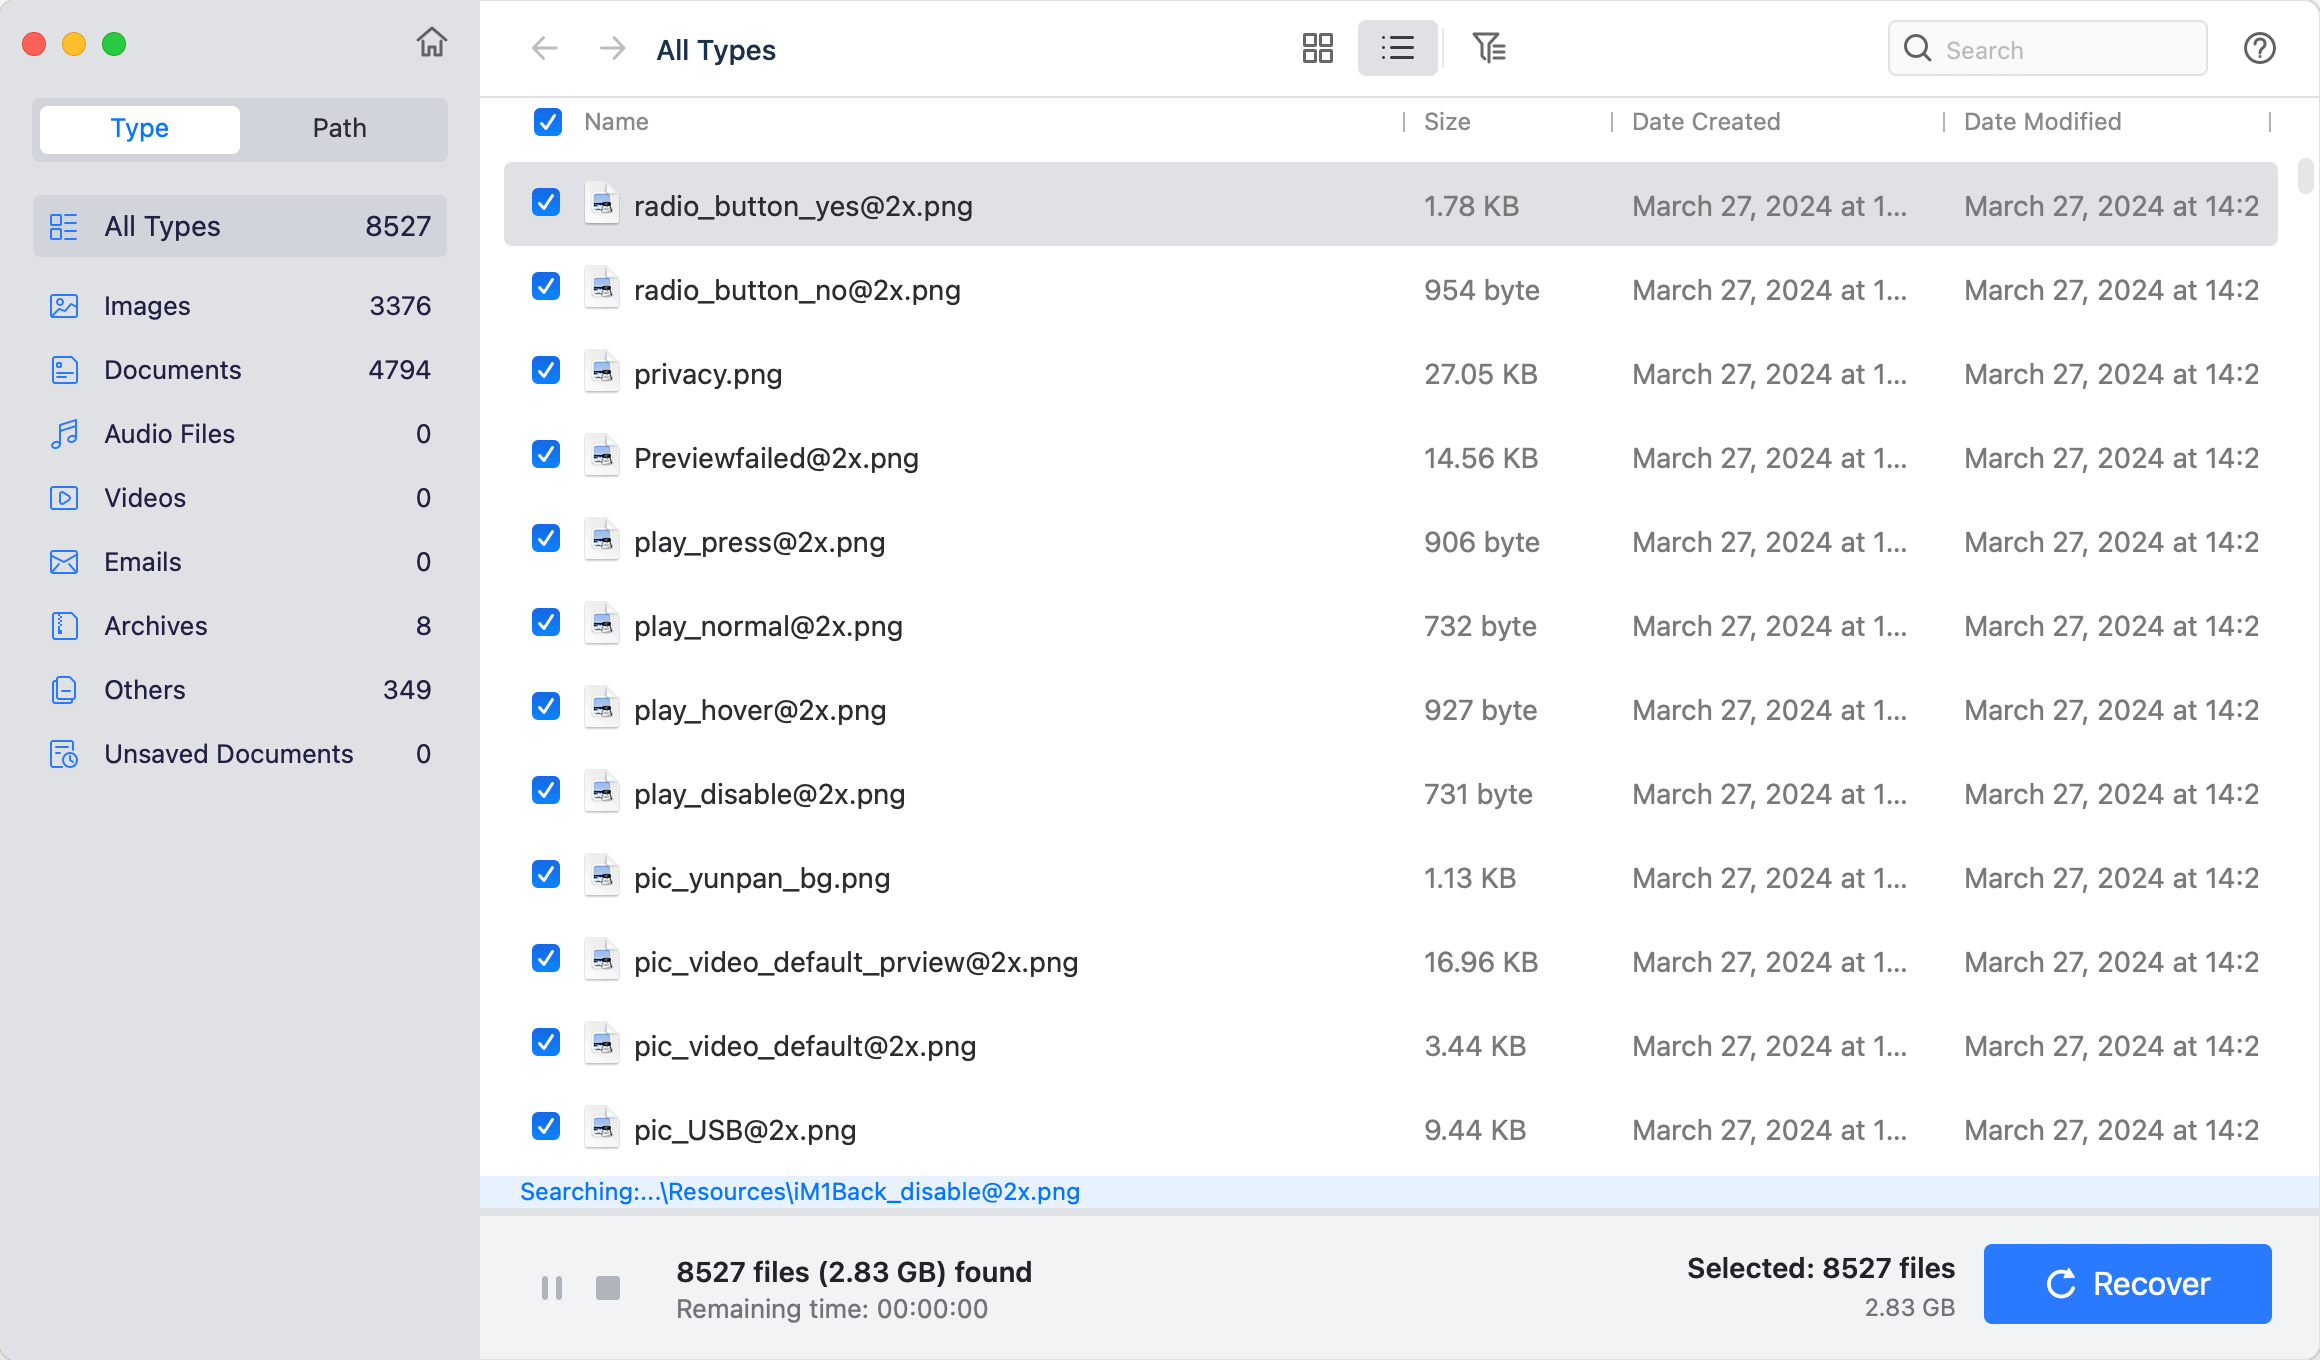
The software will instantly launch an advanced scanning algorithm. It searches through every sector of the hard drive to find file signatures for photos, videos, documents, and archives. You can see the files appear in real-time as the scan processes.
Step 4: Preview and Recover
Once the scan finishes, browse through the neat folders or use the search filter to locate specific items. You can double-click images, PDFs, and videos to preview them and ensure they are intact. Check the boxes next to the files you want back, click Recover, and choose a safe location on a completely different drive to save them.

Alternative: Restoring via Time Machine Backup
If you are someone who keeps local backups, you might be able to bypass software recovery entirely. macOS 27 Golden Gate continues to support local Time Machine backups. Note that version 27 has officially removed legacy Apple Filing Protocol (AFP) support, meaning old network setups like AirPort Time Capsule will not work, but local external drives work perfectly.
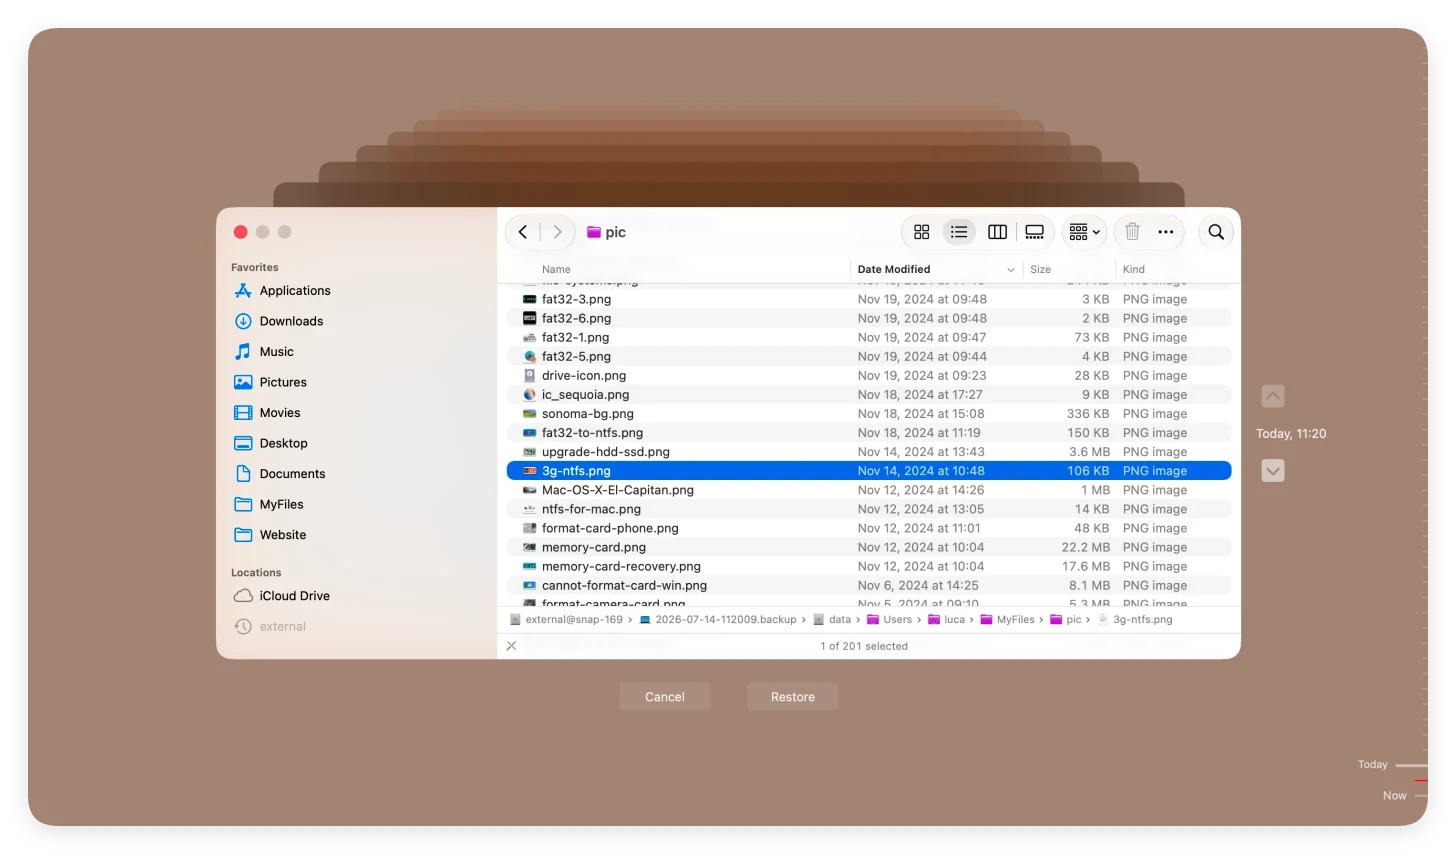
Simply plug in your Time Machine backup drive, open the Time Machine app via Spotlight, browse back to a timestamp before the accidental format occurred, select your files, and click Restore.
Conclusion:
Accidentally formatting a hard drive can feel like a disaster, but on macOS 27 Golden Gate, you have options. As long as you remember the golden rule—stop using the drive immediately to prevent overwriting—your lost data remains highly recoverable.
Whether you have a local Time Machine backup ready or need to rely on the advanced scanning power of Do Your Data Recovery for Mac, reversing a format is easier and more secure than ever before. Don't leave your important files to chance; download the software, start your scan, and get your missing data back safely today.
FAQs about Unformatting Hard Drive on macOS 27
Do Your Data Recovery for Mac
Do Your Data Recovery for Mac, one of the best Mac data recovery software, can help you easily and completely recover deleted, formatted or lost files from Mac HDD/SSD, external HDD/SDD, USB drive, memory card, digital camera, or other storage devices.
Written & Updated by Justin Kenny
Justin Kenny is a writer & editor of DoYourData. He joined DoYourData in 2016 and focuses on writing articles about Windows data recovery, Mac data recovery, external device data recovery, hard drive clone, data erasure, Mac cleanup, computer issue fixes, etc. He is a super fan of Apple devices and is big on testing new digital device and system utility software.