Use Do Your Data Recovery for Mac on macOS 27 Golden Gate: Complete Guide
To recover deleted or lost data on macOS 27 Golden Gate, the reliable recovery tool Do Your Data Recovery for mac is recommended. With the software, you can easily get back the lost data within 3 steps.
 Updated by Justin Kenny on July 21, 2026
Quick Navigation:
- Why Data Loss Happens on macOS 27 Golden Gate
- Is Data Recovery Safe on macOS 27 Golden Gate?
- Use Do Your Data Recovery for Mac on macOS 27
- Alternative Recovery Methods on macOS Golden Gate
- FAQs about macOS 27 Golden Gate Data Recovery
- Conclusion
Losing important files can feel like a complete nightmare. Whether you accidentally emptied the Trash, formatted a drive by mistake, or encountered a system glitch after updating to macOS 27 Golden Gate, your valuable documents, photos, and videos might seem gone forever.
The good news? They are usually still recoverable! When you delete a file on Mac, macOS doesn't immediately destroy the data; it simply marks the storage space as available. Until new data overwrites that space, your lost files remain intact under the hood.
In this comprehensive guide, we will walk you through exactly how to use Do Your Data Recovery for Mac on macOS 27 Golden Gate. Designed for all Mac users, this powerful software allows you to retrieve deleted or lost data in just three quick steps.
Quick Overview: How to Recover Files on macOS 27 Golden Gate
- Download & Install: Install Do Your Data Recovery for Mac on your system.
- Select & Scan: Open the app, choose the location where files were lost, and click 'Scan'.
- Preview & Recover: Preview recoverable files, select what you need, and save them to a secure location.
Why Data Loss Happens on macOS 27 Golden Gate
macOS 27 Golden Gate brings exciting updates, refined performance, and enhanced privacy protections. However, major system upgrades and daily computing can still lead to unexpected data loss. Understanding why files go missing helps you prevent future loss and take fast action.
Here are the most common reasons why users lose data on macOS 27 Golden Gate:
- Accidental Deletion: Pressing Command + Delete or emptying the Trash prematurely without double-checking the contents.
- Disk Formatting: Erasing an external drive, SD card, or secondary volume in Disk Utility by mistake.
- System Updates & Bugs: OS updates or unexpected system crashes during updates can cause file corruption or missing partition tables.
- Drive Corruption: Unplugging an external hard drive or USB flash drive without safely ejecting it first.
- Trash Bypass: Using shortcuts like Option + Command + Delete, which permanently deletes files without placing them in the Trash.
Is Data Recovery Safe on macOS 27 Golden Gate?
Yes, data recovery is completely safe on macOS 27 Golden Gate when using a trusted, Apple-compliant utility like Do Your Data Recovery for Mac. The software operates in read-only mode, meaning it scans your drive without modifying or damaging existing data.
To maximize your recovery success rate, keep these crucial rules in mind:
- Rule 1. STOP USING THE AFFECTED DRIVE: Do not save new files, download big applications, or stream heavy media onto the drive where files were lost. New data can overwrite lost file fragments.
- Rule 2. DO NOT SAVE RECOVERED FILES BACK TO THE SAME LOCATION: Always restore files to a different drive (e.g., an external HDD or secondary partition) to avoid overwriting remaining lost data.
Use Do Your Data Recovery for Mac on macOS 27
Do Your Data Recovery for Mac offers a seamless, beginner-friendly 3-step process. Follow these detailed steps to restore your deleted or formatted files.
Step 1: Download, Install, and Launch the Software
First, download Do Your Data Recovery for Mac from the official website. Open the downloaded installer file (.dmg) and drag the Do Your Data Recovery icon into your Applications folder.
Do Your Data Recovery for Mac
- Effective data recovery software for macOS 27.
- Support recovering deleted, formatted, or other lost data.
- Recover photos, videos, documents, and more files.
Launch the app from Launchpad or Finder. If prompted by macOS 27 Golden Gate's security settings, grant the application permission to access your storage drives. On Apple Silicon machines (M1, M2, M3, M4, or M5 chips), you may need to grant Full Disk Access in System Settings > Privacy & Security > Full Disk Access.
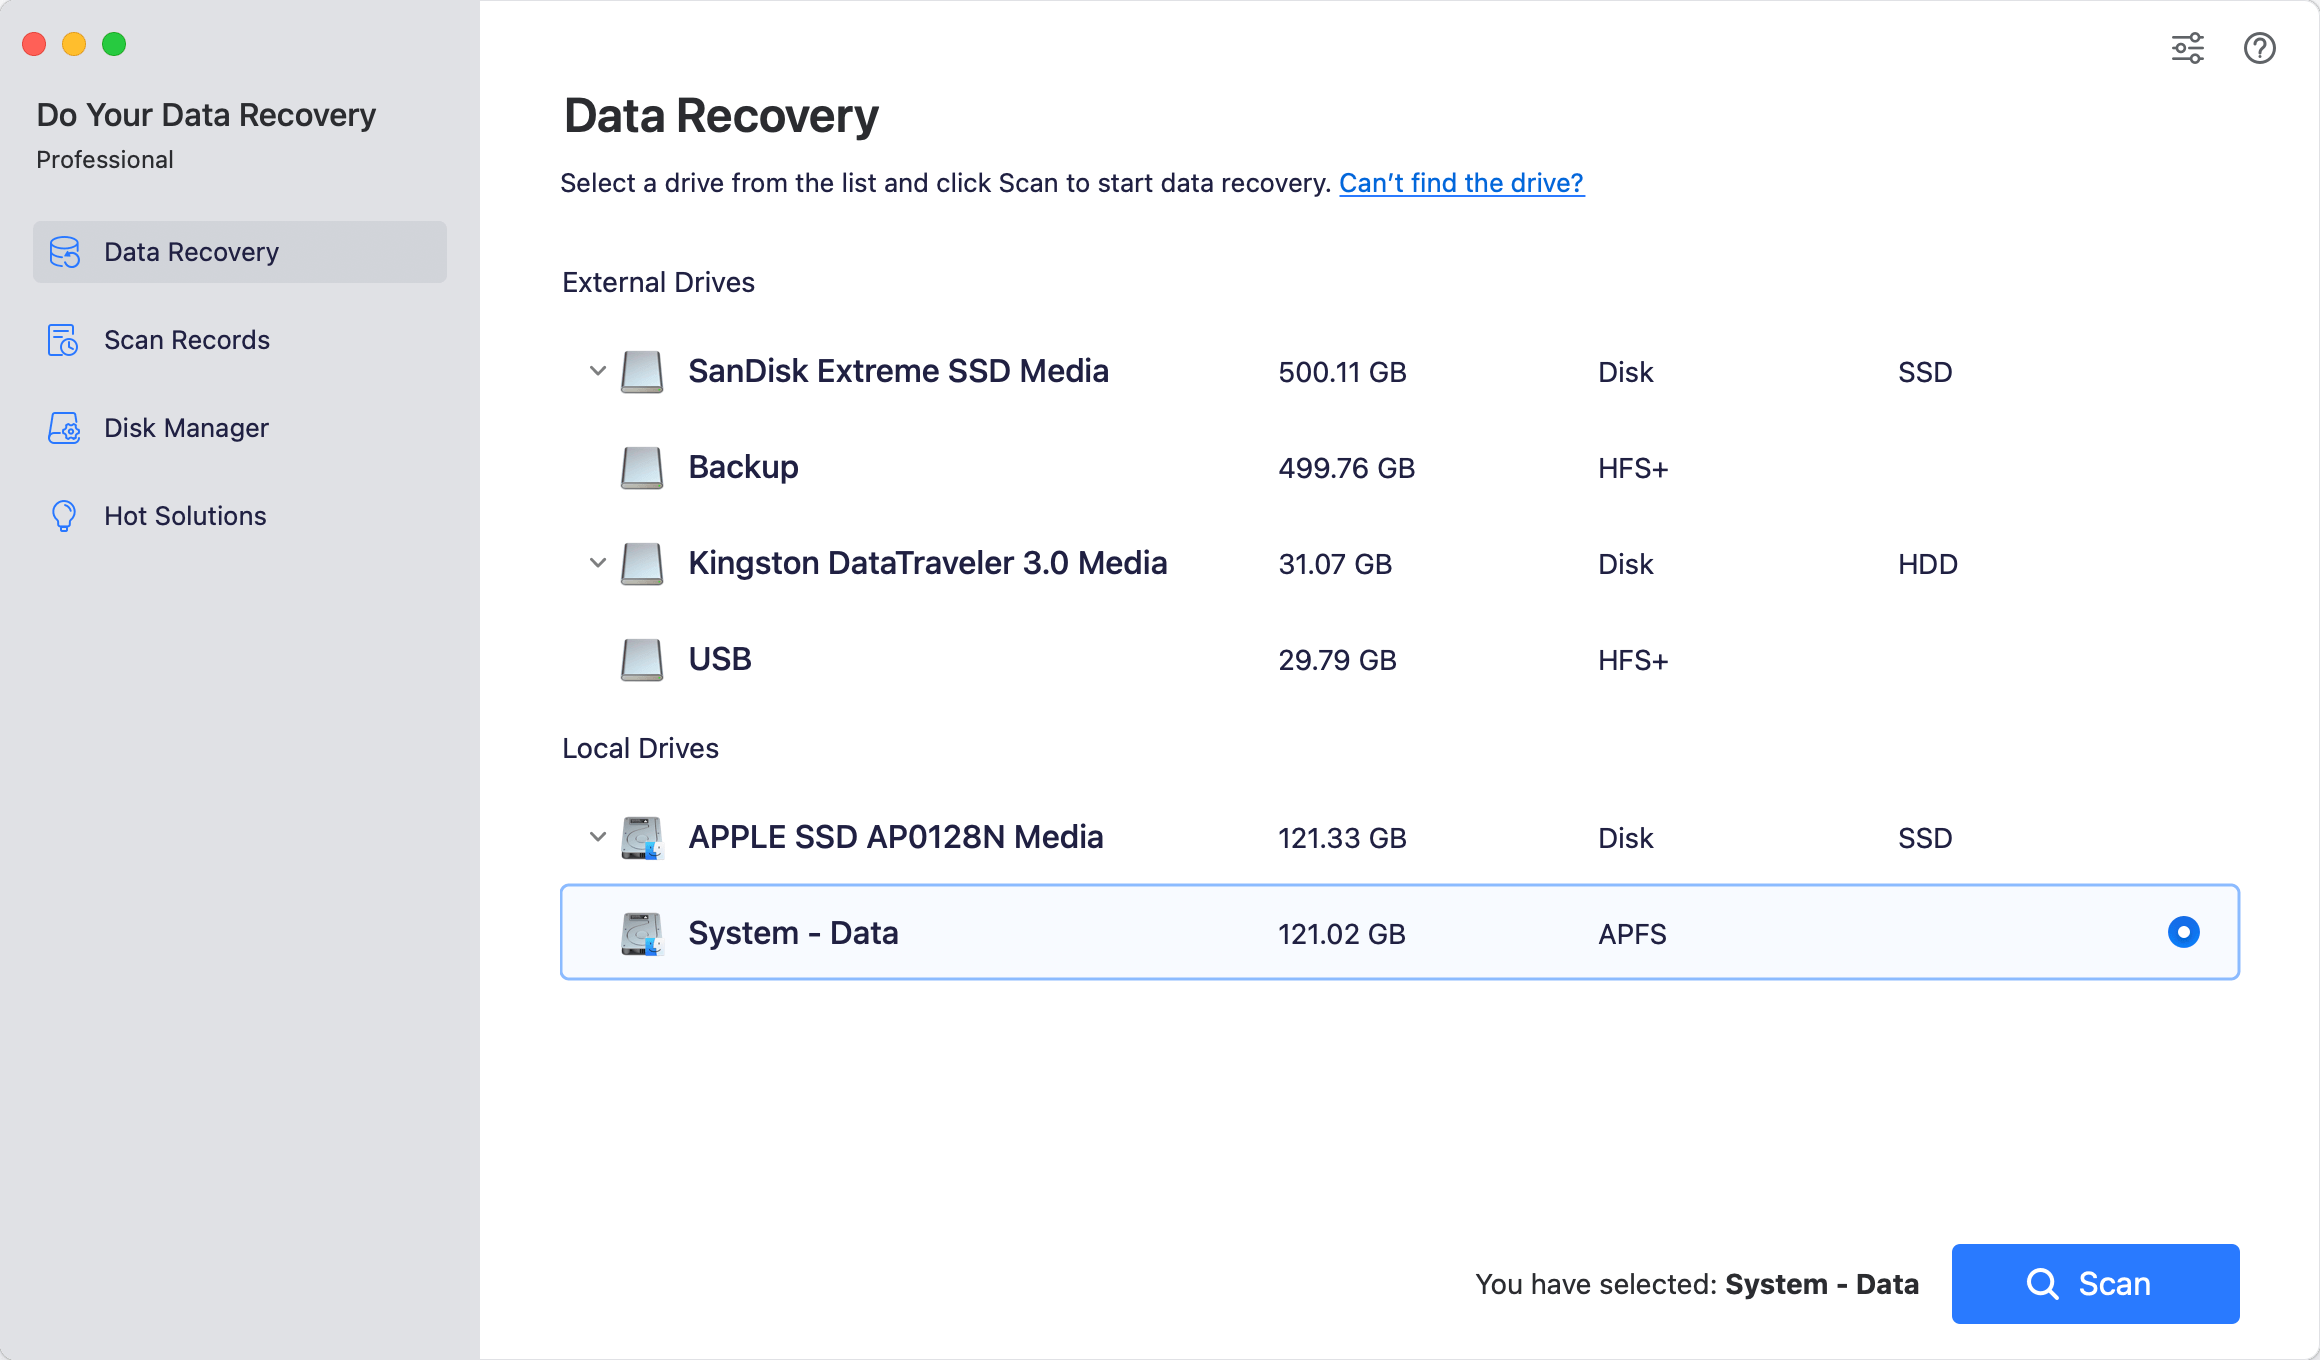
Step 2: Choose the Location and Scan
When you open the software, you will see a clean main menu displaying all available storage locations, including local Mac volumes, external hard drives, SSDs, USB flash drives, and SD cards.
Simply select the target drive or volume where your files were stored before deletion. By default, the software scans for all file types. If you want to speed up the process, you can select specific file types like Images, Documents, Videos, or Audio from the option menu.
Click the Scan button to begin. Do Your Data Recovery for Mac performs an automatic deep scan using advanced scanning algorithms to rebuild broken file structures and locate deeply hidden data.
Step 3: Preview and Recover Your Files
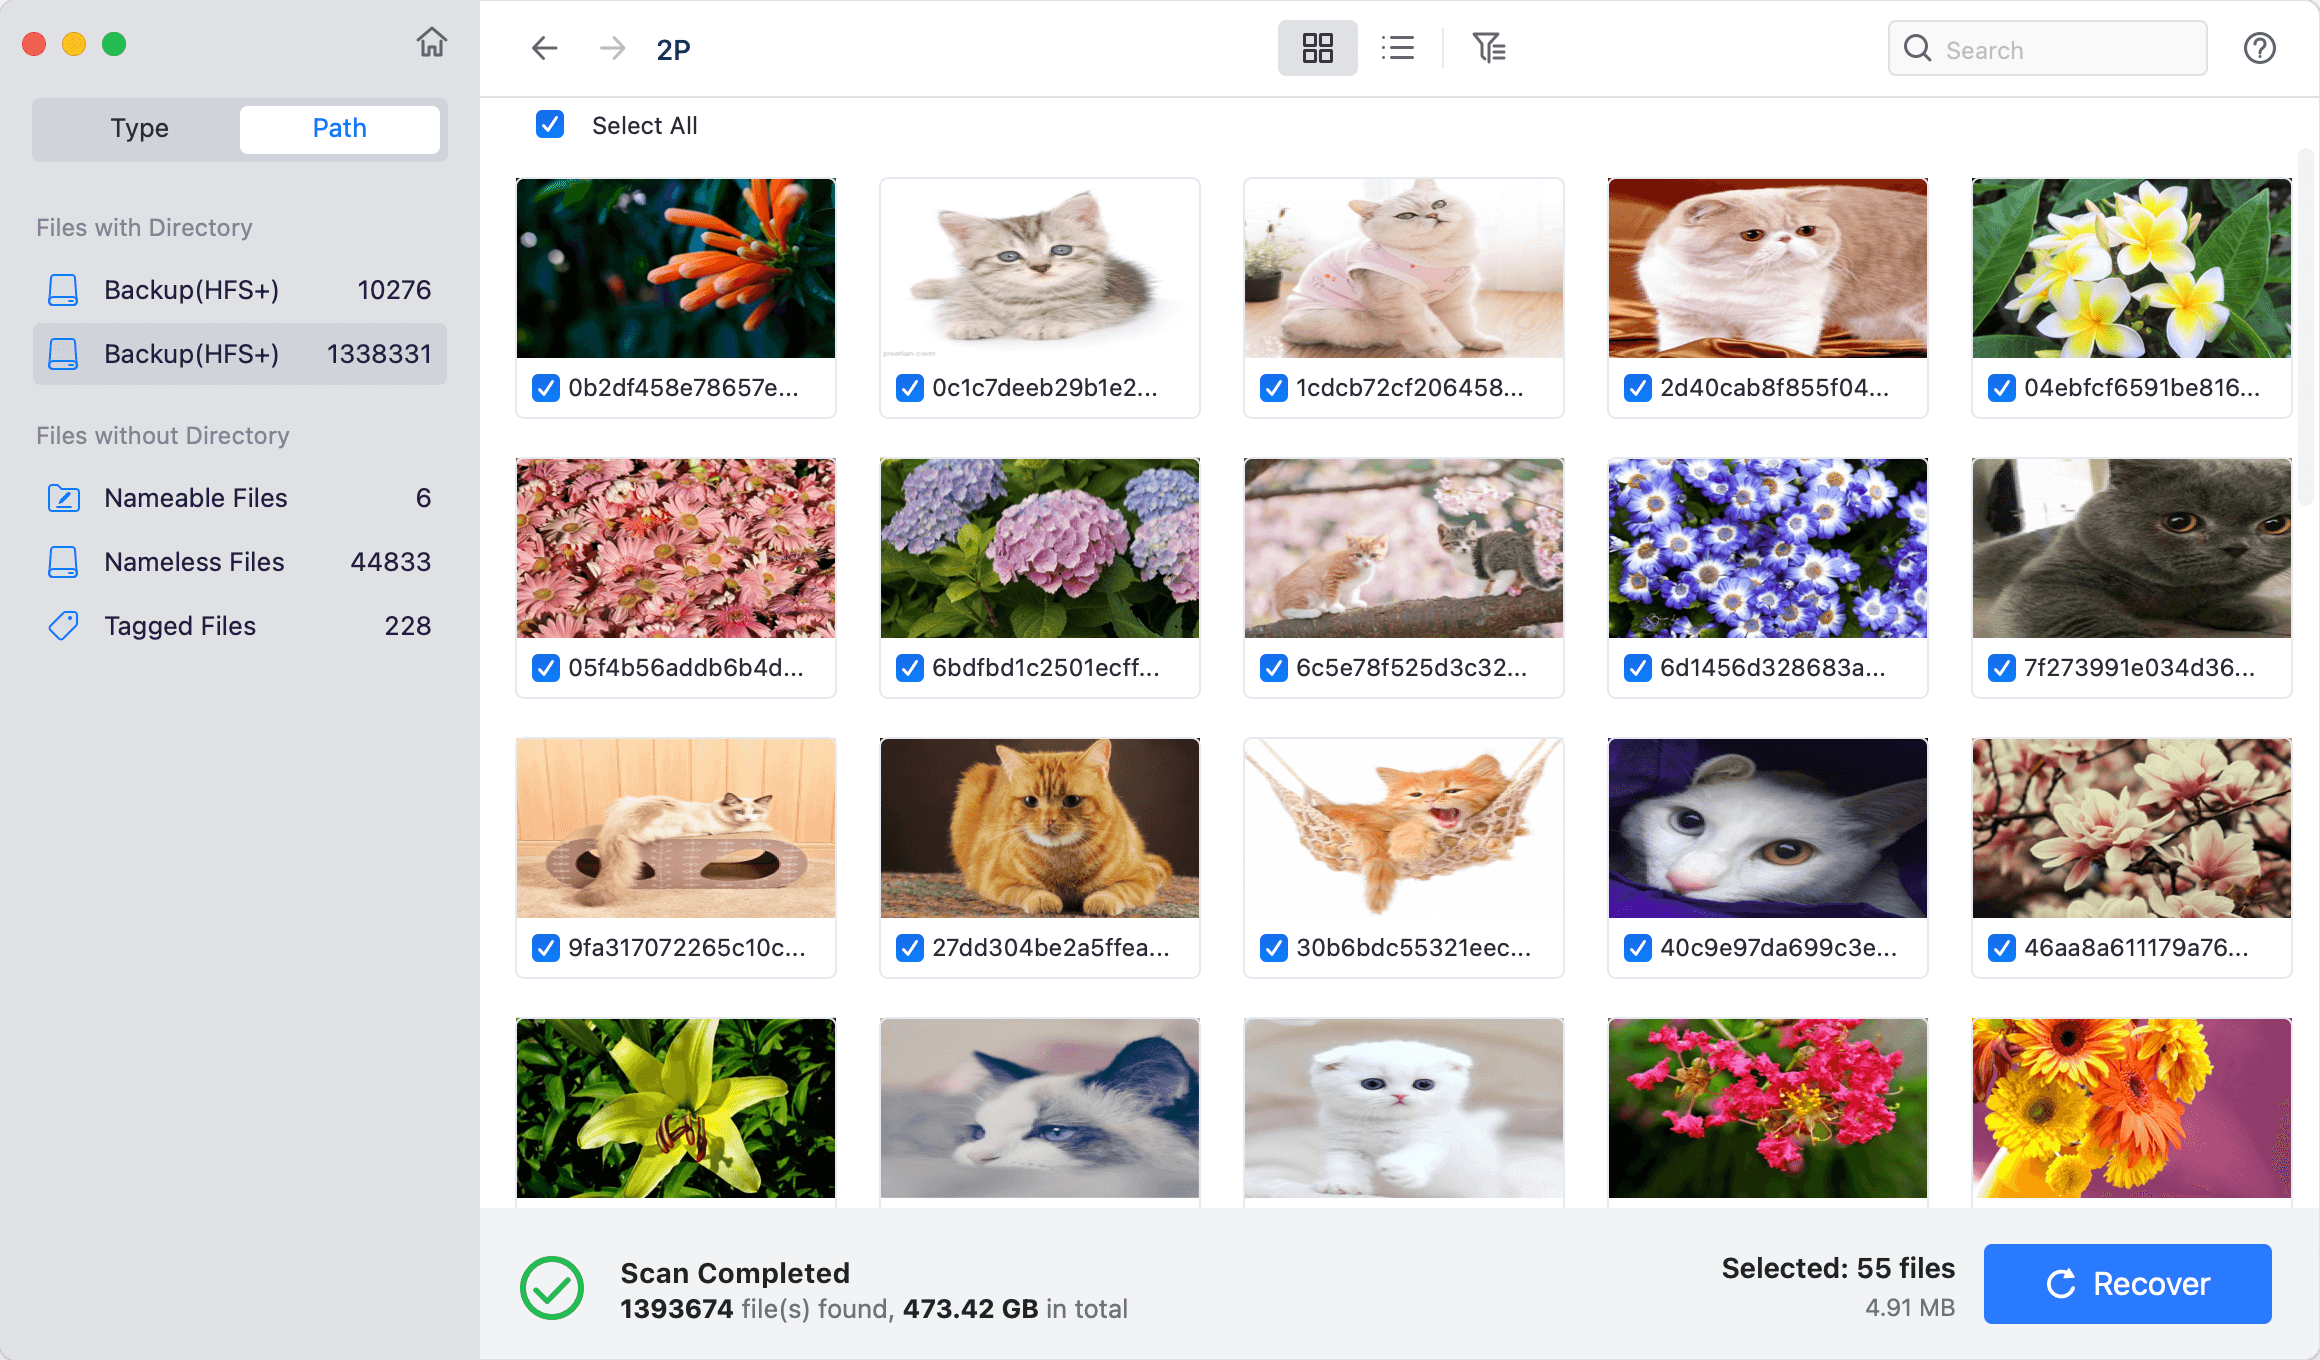
Once the scanning process finishes, all recoverable files will be organized neatly by File Type, Path, or Time in the left sidebar.
You can click on any file to preview its content—including photos, PDFs, Word documents, text files, and videos—to ensure the file is intact before recovering it.
Check the boxes next to the files you want to restore, click the Recover button at the bottom right, and choose a safe saving location on a different drive.
Supported Storage Media & File Types
Do Your Data Recovery for Mac provides broad compatibility for macOS 27 Golden Gate users, covering virtually all common formats and storage media:
| Category | Supported Details |
|---|---|
| Supported Devices | MacBook Pro, MacBook Air, iMac, Mac mini, Mac Studio, MacBook Neo, external HDDs/SSDs, USB drives, SD cards, digital cameras. |
| Supported File Systems | APFS, Encrypted APFS, HFS+, FAT16/32, exFAT, NTFS. |
| Supported File Types | Photos (JPG, PNG, RAW), Videos (MP4, MOV, AVI), Documents (DOCX, PDF, XLSX), Audio, Emails, Zip Archives, and more. |
| Apple Chip Support | Fully compatible with Intel, T1/T2 security chips, and Apple Silicon M1/M2/M3/M4/M5 processors. |
Alternative Recovery Methods on macOS Golden Gate
While Do Your Data Recovery for Mac is the most reliable method for complex data loss scenarios, macOS 27 Golden Gate offers a few built-in fallback options:
1. Restore from Mac Trash
If you simply deleted a file recently, open the Trash icon in your Dock. Right-click the missing item and select Put Back. The file will instantly return to its original location.
2. Restore via Time Machine
If you have Time Machine automatic backups enabled on an external drive, connect your backup drive, open the folder where the file was lost, click the Time Machine icon in the menu bar, and browse past snapshots to restore the file.
3. Check iCloud Recently Deleted
For files stored in iCloud Drive, log into iCloud.com, navigate to iCloud Drive, and check the Recently Deleted folder in the sidebar to restore items removed within the last 30 days.
FAQs about macOS 27 Golden Gate Data Recovery
Conclusion
Accidental data loss on macOS 27 Golden Gate doesn't have to ruin your day. By understanding how data storage works and using a professional tool like Do Your Data Recovery for Mac, you can safely retrieve your files in just a few minutes.
Remember to stop using the affected drive immediately and download Do Your Data Recovery for Mac to scan and restore your lost data hassle-free!
Do Your Data Recovery for Mac
Do Your Data Recovery for Mac, one of the best Mac data recovery software, can help you easily and completely recover deleted, formatted or lost files from Mac HDD/SSD, external HDD/SDD, USB drive, memory card, digital camera, or other storage devices.
Written & Updated by Justin Kenny
Justin Kenny is a writer & editor of DoYourData. He joined DoYourData in 2016 and focuses on writing articles about Windows data recovery, Mac data recovery, external device data recovery, hard drive clone, data erasure, Mac cleanup, computer issue fixes, etc. He is a super fan of Apple devices and is big on testing new digital device and system utility software.