How to Wipe A Backup Drive on Mac?
Disk Utility can help you quickly wipe a backup drive on Mac, but the erased data is not lost for good and can be recovered by data recovery software. If you want to permanently erase all data from a backup drive, just try Mac data eraser - such as DoYourData Super Eraser. This software can securely and completely wipe the backup drive on Mac, permanently erasing all data from it. No trace left!
![]() Updated by Shirly Chen on June 16, 2024
Updated by Shirly Chen on June 16, 2024
Quick Navigation:
- Why Should Wipe Your Mac Backup Drive?
- Wipe Backup Drive on Mac with Disk Utility [Data can be recovered]
- Wipe Backup Drive on Mac with Data Eraser [Data is lost for good/unrecoverable]
- Conclusion
Keeping your info safe and organized is more important in today's world. It is very important to know how to wipe a backup drive on your Mac, whether you want to clear out your digital life, sell or donate the backup drive, reuse an old drive, or ensure that private data is deleted permanently.
You could have peace of mind knowing that your photos, bank records, and other private files on your old backups have been deleted. With no traces left, you don't have to worry about your info getting into the wrong hands. With the help of macOS's built-in tools or third-party data erasure tools, this guide will go through the steps to wipe your Mac backup drive completely.
Anyone can use this help, from people who are new to technology to people who are very good at it. Let's learn how to safely erase your backup drive so that you don't leave a digital trace and your storage options work well.
Why Should Wipe Your Mac Backup Drive?
🔐 Security
For safety reasons, wiping a hard drive is very important. Backup drives store many private and sensitive information over time, like photos, financial records, and work papers. People who aren't supposed to can get back the data on these drives if they aren't fully erased before they are sold, thrown away, or used for something else. It could cause identity theft, loss of money, and data leaks.
💡 Reallocation
You should also wipe a hard drive to be used for something else. You might want to use an old drive for new backups or other storage jobs as your storage needs change or as technology improves. The old data is erased by wiping the drive, so there is no more data mixing or misunderstanding.
🧹 Performance
Backup drives can get data corruption or fragmentation over time, making them run slowly or not work at all. Wiping the drive can help get rid of these problems. It resets the drive and often makes it work better and more reliably.
💻 Space Management
Another reason to wipe a backup drive is to use the room better. Backing up old files takes up space on the drive that could be used for other things. Regularly deleting backups that aren't needed can free up a lot of room on the device, making it easier to use.
Wipe Backup Drive on Mac with Disk Utility [Data can be recovered]
If you want to erase your backup drive, use the built-in macOS tool Disk Utility. It has many features for managing drives and folders, such as erasing data.
Step 1: Connect the Backup Drive.
You can use Thunderbolt, USB, or another method to connect your Mac's external hard drive or SSD. Make sure that the drive is mounted and identified correctly.
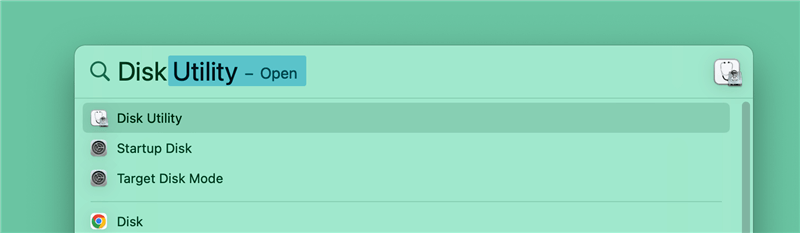
Step 2: Open Disk Utility.
Select Utilities from the list of apps and then double-click Disk Utility. You can also use Spotlight by pressing Command + Space, typing "Disk Utility," and then hitting Return.
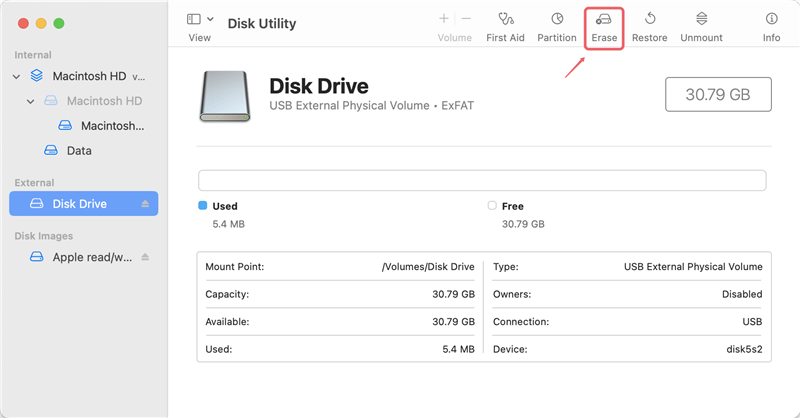
Step 3: Select the Backup Drive.
You can see a list of all the connected drives and their folders in Disk Utility. From the list on the left, carefully pick out the backup drive you want to erase. Pick the right drive so as not to lose info on other devices.
Step 4: Erase the Drive.
Initiate the Erase Process
Click on the "Erase" box at the top of the Disk Utility window.
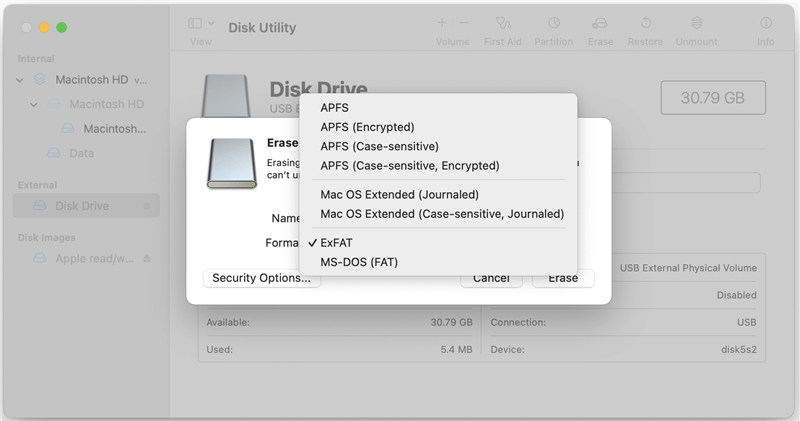
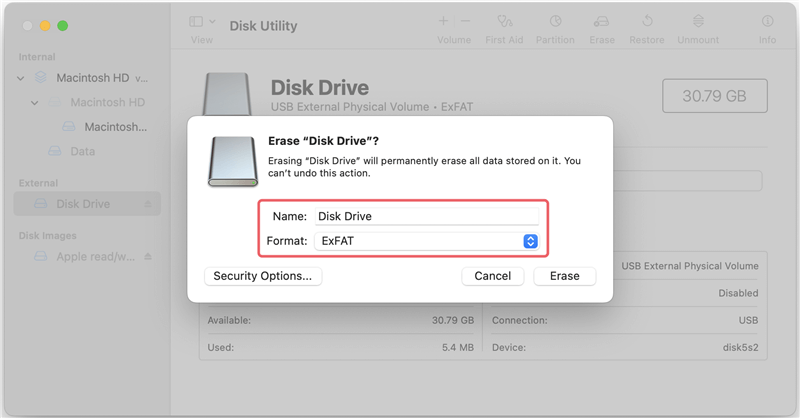
Configure Erase Settings
Name: If you want to, you can give the drive a new name.
Format: Pick a type for the file system. Some common choices are:
- APFS (Apple File System): Best for macOS High Sierra and later.
- Mac OS Extended (Journaled): Suitable for older macOS versions.
- ExFAT or MS-DOS (FAT): Compatible with both Mac and Windows.
Scheme (optional): For most current uses, choose GUID Partition Map.
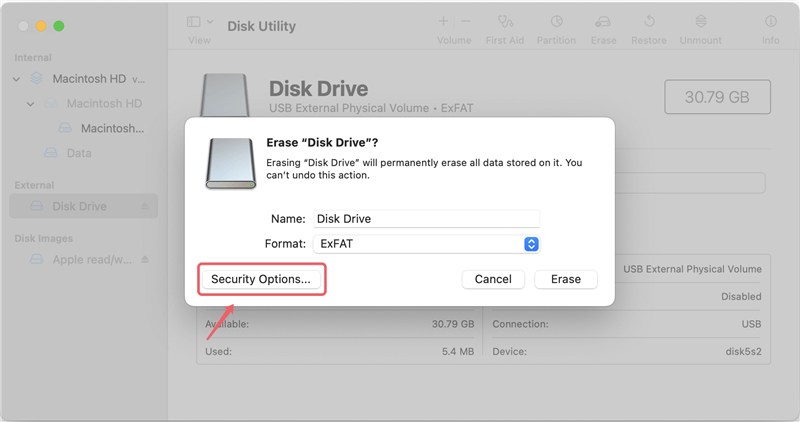
Security Options
You can pick how safely you want to erase the drive by clicking Security Options. You can erase the data quickly (the least secure option) or write over it several times (the safest option). The Fastest choice is usually enough, but you might want to consider a safer option if you need to send sensitive data.
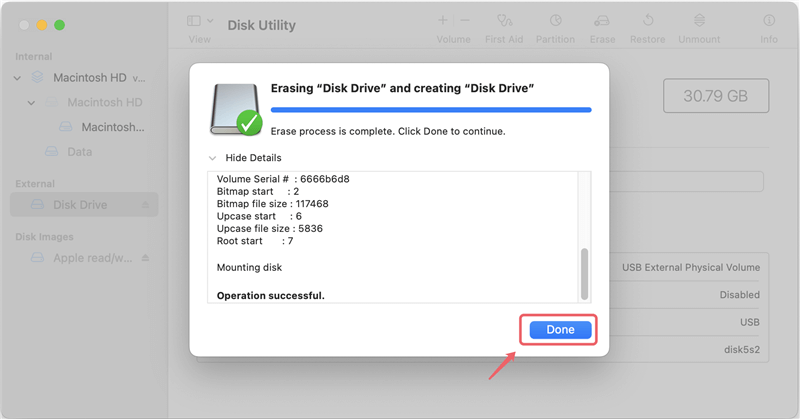
Erase
Once the options are right, click "Erase" to begin the process. It could take a while, based on how big the drive is and what kind of security you choose.
Step 5: Confirmation.
When the process of erasing is complete, Disk Utility will let you know. Now that you've erased your drive, you can use it again.
Note:
- The data which is erased by Disk Utility is not lost for good and can be recovered by data recovery software. (Check how to recover lost data from a drive which is erased by Disk Utility >>)
- If the backup drive is a Time Machine backup disk, you also need to remove it from your Mac Time Machine if you don't want to use it to back up your Mac again.
How to Choose the Right File System Format?
When you wipe a backup drive on your Mac, choosing the right file system format is important to ensure it will work with other devices and be usable in the future. Each file type has its own benefits and best uses.
APFS (Apple File System)
For macOS High Sierra (10.13) and later, APFS is the best file system to use. This file system works much faster than older ones because it was made to work with SSDs and flash storage. Strong encryption, space sharing, fast directory sizing, and snapshots are all features that APFS offers. These features make it safer, easier to handle storage, and faster to work with files. If you have a new Mac with an SSD, APFS is the best way to use these tools fully.
Mac OS Extended (Journaled)
Mac OS Extended, also called HFS+, is the old file system for macOS that was used before APFS came out. You can use it with older macOS versions and mechanical hard drives (HDDs). Journaling is built into this format, which helps keep the file system safe if the power goes out or the system stops. It's not as advanced as APFS, but it's still a good choice for older hardware and software settings because it works with them.
ExFAT
ExFAT is a flexible file system that can be used on drives that must be used on both Mac and Windows computers. It can handle files bigger than 4GB, making it a good choice for external drives that store video files and other big data sets. It's not as secure or journaling-friendly as APFS and HFS+, but ExFAT is great for drives that switch operating systems because it works with many of them.
Wipe Backup Drive on Mac with Data Eraser [Data is lost for good/unrecoverable]
In case that some important files would be deleted by mistake, Mac users always need a regular backup to safeguard the files. They always back up Mac data with an external hard drive or USB flash drive. But, as days passed, the backup hard drive will be sold or donated, then the backup data should be erased permanently.
To permanently wipe all data from a Mac backup drive, you need use special data erasure tool to erase the data and overwrite the disk space with random data.
DoYourData Super Eraser for Mac is a reliable data erasure program which supports to permanently erase data from Mac-based HDD/SSD, external drive, USB flash drive, memory card, digital camera, etc. Once the data is erased by DoYourData Super Eraser for Mac, the data is lost forever, cannot be recovered by any method.
DoYourData Super Eraser for Mac
- Securely wipe backup drive on Mac.
- Certified data erasure standards including NIST 800-88, Peter Gutmann's algorithm, DoD 5220.22-M, U.S. Army AR380-19, etc.
- 100% safe and easy-to-use data erasure tool.
Follow the steps below to wipe a backup drive on Mac:
Step 1. Download and install DoYourData Super Eraser for Mac on your Mac, and connect the backup drive to the Mac. (This software not only can wipe Mac backup drive, but it also supports to wipe Windows backup drive on your Mac.)
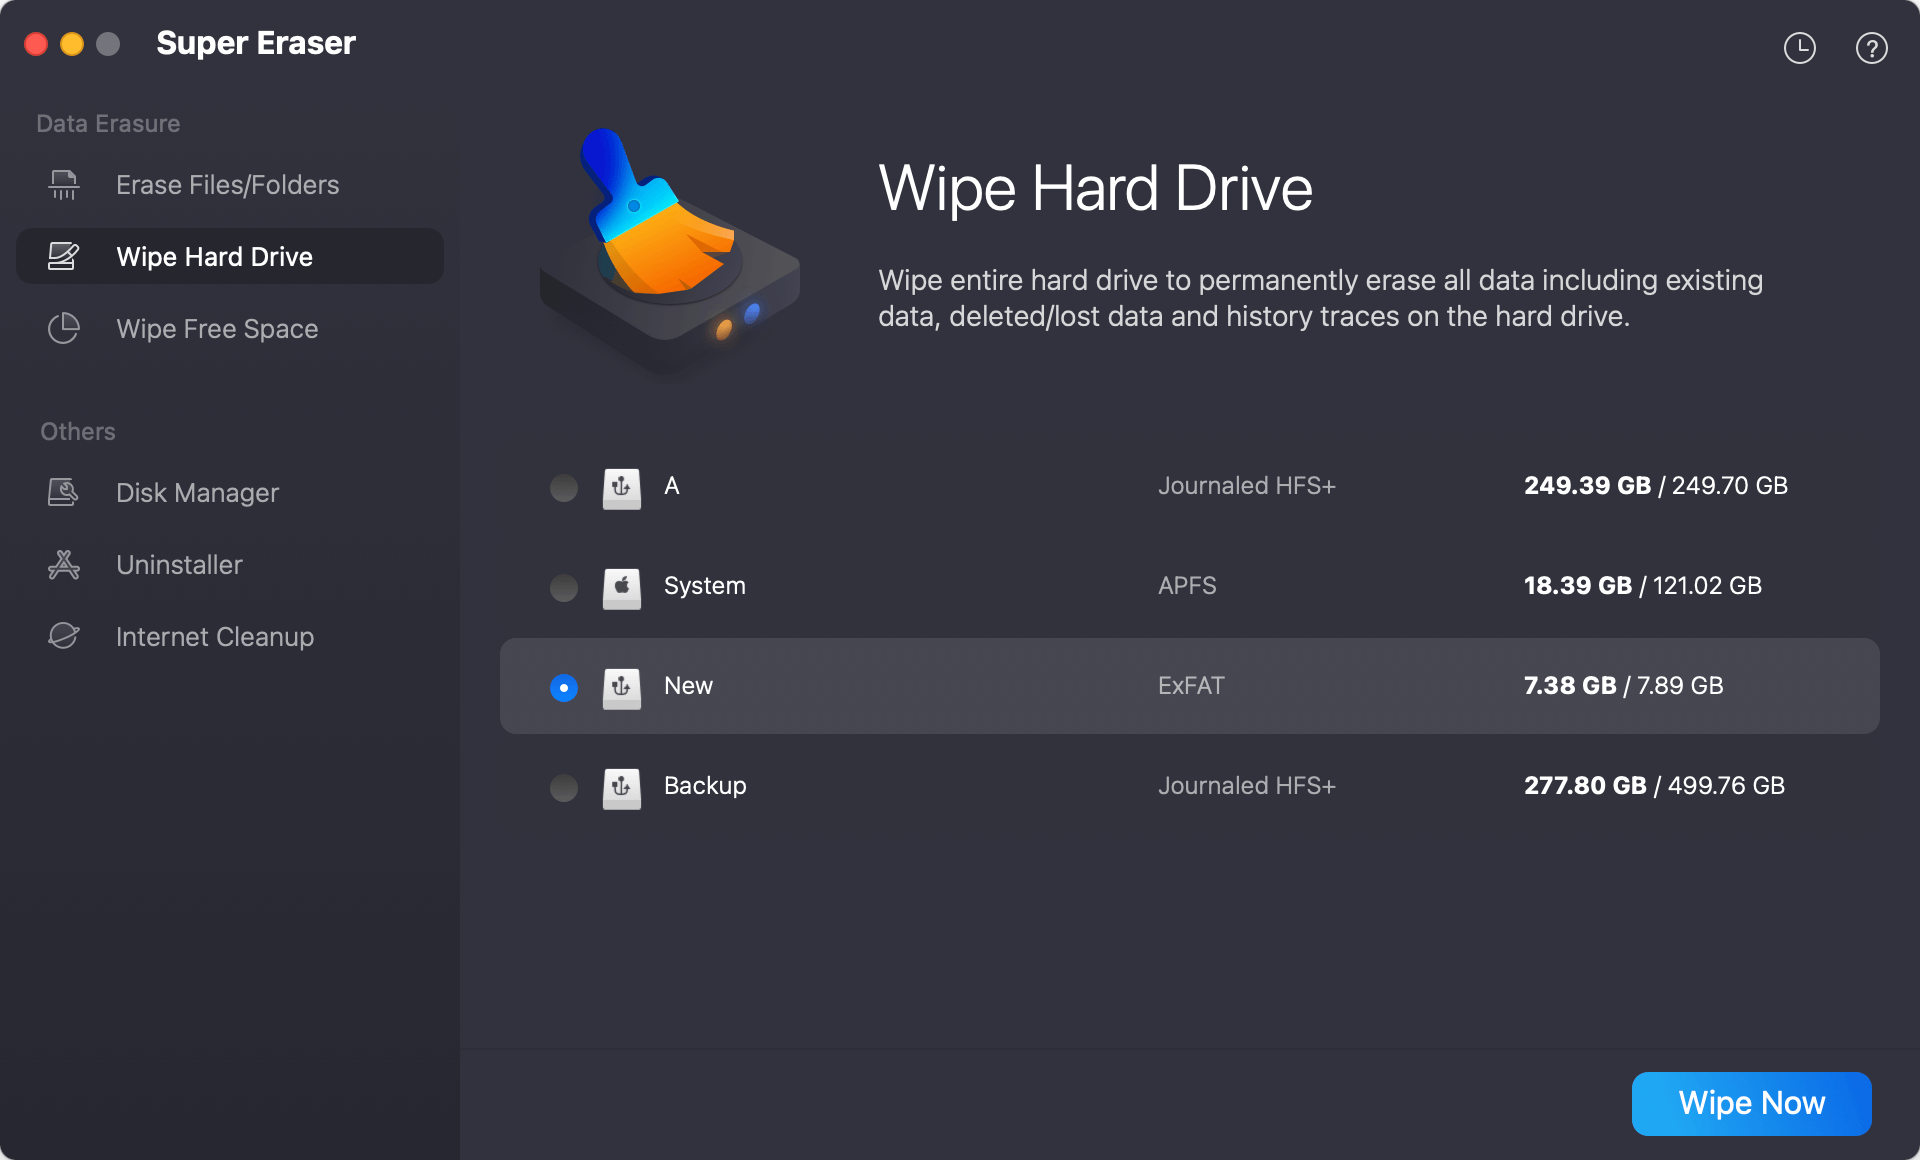
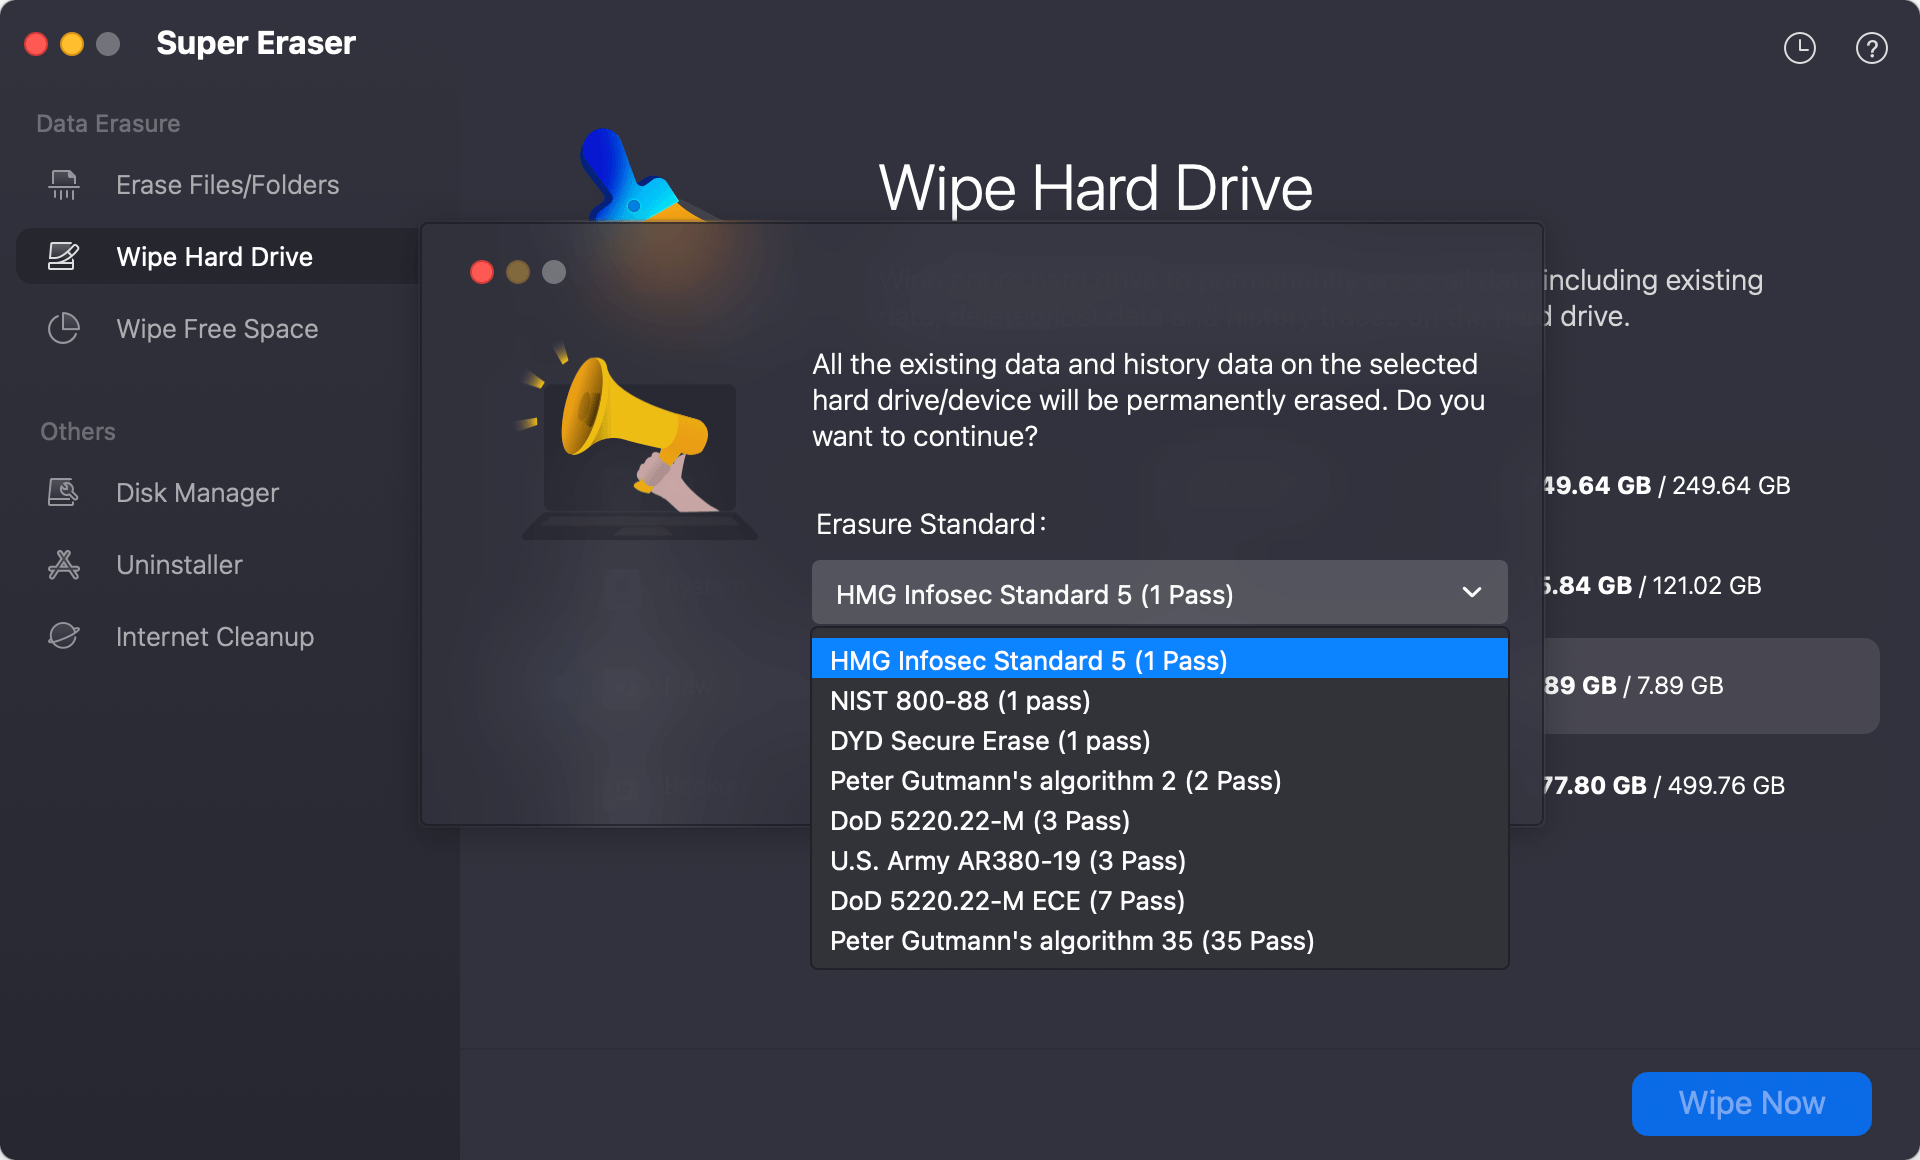
Step 2. Open DoYourData Super Eraser for Mac, choose Wipe Hard Drive mode, then select the backup drive, click on Wipe Now button.
Step 3. Choose a data erasure standard, then click on Continue button.
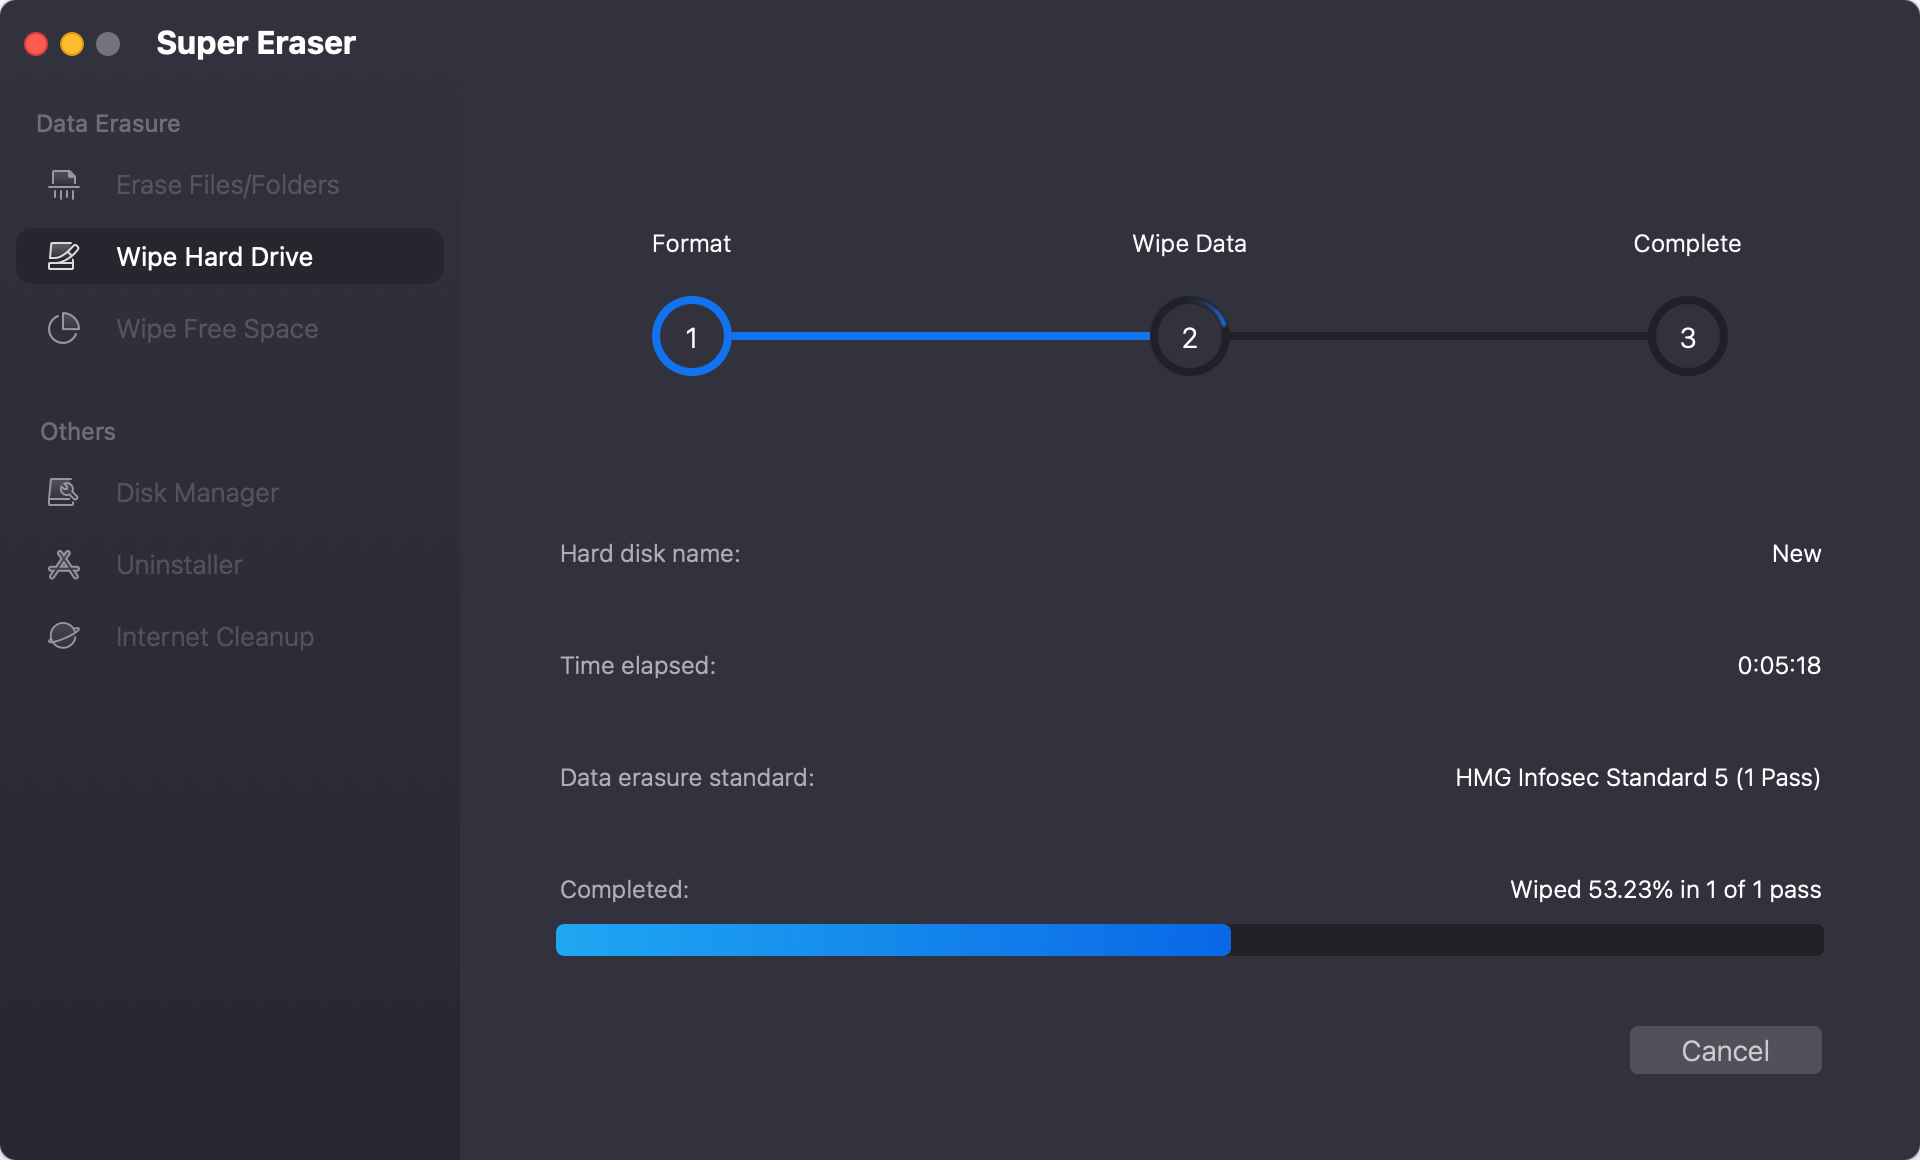
Step 4. Securely wipe the backup drive and permanently erase all data from it.
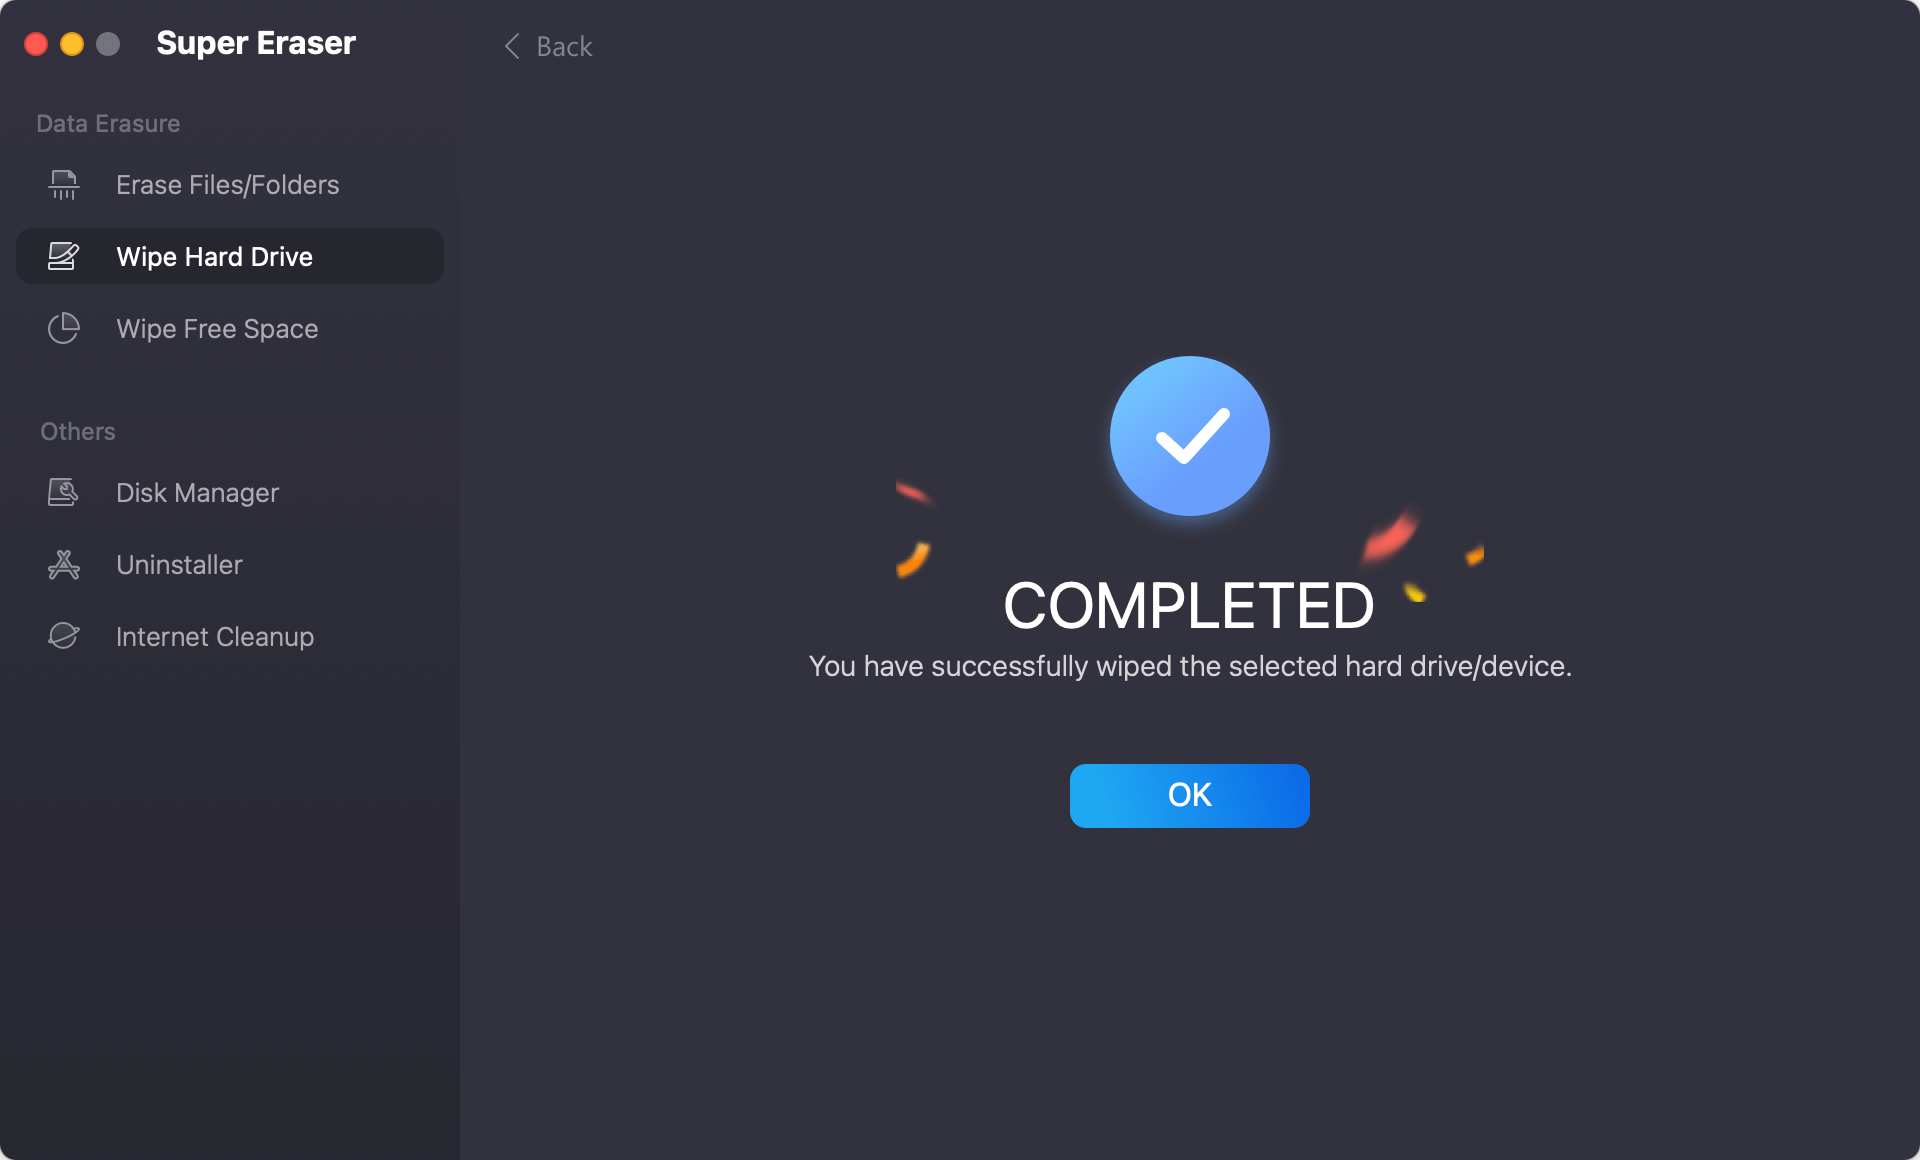
Step 5. Once the process gets finished, open the backup drive, check if all data is gone. Then eject it from your Mac.
Conclusion:
Wiping a backup drive on your Mac is important to keep your data safe, improve speed, and organize your storage effectively. Using macOS's built-in Disk Utility and DoYourData Super Eraser for Mac, you can completely erase your drive. It stops others from recovering your data and prepares the drive for new uses.
Which file system type to use - APFS, Mac OS Extended, or ExFAT - depends on your needs and the devices you want to use them on. This plan lets you keep your digital space clean, organized, and safe, giving you peace of mind and helping your storage work better.
DoYourData Super Eraser for Mac
DoYourData Super Eraser for Mac is a 100% safe, powerful and easy-to-use data erasure program. It offers certified data erasure standards including Peter Gutmann, U.S. Army AR380-19, DoD 5220.22-M ECE to permanently erase data from Macs and external devices, making data recovery be impossible.
Written & Updated by Shirly Chen
Shirly Chen has been writing data recovery, data erasure articles for DoYourData over 4 years. She has been working as a professional website content writer & editor for quite a long time. She also writes articles about disk clone, Mac optimization, disk backup, etc.