How to Recover Formatted Seagate Backup Plus on Mac
Data recovery software can scan the formatted Seagate Backup Plus drive and find all deleted, formatted and lost files. Quickly get all lost files back.
Quick Navigation:
Keeping our important files safe and secure is just as important in the digital world. For the Seagate Backup Plus portable hard drive to work properly, you must ensure it is formatted if you have a Mac. It's easy to format your Seagate Backup Plus or Seagate Backup Plus Slim for Mac. This guide will show you how.
You can think of formatting as giving your external drive a Mac-friendly change that lets it talk to your macOS. When you finish this guide, your Seagate Backup Plus and Mac will work well together, giving you peace of mind and easy data control. Let's start this journey toward ease of use together!
It's not always necessary to format a new Seagate Backup Plus for Mac because these portable hard drives already have a file system that works with both Windows and macOS. There are, however, times when you might want to change the drive to make it better fit your needs or preferences:
Formatting the drive also can fix Seagate Backup Plus read-only on Mac, repair crashed Seagate Backup Plus portable hard drive, quickly remove all data stored on the drive. And if you will sell or donate your Seagate Backup Plus portable hard drive, you even should find a high-level format method to permanently erase all contents stored on the drive.
Realizing that data keeps our digital lives going, protecting it becomes very important before starting any erasing process. All the data on the drive is erased during the cleaning process, which shows how important it is to make a full backup. You can just copy the data from your Seagate Backup Plus to another drive or use a disk cloning program to clone everything of the drive to a new drive.
Setting up a stable physical link is the first thing we must do to start formatting. Connect your Seagate Backup Plus drive to your Mac using the USB wire that came with it or another connection that works. It will keep the formatting process from being interrupted.
Our next stop is Disk Utility, a built-in tool for controlling disks and other storage devices. Simple steps are needed to get to Disk Utility:
Click Launchpad, go to Other.
Find Disk Utility and open it.
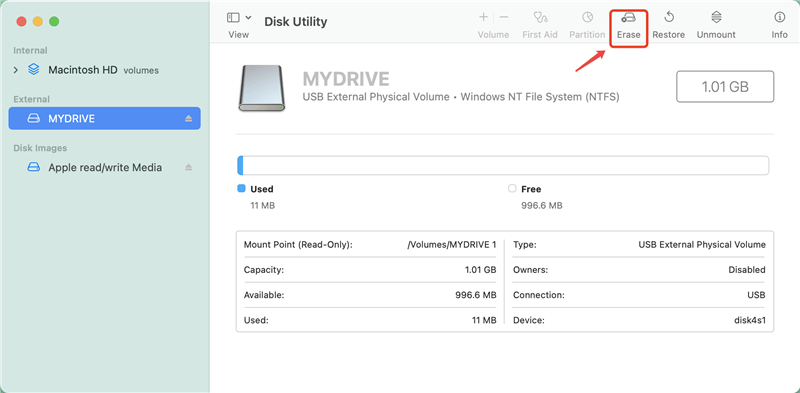
Then, find your Seagate Backup Plus drive among the available devices in Disk Utility. Make sure you don't pick the wrong disk drive by chance. It will lower the chance of losing data during formatting.
Select the Seagate Backup Plus drive and then choose Erase.
Find the drop-down button that says "Format" inside the window. Based on your choice and the version of macOS, pick "APFS" or "Mac OS Extended (Journaled)." APFS is suggested for macOS High Sierra or later for better performance and protection. If you want to use the Seagate Backup Plus drive on both Windows and macOS, just pick up ExFAT as the file system.

Choose the right "Scheme," and the "GUID Partition Map" should work for most people. To start formatting, click the "Erase" button.
An acceptance dialog box will tell you that all the Seagate Backup Plus drive data will be deleted. Check your backup again, then click "Erase" to start the formatting process.
Disk Utility shows a progress bar that shows how far along the formatting process is—time changes based on the drive size.
When the task is done successfully, Disk Utility lets you know. Click "Done" to close the window.

Note: The data stored on the Seagate Backup Plus will be erased by Disk Utility after clicking on Erase button. But the erased data is not lost forever, it can be recovered by data recovery software.
How to Recover Formatted Seagate Backup Plus on Mac
Data recovery software can scan the formatted Seagate Backup Plus drive and find all deleted, formatted and lost files. Quickly get all lost files back.
1. Which file system should be chosen while formatting Seagate Backup Plus for Time Machine?
If you are using macOS 10.13 or later, choose APFS as the file system. If you are using macOS 10.12 or earlier version, select Mac OS Extended.
2. How to format Seagate Backup Plus portable hard drive on Mac?
Just open Disk Utility, select the Seagate Backup Plus drive, then click on Erase button.
Select a file system, click on Erase button again.
3. Is it possible to use NTFS Seagate Backup Plus drive on Mac without formatting?
NTFS is the native file system of Windows, but it is not supported by macOS. If you want to read-write a NTFS drive on Mac, you should install a third-party NTFS driver on your Mac. To use a NTFS Seagate Backup Plus drive on Mac, check the steps below:
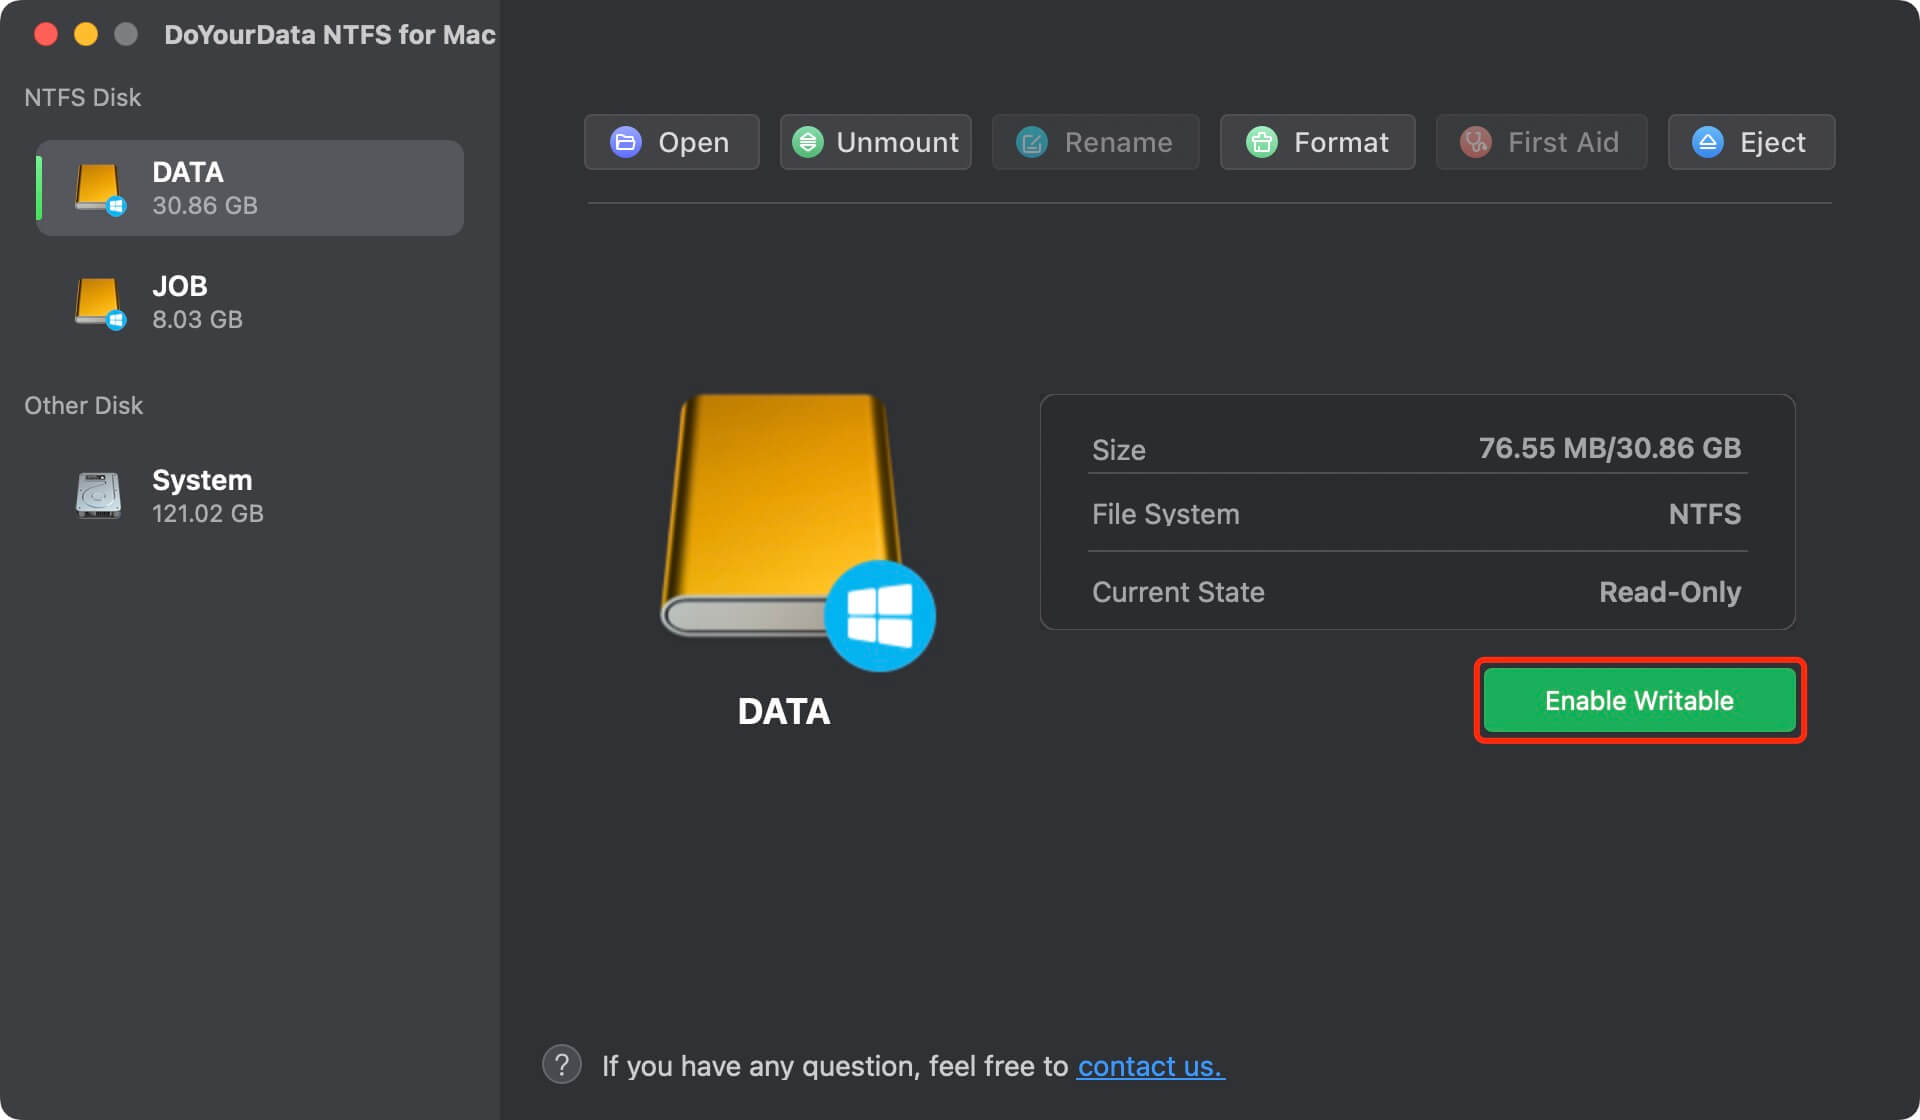
Step 1. Download and install DoYourData NTFS for Mac on your Mac, open it.
Step 2. Connect the Seagate Backup Plus drive to your Mac, then select it on DoYourData NTFS for Mac, click on Enable Writable button. Then you can use the Seagate Backup Plus drive on your Mac without any limitation.
4. How to wipe Seagate Backup Plus on Mac before selling or donating?
If you will sell or donate your Seagate Backup Plus, you should permanently erase all data from it to prevent potential data recovery.
Mac data erasure software - such as DoYourData Super Eraser for Mac can help you securely wipe the Seagate Backup Plus and permanently erase all data from it.
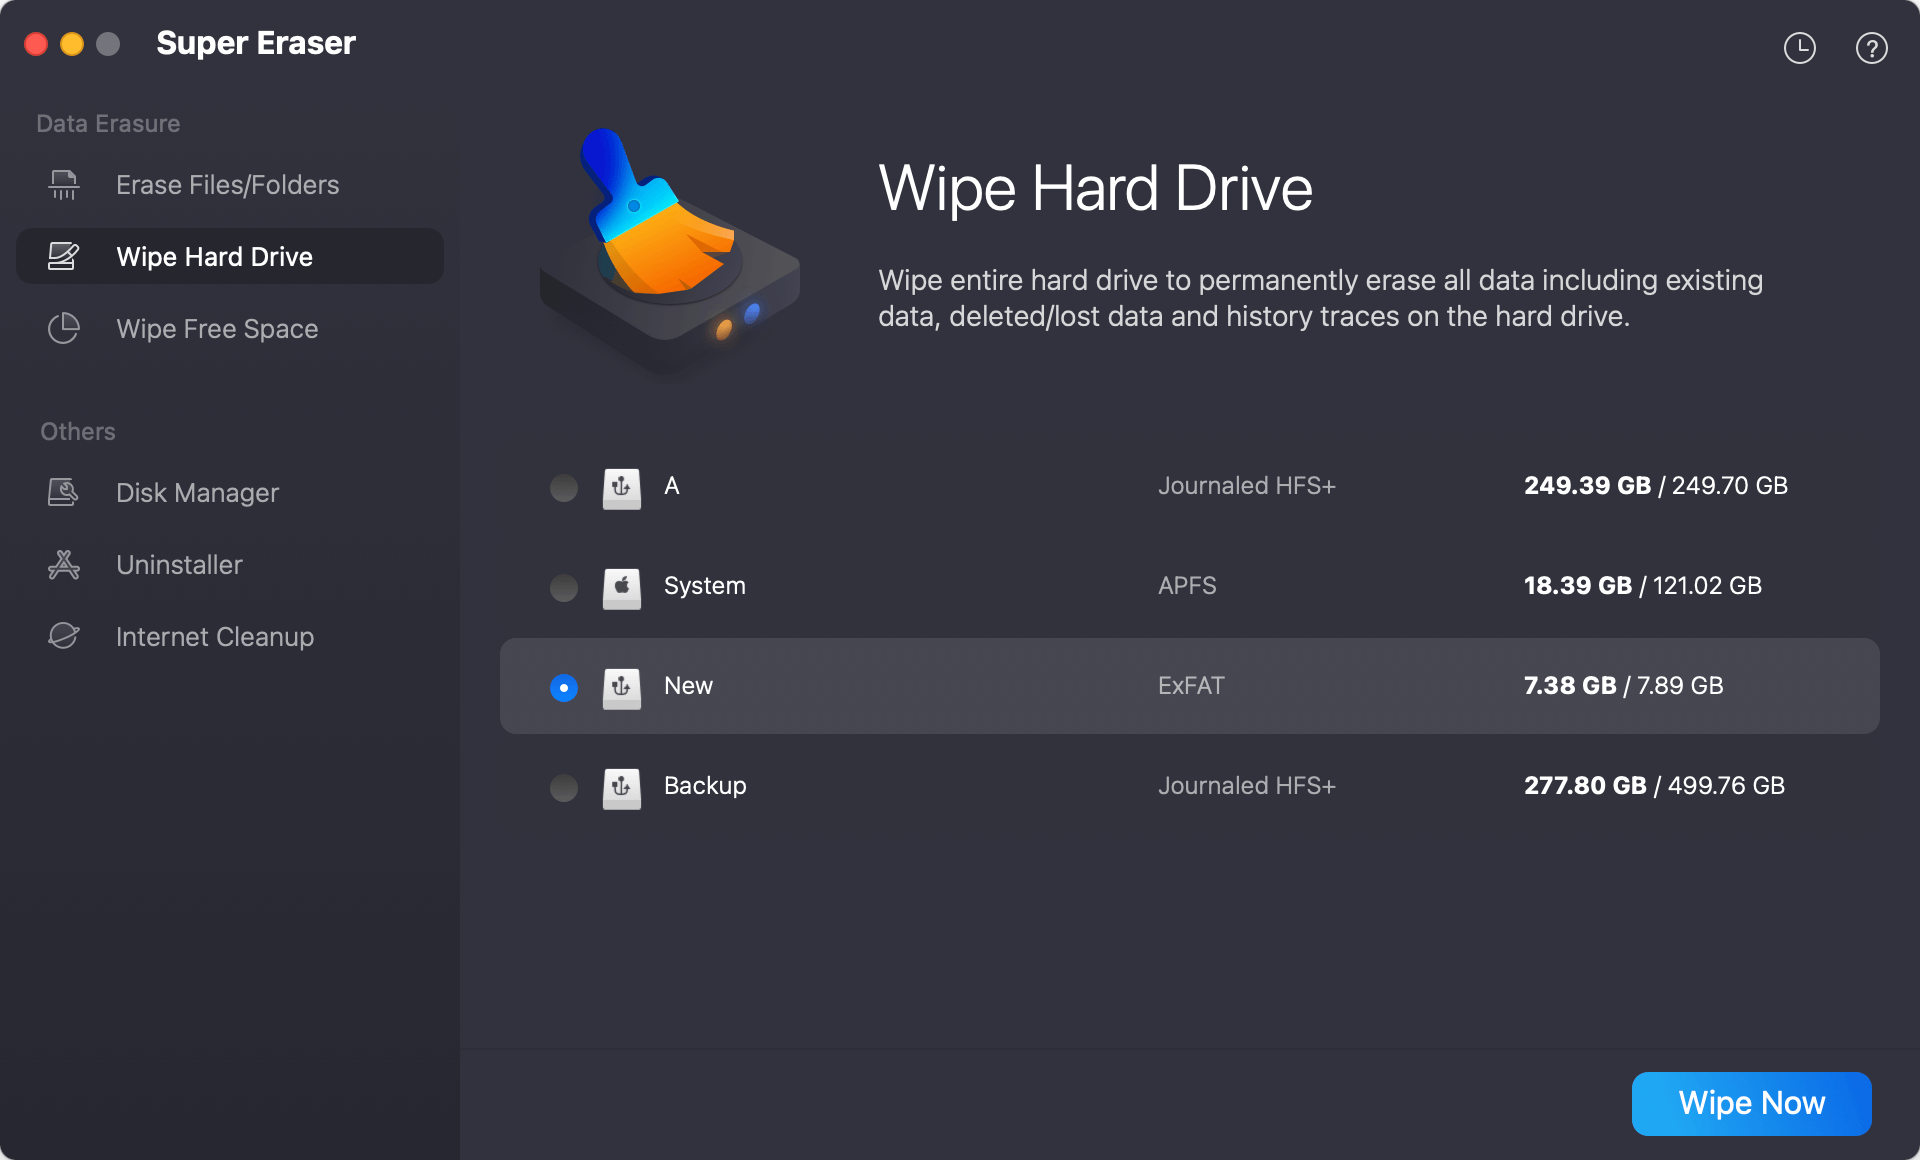
Step 1. Download and install DoYourData Super Eraser for Mac, open it.
Step 2. Choose Wipe Hard Drive mode, then select the Seagate Backup Plus drive, click on Wipe Now button. It will wipe the drive and permanently erase all data from it.
For the best speed and compatibility with your macOS, formatting your Seagate Backup Plus for Mac is simple. By carefully following this detailed guide, you can format your external drive safely, keeping your data safe and making it work best on your Mac. Before you start the process, ensure you have a copy of your data and use the layout options wisely to meet your needs. If you format your Seagate Backup Plus drive, it will work perfectly as a portable hard drive for your Mac.
Written & Updated by Ricky Lin
Ricky Lin is an senior editor of DoYourData who lives in Adelaide, Australia. He is interested in writing technology articles related with data recovery, computer issue fixes, disk clone, iPhone data recovery, video edit, Mac optimization, etc. He Joined DoYourData in 2019 and have written 500+ articles to help both Windows users and Mac users to solve data or computer problems.
Hot Articles