Quick Navigation:
- Why Formatting SD Card for Mac?
- Format Sony SD Card on Mac Using Disk Utility
- Format the Sony SD Card on Mac Using DoYourData Super Eraser
- Benefits of Formatting An Sony SD Card
- Recover Lost Data after Formatting Sony SD Card on Mac
- FAQs About Using Sony SD Card on Mac
- Conclusion
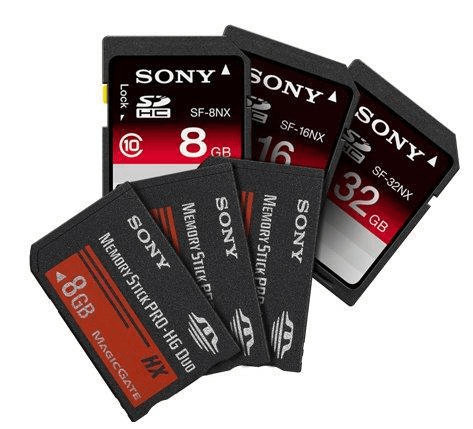
Are you an avid photographer, film fan, or person who carefully arranges their digital files? If so, you likely trust your Sony SD card to keep your important info safe. Your Sony SD card is an important part of keeping these precious memories alive; you'll never forget whether you're taking photos or videos of times.
Properly formatting your Sony SD card is important to ensure it works properly with your Mac. By fixing your SD card to work perfectly with a Mac, you can get the most out of it and make sure that data transfers go smoothly.
We're here to make the process easier for you with this full guide. Let's go through formatting your Sony SD card on your Mac. Let's dive in and make your storage option work for you!
Why Formatting SD Card for Mac?
Formatting an SD card for a Mac ensures it works perfectly and is compatible with other devices. Many Macs use APFS or HFS+, while most Windows computers use NTFS or FAT32. If you change the SD card to a file system that works with Mac, like ExFAT, both Mac and Windows computers can read it.
Formatting also eliminates any file system mistakes or damaged data, making the card work better and be more reliable. This process also makes it easy to handle data and deletes sensitive information in a way that keeps others from seeing it.
Format Sony SD Card on Mac Using Disk Utility
Step 1. Put The Sony SD Card Into Your Mac.
Start by putting your Sony SD card into your Mac's slot. A USB-to-SD card reader can connect an SD card to a Mac that doesn't have an SD card drive built in.
Step 2. Open Disk Utility.
Connect the SD card to your Mac. Then, go to "Utilities" > "Applications" and open "Disk Utility. Mac OS X has a Disk Utility app that lets you manage disks and folders.
Step 3. Choose the Sony SD card.
The Disk Utility window lists all the drives and other storage devices linked to your Mac. In the Disk Utility window, find your Sony SD card in the list on the left. To choose the Sony SD card, click on it.
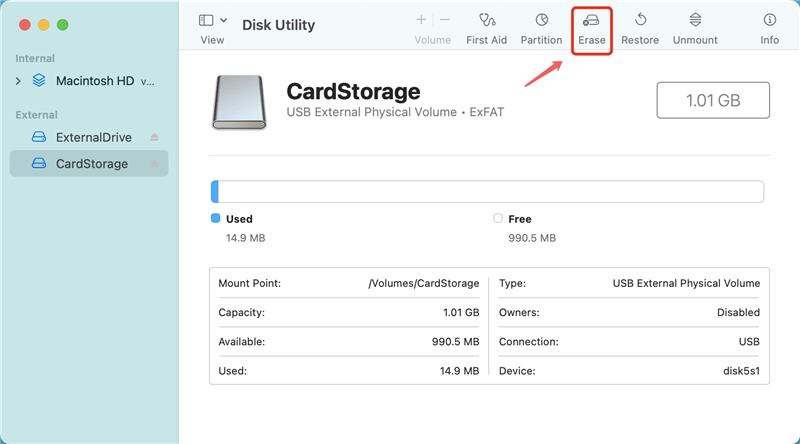
Step 4. Pick the "Erase" button.
Select the Sony SD card and click the "Erase" button in the Disk Utility window. It will open a new window where you can change how the removal works.
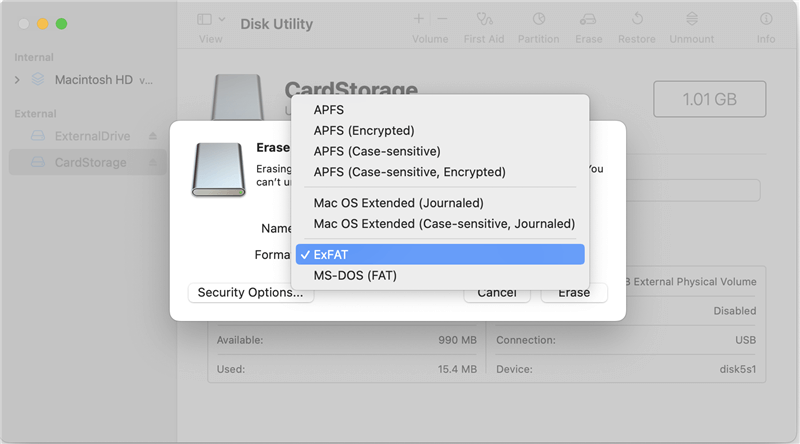
Step 5. Set Up The Erase Settings.
You must choose the SD card's format and scheme in the erase settings box. It is suggested that you pick the "ExFAT" file so that it works with Mac computers. ExFAT works with both Mac and Windows computers and can handle big files. Next, give your SD card a name that makes sense. You can type in your name or leave the default name. The plan should be set to "GUID Partition Map."
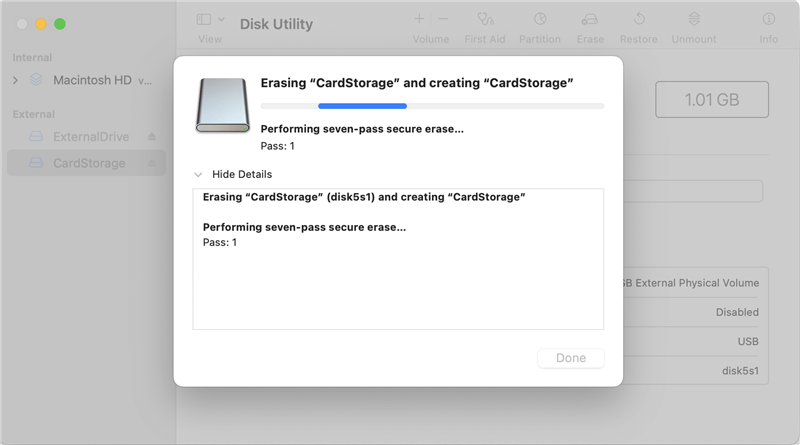
Step 6. Start The Process Of Formatting.
After putting up the erase settings, make sure everything is right by checking it again. Remember that everything will be removed when you format the SD card, so make a copy of anything important.
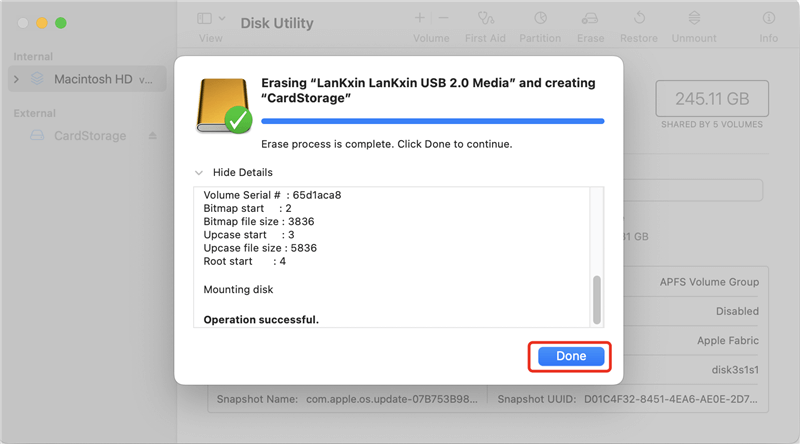
Once you know the choices, click "Erase" to begin the formatting process. Disk Utility will start formatting the Sony SD card based on your settings. The SD card's size will determine how long this takes.
Step 7. Finish The Formatting Process.
You'll see a message letting you know that the Sony SD card has been successfully formatted when the formatting process is done. It's now safe to close Disk Utility and take the SD card out of your Mac.
Format the Sony SD Card on Mac Using DoYourData Super Eraser
Many other Mac disk formatting tools can help you format Sony SD card on Mac. For example, you can use an easy-to-use eraser tool - DoYourData Super Eraser for Mac to help you format a Sony SD card on Mac.
Step 1. Download and install DoYourData Super Eraser on your Mac, then connect the Sony SD card to your Mac.
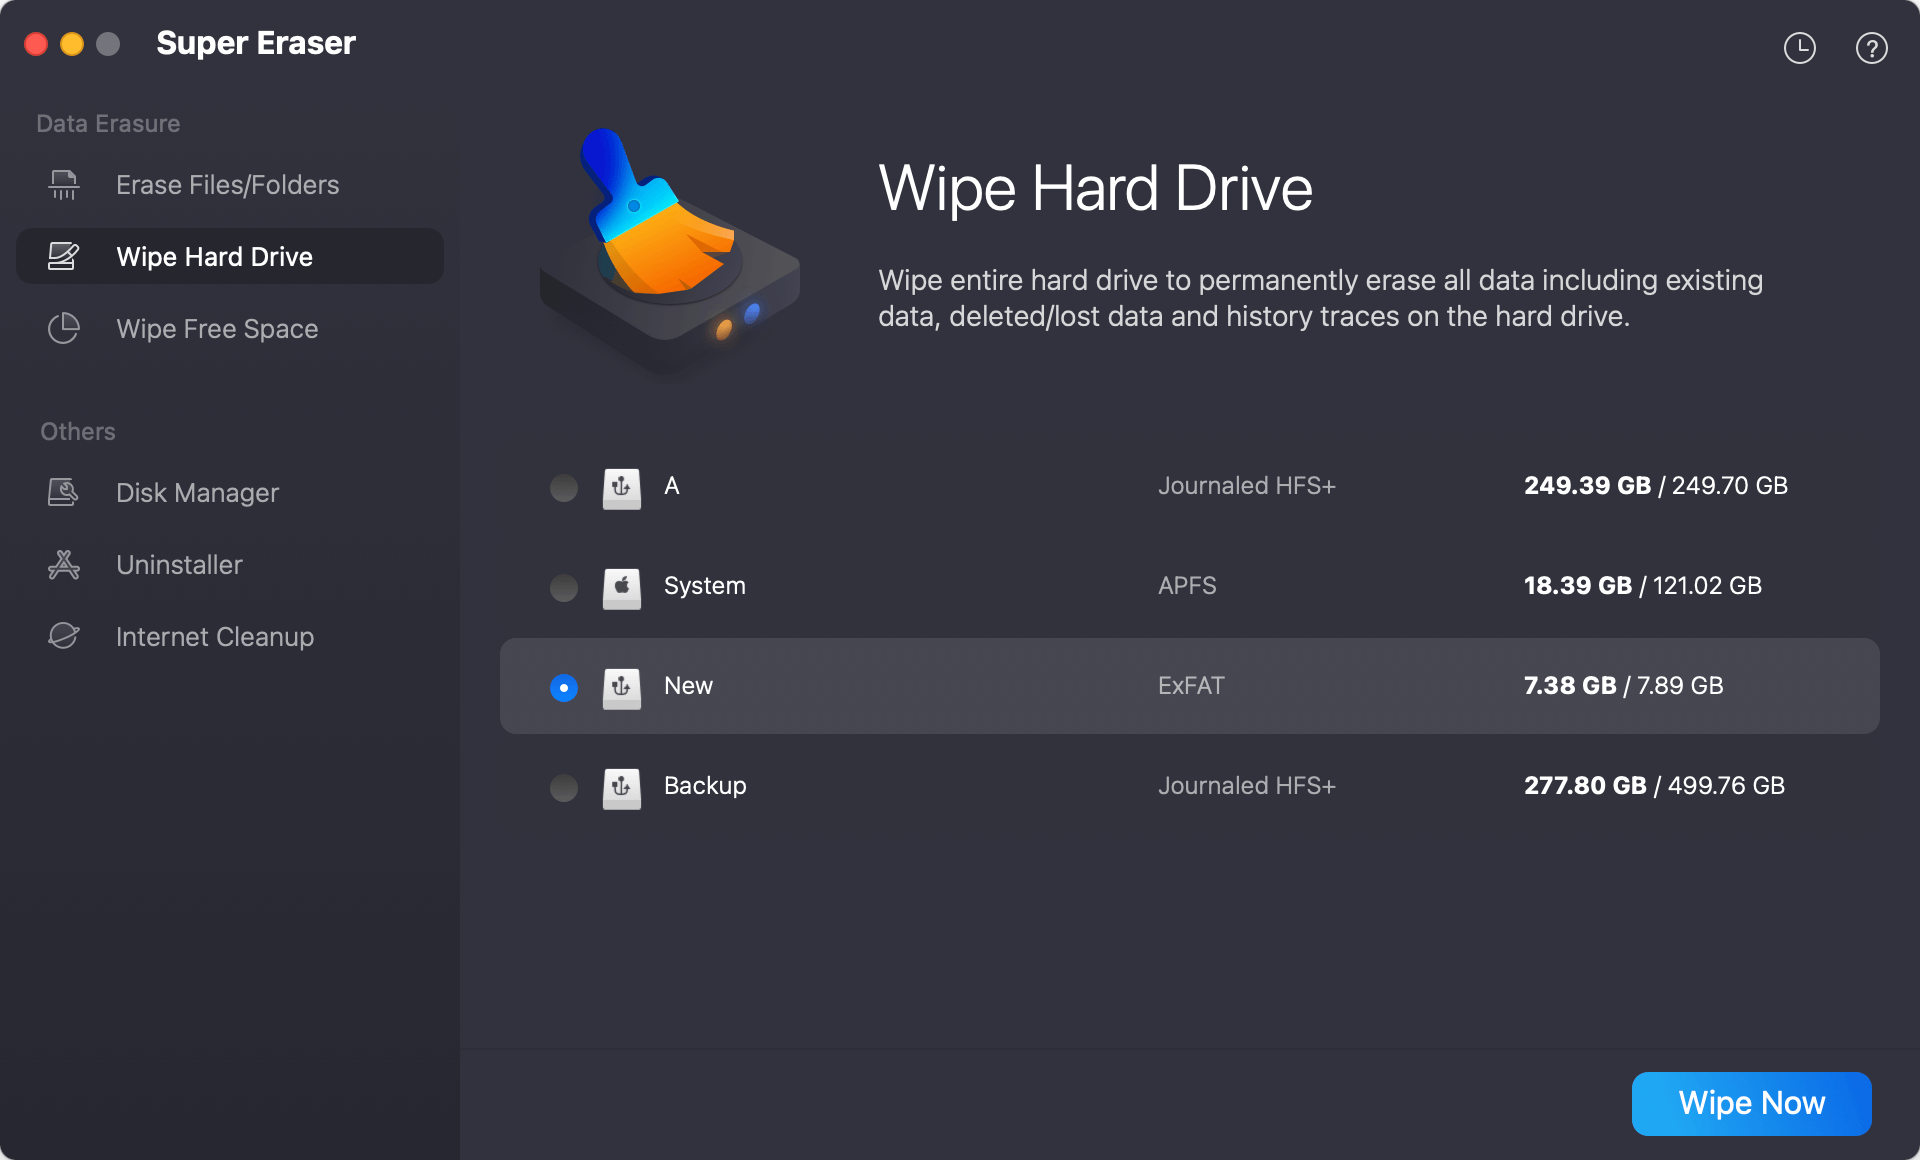
Step 2. Open DoYourData Super Eraser for Mac, then choose Disk Manager. Select the Sony SD card, click on Format button. Select ExFAT as the file system. Then format the SD card.
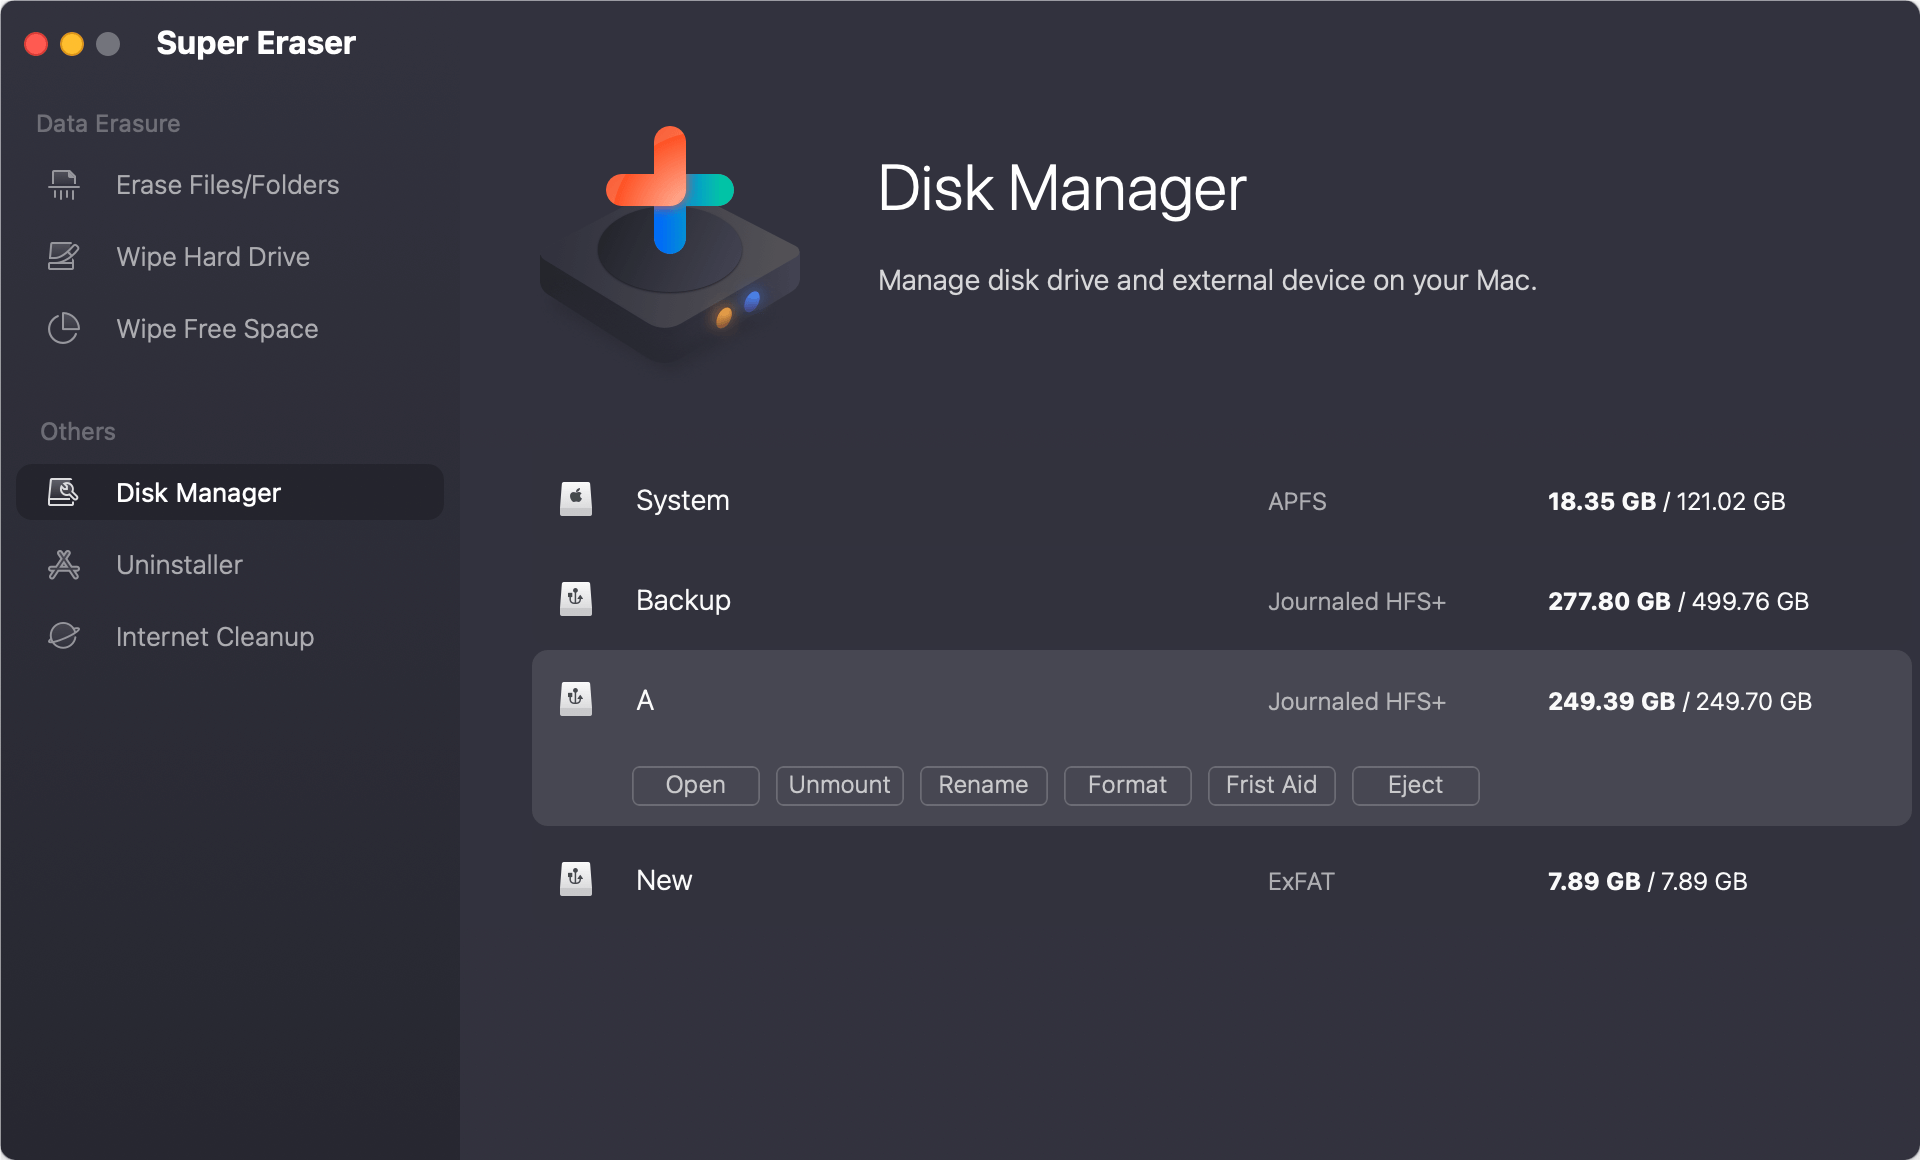
If you will sell, donate or throw out an old Sony SD card, just choose Wipe Hard Drive mode. This mode will format and wipe the Sony SD card. All data stored on the Sony SD card will be erased permanently, can’t be recovered by any method.
Benefits of Formatting An Sony SD Card
Formatting a Sony SD card for a Mac has many benefits, including ensuring that it works perfectly and you can easily handle your data. Let's look into these advantages:
- Performance
Formatting eliminates any file system mistakes or damaged data on the card, making it work better and more reliably when storing and retrieving data. - Compatibility
Setting up the SD card to work with Mac computers ensures it will work without problems, making it easy to share and use data. - Data Organization
A formatted SD card makes it easier to organize and handle data by making it easier for users to sort, access, and change files, which speeds up workflow. - Safety
Formatting the SD card is a safe way to get rid of private information saved on it, lowering the risk of data breaches or unauthorized access. It protects the safety and security of data, keeping important data safe.
Recover Lost Data after Formatting Sony SD Card on Mac
It is strongly recommended to back up your data stored on the Sony SD card before you formatting the SD card. However, if you’ve lost data from the Sony SD card without a backup, you still can use a data recovery app to get lost data back.
Step 1. Download and install Do Your Data Recovery for Mac, the powerful data recovery app.
Step 2. Open Do Your Data Recovery on Mac, it shows all drives and devices, just select the Sony SD card to begin.

Step 3. Click on Scan button to deeply scan the Sony SD card, it will find all lost images, videos and files.
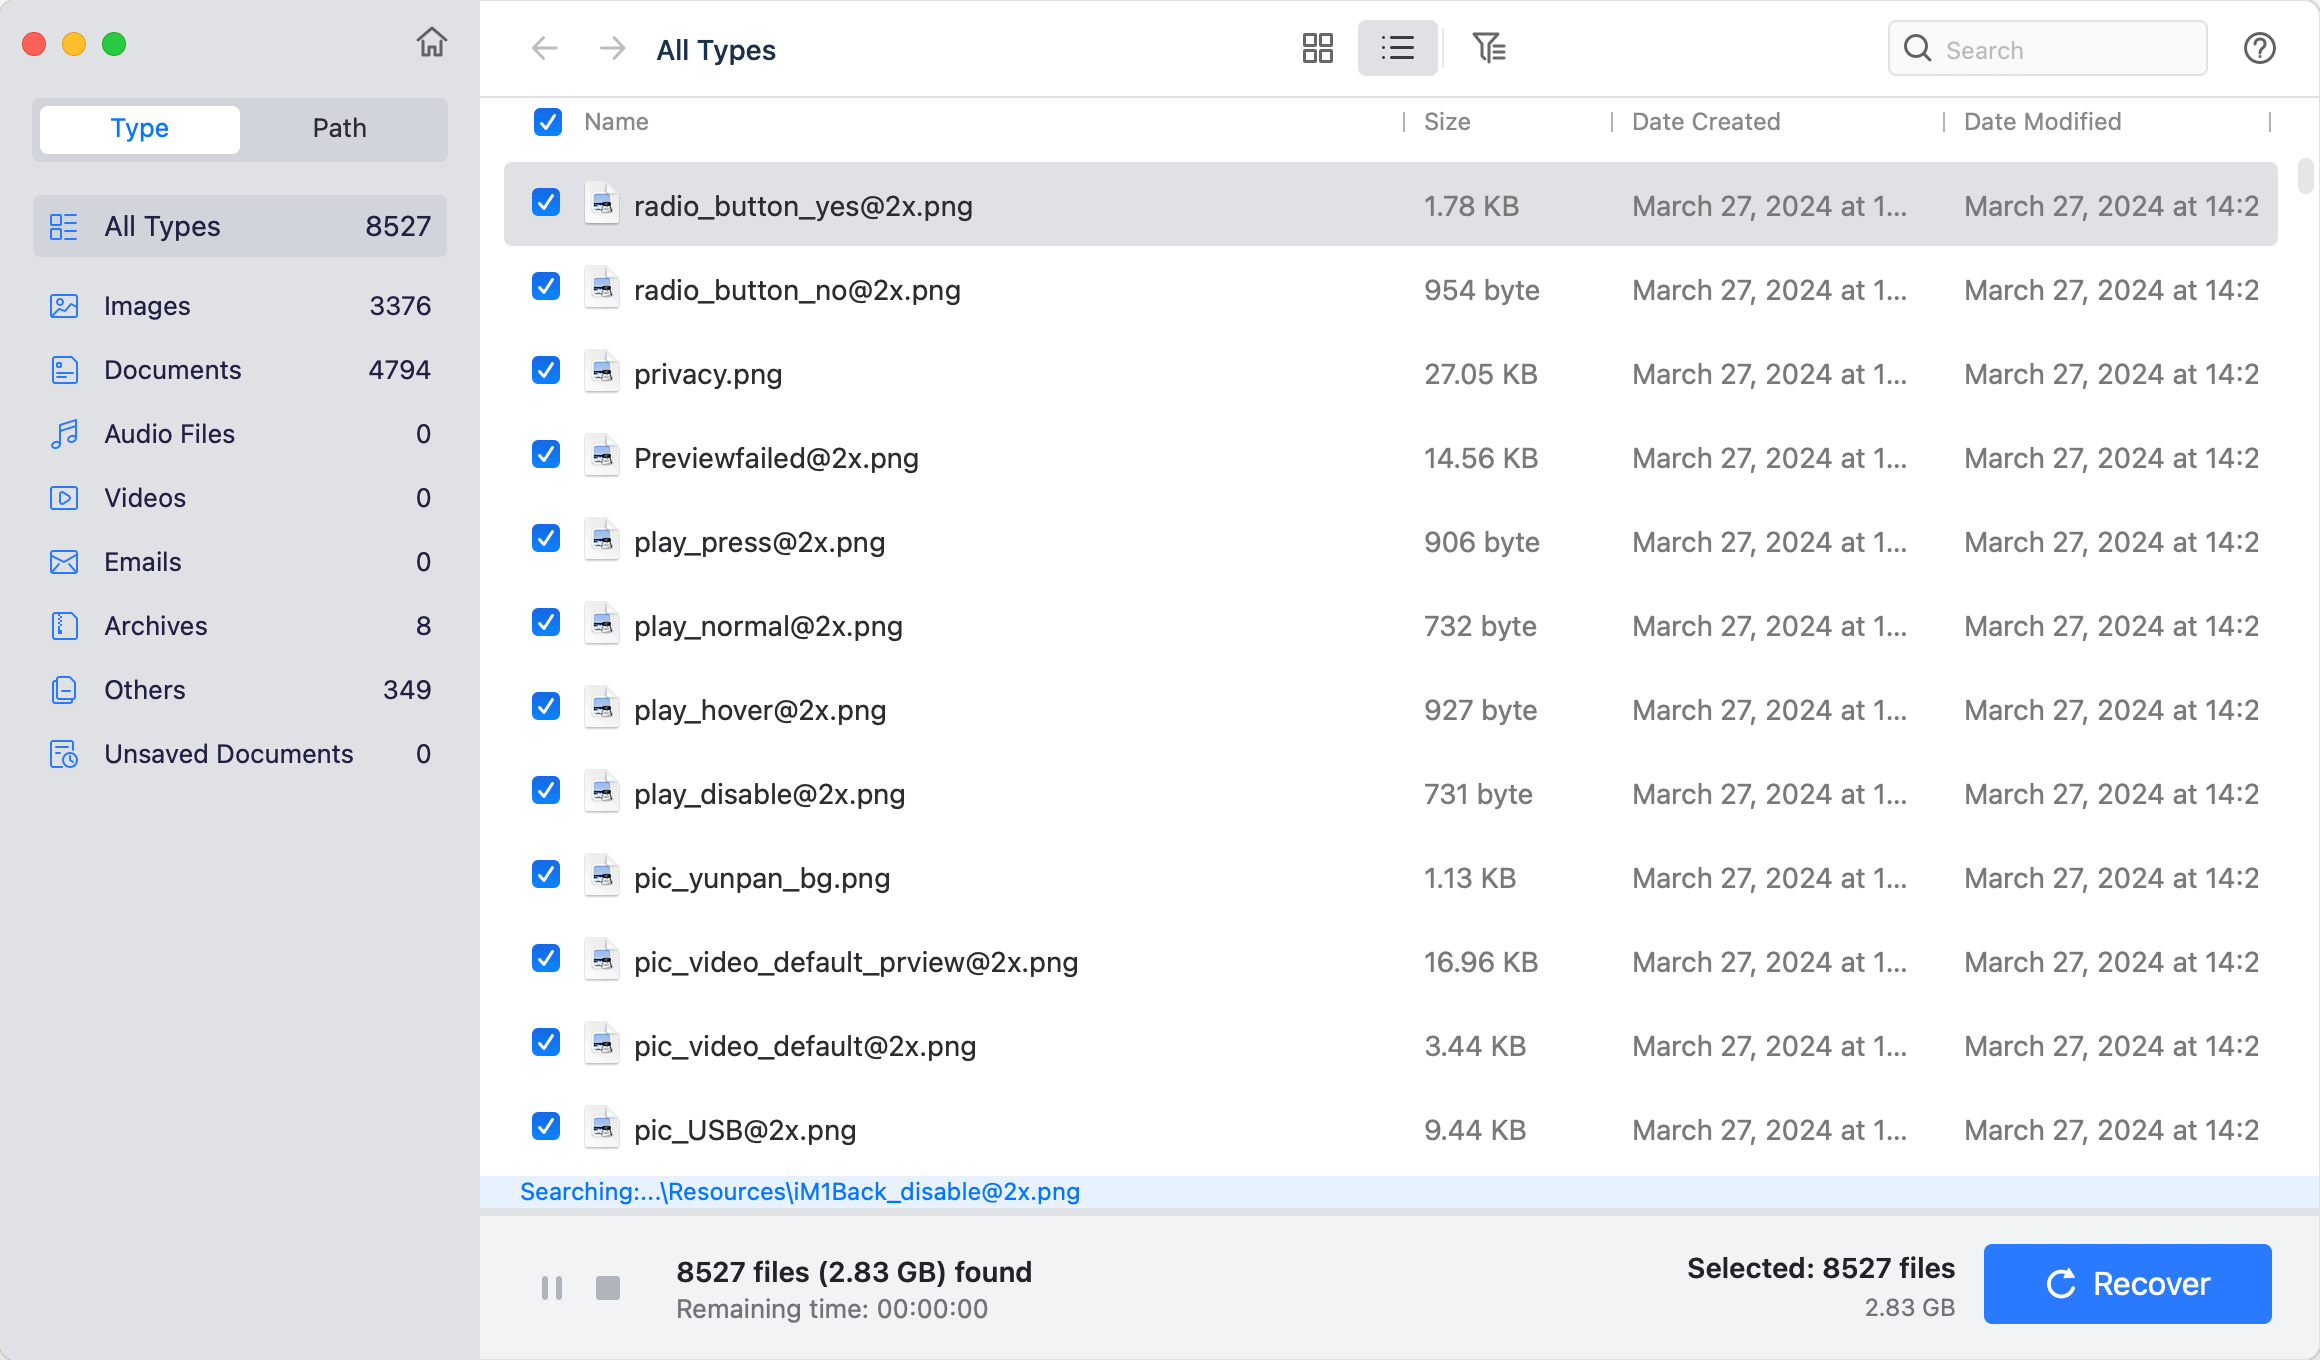
Step 4. Once the scan is completed, you just need to select the wanted files. Then click on Recover button to save them.

FAQs About Using Sony SD Card on Mac
1. How to format Sony SD card for Mac?
- Go to Launchpad > Other > Disk Utility, open this app.
- Connect the Sony SD card to your Mac.
- Select the Sony SD card, click Erase.
- Type a new name, select ExFAT as the file system.
- Click Erase again.
- Once the formatting process gets finished, click on Done button.
2. The Sony SD card has been formatted to NTFS, can I write data to it without formatting?
Yes, if you want to read-write a NTFS storage device on Mac without formatting, you can use a NTFS for Mac tool to help you enable writable for the NTFS drive.
Step 1. Download and install DoYourData NTFS for Mac.
Step 2. Connect the Sony SD card to your Mac.
Step 3. Open DoYourData NTFS for Mac, then select the Sony SD card and click on Enable Writable button.
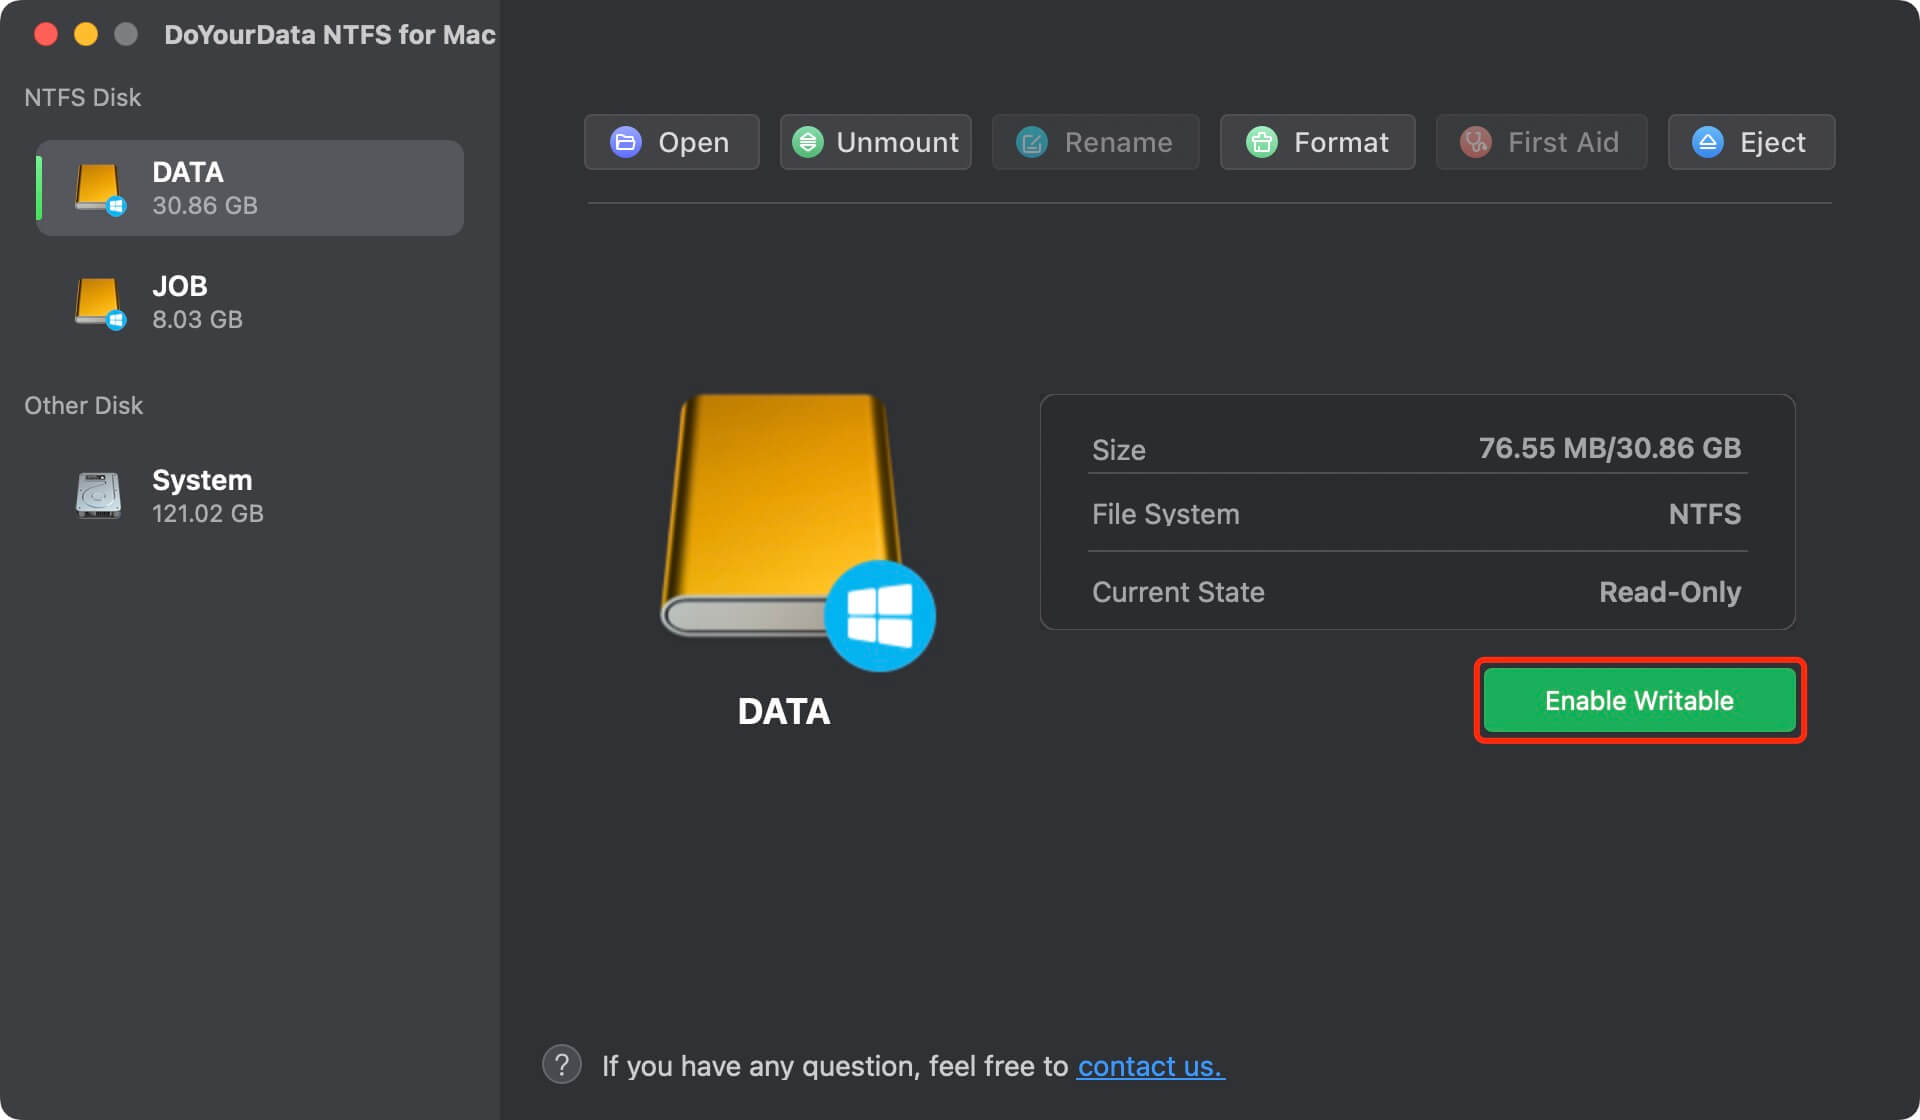
This tool also can help you format Sony SD card on Mac, mount Sony SD card on Mac, repair damaged Sony SD card on Mac.
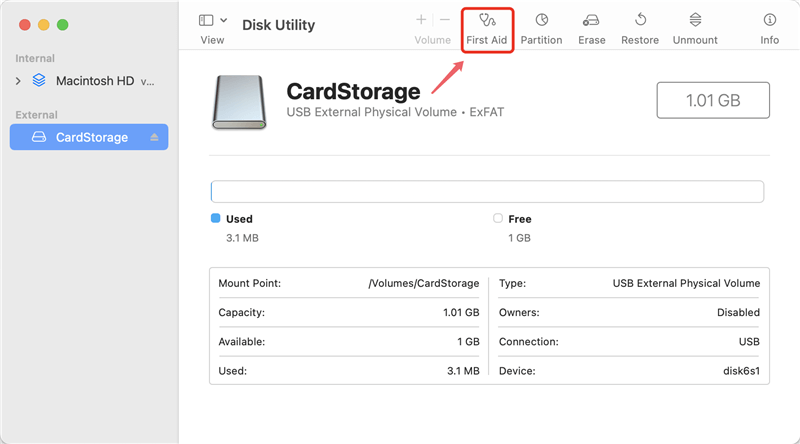
3. How to fix corrupted Sony SD card on Mac?
- Connect the Sony SD card to your Mac.
- Open Disk Utility.
- Select the Sony SD card and click on First Aid button.
- Run First Aid on the Sony SD card, when it gets finished, click on Done button.
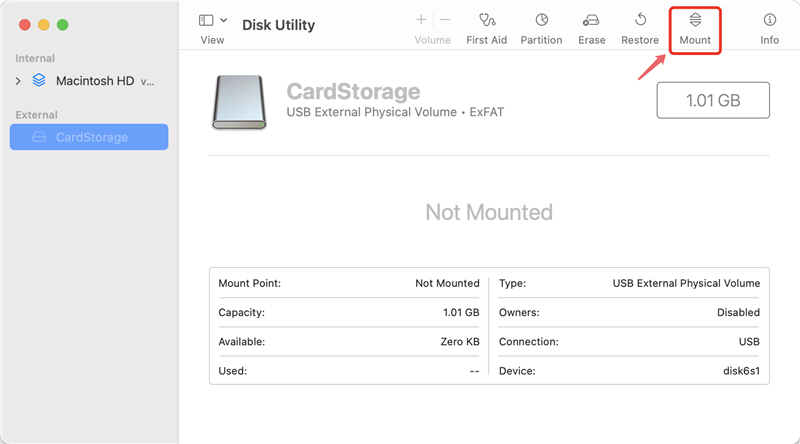
4. How to mount Sony SD card on Mac?
You can open Disk Utility, select the Sony SD card, then click on Mount button. If the Mount button is not available, just click on First Aid button to repair the Sony SD card.
5. Sony SD card is not showing up on Mac, how to fix it?
- Open a Finder, then click Finder on Apple menu.
- Choose Setting, open Finder Settings window.
- Click General and Sidebar, make sure External disks is selected.
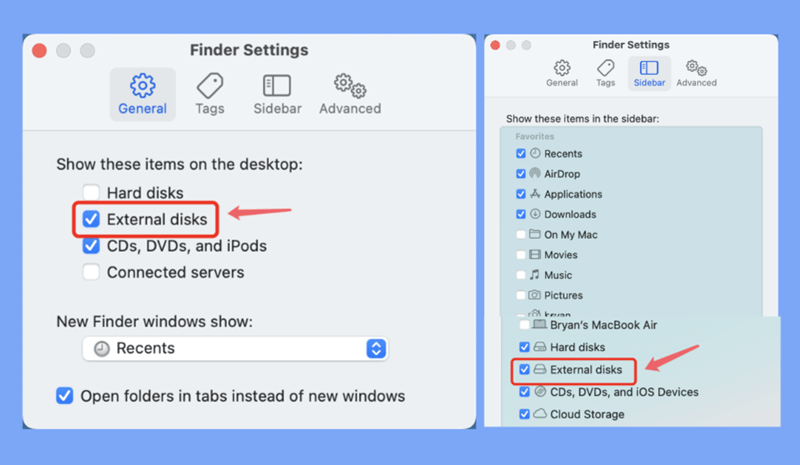
If you still can’t see the Sony SD card on your Mac’s desktop and Finder sidebar, you can open Disk Utility to mount the Sony SD card or repair the Sony SD card.
Conclusion:
In conclusion, resetting your Sony SD card for Mac is important to ensure it works perfectly, manages your data easily, and keeps your information safe. Using the step-by-step instructions, you can get the most out of your SD card and use it to store your pictures, videos, and documents safely.
Formatting your SD card for Mac ensures it works for you and protects your important data, whether you're a professional shooter, videographer, or regular user. Utilize layout advantages to improve how you store data on your Mac.
Written & Updated by Ricky Lin
Ricky Lin is an senior editor of DoYourData who lives in Adelaide, Australia. He is interested in writing technology articles related with data recovery, computer issue fixes, disk clone, iPhone data recovery, video edit, Mac optimization, etc. He Joined DoYourData in 2019 and have written 500+ articles to help both Windows users and Mac users to solve data or computer problems.
Hot Articles
- Fix External Hard Drive Read-Only Issue on Mac
- How to Wipe Trash Bin on Mac?
- Recover Lost Data from WD (Western Digital) External Hard Drive on Mac
- Fix External Hard Drive Not Showing Up on Mac
- How to Wipe SD Card on Mac?
- Mount and Unmount the External Hard Drive on the Mac
- Run First Aid on Mac to Repair Disks
- Fix Can't Save Files to An External Hard Drive on Mac
- (Solved) External SSD Not Detected in Disk Utility on Mac
- Why Can't Format A Hard Drive To NTFS on Mac? Can We Fix It?