The reliable Mac data recovery software to recover deleted or lost files.
Free TrialSSD TRIM is an important feature to be aware of if you're considering purchasing an SSD or already have one on your computer. Continue reading to get the answers to any questions you have regarding SSD TRIM, and this article will also teach you how to enable or disable SSD TRIM on a Mac.
Quick Navigation:
- 1. What is SSD TRIM?
- 2. How can I tell whether my Mac's TRIM feature is on or disabled?
- 3. With Trimforce, turn on TRIM
What is SSD TRIM?
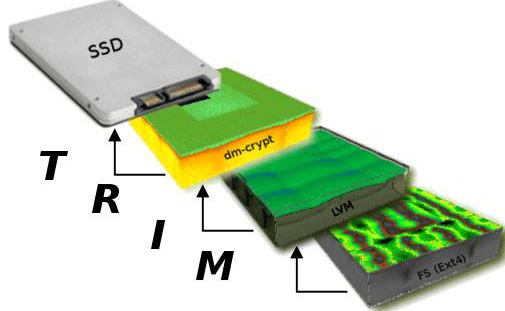
The SSD TRIM command, also referred to as an Advanced Technology Attachment (ATA) command, communicates to the solid-state drive (SSD) which data blocks it may delete with the assistance of the operating system since the system is no longer using them.
TRIM is not just accessible for SSDs that utilize the ATA interface but also for those that accept the SATA interface. SSDs that have other types of interfaces than TRIM also contains a command that is comparable to TRIM. SCSI, for example, has the UNMAP command, which is a complete parallel to the TRIM command.
You may use the SSD TRIM command to clean up and arrange your solid-state disk using Active Garbage Collection. When you erase a file from your SSD, the data on the drive is tagged as no longer being utilized.
Next, the SSD TRIM command instructs the drive to allow for the erasure of all data on the device. Data will be erased via Active Garbage Collection the next time the machine is inactive.
How can I tell whether my Mac's TRIM feature is on or disabled?
Here is how to determine whether or not TRIM is currently operating.
- Select About This Mac after clicking on the Apple symbol located in the screen's upper-right corner.
- Simply choose the System Report option.
- In the System Information window's left pane, locate the Hardware section and then browse to the SATA/SATA Express heading.
- You will need to scroll down the right pane until you locate the TRIM Support option.
How does the TRIM function on a Mac? The TRIM command is a system-level command that lets the operating system and the drive communicate with one another over which sections of the drive are deemed unused and are thus ready to be deleted and rewritten. When TRIM is not present, users may experience drastically slower write speeds from their drives when the storage space on those drives becomes full.
With Trimforce, turn on TRIM
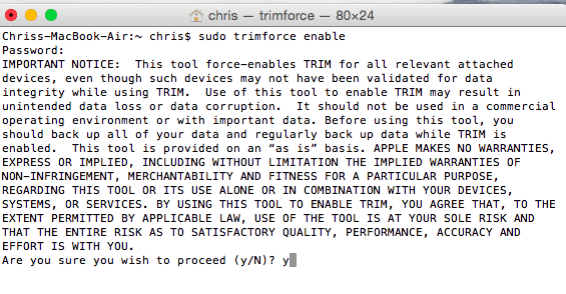
In a relatively unnoticed upgrade to OS X 10.10 Yosemite, known as OS X 10.10.4, Apple included a brand new command named "trimforce." This application may also be found in Apple's OS X 10.11 El Capitan operating system.
A single-use of this command will enable TRIM across your whole array of solid-state drives (SSDs). It removes the restriction that only enables TRIM to operate on solid-state drives offered by Apple as an OEM.
All of your solid-state drives will have TRIM enabled once you execute it. It is impossible to turn on TRIM for one solid-state drive (SSD) while leaving it off for another SSD.
Warning: Doing so might result in serious consequences! Just in case, it's a good idea to have copies of your most crucial files on hand.
A Terminal window can be open by pressing Command + Space, typing Terminal, then pressing Enter to start a Spotlight-enabled terminal. When prompted, type and click Enter to launch a terminal window.
sudo trimforce enable
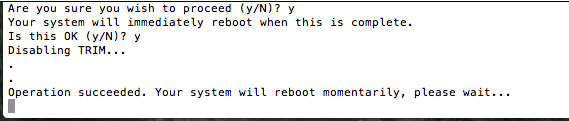
You'll be prompted for your user account password, which you should enter. After you've done that, you'll have to read a spooky-sounding warning and consent by inputting a y.
After answering the follow-up question with a y, your Mac will automatically reboot. All SSDs attached to your Mac will be able to use TRIM when it restarts.
For Apple's OEM solid-state drives, you can deactivate trimforce and solely utilize TRIM by running the command:
sudo trimforce disable
It's reasonable to assume that this will work with most Mac SSDs, just as it does for most Linux SSDs when TRIM is enabled. While certain SSDs may not fully perform TRIM as intended, Apple will not take responsibility for any difficulties that may arise due to an SSD's hardware failing to do so.
Conclusion
If you want to expand the capacity of your system with additional solid-state drives (SSDs), you should maintain the TRIM Enabler software installed so that you can simply enable TRIM on any new SSDs you add.
You are free to remove it in any other case since it isn't necessary for TRIM to continue functioning normally. These days, TRIM is only one of numerous strategies manufacturers utilize to ensure that solid-state drives continue to work at their highest possible efficiency.
It's possible that having it on won't be absolutely required, but it certainly won't harm, and the more streamlined the data is, the better your SSD will run, so it's nearly always worth keeping on. Now that you know how solid-state drives function, you also know how TRIM keeps them running at top efficiency for longer!
Learn more:
DoYourData Products
DoYourData Super Eraser for Mac
Permanently shred files or wipe hard drive to prevent data recovery on Mac.
Free TrialClone HDD, SSD, Mac OS, external disk, USB drive, and more under Mac OS.
Free TrialWritten & Updated by Justin Kenny
Justin Kenny is a writer & editor of DoYourData. He joined DoYourData in 2016 and focuses on writing articles about Windows data recovery, Mac data recovery, external device data recovery, hard drive clone, data erasure, Mac cleanup, computer issue fixes, etc. He is a super fan of Apple devices and is big on testing new digital device and system utility software.