
Create bootable clone backup before updating Mac
DoYourClone for Mac can help you create a bootable clone copy of Mac before updating the macOS Read more >>
You may delete/ose files during or after upgrading to macOS Ventura. This article will introduce some workable solutions to recover the deleted or lost files. You can check the deleted files in Trash, Time Machine backups, another user account, or use professional data recovery software to recover the lost files.
![]() Updated by Justin Kenny on September 18, 2024
Updated by Justin Kenny on September 18, 2024
Quick Navigation:
Many people may have updated or plan to update to macOS 12 Monterey and macOS 11 Big Sur, which have been available for quite some time. In addition, the newer macOS 13 - macOS Ventura official version is available for some time. Most of the time, we get a flawless Mac update and can look forward to the next one. However, we may encounter issues updating Mac to version of macOS 13 Ventura from the previous version.

When users update the system, the most common complaints are "missing files after Mac update" and "I updated my Mac to macOS Ventura and lost everything." This could be disastrous but take a deep breath. We can recover your missing files after a Mac data loss using advanced recovery software and an existing backup after an Update to Ventura.
Should you suffer data loss during macOS Ventura, just follow this guide to recover deleted/lost files after upgrading to macOS Ventura.
Usually, updating to a new version of macOS will only wipe some things because a macOS upgrade is intended to introduce new features, update Mac software, repair issues, and improve the system performance. The entire update process will not affect the personal files saved on your Mac storage. This can happen if you updated your Mac and then wiped everything:
So, it's a good way to help you protect the data by backing up important files suing Time Machine or other methods before a system updated. Whatever the reason, we are here to help you avoid calamity. The following section will show you how to recover missing files after a Mac upgrade.
Now that you understand the causes of data loss following the macOS Ventura upgrade let's move on to the recovery method. Here are 5 strategies for recovering files from macOS Ventura:
If you haven't permanently erased the files, the simplest way to recover them is through Trash. Here's what you should do:
Step 1: On your desktop, navigate to the Trash folder from the dock.
Step 2: Right-click on the files you want to recover and select Put Back.
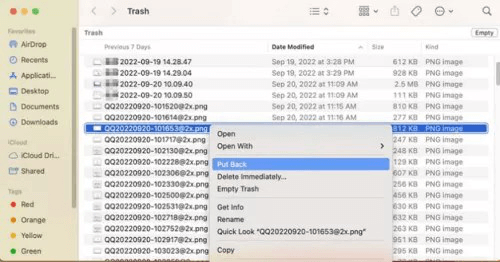
The selected files or folders will be placed back in their original location. Or you can choose the Copy option and then paste the files to another location manually.
Please note that this can only work if the files were not deleted with Command + Del keys, or the Trash hasn't been emptied after moving the files to Trash.
If you have already cleared the Trash, proceed to "Way 2." If you still need to, you can use Terminal to restore deleted data on macOS Ventura if you haven't before. You must type the command precisely and convert files one by one.
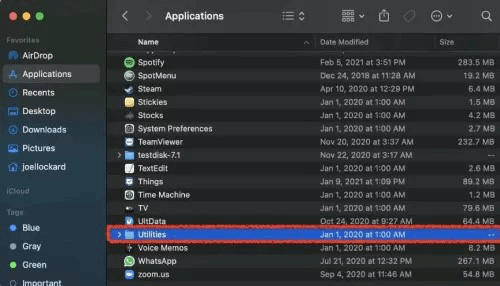
Step 1: From the Utilities menu, launch the Terminal app. Utilities can be found in the Applications folder under Finder.
Step 2: In the Terminal, type command cd .Trash and press the Return key. Enter the following command to list the deleted files in the Trash: ls -al ~/.Trash
Then type the command mv xxx ../Documents but replace xxx with the name of the deleted file, also you can replace the ../Documents with another location to save the restored file. Now press the Return key once more.
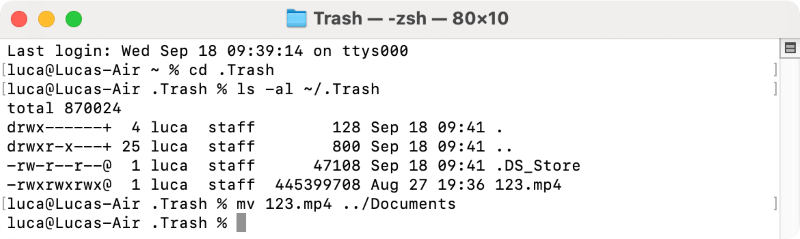
Step 3: After restoring your deleted file, type Quit and exit the Terminal app.
Time Machine is backup software built into the Mac operating system that automatically returns your information to an external hard disc. Has a Mac update erased everything? Time Machine can effortlessly restore lost images, iPhone photos, documents, calendars, etc. But, as I already stated, only if you have backup files.
Restart your Mac, then hold down the Command + R keys to enter Recovery Mode at the same time. (If you are using an Apple Silicon chip Mac, hold Power button to enter macOS Recovery mode.)
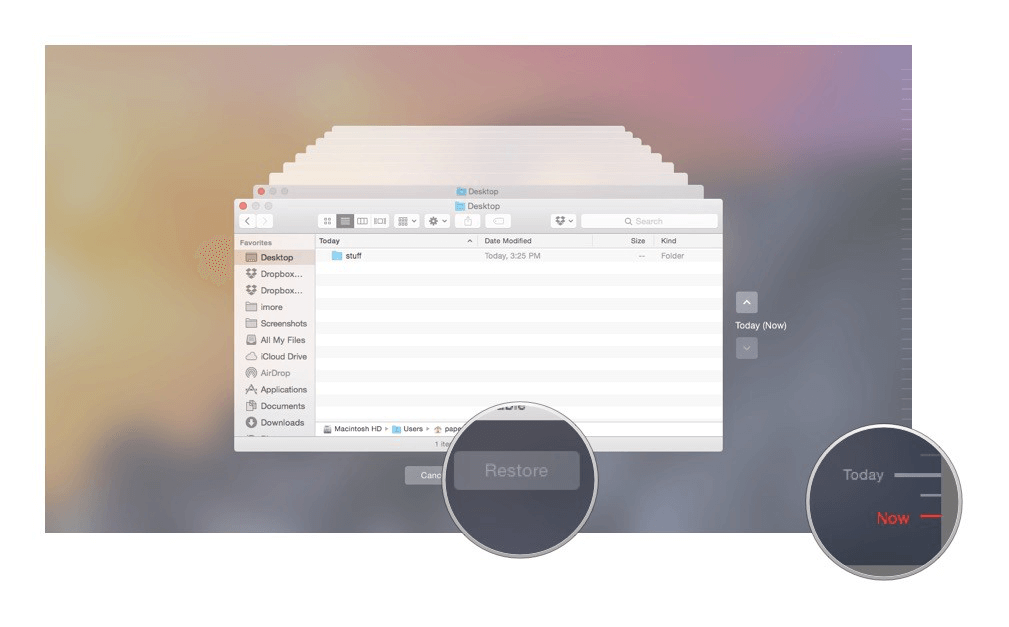
Select Restore from Time Machine Backup and press the Continue button.
Start Time Machine on your Mac, pick the files you want to recover and then press the Space Bar to preview them.
To recover missing data after a Mac update, click the Restore button. A time machine can be used to retrieve missing files.
Time Machine occasionally displays errors due to incorrect operation or Mac performance. It is only sometimes possible to recover lost files after a Mac update. Try the other methods in such a case.
Don't be surprised if you're advised to do so. Yes, I'm sure you know which account to use and how to log in; however, macOS updates occasionally merely wipe your previous user account profile while keeping the home folder, which is why your data are gone and missing. In this instance, you need to re-add your previous profile and log in again.
Select Log out xxx from the Apple menu.
Then, log in with your previously used account to see if the files can be retrieved; it is recommended that you try this on all registered accounts on your Mac.
If you cannot log in with your old account, click the Apple icon > System Settings > Users & Groups, and then click on the padlock with your password to add the old version as before. Then log in to look for the missing files.
If the methods above can't help you recover deleted/lost files on macOS Ventura, just try data recovery application. Do Your Data Recovery for Mac is a powerful, safe and easy-to-use data recovery application. It can help you completely recover deleted or lost files in macOS Ventura.
Download and install the software on your Mac, and then follow the steps below to completely recover deleted or lost files after upgrading to macOS Ventura:
Step 1: Select the hard drive to start data recovery.
Open Do Your Data Recovery for Mac, then select the hard drive where you delete or lose your files. It supports to recover lost data from local disk or external storage device.

Step 2. Scan the hard drive to find deleted/lost files.
Click on Scan button. This effective data recovery software will deeply scan the hard drive and find every recoverable file.
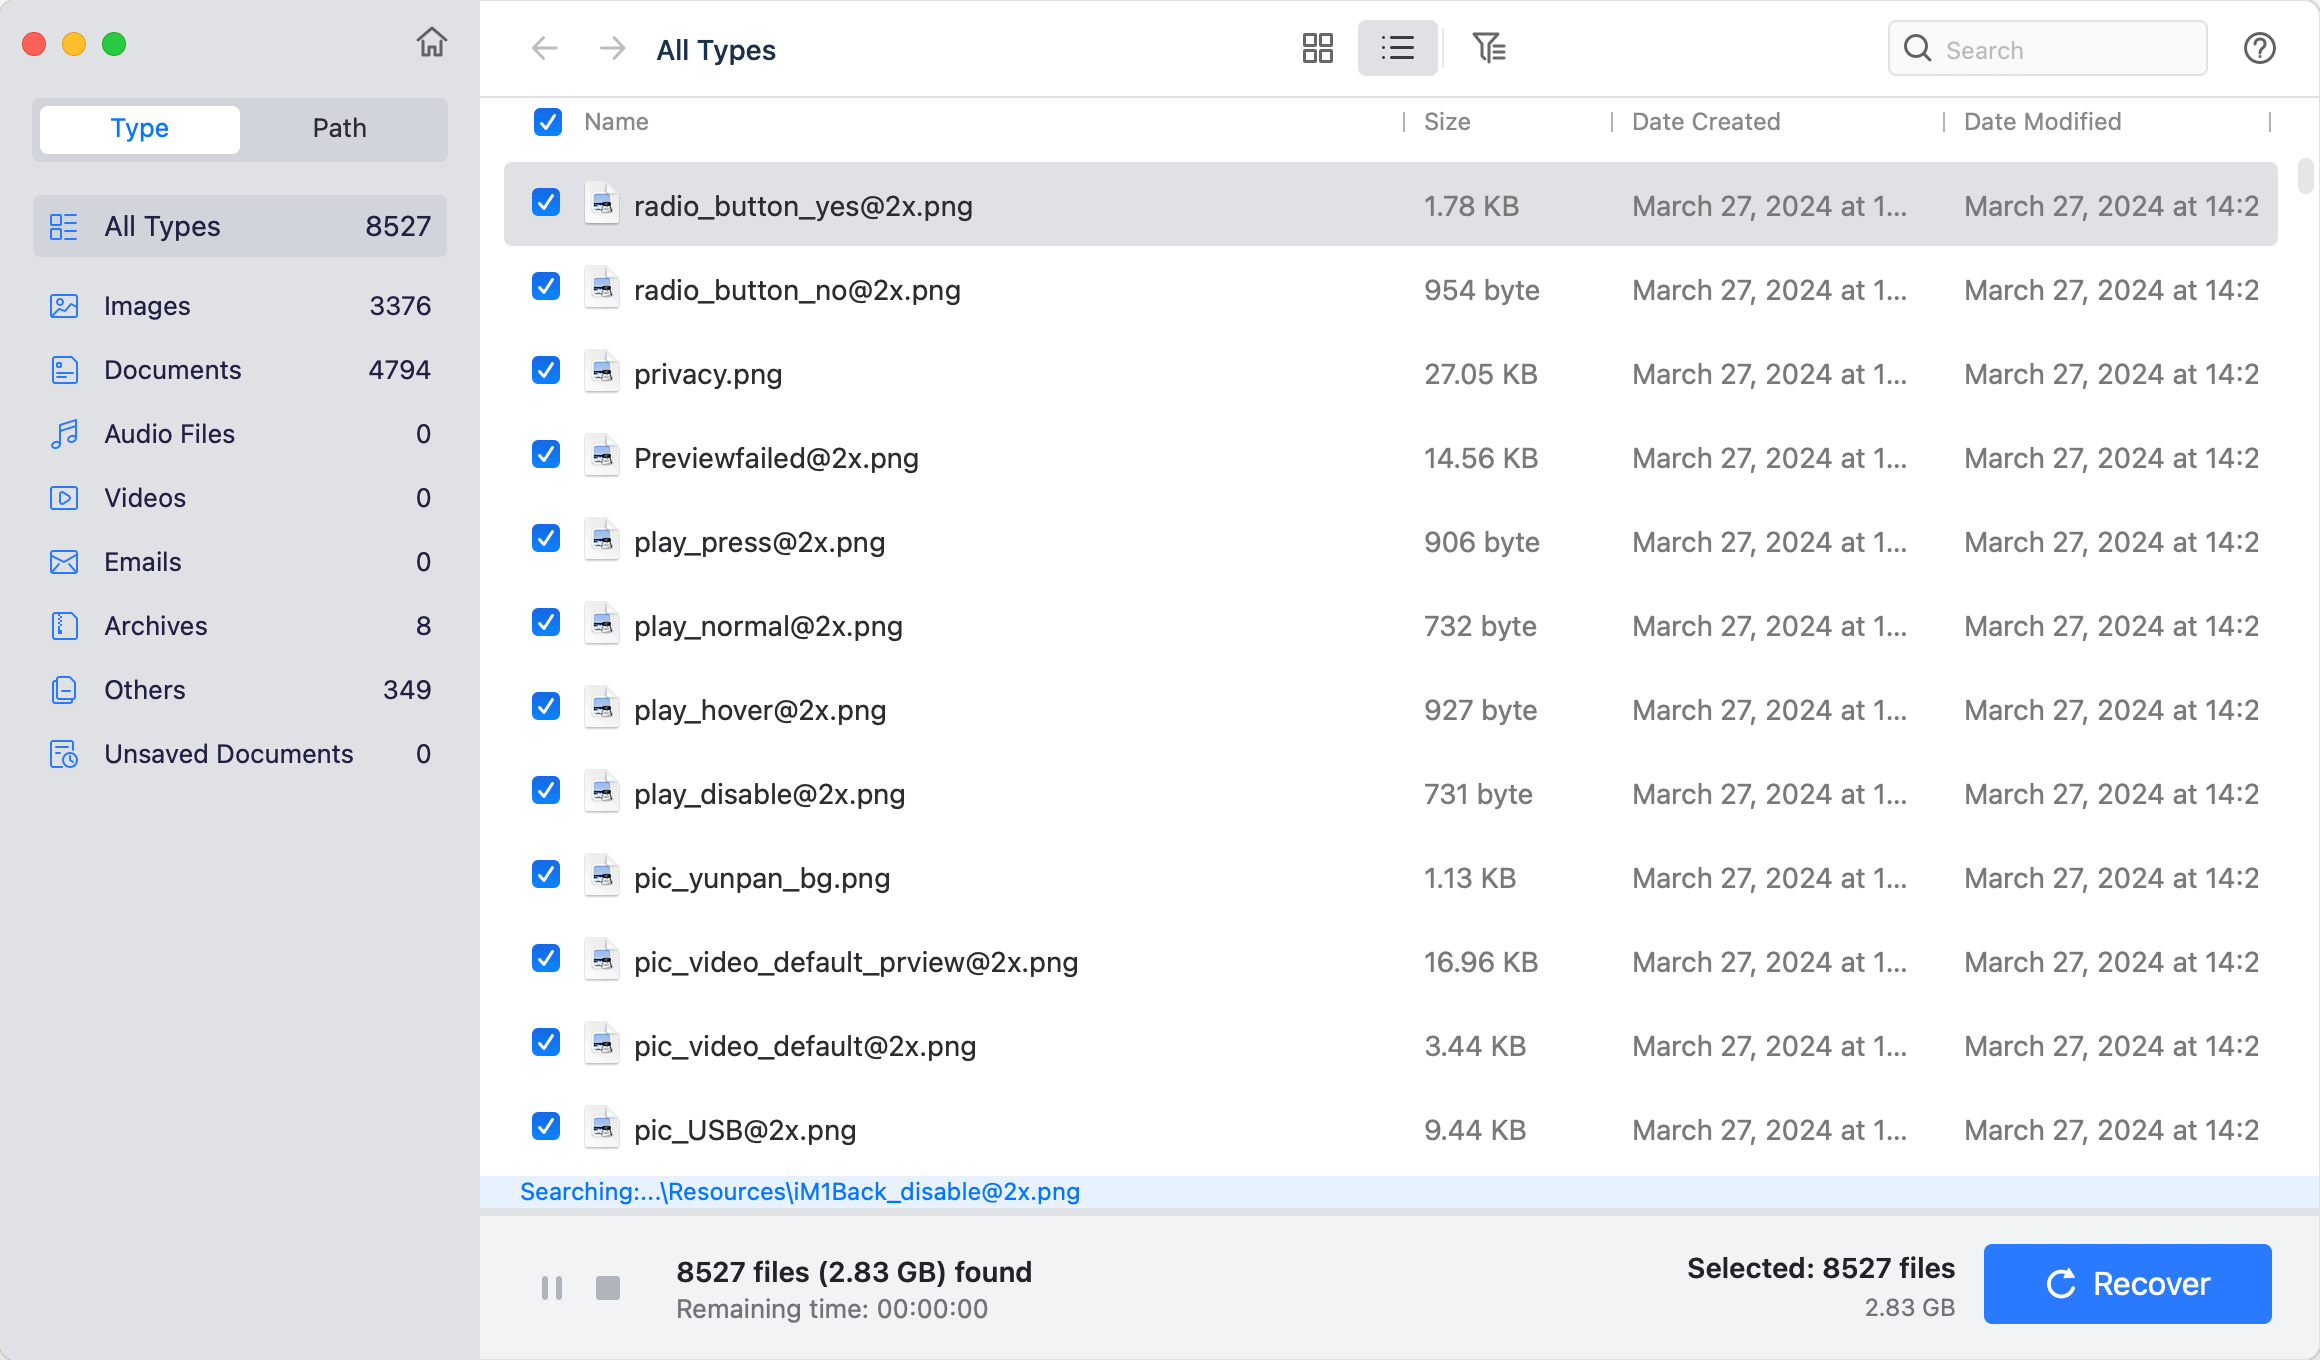
Step 3. Preview and recover lost files.
Once the scan is completed, you can preview all recoverable files. Select the wanted files and save them to another drive.

There always be issues that would happen and cause data loss or other problems. You cannot guarantee the updates will go through smoothly 100% each time. To keep your data safe and avoid data loss after a Mac update to Ventura, there are simple steps can be taken first:
Create bootable clone backup before updating Mac
DoYourClone for Mac can help you create a bootable clone copy of Mac before updating the macOS Read more >>
Actually, even if you don't need to update your Mac operating system, it's a good habit to handle your Mac carefully, check the Mac health, make regular backups. Then you can avoid data loss in most situations and get back your lost data easily in any data loss case.
It's critical to keep your macOS up to date, but upgrades sometimes go differently than intended. Hopefully, you've followed our guide on how to restore deleted or lost files after upgrading to macOS Ventura. You may not be comfortable using command lines on the Terminal or don't have a Time Machine backup, or the trash has been emptied after deleting files. Then you can only try other methods to recover the lost files.
Your best bet is to use a third-party program to recover deleted files on macOS Ventura. Whatever the state of your information, these third-party data recovery applications are your best chance for efficiently recovering lost files. It offers an easy-to-use interface, no learning curve, and recovers permanently erased files using an innovative algorithm.
1. How to restore deleted file from Trash on macOS Ventura?
There are 2 ways to restore deleted file from Trash. The first way is to go to Trash directly from the dock, then right click the deleted file and choose Put Back to restore it.
The second way is using command with Terminal.
2. Will macOS Ventura system upgrading process delete everything?
Normally, the macOS Ventura system upgrading will not delete everything, it will only update the system files with the new system, but keep your personal settings and data intact. However, if there are issues happen or the system update was interrupted, data loss may happen.
3. How to recover lost files after upgrading macOS Ventura?
You can restore the lost files from a backup. However, you should have created backups which including the lost files before you update the macOS Ventura. Otherwise, you can only try the data recovery software to recover the lost files. Here's how:
4. Any way to create a bootable copy of macOS Ventura before upgrading?
It's important to back up the data or system before you update macOS Ventura or other Mac systems. For example, you can use DoYourClone for Mac to create a bootable copy of macOS Ventura before updating. You can follow the steps below:
Do Your Data Recovery for Mac
Do Your Data Recovery for Mac, one of the best Mac data recovery software, can help you easily and completely recover deleted, formatted or lost files from Mac HDD/SSD, external HDD/SDD, USB drive, memory card, digital camera, or other storage devices.
Written & Updated by Justin Kenny
Justin Kenny is a writer & editor of DoYourData. He joined DoYourData in 2016 and focuses on writing articles about Windows data recovery, Mac data recovery, external device data recovery, hard drive clone, data erasure, Mac cleanup, computer issue fixes, etc. He is a super fan of Apple devices and is big on testing new digital device and system utility software.