How to Erase Hard Drive on macOS Ventura?
Erase hard drive will help you remove all the data to get a fresh new start. It's necessary to erase hard drive when you need to remove virus or fix unknown issues. There are different methods to erase hard drive on macOS Ventura. You can follow the guide to erase the hard drive easily. If the erased drive or machine will be sold or donated, it's essential to wipe the data permanently with DoYourData Super Eraser to prevent data breaches.
![]() Updated by Shirly Chen on April 23, 2025
Updated by Shirly Chen on April 23, 2025
Quick Navigation:
- What should you know about Ventura?
- How to erase the hard drive on your macOS Ventura?
- How to reinstall macOS after erasing hard disk?
- Permanently erase data on macOS Ventura using data eraser
- Conclusion:
Apple comes with the new Mac operating system, the macOS Ventura, at WWDC 2022. Ventura is a successor to macOS Monterey and comes with some fascinating features. A Public version of macOS will be coming in later 2022. This post comes with an insightful guide that will help you how to erase the hard drive on macOS Ventura.

What should you know about Ventura?
macOS has been noticing various revisions over a few years. Big Sur came up with the redesigned interface introducing features including revamped Notification Center and Control Center.
The next revolution was the macOS Monterey, which came with interesting FaceTime features, including SharePlay to share the content with others and the Voice Isolation feature to improve the sound.
Surprisingly, macOS Ventura comes with more splendid features than other macOS versions.
The best thing about this new version is that the Ventura macOS version also improved the earlier features instead of introducing the new ones.
For instance, macOS Ventura decided to change the Spotlight feature. macOS Ventura also decided to improve the Mail as various Mac users had complained about facing issues with it.
The spotlight was used to search for files, apps, and other content in Monterey macOS. What macOS Ventura brings is that it intends to improve the spotlight so it can integrate with other Apple devices in a more befitting way.
Monterey introduced the Tab Groups in the Safari browser that empowered the users to establish the tabs' group that can be accessed to the normal tabs you may open.
Ventura macOS, on the other hand, has taken the initiative of introducing Shared Tab Groups. This feature allows you to share the Tab groups with other people.
How to erase the hard drive on your macOS Ventura?
If you're looking to erase all contents and settings on your latest macOS Ventura, you'll need to follow the step-by-step guide below.
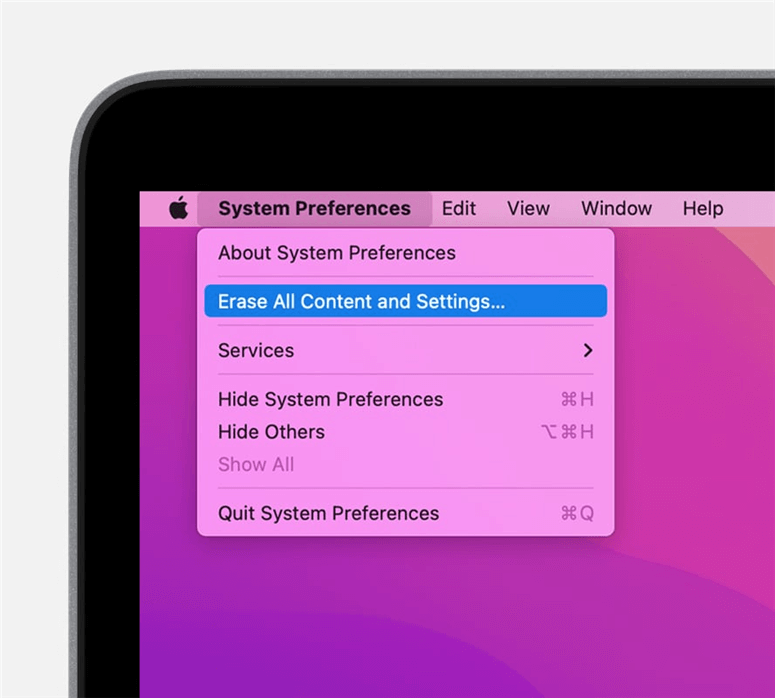
Step 1. Restart your Mac, navigate to Apple Menu, and tap on it. Next, you'll need to select the System Preferences icon from there.
Step 2. After visiting the System Preferences icon, you'll need to select the Erase All Content and Settings icon.
Step 3. Now, Erase Assistant will open and urge you to type in your administrator credentials. Next, you must enter the pass code you tend to use for logging in with your Mac. After entering the pass code, tap on the OK icon.
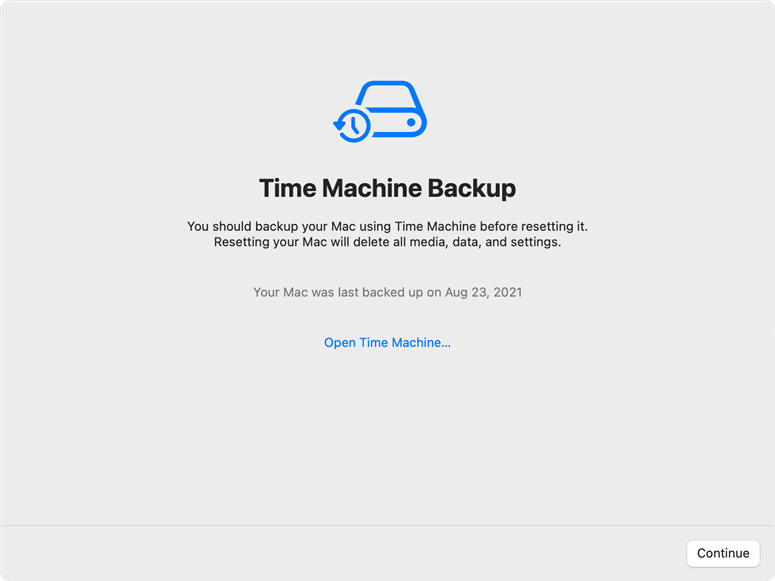
Step 4. Suppose you want to backup your data before resetting your macOS. It would help if you launched the Time Machine icon to back up your Mac data. Next, you can backup your data to an external storage device. You can also tap Continue to start making a new backup.
Step 5. You need to click on the Continue icon to remove your media, settings, data, and other items.
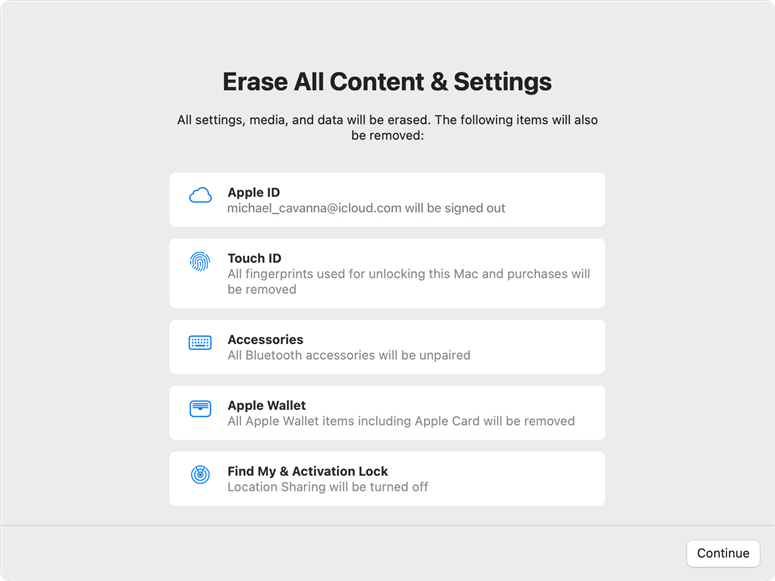
Step 6. You might be asked to log out from Apple ID, and all you need to do is type in your Apple ID's password and select the Continue icon to start scanning your signing out of Apple ID.
Next, you'll need to tap on Erase All Content & Settings again to confirm the action you're performing.
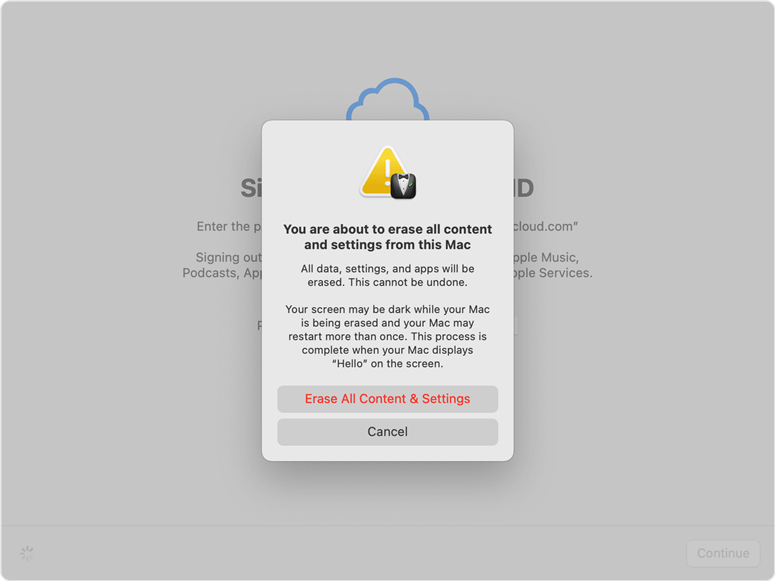
Step 7. Your Mac will start again, and you might see a progress bar or black screen. If it wants to connect to a Bluetooth Accessory, including a mouse or keyboard, you might be urged to turn on your Mac's accessory icon.
If you can't connect the accessory within 30 seconds, turn it off once and then turn it on again. You'll need to select a language when connecting to your Bluetooth keyboard.
In the future, you might be urged to attach a network cable or choose WiFi. You can use the WiFi menu to select the WiFi network.
Your Mac will activate once you join in with a network. Next, you must tap on the Restart icon.
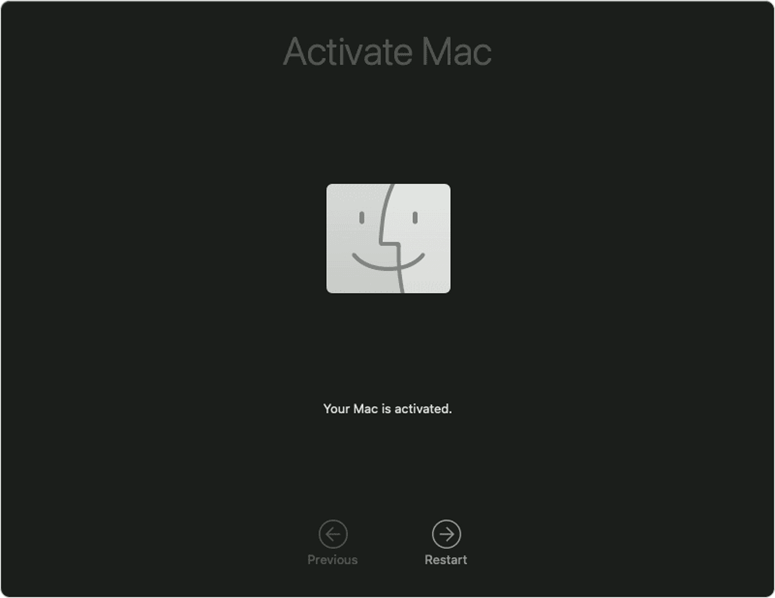
Step 8. After restarting your device, a setup assistant comes forward and guides you through Mac's setup process.
Remember, you'll need to take the help of a setup assistant guide if you're setting up the Mac for the first time.
How to reinstall macOS after erasing hard disk?
If you're looking to install the new iOS version after erasing the data, doing this on Apple Silicon Mac and Intel Macs is a bit different. To begin with, you'll need to boot the Mac into recovery mode.
For Intel Macs:
You'll need to hold the Command + R icon when booting.
For M1 Macs:
Press and hold Mac's power button until the startup window option appears on your screen.
Follow the guide below to erase Apple Silicon Mac or Intel Mac.
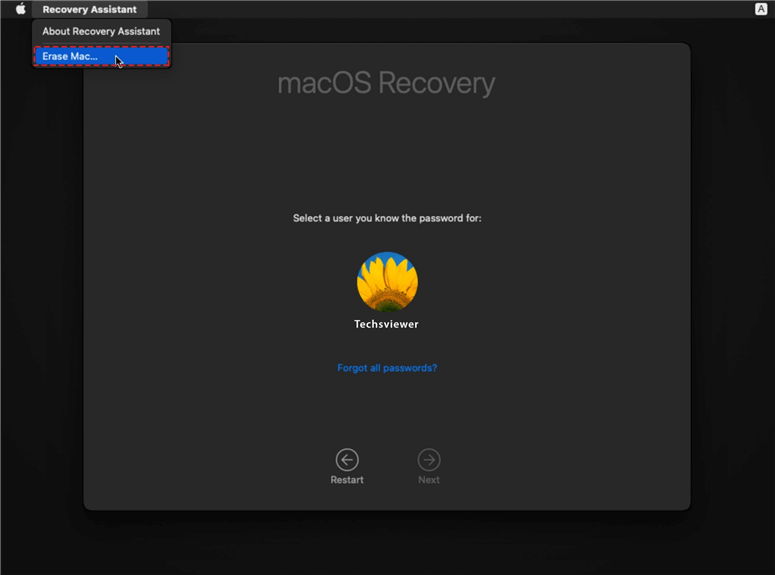
Step 1. Try entering the Recovery mode after hitting on the Options and Continue icons.
Step 2. After entering the Recovery Assistant mode, you'll need to select Erase Mac and tap the Continue icon.
With Intel Mac, you'll need to enable the FileVault icon to use the option ( System Preferences icon/Security icon & Privacy/File Vault).
Step 3. Now, you're in the macOS utility window. Next, you'll need to tap on the Reinstall macOS icon and follow the on-screen instructions to install the operating system again.
Permanently erase data on macOS Ventura using data eraser
Whether you delete your files or erase the hard drive using Disk Utility, the lost data is not lost forever, and can be recovered by data recovery software. If you want to permanently erase all your data before selling or donating a Mac, you can try data erasure software - such as DoYourData Super Eraser for Mac.
DoYourData Super Eraser for Mac
- Certified data erasure standards including U.S. Army AR380-19 (3 passes), DoD 5220.22-M ECE (7 passes).
- Three flexible data erasure modes: shred files, wipe hard drive, wipe free space.
- Once the data is erased, the data is gone forever, can't be recovered by any method.
The software can ensure to wipe data permanently and make sure the wiped data is no longer recoverable. The software adopt international data erasure algorithms to destroy data completely from hard drive. There are 3 modes available in the software to help you shred files or wipe drive data flexibly in different scenarios.
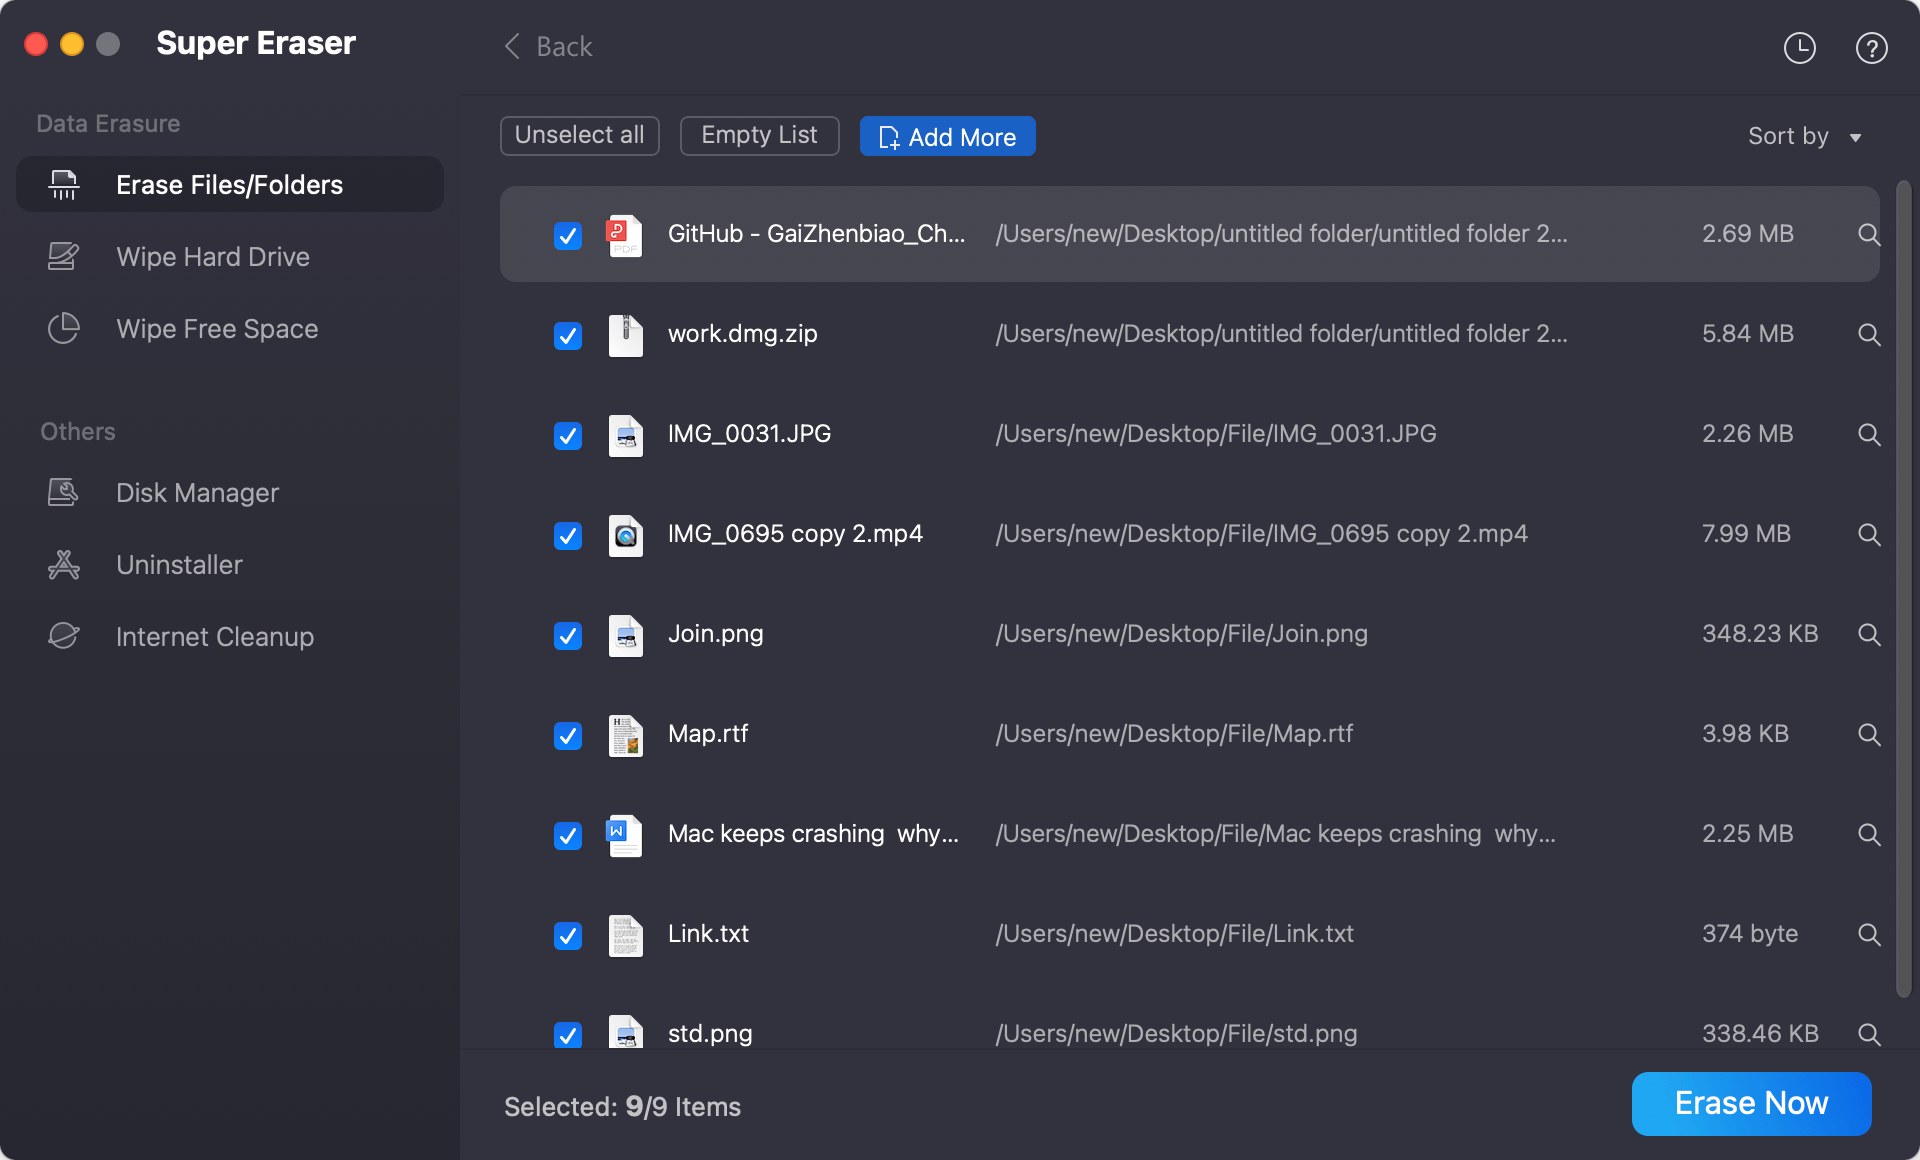
Mode 1. Erase Files/Folders.
Add files and folders to the erasure list. Then click on Erase Now button to securely and permanently erase the selected files and folders. This mode is useful when you only want to destroy some certain confidential or sensitive files from your computer or drive.
Mode 2. Wipe Hard Drive.
This mode will help you wipe all data from a hard drive. Make sure the hard drive is connected to your Mac and select it. Click on Wipe Now button to wipe all existing data and deleted/lost data on this hard drive. Be careful to check and select the right disk to wipe as the wiped data is unrecoverable in any way.
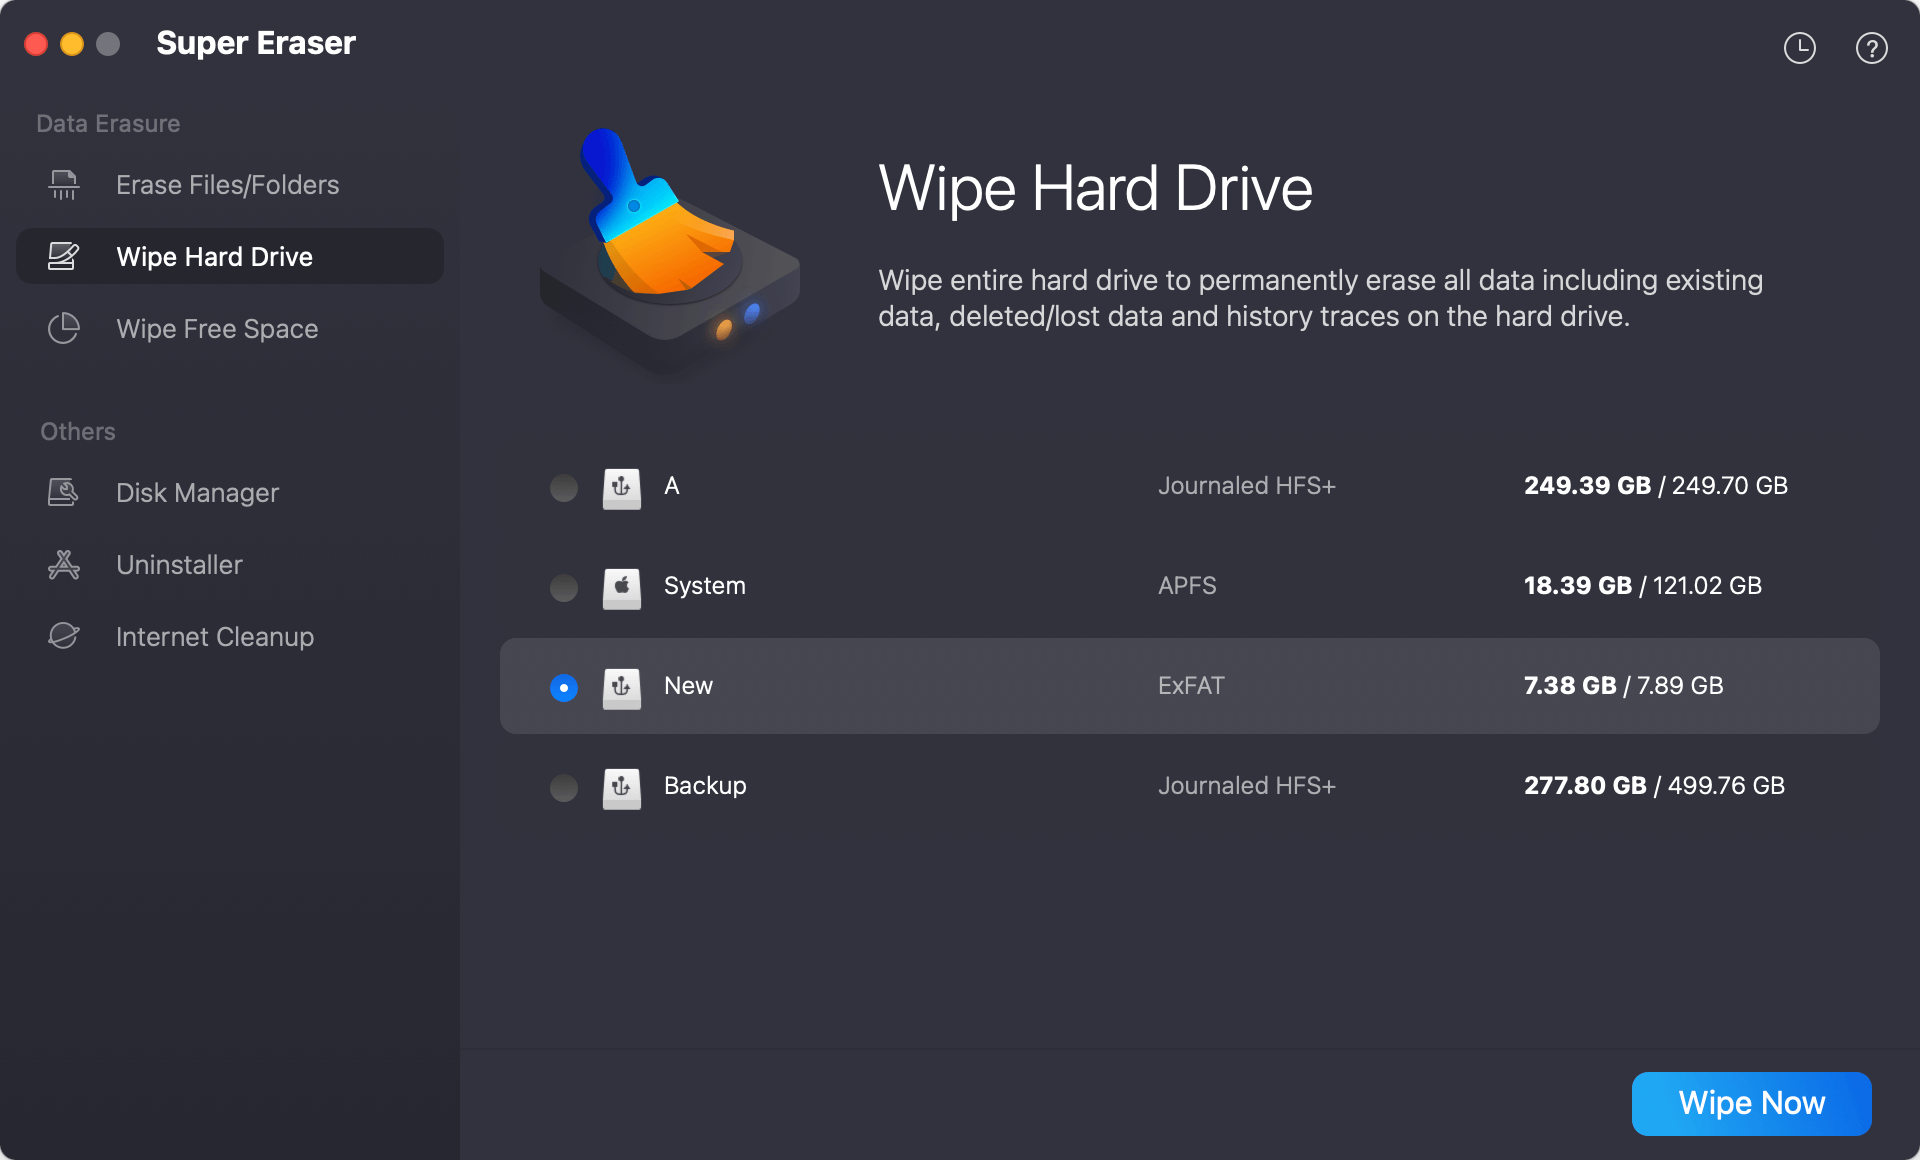
🚨 Note: This mode can't wipe the startup disk. If you want to permanently erase data on macOS Ventura's startup disk, check this guide: erase startup disk >>
Mode 3. Wipe Free Space.
It will wipe free disk space of your hard drive and permanently erase all deleted/lost data on the hard drive. It will not affect the existing data on the hard drive. If you have deleted some sensitive or private data and want to ensure the data is no longer recoverable, this mode can help you.

Conclusion:
Erase data or hard drive is a good way to protect your privacy information. In some cases, it's necessary to erase the hard drive on macOS Ventura. Before you wipe the drive, ensure to check and back up the needed data to a safe place to avoid data loss.
To wipe data from drive under macOS Ventura, you can use the macOS built-in feature first. It will be sure to remove all the data from the drive. After that you can reinstall the macOS and get a new fresh copy of macOS Ventura.
If you also need to ensure the removed data is completely gone for good, use the professional data wiping tool DoYourData Super Eraser for Mac to wipe the free space of the drive. It can guarantee the removed data on the drive is permanently wiped.
DoYourData Super Eraser for Mac
DoYourData Super Eraser for Mac is a 100% safe, powerful and easy-to-use data erasure program. It offers certified data erasure standards including Peter Gutmann, U.S. Army AR380-19, DoD 5220.22-M ECE to permanently erase data from Macs and external devices, making data recovery be impossible.
Written & Updated by Shirly Chen
Shirly Chen has been writing data recovery, data erasure articles for DoYourData over 4 years. She has been working as a professional website content writer & editor for quite a long time. She also writes articles about disk clone, Mac optimization, disk backup, etc.