Quick Navigation:
- Why Format APFS for Windows?
- Format APFS Hard Drive for Windows on Mac
- Format APFS Hard Drive for Windows on Windows PC
- Recover Lost Data after Formatting APFS Hard Drive for Windows
- Conclusion
Users often encounter a confusing problem when they try to move between the Apple and Windows worlds: the APFS hard drive compatibility puzzle. You have important files on your cool Mac, but your trusty Windows PC is missing. Do not be afraid! We will help you figure out how to move your info easily between these two tech worlds in this guide.
It works like a friendly translator for your hard drive, ensuring it can easily talk to both macOS and Windows. So, come with us on an easy-to-use journey as we learn how to format your APFS hard drive for Windows. In the world of technology, no device should be left alone.
Why Format APFS for Windows?
Both the New Technology File System (NTFS) and the Extended File Allocation Table (exFAT) are the prevalent file systems used by Windows. However, neither of them natively supports APFS. Therefore, an APFS-formatted disk is useless because Windows machines do not provide limited or no access when connecting such a drive. Users can format their APFS disks to a file system compatible with macOS and Windows as a workaround. It will ensure flawless cross-platform compatibility.
Choosing the Right File System:
Decide on a file system before you format an APFS drive to use Windows. ExFAT and FAT32 are the two most promising file systems among the available solutions, you also can format APFS drive to NTFS so that you can use the drive on your Windows PC.
exFAT:
- One up-to-date file system is exFAT, which stands for Extended File Allocation Table, and Microsoft created it.
- It works with huge files and partitions. Therefore, it's good for USB devices made for Windows and macOS.
- Anyone working with files bigger than 4 GB should use exFAT.
FAT32:
- The older FAT32 is a safe bet for both macOS and Windows regarding file system compatibility.
- Nevertheless, there are certain restrictions, such as a 4 GB limit on files and a 32 GB limit on partitions.
- Despite these limitations, FAT32 is still a viable choice for smaller drives that don't have very high storage requirements.
NTFS:
- NTFS, which stands for NT file system and the New Technology File System, is the native file system of Windows.
- No file size or storage size limitation.
- Only works on Windows operating systems.
Format APFS Hard Drive for Windows on Mac
- Connect to macOS:
Use a dependable USB or Thunderbolt cable to link your APFS hard drive to your macOS device. That will ensure a consistent connection. You may check if the Drive is recognized by checking the System Information or Disk Utility. It will verify the connection. - Open Disk Utility:
Start by launching the Finder on your macOS device. From there, go to "Applications" and select "Utilities." First, open "Disk Utility." Spotlight Search is another option; press Command + Space and type "Disk Utility." - Select APFS Drive:
Disk Utility lists all the disks and volumes attached to the computer on the left sidebar. To proceed, locate the Drive formatted with APFS and click on it. - Click on Erase:
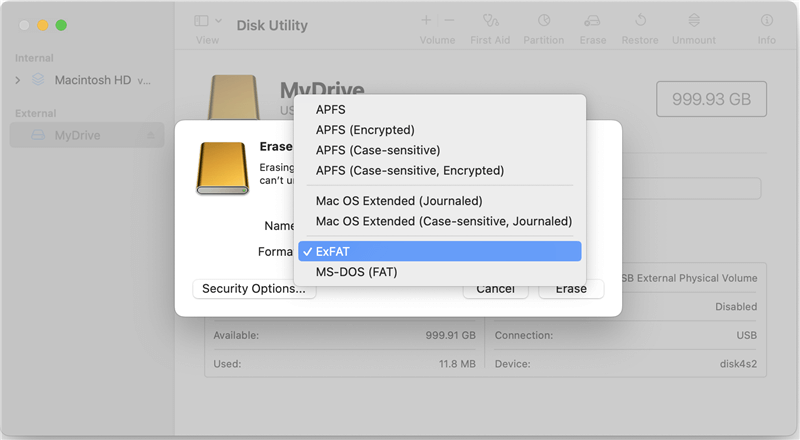
Concentrate on the Disk Utility window's toolbar while selecting your APFS drive. Initiate the formatting process by finding and clicking the "Erase" button. - Choose File System:
Formatting options will be shown in the Erase window. Carefully select "exFAT" or "FAT32" from the "Format" dropdown menu according to your requirements. Think about the amount of your files and your storage needs in general, and make mental notes of the benefits and drawbacks of each file system. - Enter Drive Name:
Below the formatting options is a field called "Name." Give your road a name that stands out and is easy to remember. For macOS and Windows to recognize your Drive, this name is essential. - Click "Erase":
Click the "Erase" button once you've named the Drive and chosen the file system. A confirmation box will update the formatting, asking for your express confirmation. - Wait for Completion:
A progress bar will show the ongoing state as the formatting process begins. The longer it takes depends on variables like your hard Drive's capacity and speed. Do not disconnect or take any more action until the process is finished. - Eject the Drive:
When formatting is complete, ejecting the Drive securely from the macOS system is necessary. Using the eject button in Disk Utility or right-clicking on the drive icon and choosing "Eject" will accomplish this. - Connect to Windows:
After formatting, use the correct connector to connect the newly formatted disk to your Windows computer. Assuming Windows detects the disk quickly, reading and writing should be a breeze.
Note: If you want to format the APFS drive to NTFS, just try NTFS for Mac tool, it will help you securely and quickly format an APFS drive to NTFS.
Format APFS Hard Drive for Windows on Windows PC
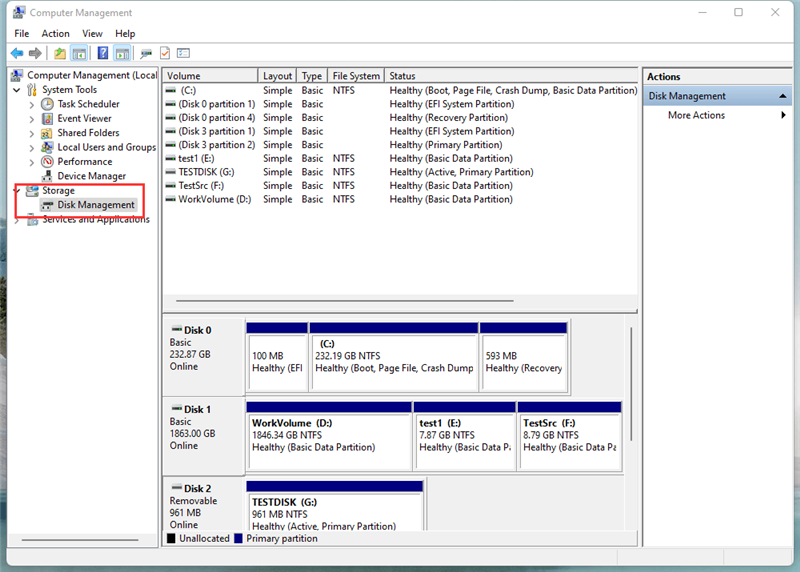
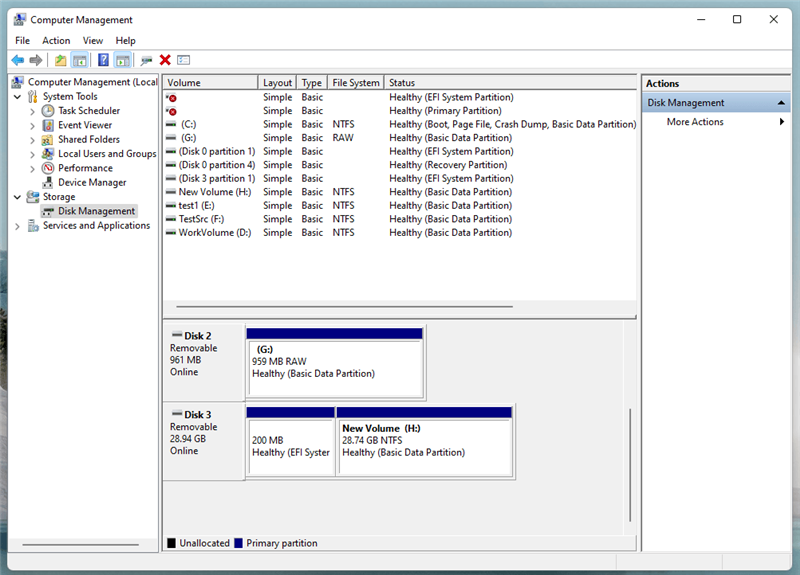
Step 1. Right-click This PC, choose Manage, then open Computer Management > Click Disk Management, then it lists all hard drives.
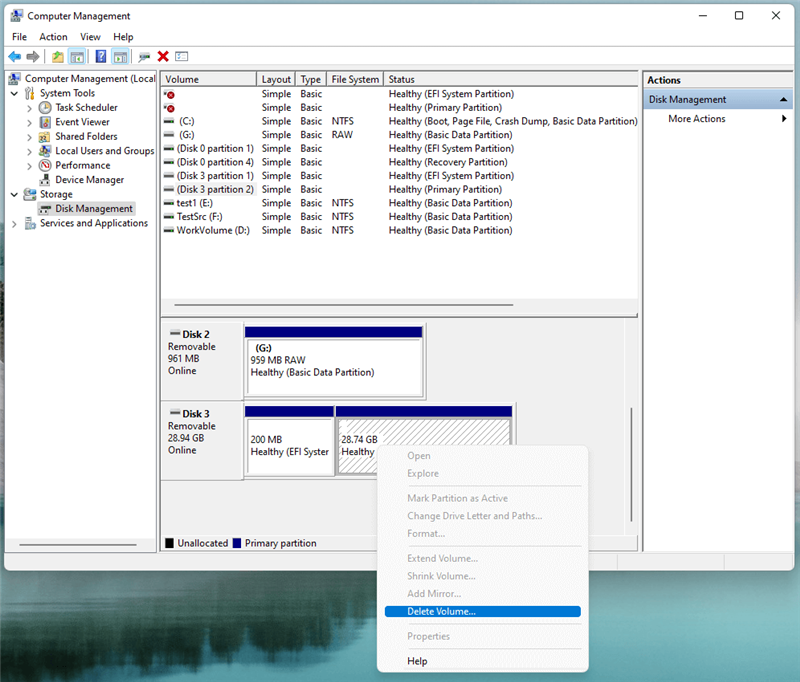
Step 2. Find the APFS hard drive, right-click it and choose Delete Volume.
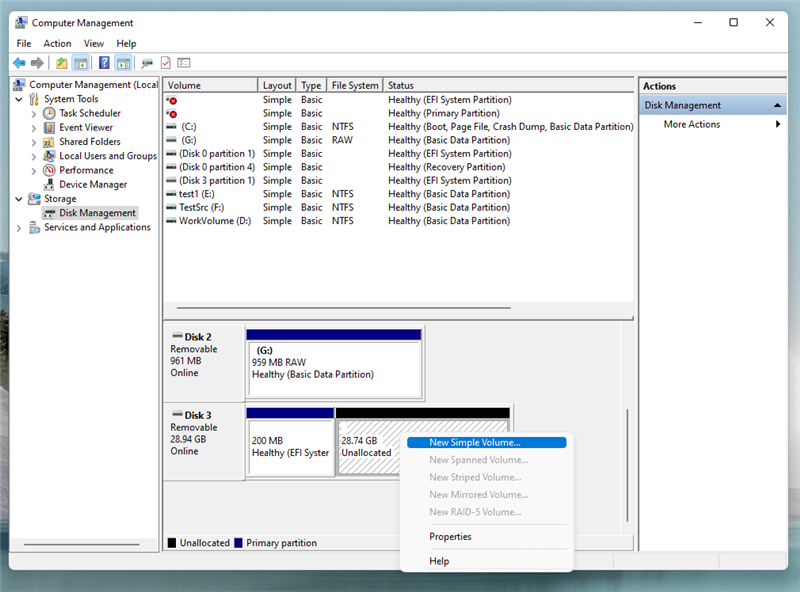
Step 3. After deleting volume, right-click the drive again, then choose New Simple Volume to create a NTFS or ExFAT volume on the drive.
Step 4. Close Disk Management, then open This PC to check if you can see the drive.
Recover Lost Data after Formatting APFS Hard Drive for Windows
If you lost data due to formatting the APFS hard drive to NTFS/ExFAT, you can use a data recovery tool to help you unformat the drive and get all lost data back.
Step 1. Download and install the reliable data recovery program - Do Your Data Recovery on your computer.
Step 2. Open Do Your Data Recovery, select the formatted drive to start data recovery.
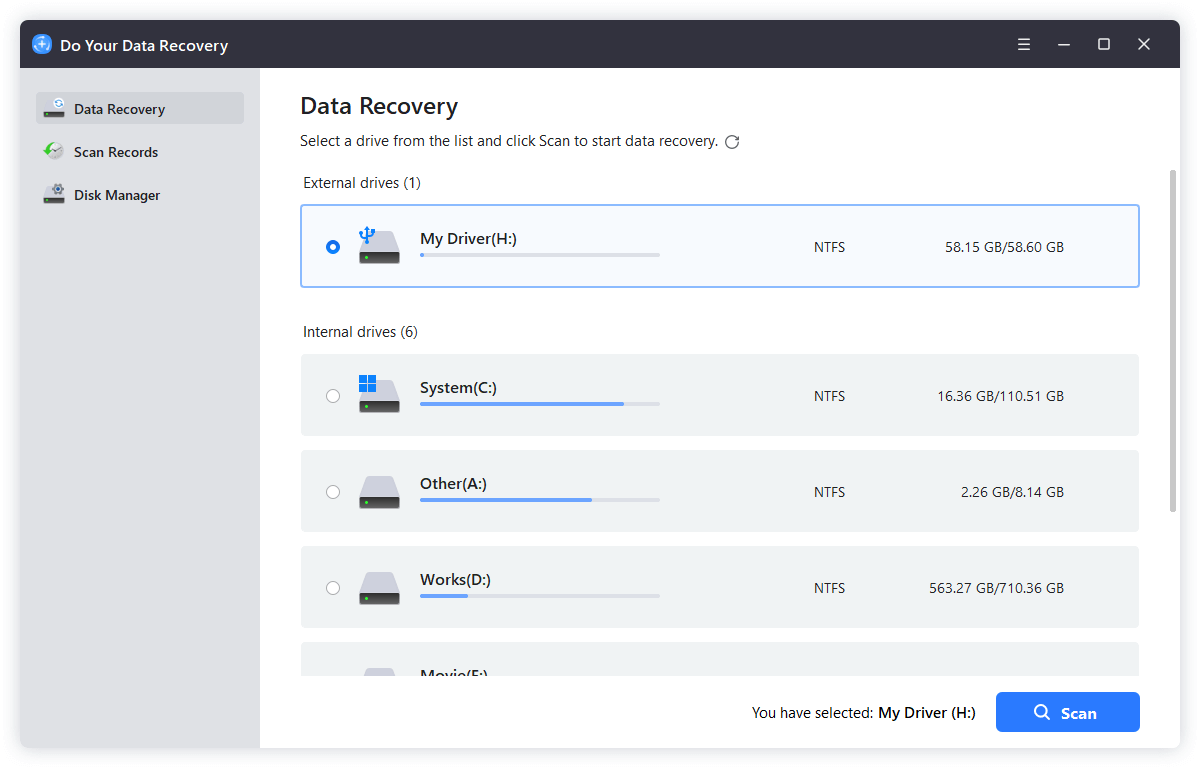
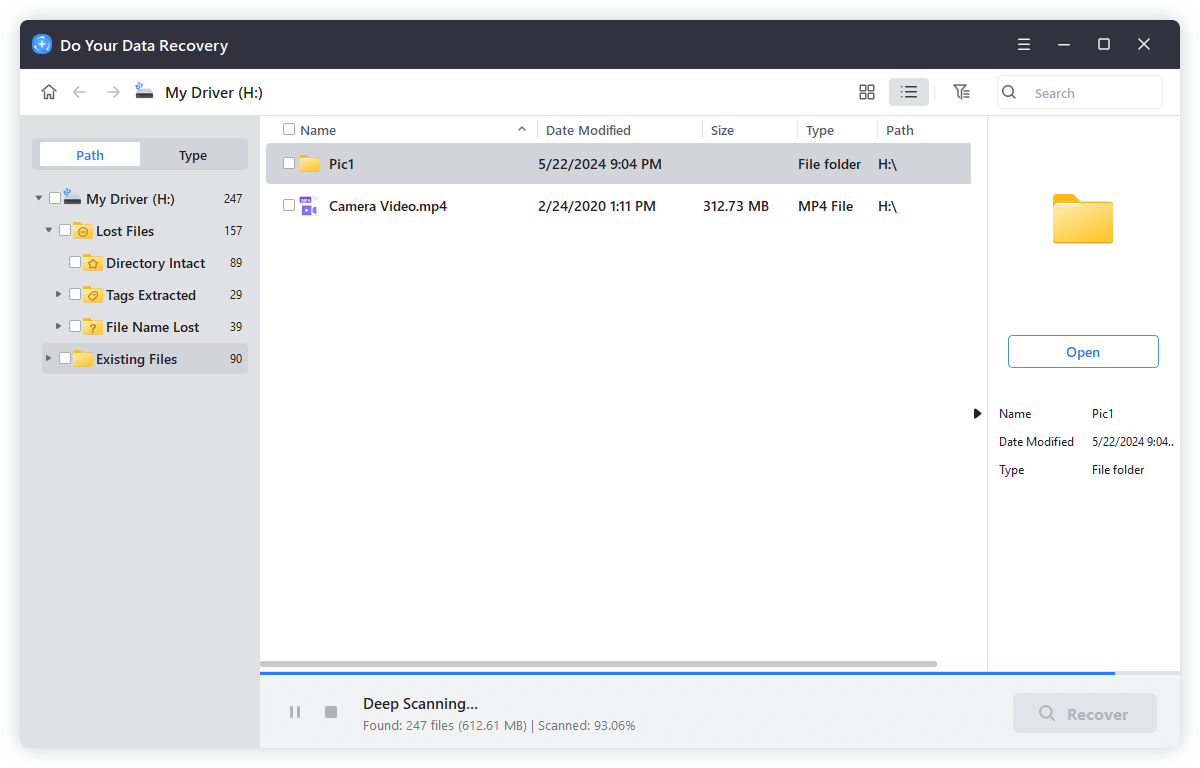
Step 3. Click on Scan button to deeply scan the formatted drive.
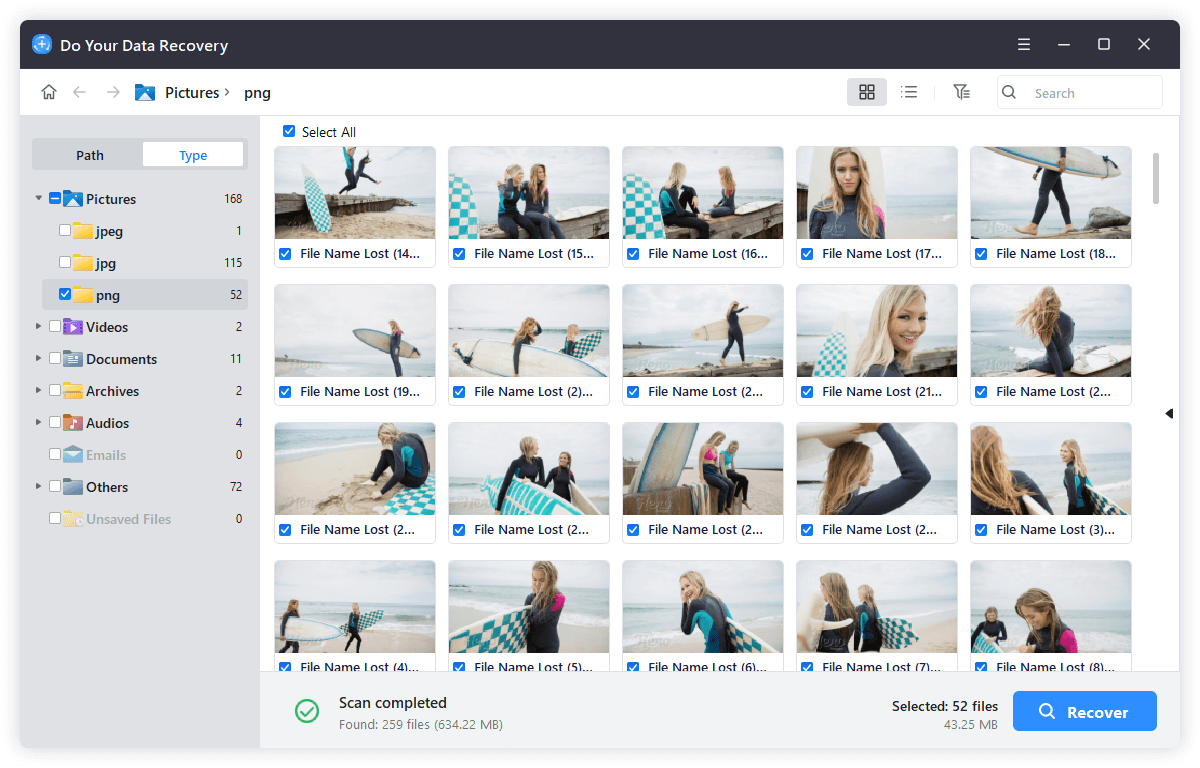
Step 4. Once the scan is completed, select the files you want to recover and click on Recover button to save them.
Conclusion:
Making macOS and Windows work together is important in the fast-paced world of technology, where people often use multiple operating systems. Formatting an APFS hard drive for Windows lets users move and view data without problems on various platforms. By learning the details of APFS and following an organized formatting process, people can confidently and easily navigate the complicated world of cross-platform compatibility.
DoYourData NTFS for Mac is an easy-to-use disk management tool. This tool can help you force format an APFS hard drive to NTFS on Mac. If you only need to use the hard drive on Windows PC, just format it to NTFS, otherwise, format it to ExFAT or FAT32.
Written & Updated by Ricky Lin
Ricky Lin is an senior editor of DoYourData who lives in Adelaide, Australia. He is interested in writing technology articles related with data recovery, computer issue fixes, disk clone, iPhone data recovery, video edit, Mac optimization, etc. He Joined DoYourData in 2019 and have written 500+ articles to help both Windows users and Mac users to solve data or computer problems.