How to Format A HDD or SSD on Windows 11?
![]() Ricky Lin updated on May 22, 2024
Ricky Lin updated on May 22, 2024
Quick Navigation:
- Understanding Formatting
- Precautions Before Formatting
- How to Format HDD or SSD in Windows 11?
- How to Unformat HDD/SSD on Windows 11?
- How to Wipe HDD/SSD on Windows 11?
- Conclusion
Your computer's performance depends on how well you store data. Solid-state and hard disk drives (HDDs) are the main ways you store your files, operating systems, and programs. But sometimes, you need a fresh start. Formatting a drive eliminates all the data and makes it ready for new use, which has several benefits.
This complete guide for Windows 11 users allows you to format HDDs and SSDs. It provides the information and steps you need to safely erase data from a drive before selling it, prepare for a fresh installation of Windows 11, or fix drive problems.
Before we start, we'll ensure you understand HDDs and SSDs and what makes them different. This will ensure that you consider the right things for your drive type when you format. We'll also walk you through a pre-formatting plan to ensure the process goes smoothly.
Understanding Formatting:
Before getting into the formatting details on Windows 11, it's important to understand what formatting means. Formatting means making a file system and removing any current data structures from a storage device so that it is ready to store data. This step is needed to set up a new drive, fix problems with a disk, or delete data for privacy or security reasons.
You can choose from different file systems when formatting a drive. Each has its features and is compatible with different types of files. For both internal and external drives, Windows mostly uses the NTFS (New Technology File System) and exFAT (Extended File Allocation Table) file systems. NTFS is good for most situations because it has strong security features, can handle big files, and uses storage space well. ExFAT, on the other hand, works better with other operating systems and is best for portable storage devices like USB files.
Precautions Before Formatting:
- Backup Important Data: Ensure you have a copy of any important data on the Drive before cleaning it. Since formatting will eliminate all the data on the Drive, it's important to make backups to avoid losing information.
- Look at the Drive's health: Check the Drive's health with disk monitoring tools. If the Drive is physically failing, resetting might not fix the problem. You should get help from a professional.
How to Format HDD or SSD in Windows 11?
Formatting Methods in Windows 11. In Windows 11, there are ways to format a drive:
Method 1: Using File Explorer
Step 1. Open File Explorer, click This PC.
Step 2. Find the drive you want to format, then right-click it, choose Format.
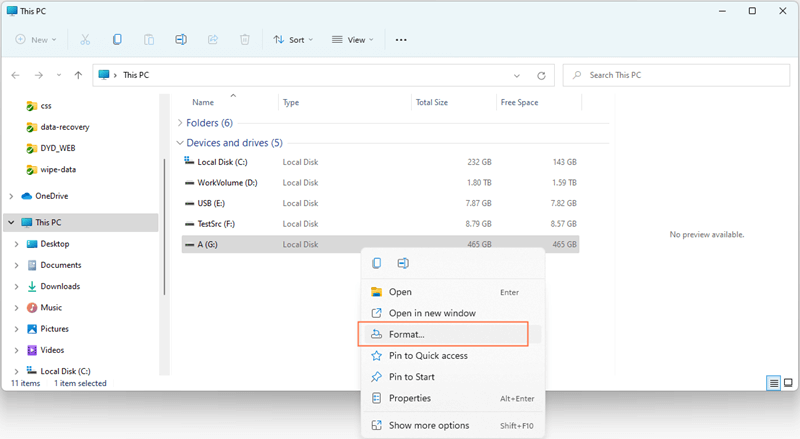
Step 3. Select a file system, such as ExFAT, NTFS, then click Start to format the drive.
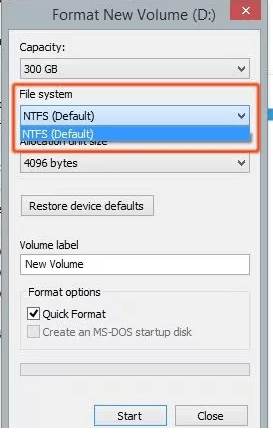
A new window called "Format" will show up. That is what each choice means:
- Capacity: Shows how much space the Drive has available.
- File system: Pick the file system you want to use for styling. NTFS is better for security and handling large files than the older FAT32 format, so it is suggested for new Windows installations. ExFAT is compatible with Windows OS and macOS.
- Allocation unit size: This tells the Drive what size cluster to use. The usual choice is good for most situations. However, a larger allocation unit size can slightly improve speed for drives bigger than 1 TB.
- Volume label: You can give that name the saved Drive if you want to.
Quick Format:
Picks a faster formatting method that eliminates the file system table without erasing all the data sectors. It's not a good idea to safely delete info.
Perform a quick format:
If you choose "Quick Format," check this box. If not, don't check it and do a full reset, which overwrites data sectors for better security but takes longer.
After reviewing the choices, click "Start" to begin formatting. A confirmation box may appear. Click "OK" to proceed.
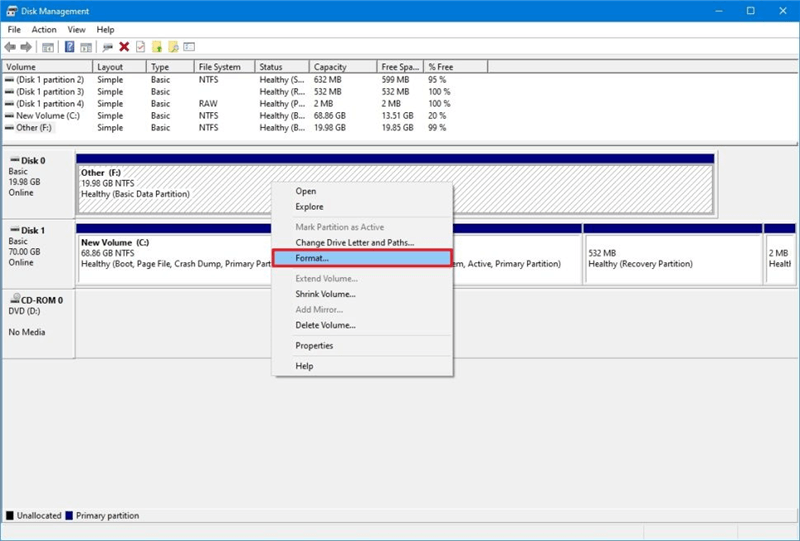
Method 2: Using Disk Management
Use the Windows search bar for "Disk Management" and choose the result.
- Open Disk Management, choose the drive you want to format.
- Right-click the drive, choose Format.
- Select a file system, then format the drive.
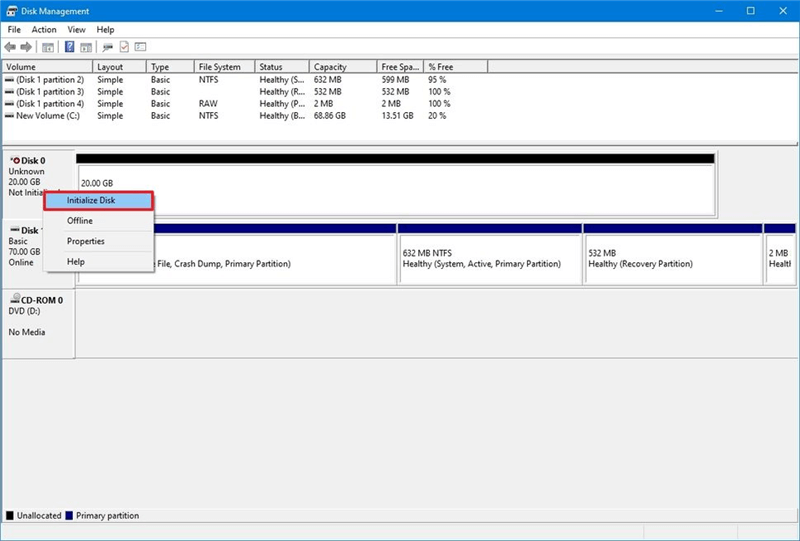
Initialize the Drive (if necessary):
- You'll need to start the drive before you can format it if it's brand new or unused.
- To initialize the drive, right-click on its name and choose "Initialize Disk."
- You can select the partition style you want (MBR or GPT) and click "OK" to set up the disk.
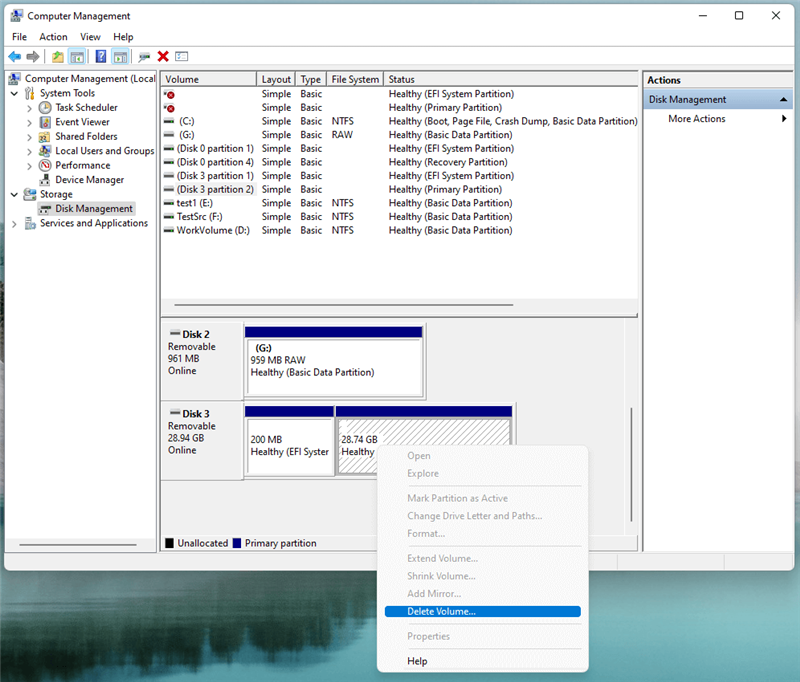
Delete Existing Partitions (if necessary):
You must delete any current partitions on the drive before formatting it.
Pick out each section and right-click on it. Then, choose "Delete Volume." When asked, confirm the move.
Create New Volume:
After setting up the Drive and removing any partitions, right-click on the space and choose "New Simple Volume."
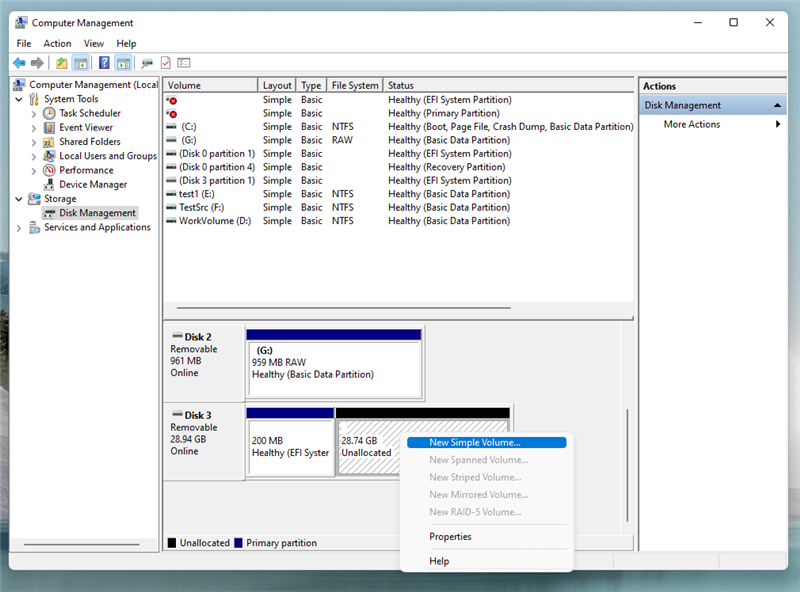
To set the volume size, give a drive letter, pick a file system (usually NTFS for Windows), and follow the on-screen prompts in the New Simple Volume Wizard. You can add a volume mark and do a quick format. After editing, click "Finish" to finish.
- Confirm Formatting: Windows will show you a message telling you that formatting the Drive will delete all of its files. Make sure you pick the right Drive twice before moving on. Click "OK" to confirm and start the editing process.
- Formatting Progress: If the Drive is big or fast, Windows may start cleaning it immediately. That could take a while. You can see how the cleaning is going in the Disk Management window or the progress dialog box.
- Completion: You'll get a message that the process was successful once the formatting is done. Now that the Drive has been formatted, it will appear in Disk Management as "healthy" and ready to use.
How to Unformat HDD/SSD on Windows 11?
If you have lost data due to formatting the HDD or SSD on Windows 11, you can use a data recovery program to scan the formatted HDD/SSD and find all lost files.
Step 1. Download and install the powerful Windows 11 data recovery program - Do Your Data Recovery. Then open it.
Step 2. Open Do Your Data Recovery, then select the formatted HDD or SSD to start data recovery.
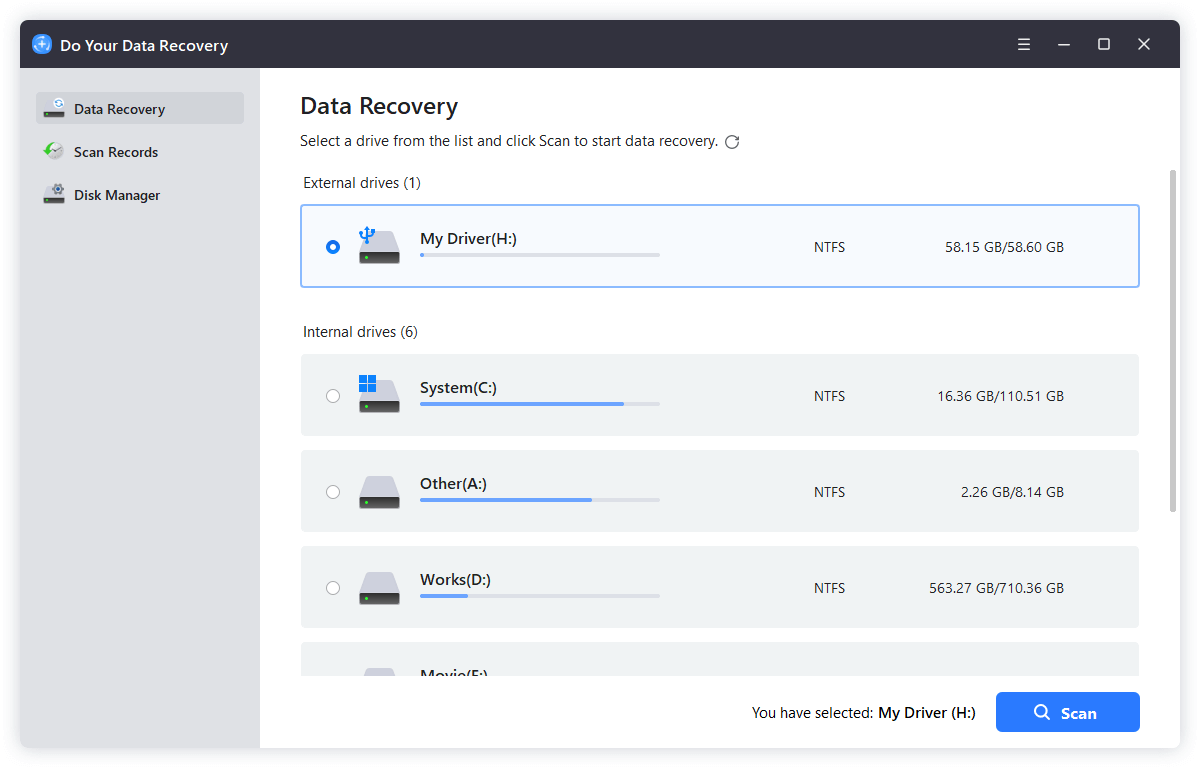
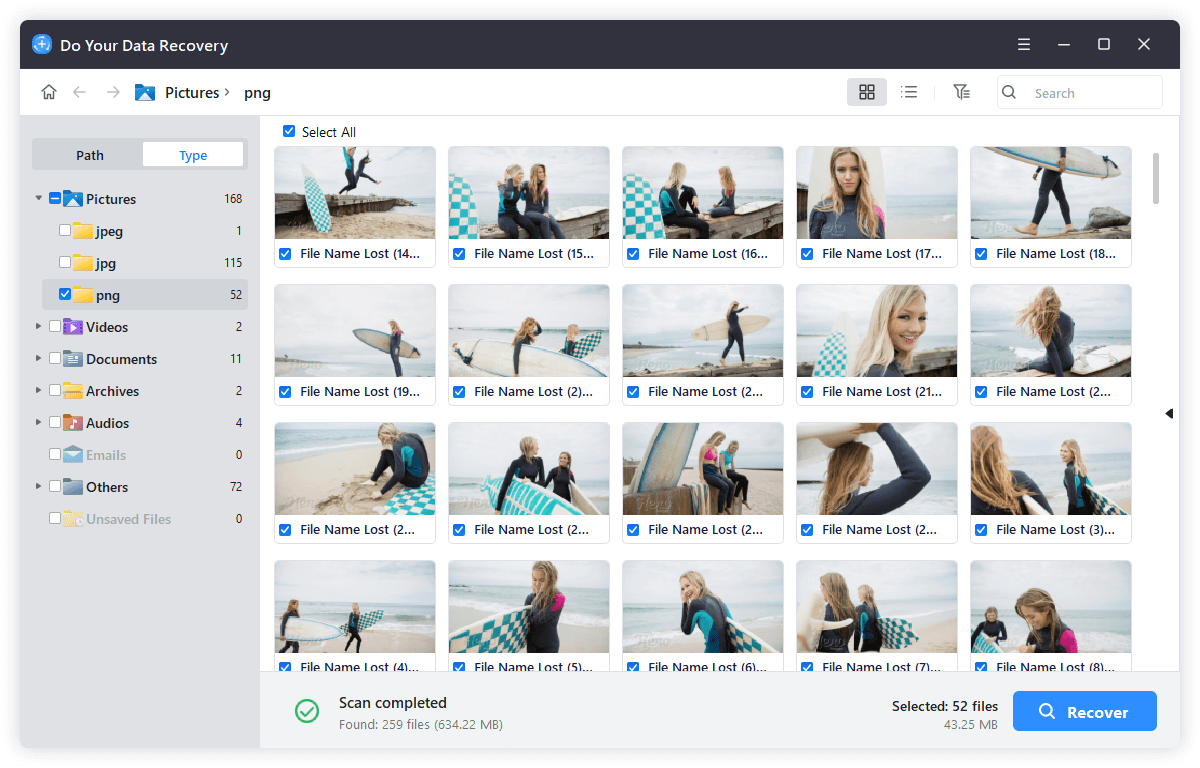
Step 3. Click on Scan button to deeply scan the drive and find all recoverable files.
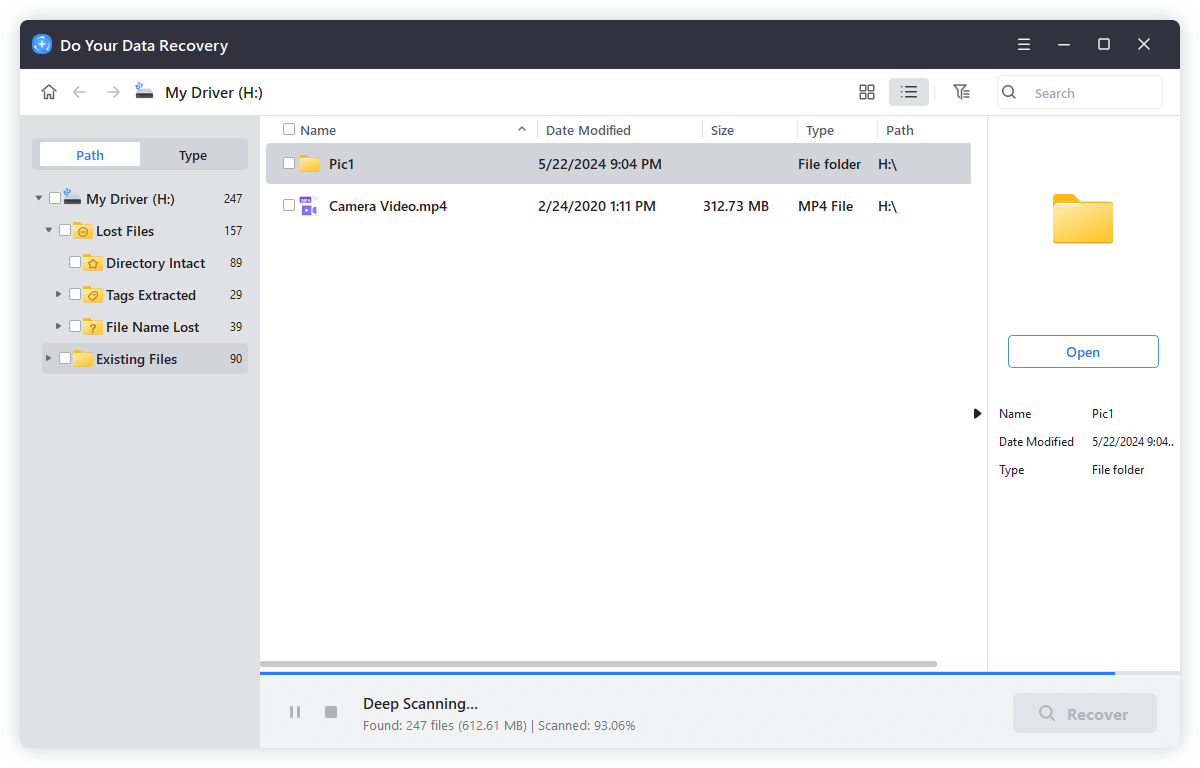
Step 4. Once the scan is completed, you can preview all recoverable files. Then select the wanted files and save them by clicking on Recover button.
How to Wipe HDD/SSD on Windows 11?
Before you sell or donate your HDD/SSD, you’d better wipe the HDD/SSD to permanently erase all data from it. DoYourData Super Eraser, the reliable data erasure software, can help you securely format & wipe the HDD/SSD to prevent potential data recovery.
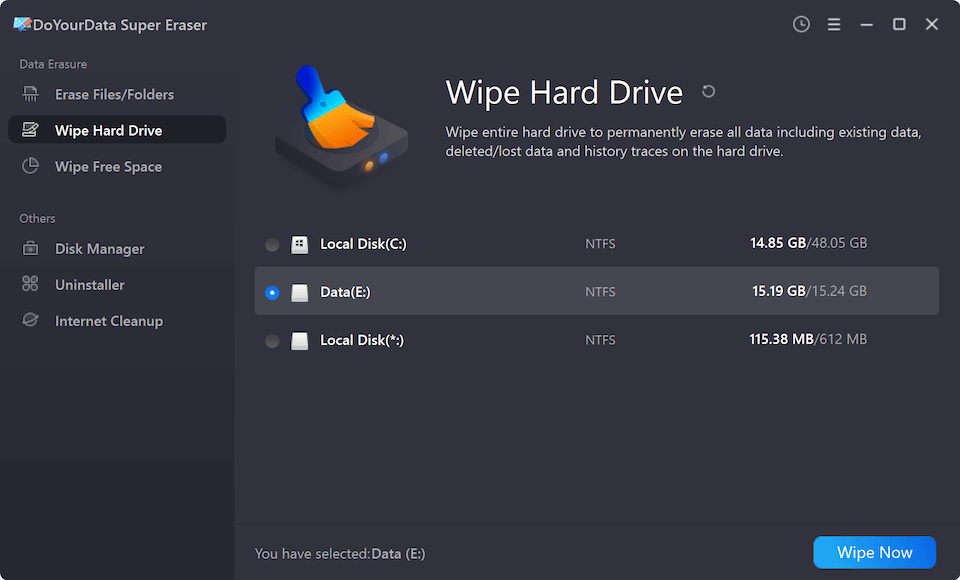
Step 1. Download and install DoYourData Super Eraser on your computer.
DoYourData Super Eraser
- Permanently erase all data from the HDD/SSD.
- Wipe HDD/SSD, memory card, USB drive on Windows 11.
- Once the data is erased, the data is lost for good, cannot be recovered by any method.
Step 2. Open DoYourData Super Eraser, choose Wipe Hard Drive mode, then select the HDD or SSD, click on Wipe Now button to securely and permanently erase all data from the drive.
Conclusion:
Formatting an HDD or SSD on Windows 11 is easy and can be done with the Disk Management tool that comes with the OS. By carefully following the above step-by-step guide, you can safely format your drives to get them ready for use or fix problems with them.
Before you format, back up any important data. Also, double-check your work to ensure you're working with the right drive. Now that you know these tips, you'll be able to handle your storage devices well on Windows 11.
If you will sell, donate or dispose of an old HDD/SSD, you can use data erasure program - DoYourData Super Eraser to wipe the HDD/SSD and permanently erase all data from it. Once the data stored on the HDD/SSD is erased by DoYourData Super Eraser, the data is lost permanently, cannot be recovered by any method.
Written & Updated by Ricky Lin
Ricky Lin is an senior editor of DoYourData who lives in Adelaide, Australia. He is interested in writing technology articles related with data recovery, computer issue fixes, disk clone, iPhone data recovery, video edit, Mac optimization, etc. He Joined DoYourData in 2019 and have written 500+ articles to help both Windows users and Mac users to solve data or computer problems.
Hot Articles
- Best Free Data Recovery Software Review
- Best Data Erasure Software Review
- Best Disk Cloning Software Review
- Fix External Hard Drive Not Showing Up on Mac
- Fix RAW External Hard Drive
- Reset A M1 Mac to Factory Settings
- How to Back Up Mac Data
- Uninstall Apps on Mac
- Install Windows-style Start Menu on Mac
- Fix iMac Black Screen and Fix iMac Boot Issue