How to Clone Windows 11 to An SSD?
To speed up the PC or update the old drive with a new SSD, you can move Windows 11 to an SSD. It can improve the computer performance and make the PC run faster. By following this guide, you can smoothly clone Windows 11 to an SSD with DoYourClone.
![]() Updated by Darren on February 17, 2025
Updated by Darren on February 17, 2025
Quick Navigation:
- Prerequisites
- How Do You Clone HDD to SSD in Windows 11?
- Adding Final Touches to your SSD
- Conclusion:
- FAQs about Cloning Windows 11 to SSD
If your primary PC storage is still a hard disk, replacing it with a solid-state drive is the most significant speed gain you can give your system (SSD).
Although SSDs are more expensive per gigabyte, they often provide significantly superior performance. When you initially boot the PC, Windows 11 should load substantially faster, and programs should launch instantly.
This page describes how simple it is to clone a hard disc to an SSD in Windows 11 without losing any data. You don't need to reinstall the operating system if it's an OS drive.
Go here for a simple way to Clone HDD to SSD in Windows 11. Let's get started by following this link:
Prerequisites
Before you begin transferring Windows 11 to SSD, you must first prepare. These are their names:
- Format the SSD (take a backup if needed).
- Ascertain that your SSD is connected to your PC/laptop, whether through a USB to SATA adapter or in a disc bay within your cabinet (for desktop PCs).
- Check that the SSD drive is listed in This PC's Devices & drives section.
- Get the trusted disk cloning software which is compatible with SSD and Windows 11.
How Do You Clone HDD to SSD in Windows 11?
What comes to mind when considering upgrading a computer's hard drive? Here are two typical questions, one of which you may be thinking about right now:
1. How do I make my present hard drive bootable by cloning it to my SSD?
2. What are the tools required for HDD to SSD cloning in Windows 11?
You can replicate everything on your hard drive to the new SSD as long as the SSD has the same or greater storage capacity than the utilized space on the previous hard drive.
If you follow the steps in this guide, you will be able to successfully upgrade your hard drive to an SSD on your computer on Windows 11:
Download and Install Windows 11 Hard Drive Cloning Software
Other complicated disk cloning software options are available online; however, we prefer DoYourClone. It's a safe, easy-to-use and powerful disk cloning program.
DoYourClone - Best Disk Cloning Software
- Clone HDD, SSD and external device on Windows 11.
- Clone Windows 11 to SSD and make it be bootable.
- 100% safe and easy to use.
Why choose this tool to clone Windows 11 to SSD? The software is reliable and professional tool to clone drive in different scenarios. It's fully compatible with Windows 11 and can ensure to create bootable copy of the system. Also, the software can optimize the SSD while cloning the OS to ensure it will run normally with the best performance.
By cloning the Windows 11 to SSD with DoYourClone, all the system data, boot information, installed programs, system and application settings and personal data will be fully cloned. It can guarantee to create a full and bootable copy of Windows 11.
Install and Initialize New SSD in Windows 11
If you intend to clone the hard drive to a used SSD, you can skip this section and proceed directly to Guide 3 to begin the disk cloning method.
However, if you intend to utilize a new SSD, please ensure that you successfully install it and initialize it using the following steps:
Step 1: Using a screwdriver, open the computer case.
Step 2: Insert your SSD into your PC.
Connect a SATA SSD to the computer using a power cable and a SATA cable. Insert an M.2/NVMe SSD into the SSD slot and secure it with its screws.
Step 3: Close the computer case and restart the machine.
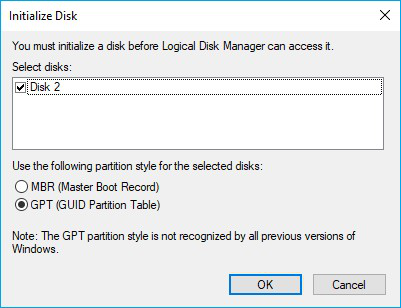
Step 4: When Windows 11 starts, press the Windows + R keys together and type diskmgmt.MSC and press Enter to launch Disk Management.
Step 5: Right-click the new SSD, choose Initialize Disk and then select MBR or GPT as the disk type.
It is important to note that the disk type on your SSD should be the same as the disc type on your source hard drive. Set the type to GPT if the source hard drive is installed with Windows 11.
Clone Windows 11 to SSD and Make It Bootable
You may now clone a Windows 11 disk to an SSD. The following procedure is carried out with the assistance of the DoYourClone:
1. Clone Windows 11 disk to SSD
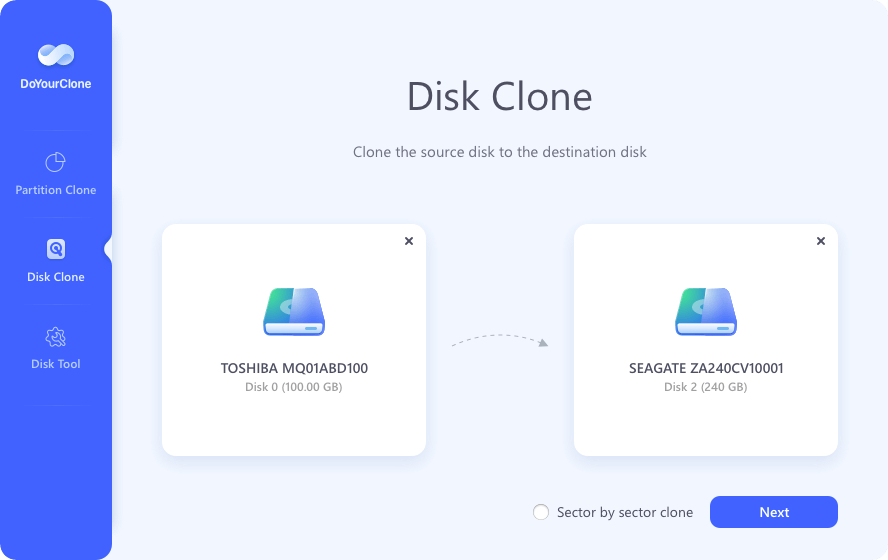
Step 1: Open DoYourClone, choose Disk Clone mode. Select the Windows 11 disk as the source disk and select the SSD as the destination disk.
Step 2: Move to the next step to edit the layout. Tick "Check the option if the destination is SSD."
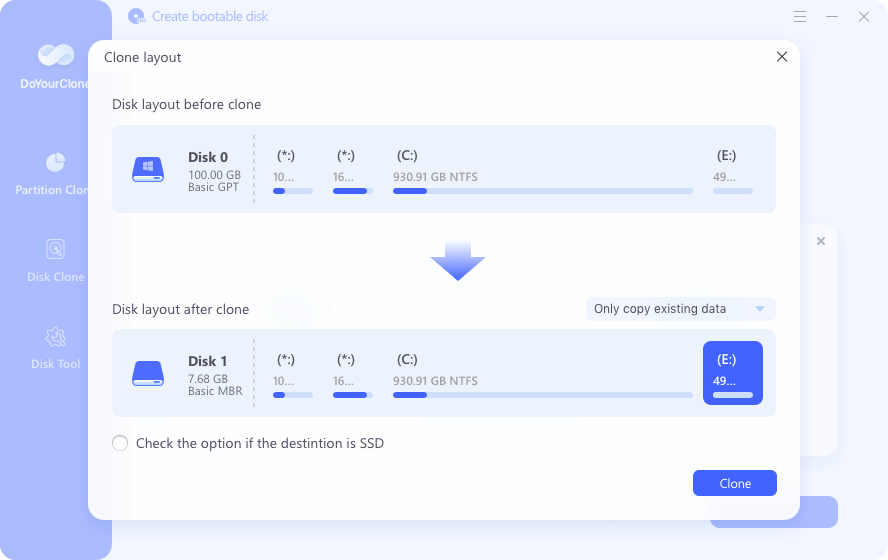
Step 3: At last, click on Clone button. The software will start to clone the Windows 11 to the selected SSD. It may take a while depending on the size of the Windows 11 drive.
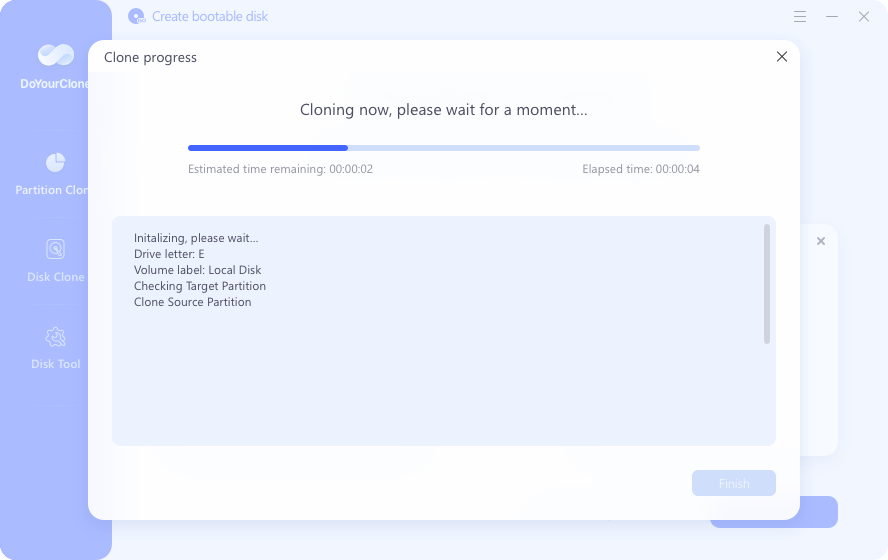
Then this software will securely clone Windows 11 OS to the SSD. It will also clone the installed programs, personal system settings and files. Also, the cloned SSD will be bootable.
2. Make Cloned SSD Bootable in Windows 11
If the old hard drive holding your operating system – Windows 11 – you must perform the following procedures to make the freshly copied SSD bootable:
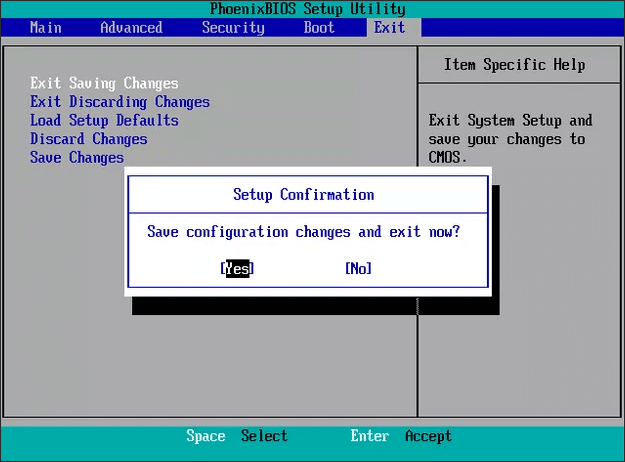
Step 1: Restart the computer and enter BIOS by pressing Del (or any other keys, like F2, F10, etc.).
Step 2: Navigate to the Boot Menu and choose the new SSD as the boot disk in the Boot Priority area.
Step 3: Hit F10 to save all of your changes and restart your computer. After that, Windows 11 will successfully boot from the new SSD.
Adding Final Touches to your SSD
The TRIM feature in Windows 11 notifies an SSD of which data blocks are no longer in use and can be safely cleaned off to become writable again.This should increase SSD performance because it won't have to spend time deleting a precise block when space is needed to keep new data.
Open Command Prompt to see if TRIM is activated on your Windows 11 PC. Then, after typing the following, press "Enter": DisableDeleteNotify is a fsutil behavior query. If the result is zero (0), it signifies that TRIM is activated and no further action is necessary. If not, continue reading.
How to enable TRIM in Windows 11?
Enter fsutil behavior set DisableDeleteNotify 0 into Command Prompt, then press Enter. To disable TRIM, replace the "0" at the end of the command with a "1," then press Enter.
To disable defragmentation, go to the Start Menu. To open the Disk Defragmenter, type dfrgui in the run box. Click the Schedule button, then the Select Disks button. Click OK after unchecking your SSD (which should be your C: disk).
Conclusion:
This page contains a comprehensive and easy-to-follow guide for cloning an HDD to an SSD without encountering boot troubles with Windows 11. It's needed to back up the data on SSD if there are important files. Then use the reliable disk clone tool to create a bootable copy of Windows 11 on SSD.
If you are a newbie, you can use DoYourClone to update your computer disk to a new SSD completely. Cloning HDD to SSD in Windows 11 Is Easy; You Can Upgrade Your Disk Now. Aside from disc cloning, you can use this software to clean up your old drive before selling or reusing it.
FAQs about Cloning Windows 11 to SSD
1. Why you need to clone Windows 11 to SSD?
In the following situations, you may want to clone Windows 11 to SSD:
- Clone the Windows 11 with all needed programs as a fully backup.
- Update the old HDD to SSD to improve the computer performance.
- Clone the failing Windows 11 system drive with the SSD to save data.
- Move Windows 11 to another computer without reinstalling OS.
2. The best clone software for Windows 11 and SSD.
- DoYourClone.
- Donemax Disk Clone.
- AweClone
- MiniTool Partition Wizard
- Clonezilla
3. Steps to clone Windows 11 to SSD.
To clone Windows 11 to SSD with DoYourClone, here are the simple steps:
- Download and install the software on your computer.
- Connect the SSD to the computer and start the program.
- Select the Windows 11 system drive as source and SSD as destination.
- Start to clone the drive.
4. If the cloned drive cannot boot, how to fix?
First, check if the drives are in same scheme, like MBR or GPT. If you clone MBR drive to GPT, the cloned drive would not boot if the mainboard doesn't support UEFI. If the mainboard supports UFEI boot, change it from legacy BIOS to UFEI boot.
Second, if there are issues with the original drive, you can enable "Sector by sector clone" option and try to clone again. Ensure the size of the SSD is equal or larger than the source drive.
Third, For desktop machine, you can replace the original drive with cloned SSD as internal, then try to boot from the cloned SSD.
DoYourClone - Best Disk Clone Software
DoYourClone is a 100% safe, powerful and easy-to-use disk cloning program. It supports to clone any hard drive, clone HDD to SSD, upgrade old drive to new drive, create bootable clone backup for Windows and macOS. With this program, you can easily clone any hard drive. It supports sector by sector clone, SSD upgrade clone, etc.
Written & Updated by Darren
Darren is an senior editor at DoYourData. Since 2021, Darren has written 100+ articles about data recovery, Mac file recovery, disk management, disk clone, computer issue fixes, etc. He helps lost of users to recover important data, get the reliable data backup solution, find optimization for PCs and Macs.